Page 1 of 2

My take-apart standup build

PostPosted: Wed Jun 05, 2013 6:12 pm
by Jim.M
I've mostly finished my take-apart collapsible standup build.

design goals were:

o can stand up in it

o can sleep in it

o can lounge in it

o can eat and cook in it

o has a sink

o has a shower

o has a stove

o has a fridge and freezer

o has a toilet (porta-potti)

o has a vanity table for the missus

o has a full-length mirror

o has a/c

o has heat

o has screened vent windows and large skylight (to see the stars?)

o can be towed by my sedan with minimal rear-view blockage (height/width)

o has a rear 2" receiver for bike rack and/or cargo basket

o and the big one: has to fit in a two-car garage with two cars in the garage as well.

fitting in the garage means it is collapsible/take-apart. for this we have these goals:

o each piece can be moved/carried by a single person (me)

o trailer can be assembled by a single person (me)

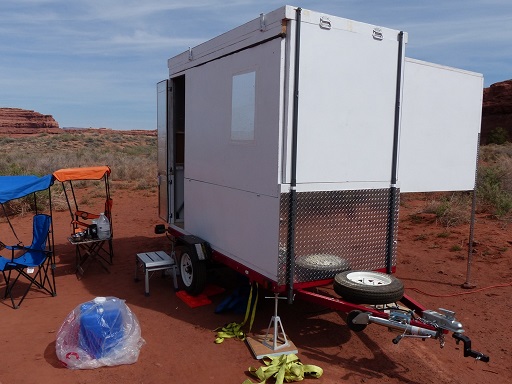
I've met all my goals except adding the screened windows (off to the home store for a screen kit now). I've taken it out on two trips, one to a nearby campground for one night, the other on a 1000 mile 4-night trip to Canyonlands National Park. I still need to do interior decorating (will be fabric attached to the walls/ceiling).

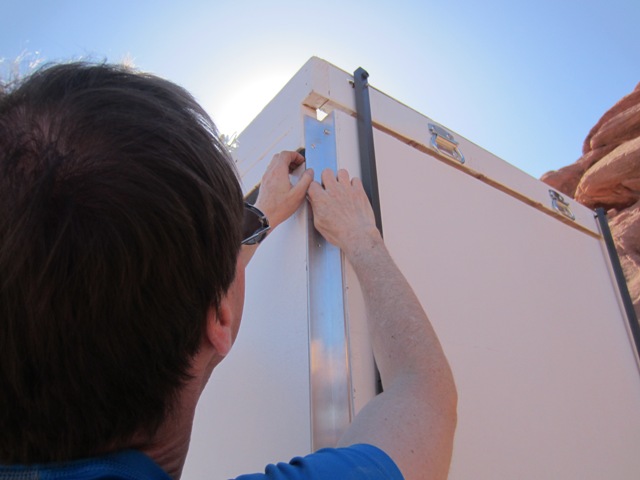
Sorry no build pictures, as my techniques are barbaric and not very precise.

Here's a link some pictures

Re: My take-apart standup build

PostPosted: Wed Jun 05, 2013 7:24 pm
by bonnie
Very inventive. Well done.

Re: My take-apart standup build

PostPosted: Thu Jun 06, 2013 6:33 am
by aggie79
bonnie wrote:Very inventive. Well done.


I agree. Tell us a little more about the wall and roof construction, please.

Re: My take-apart standup build

PostPosted: Thu Jun 06, 2013 6:52 am
by Woodbutcher
Great idea! I love your way of thinking. :applause:

Re: My take-apart standup build

PostPosted: Thu Jun 06, 2013 9:47 am
by Jim.M
aggie79 wrote:
I agree. Tell us a little more about the wall and roof construction, please.


I used extremely lightweight normal construction for the most part.

Walls: 2x2 ( 1 3/8 x 1 3/8 ) doug fir. Stiffest wood in that size I could find at Home Depot/Lowes. A bit expensive. I built the frame using butt joints which were glued with gorilla glue and screwed with stainless steel screws.
I then cut out an appropriate-sized piece of 5mm luaun (from home depot) and glued with gorilla glue to the frame. Rib spacing was a bit random, mostly 16".

Roof: mostlly the same as the walls, except the for outside edge I used 2x4s not 2x2s. everything else the same as the walls.

Floor: 1/2" oak (or was it birch) veneer plywood (for a varnished floor). I glued (gorilla) and screwed (stainless) the plywood to 2x2 furring strips (ribs every 2'). since the floor is bolted to the trailer frame, I didn't need the stiffness of the doug fir and consequently could save a few shekels.

After taking it out the first time, we decided that 4'x8' living space was like being in a mars capsule. Practically had to play 'Twister' while moving past each other, or converting the bench seat into the bed for the evening.

I added the sleeping area using a different construction technique. I did a foam-core sandwich with edges of the 2x2 doug fir and facings with the 5mm luaun. the doug fir sticks needed to be ripped down to 1" to match the thickness of the styrofoam I was using for the foam core. I glued the doug fir edges with gorilla glue, no screws. Then cut out a similar shape of luaun (2, one for each side). I glued one sheet of luaun to the frame and let cure. Next I then cut some blue DOW styrofoam insulation to fit inside the frame. Sprayed the luan with water, smeared on the gorilla glue, laid in the styrofoam, sprayed the other luaun facing sheet with water, smeared on the gorilla glue, put the face glue-side down and used weights to 'clamp' the whole thing together.

I also used vacuum bagging using a shop vac on a few of the foam-core panels. Worked 'fine' except the edges did not come out nice at all, so I needed to re-glue and clamp the facing to the doug fir edge. Let's just say a shop vac will work for a few panels, but then will not :roll:

The outside is painted with Pettit marine epoxy, I started with 'old salem clear sealer', then easypoxy undercoater, then easypoxy white. I thought I wold need the clear sealer for the luaun, but was not necessary as I have scraps in the back yard that have been outside for 1 1/2 years with no protection whatsoever and they are not delaminating at all.

Insulation is 3/4" plus 1/2" foil-backed polyisocyanurate. Walls are attached with stainless steel take-apart hinges.

Re: My take-apart standup build

PostPosted: Fri Jun 07, 2013 1:13 am
by WizardOfOdds
Wow, I find this the most interesting thread :thumbsup: I've seen here in a long long time. Here is but one point of wonder that I had in my brief look
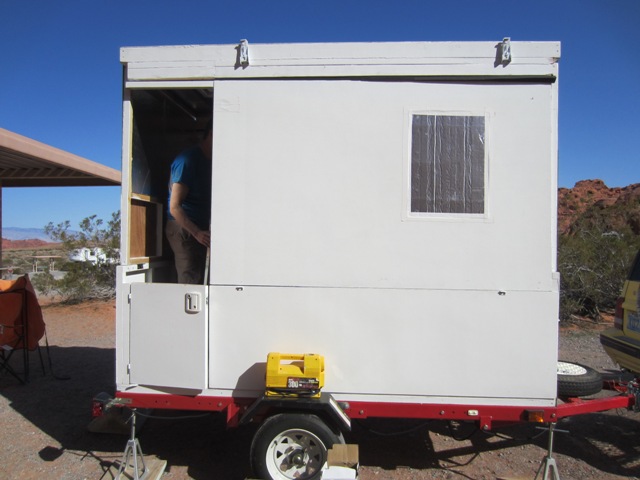
 :roll: at your photos:

I've spent many (more than I care to admit) years making sketches of expanding trailers (never had any interest in fixed geometry designs), and many of them begged to have the door at the extreme end of the side wall - just like I see in your design. I considered this a risk in many cases because the (bottom section of the) door opening does not have a top jam and that leaves the end wall with little or no fore-aft support except at the floor level. In other words, I feared the corner of the end wall at the door would tend to bend outward (or inward) unless I provided some leverage from the bottom by moving the door at least a few inches from the corner (so the end wall 'turns the corner').

In your design, I suppose the roof post near the door helps keep the end wall vertical during the erection process (in some other designs there is no roof post at that location). Seems like that could be an issue on a windy day until the walls are erected and connected to the top, so I tried to insure the end wall keeps the roof post vertical, not the other way around. Obviously your design worked!! :applause: and my fears were unfounded.

I find expanding trailers to be far more challenging to build as there are many such questions that never arise with a fixed top structure. An expanding structure needs to be stable in both the closed and opened positions and during the transition! . A fixed geometry design has only one state to worry about. Looks like you took on the challenge and won the game!

Great job, and I suspect you will have a lot of people taking a close look at your fine work. :applause:

Re: My take-apart standup build

PostPosted: Fri Jun 07, 2013 7:07 pm
by Jim.M
WizardOfOdds wrote:
In your design, I suppose the roof post near the door helps keep the end wall vertical during the erection process (in some other designs there is no roof post at that location).


Thanks for your kind words.

Concerning the door, there is no door post until all the walls are up. You can see the top of the door frame and no upper door in this picture:
Image link to larger size

I don't have a good picture of the corner piece for the door hinge, but basically I have a 1 1/2 x 1 1/2 aluminum angle that runs from the floor to the ceiling. I have a piece of 2x2 wood attached to this aluminum, so it all fits into the corner. I bolt it to the 2x2 that the bottom door is attached to, the rear wall, the ceiling, and the top of the door frame (which is attached to the wall facing us).

the door attaches using take-apart hinges, so I build the door frame every time I set up.

I use the same aluminum for the other corners, and use stainless knurled bolts and brass captive inserts to hold everything together. If you zoom in on the large size photo, you can see the insert at the roof where the support is bolted.

ImageLink to larger size

I'll take some better pictures.. right now am doing interior decorating.

Re: My take-apart standup build

PostPosted: Sun Jun 23, 2013 1:29 pm
by Helixpteron
I love the way you incorporated the pack & stack capability along with the low profile for transit and full, on site stand height.

Very innovative, thanks for sharing.

Re: My take-apart standup build

PostPosted: Tue Jun 25, 2013 9:26 am
by Jim.M
I checked temperatures (in and out) and with the windows and vent covered with foil bubble wrap, I have max 8 degrees heat gain.

Testing was done in full sun (all day) in June (long days); all doors/vents/windows closed. For an outside temp of 103, maximum inside was 111. Was under 5 degrees until noon, then climbed to 8 degrees at around 4pm. By 6pm tree shade started affect the readings.

I haven't tested at lower temps yet to see if the heat gain goes up with temp or if it's a max 8 degrees after 9 or 10 hours direct sun exposure (6am to 3 to 4pm full sun) regardless of outside temp.

covering the vent made a huge difference; I could feel the heat radiating from the white plastic before I bubble-wrapped.

Will be out camping over Independence Day for some more 'testing'.

Re: My take-apart standup build

PostPosted: Tue Jun 25, 2013 9:41 pm
by WizardOfOdds
Very impressive insulation. I am sure the white color is a big part of the equation, your foam sandwich seems to be just right. Keep up the good work and I love seeing the data.

On a side note, I tried to find one-eighth inch (2.7 mm) ply as I understand you used, but it can not even be ordered at either HD or Lowes here. Bummer!

Re: My take-apart standup build

PostPosted: Wed Jun 26, 2013 8:47 am
by Jim.M
WizardOfOdds wrote:On a side note, I tried to find one-eighth inch (2.7 mm) ply as I understand you used, but it can not even be ordered at either HD or Lowes here. Bummer!


Try looking at the underlayment area of HD. I couldn't find anything at Lowe's.

Here's a picture of the bar code for the lauan:

Image

This is probably more helpful, just took this picture this morning. I notice they are now calling it a 'utility panel'.

108741

Re: My take-apart standup build

PostPosted: Thu Jun 04, 2015 2:23 am
by WizardOfOdds
Jim

I just posted an append to http://www.tnttt.com/viewtopic.php?f=50&t=60054 with a reference to your design. Here is a portion of that append which has a specific question for you:

Sorry to hear about the trouble with the slides, wish I had some first hand advice for you. It sounds like the slides failed and I can imagine when that happens it is much worse than having no guides at all. Is the problem just weight, or is binding due to uneven lift the bigger problem? I always feared that uneven lift would cause binding problems.

Maybe you have had better luck, but although there is lots of good advise on this site about frames, finishes, and basic construction, I have found very little useful advise regarding pop top designs. However, I did notice that Jim.M’s Take-Apart trailer used top supports that look rather sturdy and useful. If you look at his pictures (using the link on his thread viewtopic.php?f=5&t=56075 ) you will see he used what looks like three section square telescoping stock with pop-out button stops about 6 inches apart. I wonder where he got those?? Of course, he has no binding problems because the walls are not part of the top, but if your top has enough "play" in it, maybe you could elevate one side at a time in small increments using the bubble stops. Just a thought.


Where did you get the telescoping supports you used on your trailer? They look to be real gems.
Has there been any new developments with your trailer. Hope all is well and would be very interested in any advice you care to offer.

Re: My take-apart standup build

PostPosted: Thu Jun 04, 2015 10:58 am
by Jim.M
WizardOfOdds wrote:Where did you get the telescoping supports you used on your trailer? They look to be real gems.
Has there been any new developments with your trailer. Hope all is well and would be very interested in any advice you care to offer.


After looking at the cost of 3-section telescoping tubing... I ended up just buying a Quik Shade Ultra Compact 64 shade structure and using the legs. On sale it was $60 or so. The ultra compact 64 was the only one I could find that had 3-piece legs, a necessity due to the low height of my closed/collapsed trailer.

The trailer ended up being much too tiny, so I added a 'bedroom' (see below) which made it a bit more roomy. However, after using it a few times... I admit the hour or so of construction required at every campground wore on me (all the walls and 'bedroom' flat-pack inside the trailer). I've moved on and have built a 6 1/2'x11' beast with accordian side walls and hinged front/rear panels. a bit too heavy to lift by hand, so I built some lifting struts powered by an ATV winch. The new one sets up in about 10 minutes (including rearranging the inside stuff from travel mode to camp mode).

Image

Re: My take-apart standup build

PostPosted: Thu Jun 04, 2015 3:43 pm
by WizardOfOdds
Thanks for all the info on the telescoping poles, a good find to keep in mind.

I've moved on and have built a 6 1/2'x11' beast with accordian side walls and hinged front/rear panels. a bit too heavy to lift by hand, so I built some lifting struts powered by an ATV winch. The new one sets up in about 10 minutes (including rearranging the inside stuff from travel mode to camp mode).


Very interesting, sounds like you built bi-folding sides with flip-up ends. I know there are lots of trades, but just out of curiosity, did you put the door in the flip-up end or bi-fold side (or ???) and why? Any plans to post any pictures? You have a lot of us interested!!

Re: My take-apart standup build

PostPosted: Thu Jun 04, 2015 4:40 pm
by Jim.M
WizardOfOdds wrote:Very interesting, sounds like you built bi-folding sides with flip-up ends. I know there are lots of trades, but just out of curiosity, did you put the door in the flip-up end or bi-fold side (or ???) and why? Any plans to post any pictures? You have a lot of us interested!!


I'll start a new topic with the details, but the door is on the side (I do a lot of driving on dusty dirt roads; a rear door would have been too dirty to contemplate). Unfortunately my base is the 1095-lb harbor freight, and the empty shell weighs about 850 lbs! So I'll be upgrading the trailer to a 1720-lb HF in the near future.