I started it on 1st March this year, and posted the journal over on tearjerker. As theres a dedicated place for journals on the board, I thought I should share this one with you all.
A huge thanks for all the inspiration from this site. Without it I might be still camping in a tent.

1st March 2009
I had so much fun building Thypod last year ,I've been pondering what to build this year.
There are a few trailers on the build list, so it's just a matter of which one to do this year.
Jessica , our eldest has just turned 17 and is learning to drive, so I thought I'd build someting suitable for her to pull with a small car.
I like the profile of the cub/ modernistic, but I think it was designed to be 10' long and 4' high .
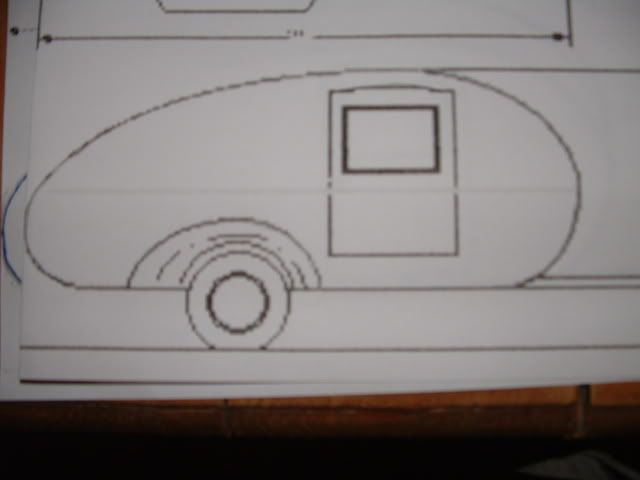
An 8' long trailer would be more suitable , so I shrank the profile to suit.
By losing 2' off the length, the hight was reduced by 9". In order to get the height back, I'm proposing to build a trolly top .
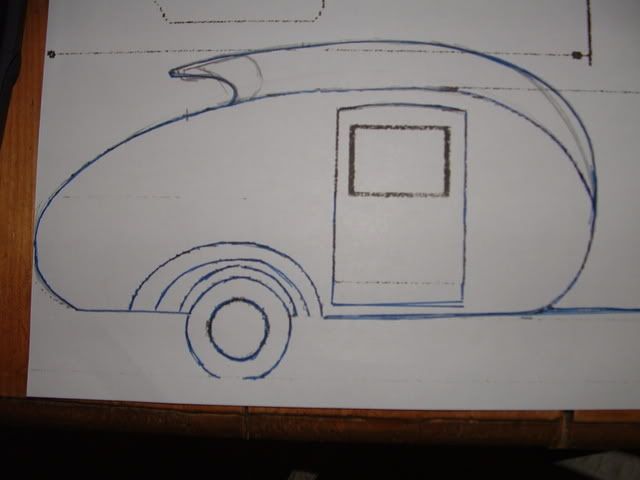
I'm still undecided as to what type of windows to fit in the sides. they may be round , oval, or something else .
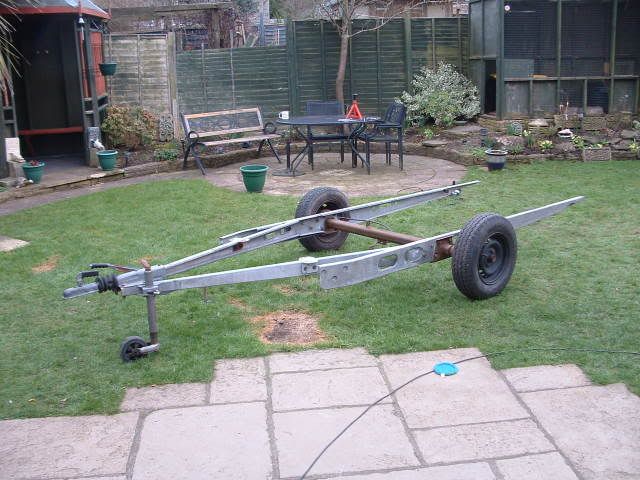
The chassis that I have left over from last year would suit a 5' wide trailer if its left as is. I could cut it down , but 5 wide is nice [smilie=econ_kewl[1].gif]
So I now have a profile I like , with a quirky roof , that I wanted to build anyway, but how's it going to look 5 wide
 oubt:
oubt:
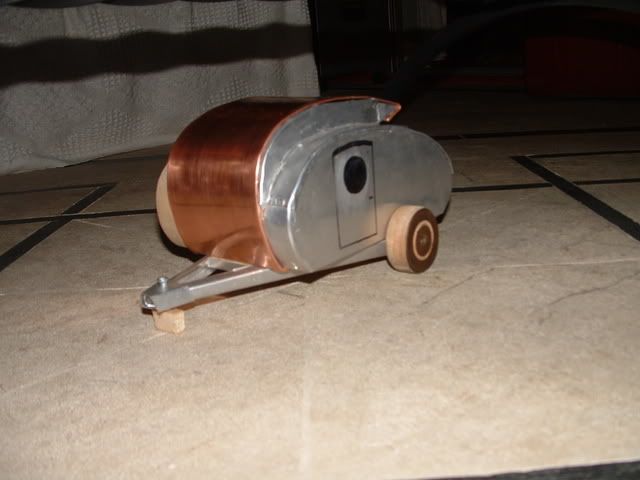
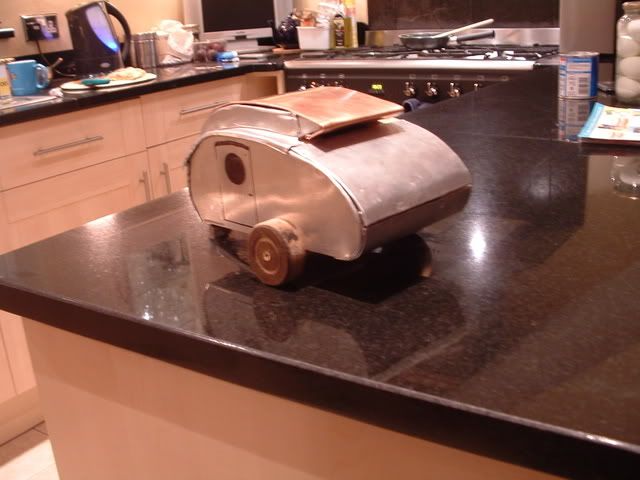
I can't do all that CAD stuff so I made a 1/12 scale model of this years proposed build [smilie=big_yeah.gif] [smilie=big_yeah.gif]
Oh did I mention I'm planning on doing the trolly top in copper. :LOL: :LOL: The real thing will have several joins in it.
So here it is;
I'm planning on doing a short hatch, It should be lighter and far easier to make. At the moment the thought is to have a simple galley. No fridge or sink in this one............yet
As the weather is improving, I may well make a start in the next week or two.
10th March
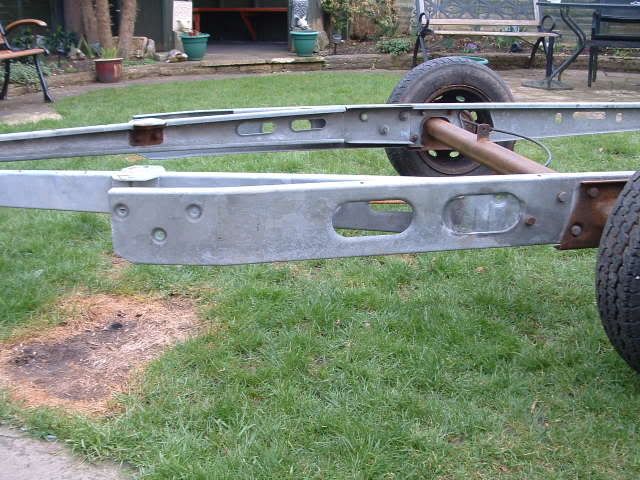
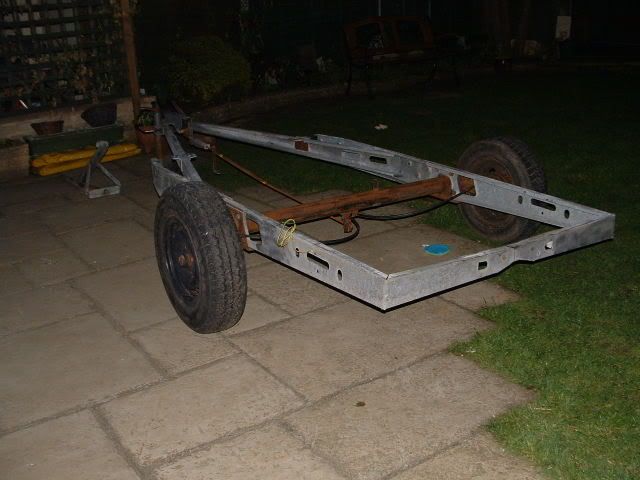
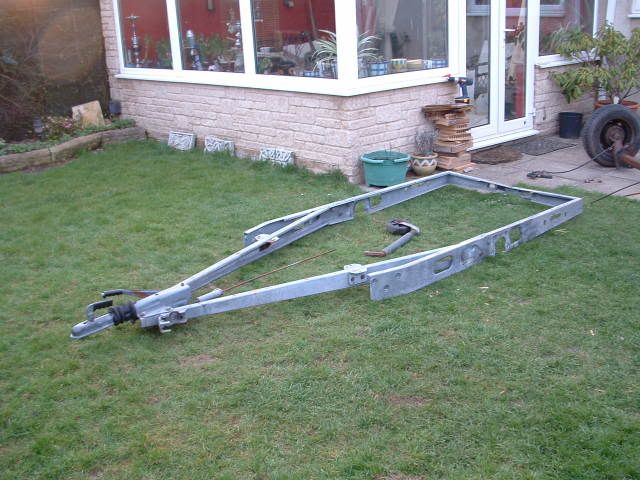
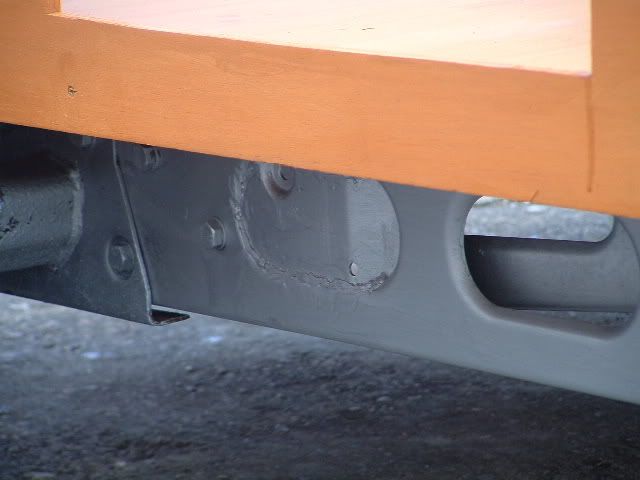
On Friday I altered the caravan chassis left over from last year. I repositioned the tongue to sit close to the axel . I think its shortened it by just under 3' [smilie=econ_goldtooth[1].gif] The profile of the chassis is much lighter and smaller than last years build.
Two of the three bolts are fixed. I will be welding the oval in just for peace of mind.
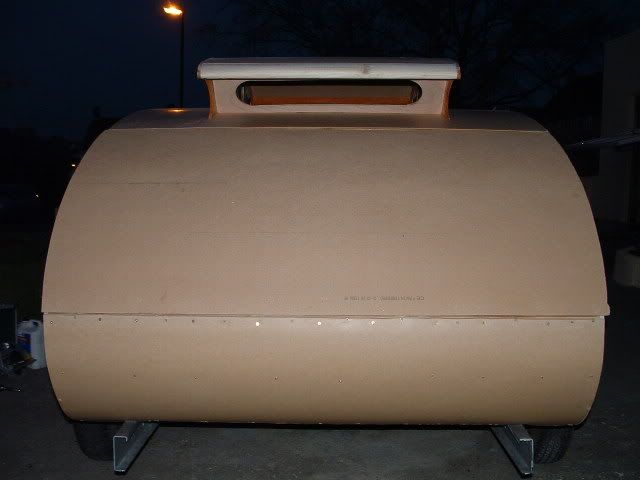
By Friday night I had cut and folded the back of the trailer in.
I may end up trimming the back off all together. I'm not sure it needs to be there.
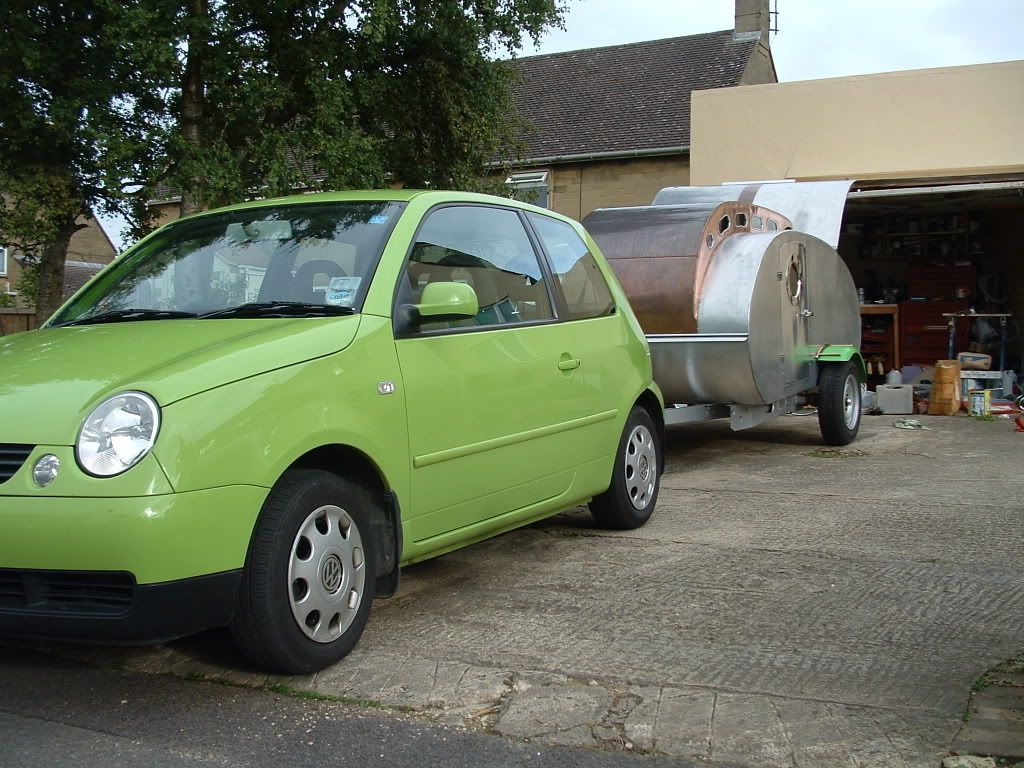
Saturday was spent doing other stuff, including going up to Birmingham to get Jess' VW Lupo , in fantasia green. It's a lovely little motor, with a 1.4 litre engine, and a maximum towing capacity of 800kg.:LOL:
The weather turned on Sunday, just after I had picked up a load of timber and a few sheets of ply. I took over the conservatory, but I know my days are numbered, and I'm going to have to be out soon.
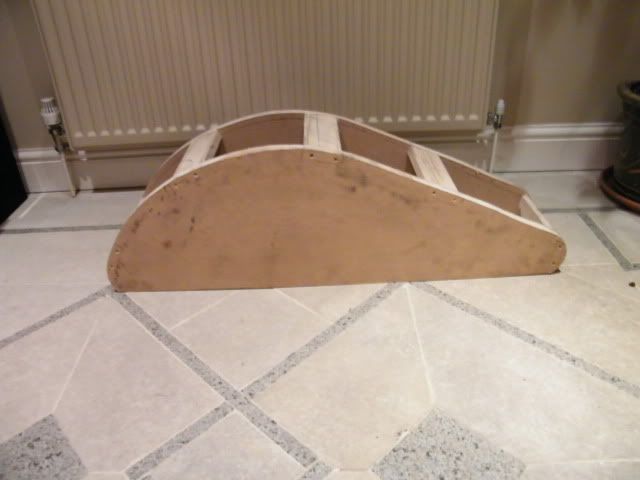
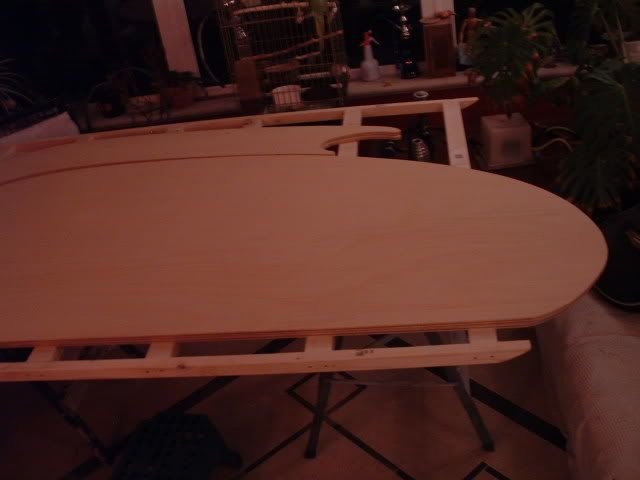
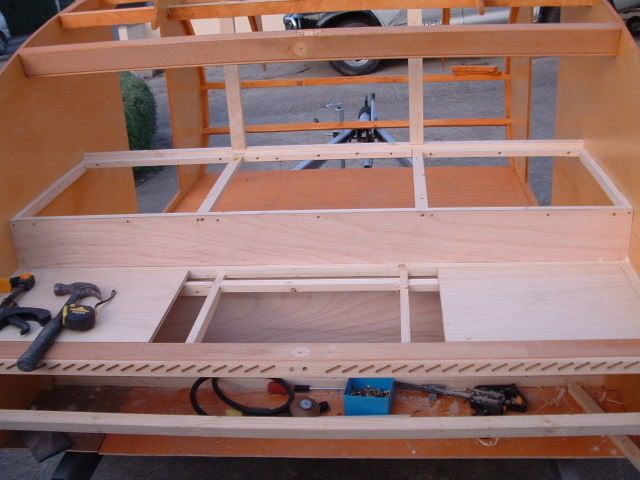
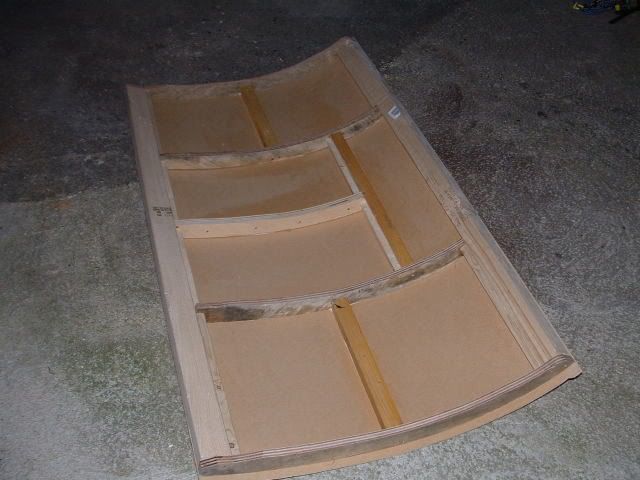
I've made the frame for the floor. It measures 4'10" wide by 6'10"long
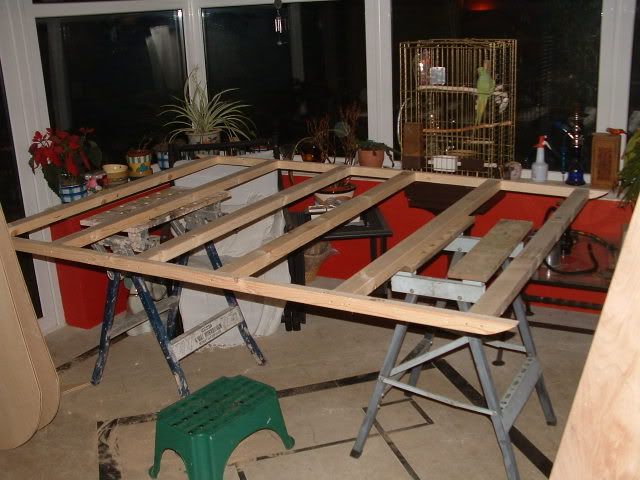
As you can see , space is a bit of a premium

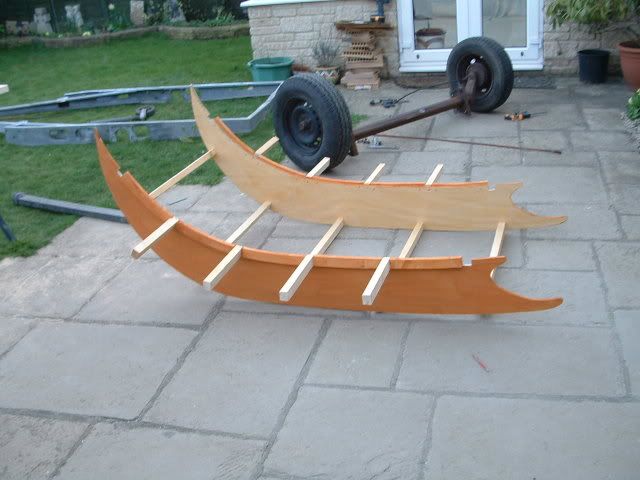
Here's the profiles led out ; First the front
and the tale end;
I'm hoping to get some varnish on it at the weekend.
15th March
I've had a few hours on the build this weekend.
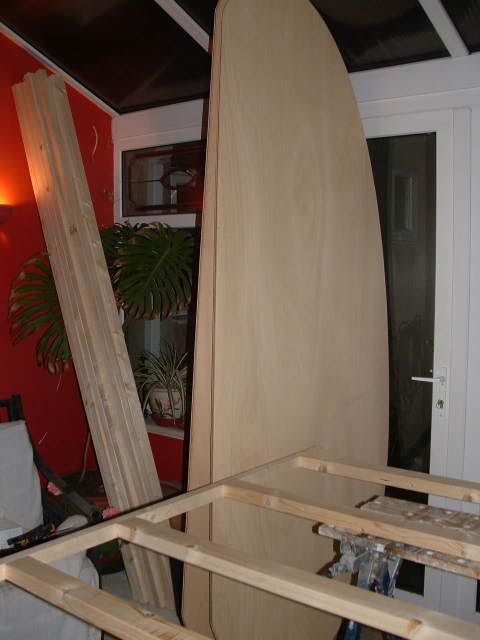
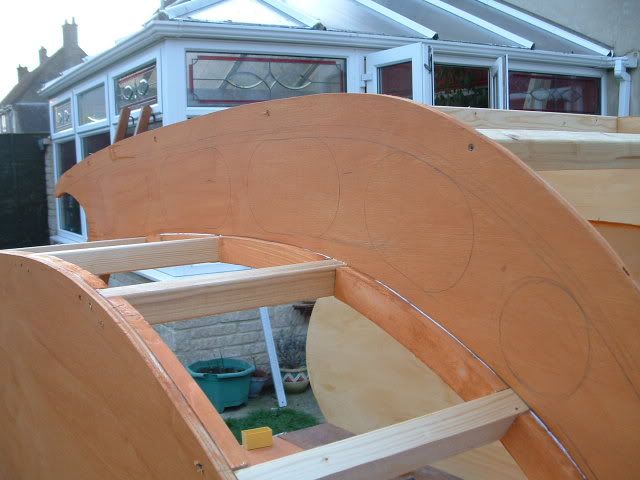
Where I'm using 1/2" ply for the sides, I thought I'd cut out some timbers to help pick up the top. As we're going with the trolley top I needed an additional set.
After getting them all cut out, I stained or varnished everything so it can stay outside without me worrying about it getting wet.
I've still got to cut the doors out, and I'm still undesided on the window design in the raised top.
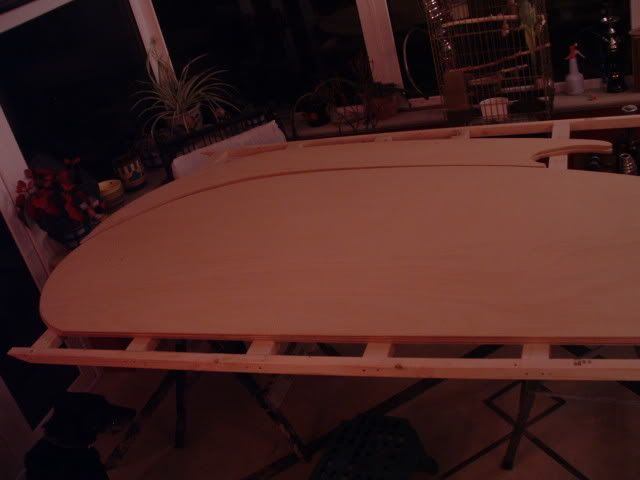
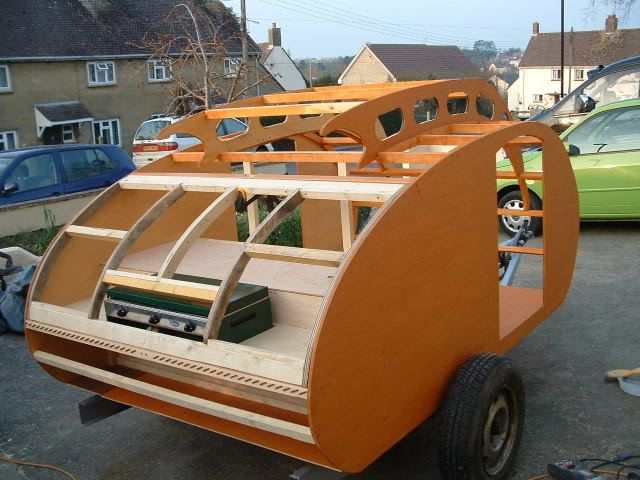
I got a bit carried away today and started puting it all together. I've glued and screwed all the edge pieces on the profiles, and screwed the rafters on.
I'm going to have to either take it apart to get it out the front, or take a fence pannel out, and take it through the neighbours garden. :LOL: :LOL:
I haven't fixed the base to the chassis yet, I'll wait untill a little later in the build , so i can get it balanced somewhere handy.

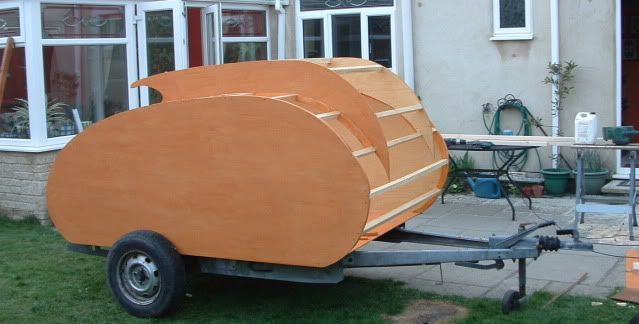
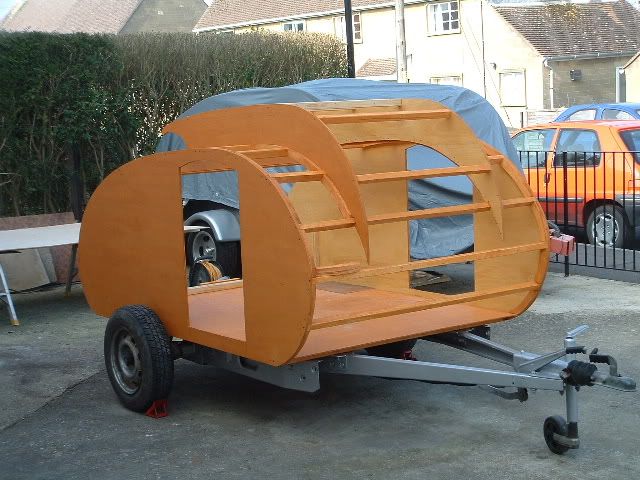
So heres where we're at by the end of play this weekend;
One thought with the windows was to start with a circle at the front, and elongate it to larger ovals toward the back.
My welder was playing up, so I've still got the chassis to finish off and paint. That can wait until later on.
It's good to get on
16th March
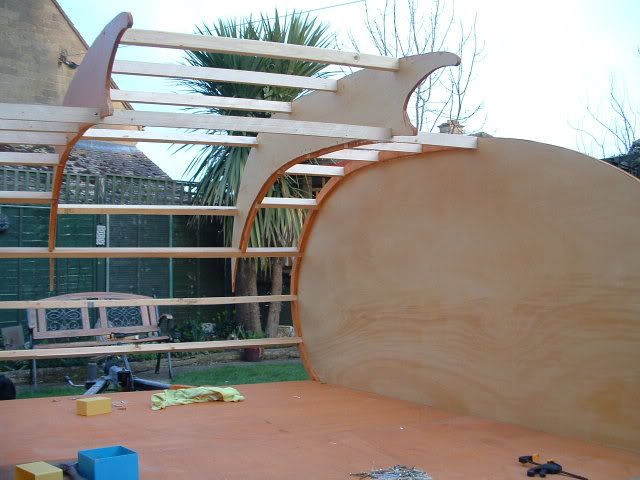
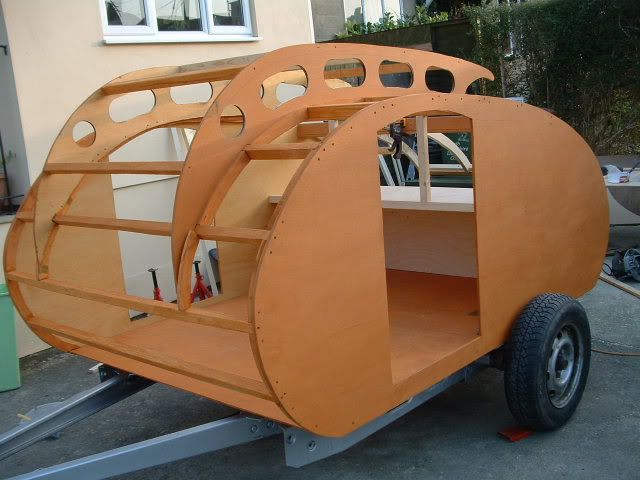
I got home from work early today. I decided I aught to move the trailer with no name onto the drive.
By tea time, this is what was left in the garden;
The trolley top reminds me of a helpless up-turned turtle

Heres the striped frame
It's all been carried through to the front drive and reassembled
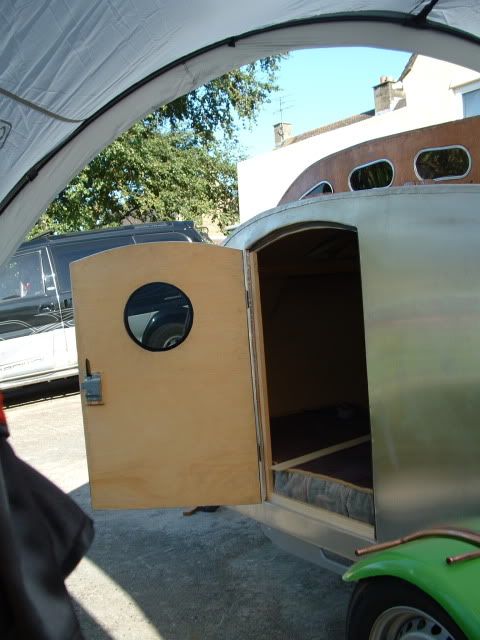
Whilst it was in bits, I cut the doors out.
Jess has given me the thumbs up on the window layout in the trolley-top.
I hope this weather holds for a while. It makes all the difference to us external builders
22nd March
The weather has been spot on for the last week at least [smilie=big_yeah.gif] .
Ive been chipping away after work most nights, and I'm very happy with the progress so far.
On Tuesday I had the stain and varnish out , giving it another coat of protection inside and out.

Wednesday I welded up the frame and the brake rod with my brother-in-law .Then I gave the frame a coat of fresh paint.
So this is where we were at on Friday morning;
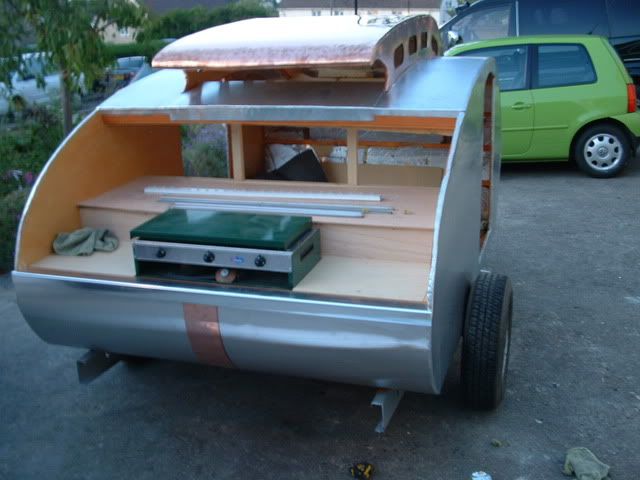
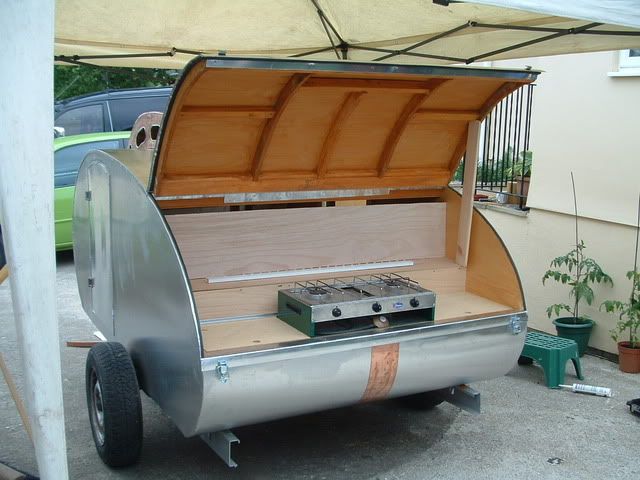
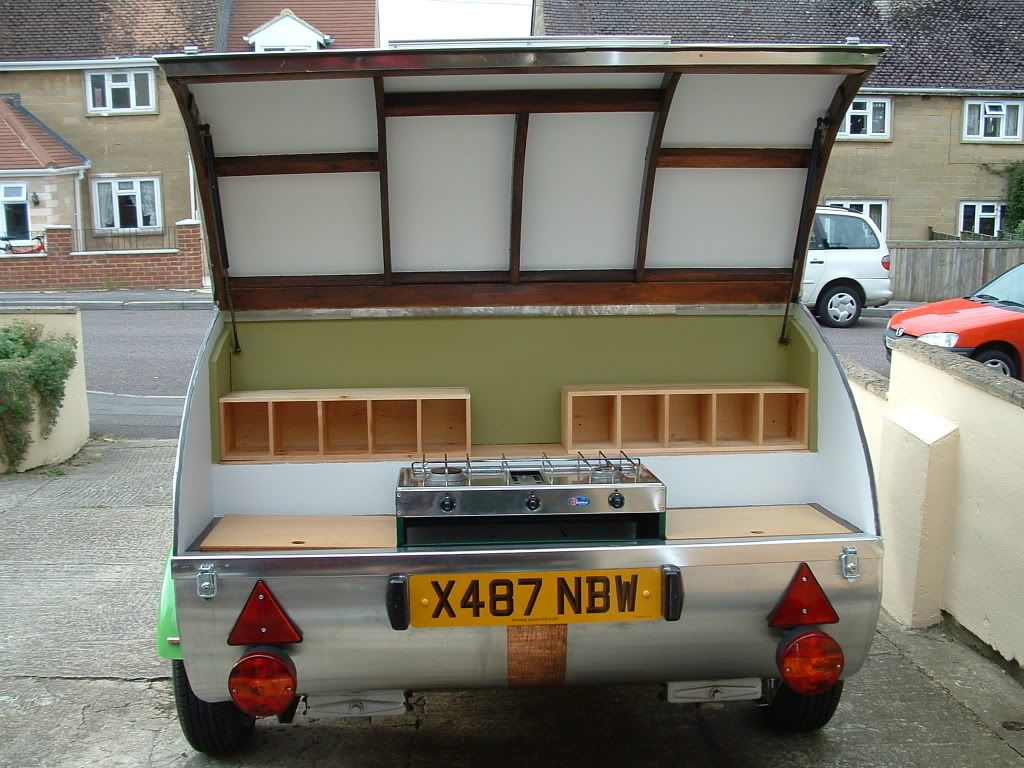
I spent Friday working in the back of the trailer. the galley is going to be fairly basic, I have a couple of removable lids to the storage area, and the cooker is mounted in the middle;
I've used the styles from a louvre door to screw the hatch hinge to, and to rest the hatch on.
By Friday evening the extra support for the rear of the trolly top was in place , and the rear shelf was cut out and sitting in place.
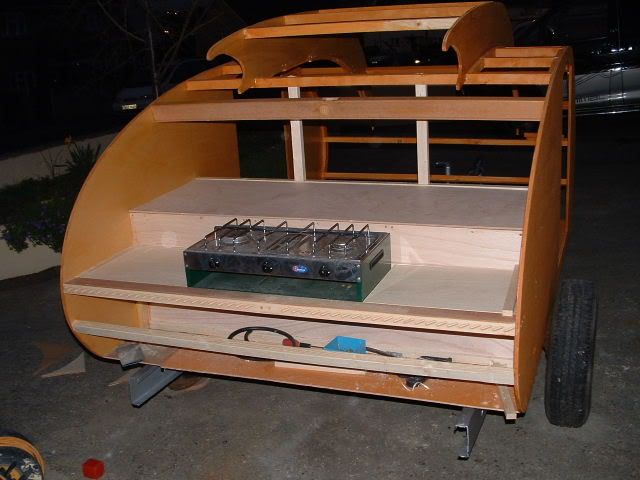
The tops either side of the cooker are in 1/2" ply. the shelf or base for the cupboard is in 1/4" ply to save weight.
Today I had another good day at it, with lots of stops as it happens. One of the drawbacks from building a trailer on your drive is that people like to stop and chat. It's quite enjoyable, but sometimes you just want to make the most of the weather.
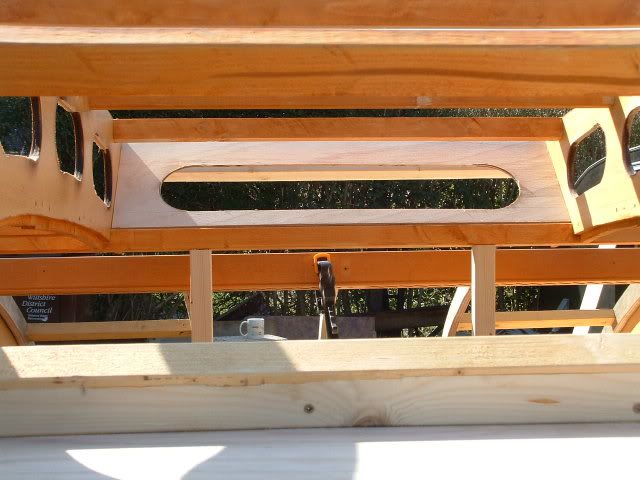
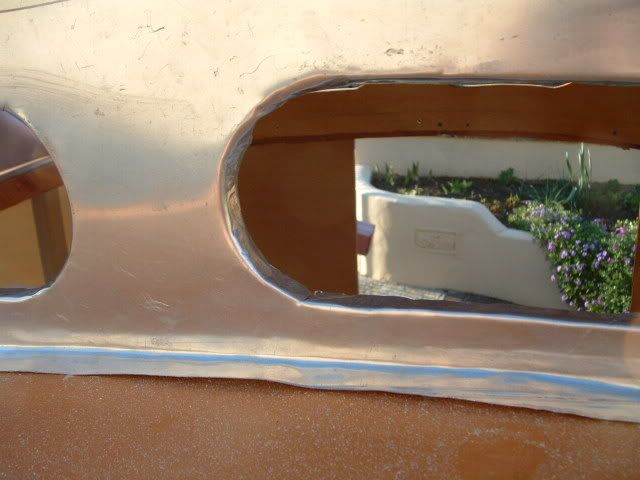
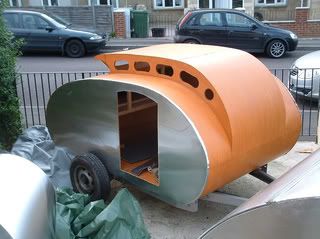
Today I made the frame for the hatch, marked out the windows in the trolly top and cut them out , and cut and shaped the last roof rafter.
Here's the hatch , and the cut outs for the windows;
The windows are 4" high and 9" long, except the one thats 4" round
Here's the end rafter , that will be wrapped in copper
I've got another day on it tomorrow, then I think things will slow up a little.
I'm going to need to prepare the copper, and sort some aluminium
I hope it meets with you approval.
evening of 22nd March
It seems to be going well at the moment, and I've had another full day on the build today.
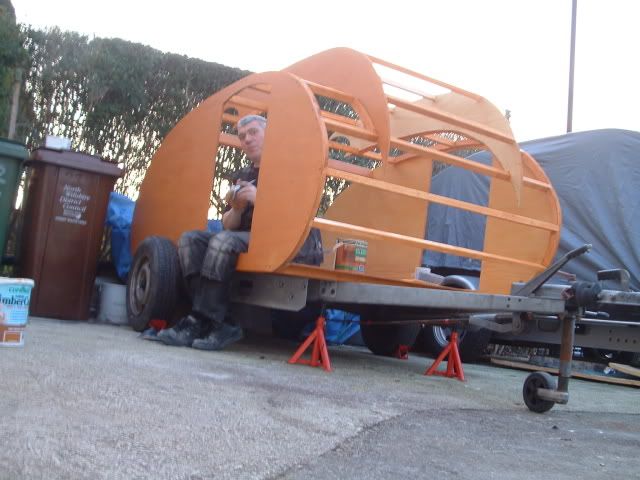
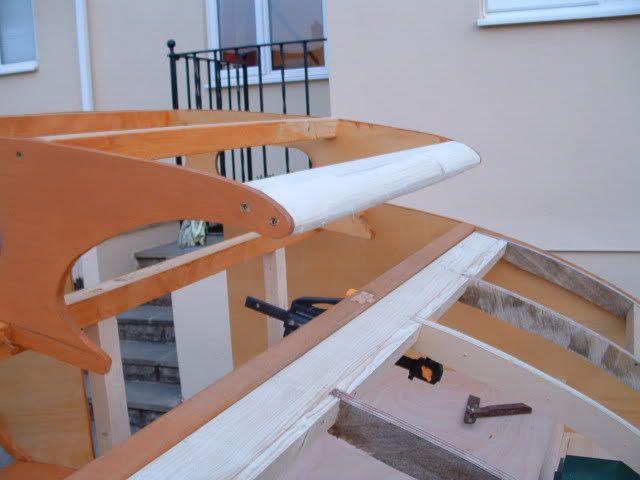
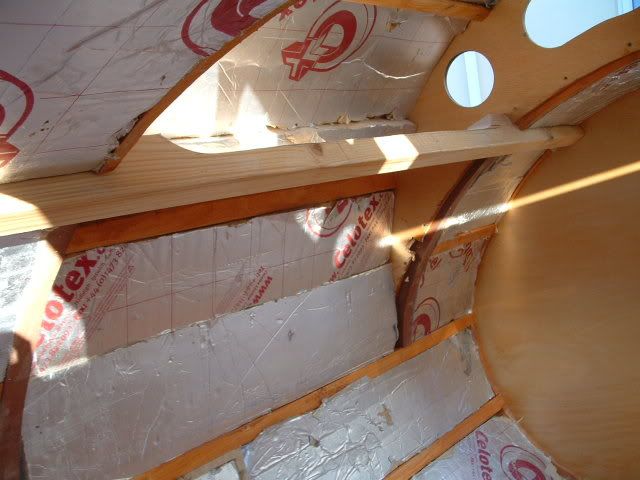
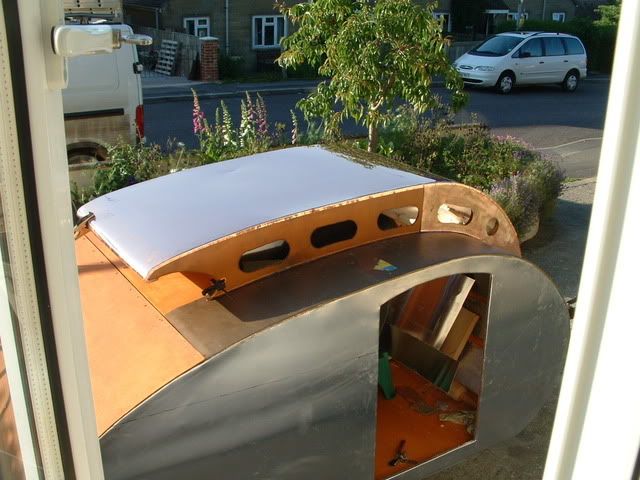
I've re jigged the front supports for the trolley top this morning. I thought I would move the support higher up to give us more space, and have a shelf above it.
I found some mahogany to make the struts out of. It should spread the load further down the trailer.
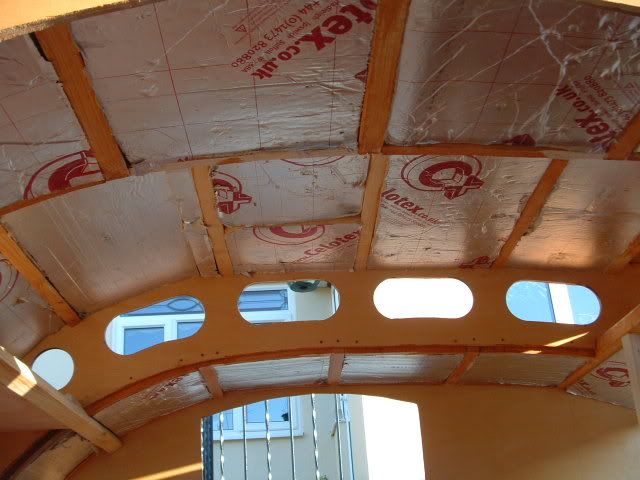
I've relocated the cross members on the trolly top, so they come between the windows now.
I've cut out an opening at the rear of the top, thats in keeping with the side lanturns.
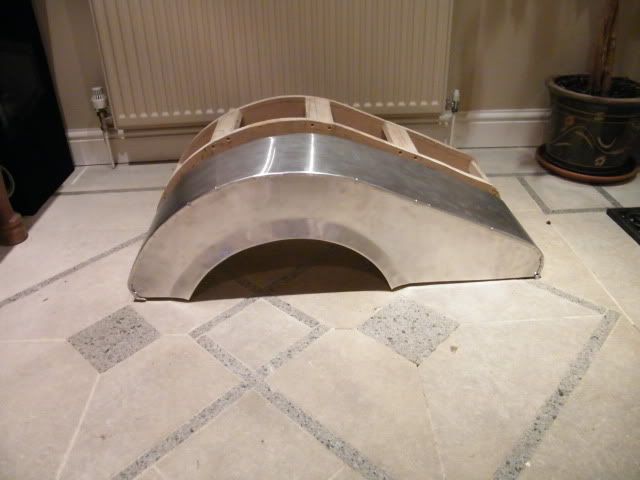
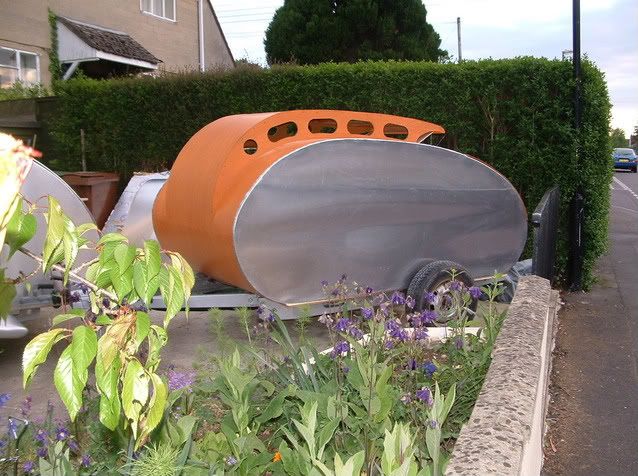
this afternoon Rosie gave me a hand , and we got the skin on the trailer, including the hatch
I can't tell you how much I'm enjoying this build. It seems to have moved on at a fair pace. I know things will slow up now as there is alot of sorting and preparing for the windows, and the metal work. There's fenders to make and all sorts
 Very unlikely to make the peaks this year [smilie=med_bad.gif]
.
I've updated my build photos
But heres a few from today;
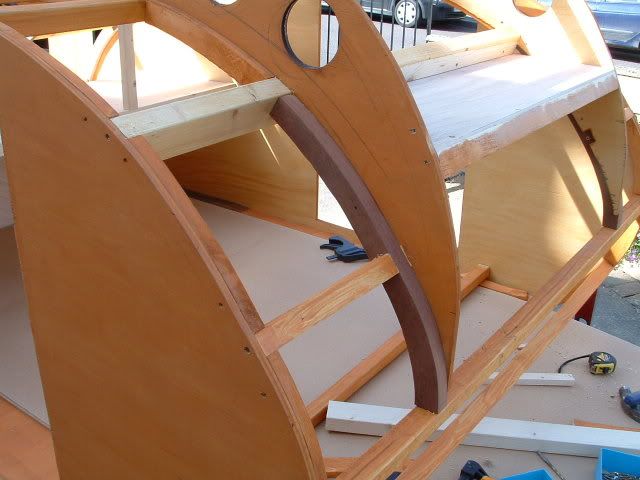
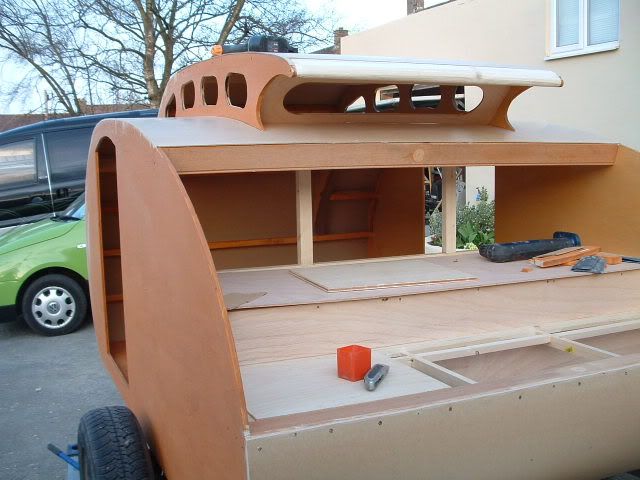
This one shows the new support along with the mahogany struts and the shelf. Its made it feel bigger inside;
Here's the rear panel for the roof. I think it will hinge at the top
Skinned up
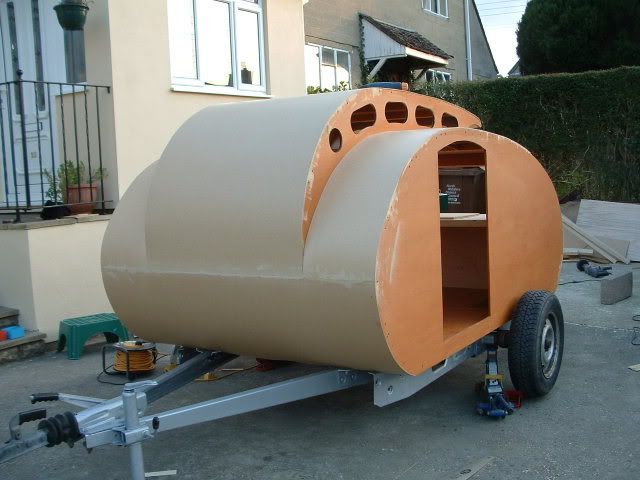
From the back, I love the panel in the back of the roof

The light was fading by the time the hatch was skinned
the hatch sitting in place;
It's back to work tomorrow for another four days. I hope I get home at a reasonable time, and I'll be able to chip away at it if the weather is OK.
I've sheeted the trailer up just in case we get some rain.
We must be due some as it's been dry all week. :LOL:
29th March
I've been chipping away at the build this weekend.
After getting a couple of coats of waterproof stain on the outside, I had ago at dressing some aluminium into the windows on the trolley top. I had some aluminium around to practice with.I tried dressing it over the roof into the windows and onto the lower roof.
I'm not really happy with the results, so I'll be using a different method of 'doing the windows'
This is what they looked like;

You may be able to see where the metal has split at the start of the curve

I felt a bit deflated that it didn't work, but hey ho , change the plan and move on . I think I'm going to get some window rubbers like Heikki used
I have had some celotex insulation stored in the loft since the last build, so i fitted that today.
I've decided to wire it for 12v lighting after all. My brother-in-law has a couple of 12v golf cart batteries that I plan to use. I might have to put a 240 hook up aswell.

Here's the insulation
I've trimmed a bit off the shelf/roof support to give a bit more access to the shelf.
I'm still looking out for a boat window for the front, and some round windows for the doors. I'm sure some will turn up sooner or later.
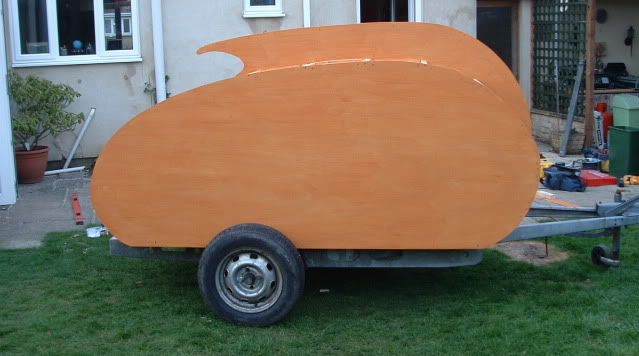
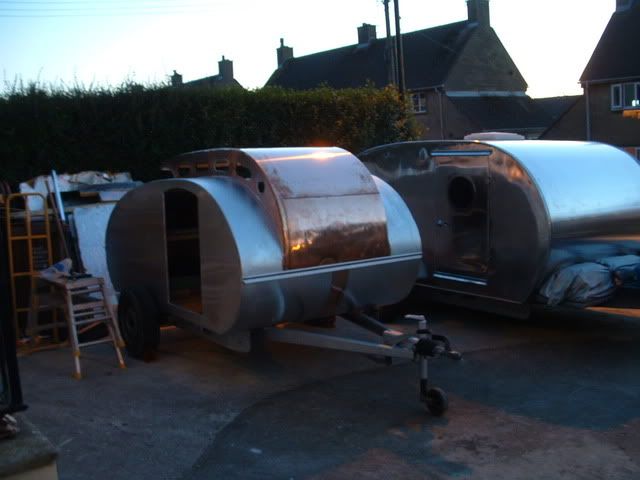
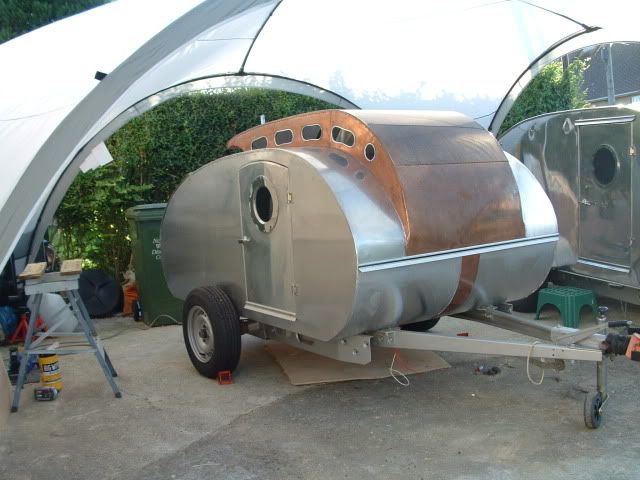
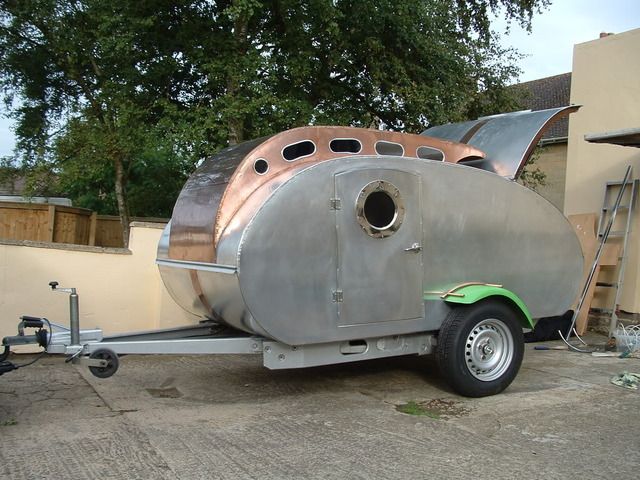
At this point, I had to strip the roof off my Grumman and redo the trailer in aluminium. It meant I had a break from the Coppertop for a couple of months
29th May
We've covered the sides with ali when we were working on thypod, just so it was safe and not going to get damaged.
Here's where were at at the moment;
An Arty shot :LOL: . The door has yet to be cut out
And here's one I cut out earlier;
I might get chance to start on the copper

30th May
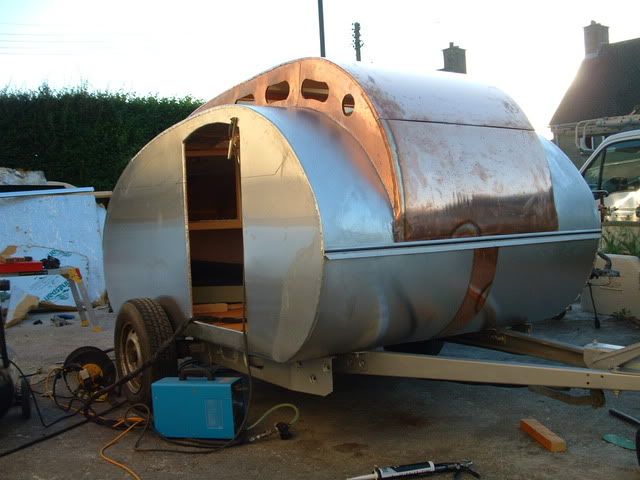
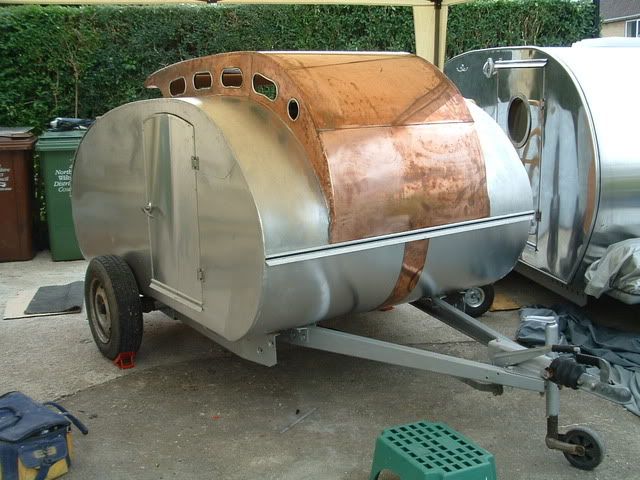
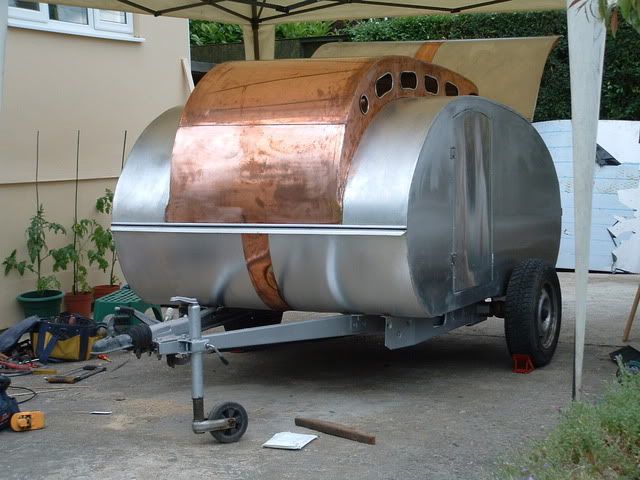
We've had some cracking weather over the last couple of days, and It's given me a chance to do a bit more to the copper top.
I got a bit carried away with the copper yesterday. I haven't really had a plan on how things were going to be, and what was going to be skined with what.
I had thought of using copper cylinders to cover the top, but after cutting a few into sheets , removing all the foam lagging to find they were still covered in glue , I found they weren't the best option. I ended up weighing them in for scrap, and buying a sheet of copper to cover most of the top.
I had a couple of older cylinders that had no foam lagging on them, and thought they would be better, so I cut them up and dressed them around the top. I've cut the holes out for the windows. Then I cut and dressed some for the lower roof. All seemed ok but I wasn't sure where the aluminium would start and the copper finish. [smilie=med_bad.gif]
This is how we were looking by the end of play yesterday;
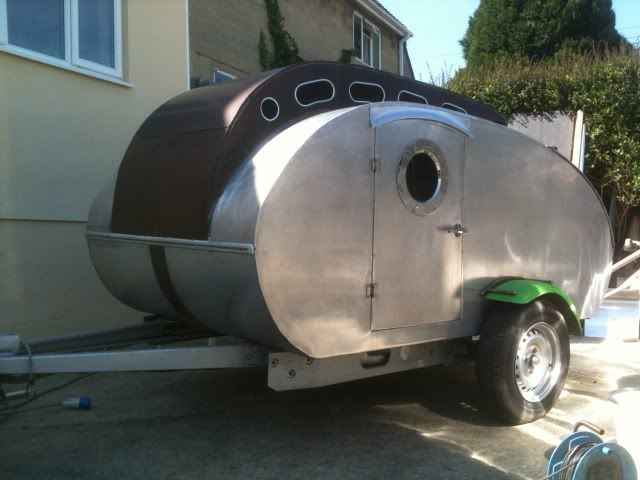
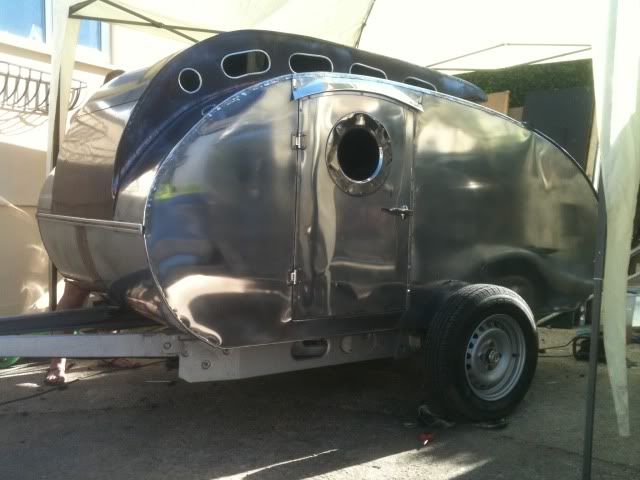
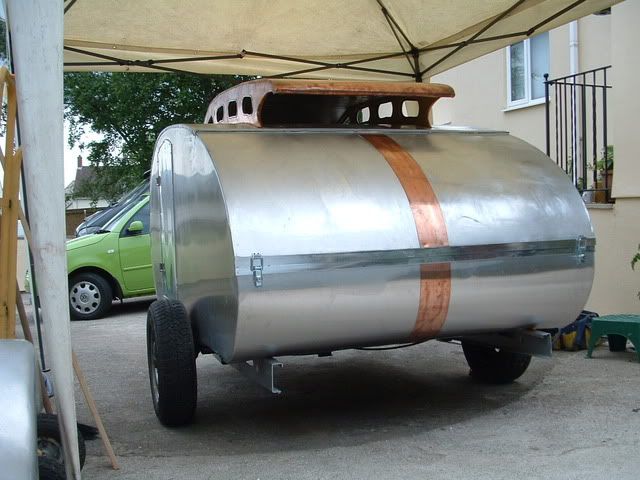
Having slept on it , I decided it would look better if the raised section was done in copper , and the rest done in aluminium.
This is how were looking after a day in the sunshine.
and the galley
I'm much happier about how its looking
[smilie=big_yeah.gif] [smilie=big_yeah.gif]
12th June
We got a bit more done today.
Jess has been away camping in Wales with her boyfriend this week , They were relly excited with the progress, and are planning the on board entertainment. I've said they can have whatever they want. if they supply it , I'll fit it. So much for it being basic :LOL: :LOL:
Heres some photos of how its looking;
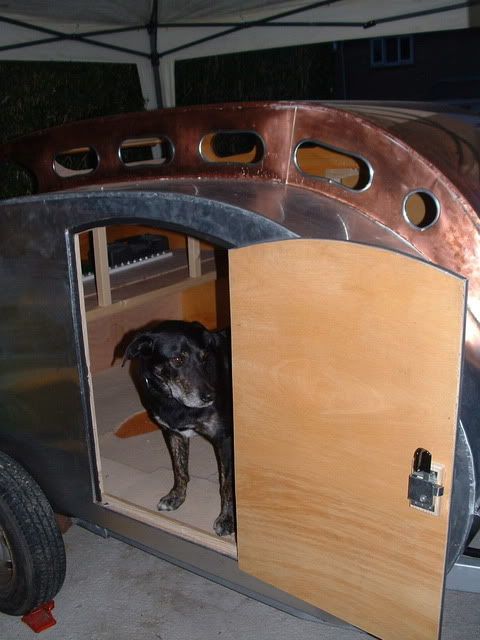
The windows have been trimmed, and the door fitted
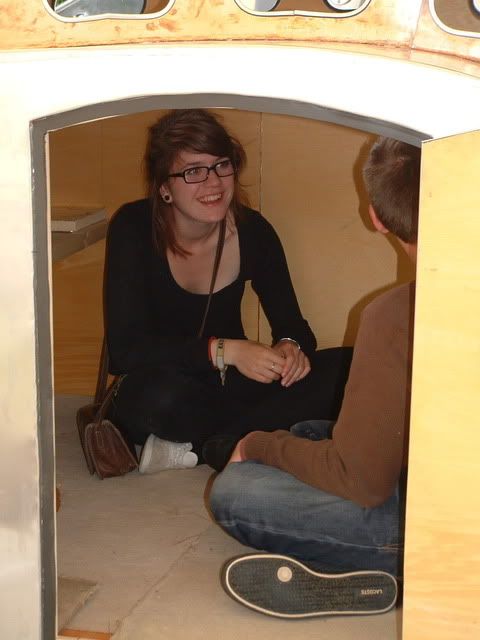
Jess and nick planning what will be...
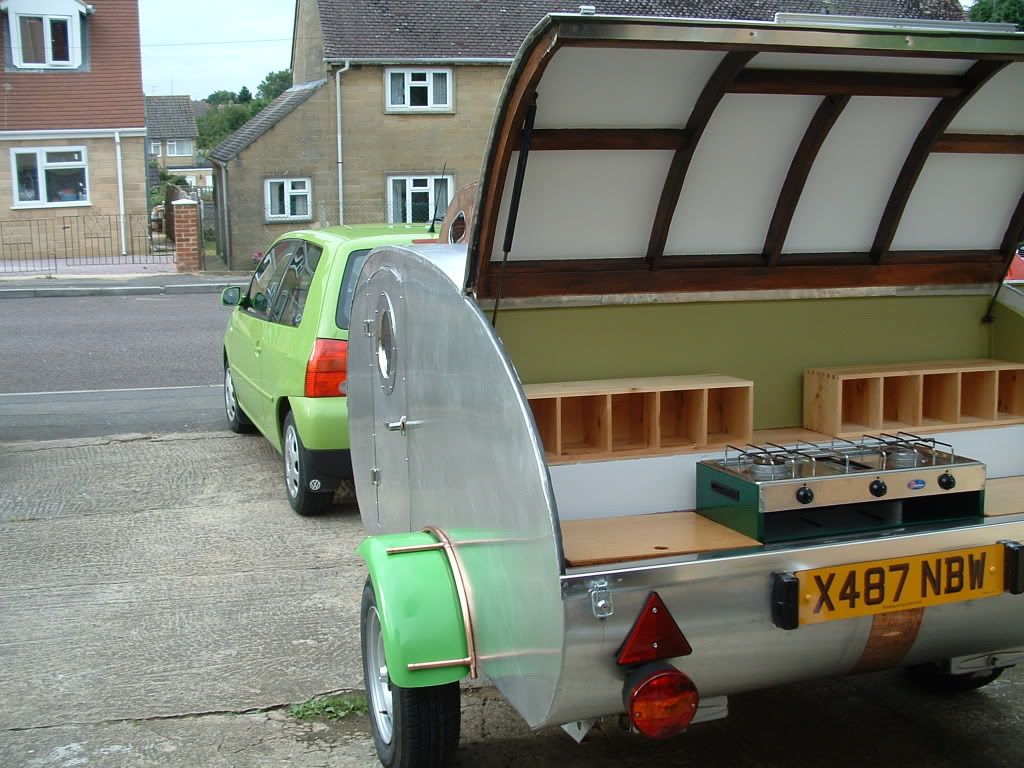
The rear end, with a copper racing stripe. The hatch has had a couple of locking catches fitted
tempory hatch support
Scooby approves
It's taking shape
It's very nearly waterproof. I've just got to fit the windows in the trolley-top , and then maybe source and fit the windows for the doors.
We have had a fair few weekends away in Thypod this year, and I wasn't sure if Jess was going to pass her test in time to take her trailer on Holiday this year, so things slowed down for a while
10th August
I've been waiting for some round window frames from a local sheet metal place, and they still haven't arrived.
Rosie and I went to see the clearance store at Scots of stow. Our niece works for them , and told us of the clearance sale. They sell all sorts of stuff, including gimicky lights, furniture, kitchen stuff and decorative stuff.
On one of the shelves I found some chrome/ stainless steel plates that looked like they may be handy
I bought four of them @ £2, as I think I need two for this build, and two for the next one, if it all works out .
I'll post some updated photos of the progress tommorrow.
11th August
Heres a few photos of how things are looking.
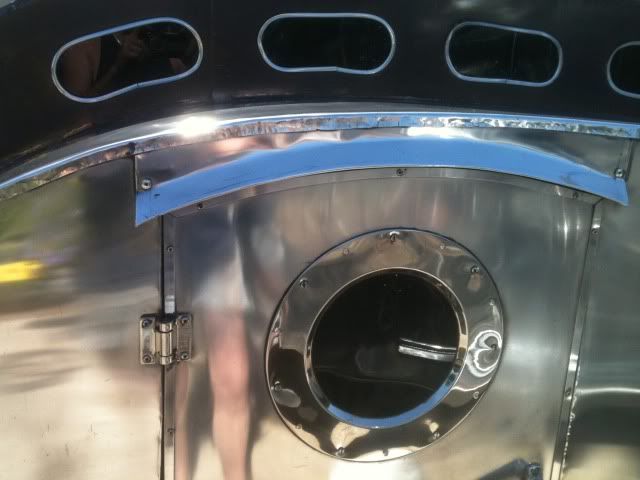
Firstly..the bargain plates
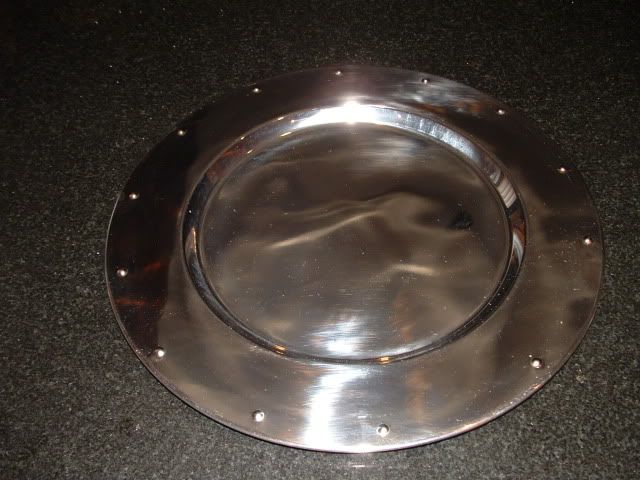
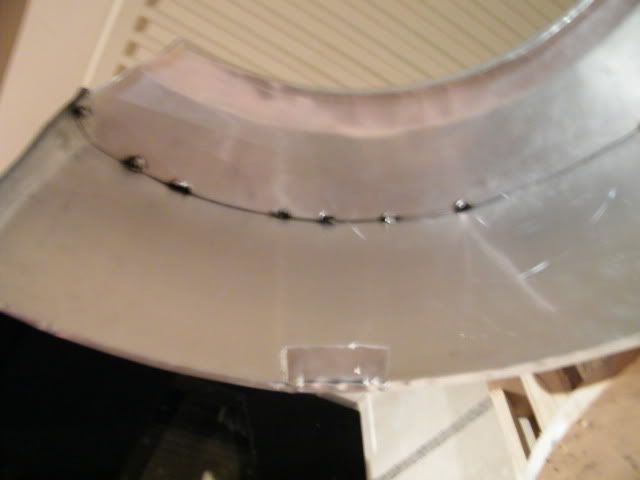
I've cut the middle out of them ,drilled out every other little nobble and mounted them in the doors, I've used perspex from the donor caravan , and tinted them with limo black film.
The wood was cut slightly larger than the hole in the plate, I've used silicone to stick them in , and a few glazing tack to secure them.
The inside looks like this;
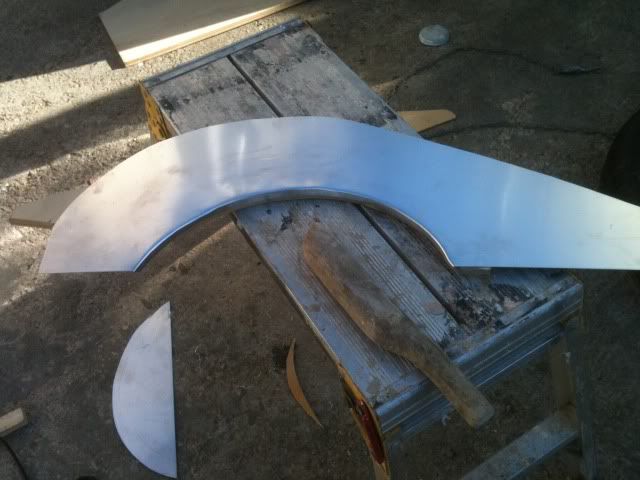
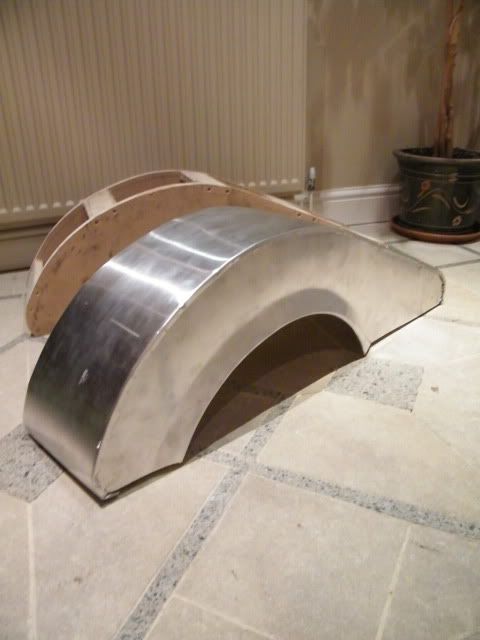
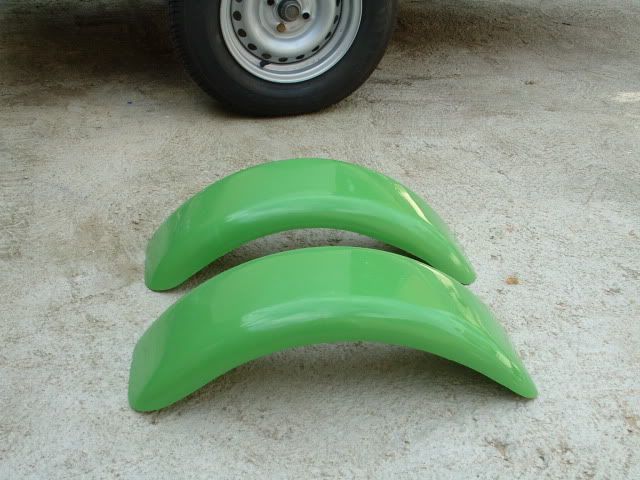
Jess had requested plain fenders/ arches, so I bought a couple of cycle wings , in Kawasaki green. They're a little darker then her car , so may get sprayed the right green in the fullness of time.
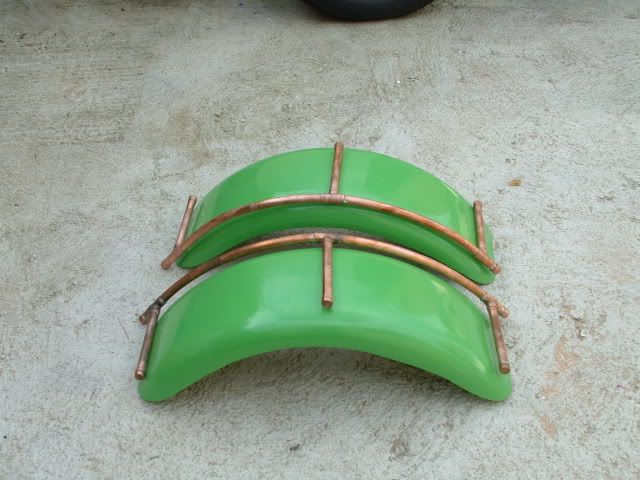
Ive made some brackets out of copper tube to mount them on. O wasn't sure how they are going to look, but i think they shoud be OK.
I've bought a new pair of steel caravan wheels and tyres that are looking very smart. I've looked at the brakes, and they need replacing, along with the retaining springs .
I've orderd some hamburger lights for the back, they should arrive any time.
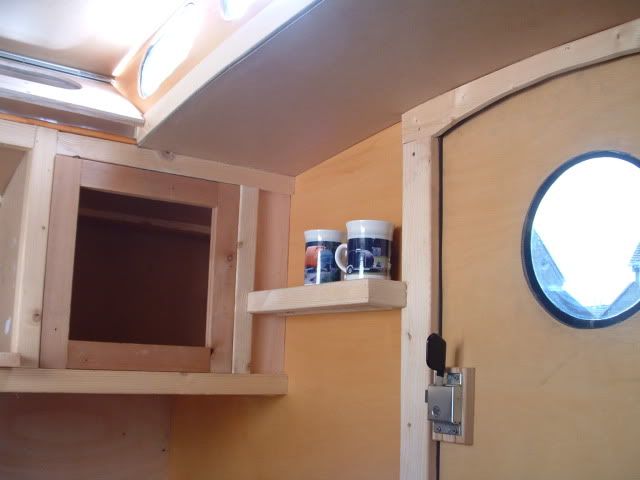
I've cut some trim for the inside, made up some door frames for the rear cupboards,and fitted the ceiling.
I've fitted a gas lifter for the rear hatch , but I think a pair of them would be better. I'll see if i can get that done tommorrow. I'm hoping Jess will paint the ceiling and get all the trim varnished up this comming weekend.
I've got tomorow on it, then Rosie and I are off to a festival until Sunday.
I'm back to work for a few days, that leaves me two days to finish off before our trip to Cornwall.
I'll try and take some more photos tomorrow.
I seem to be going at it from all sides at the moment, I'm sure it will all come together before to long.
17th August
The time just fies by......
But i have a few more updates to add .
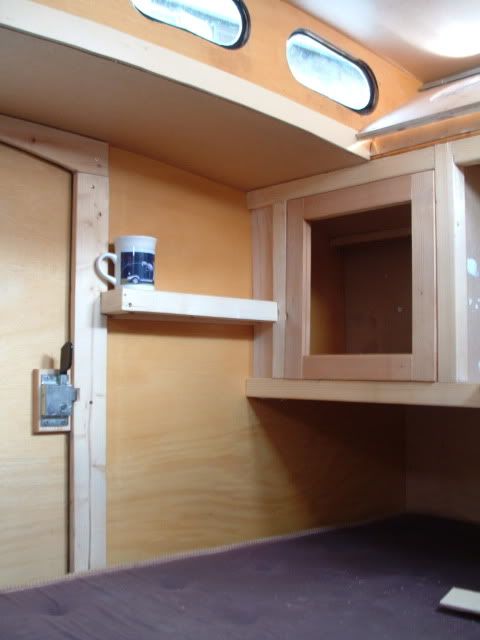
I've installed a couple of small coffe cup shelves on the side of the cabin, and done a bit of tit-er-vating inside. The door frames are made up, and the ceiling is in.
Heres the cycle wing fenders;
They are going to be fixed on with some copper pipe , over the top frames;
The hamburger lights look more like Scooby snacks [smilie=econ_shocked[1].gif] [smilie=econ_shocked[1].gif]
Ive made up a bracket and fixed one of them on, but i'm not happy about how it looks, so I'm going to see about setting it in.
I've fixed the trailer to the chassis today , and started running the wiring in for the road lights.
We're close to being on the shedule for this weekends deadline. I've still got to fit the tow bar to the Lupo yet.finish the lights, and fit the numberplate. Jess and Nick have started the finnishing decorating the inside
I'll try to keep up with the photos :LOL:
We'll see what happens tomorrow.
Fingers crossed the weather will hold.
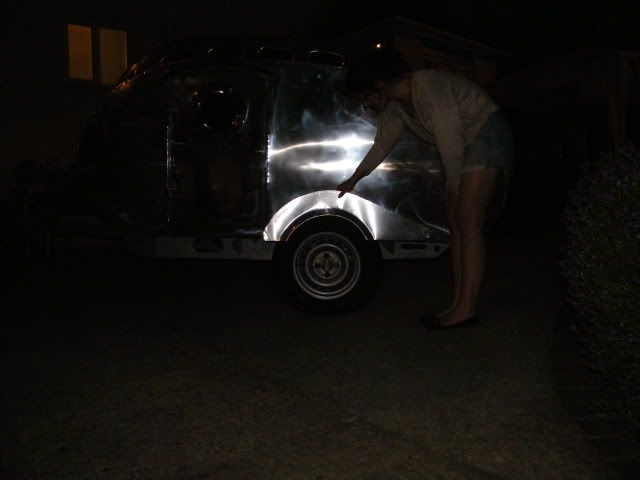
31st August, Just back from a week in Cornwall with both trailers :thumbsup:
I had a marathon week building up to the Cornwall trip, and everything worked out just fine. The trailer pulled well , and Nick and Jess really enjoyed the trailer.
Here's a few of the near finished/ pre alteration trailer;
Gas lifters fitted to the hatch, tail lights , numberplate and reflectors fitted, as well as stabilizers;
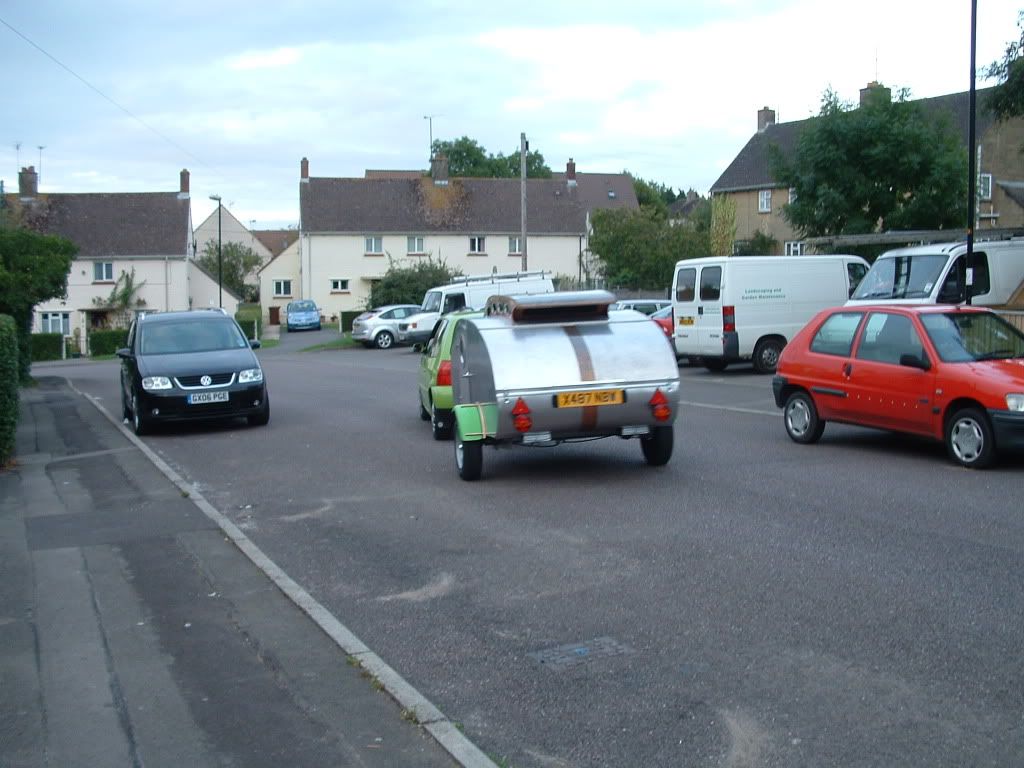
Hitched up to the new tow bar;
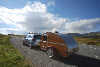
The combo;
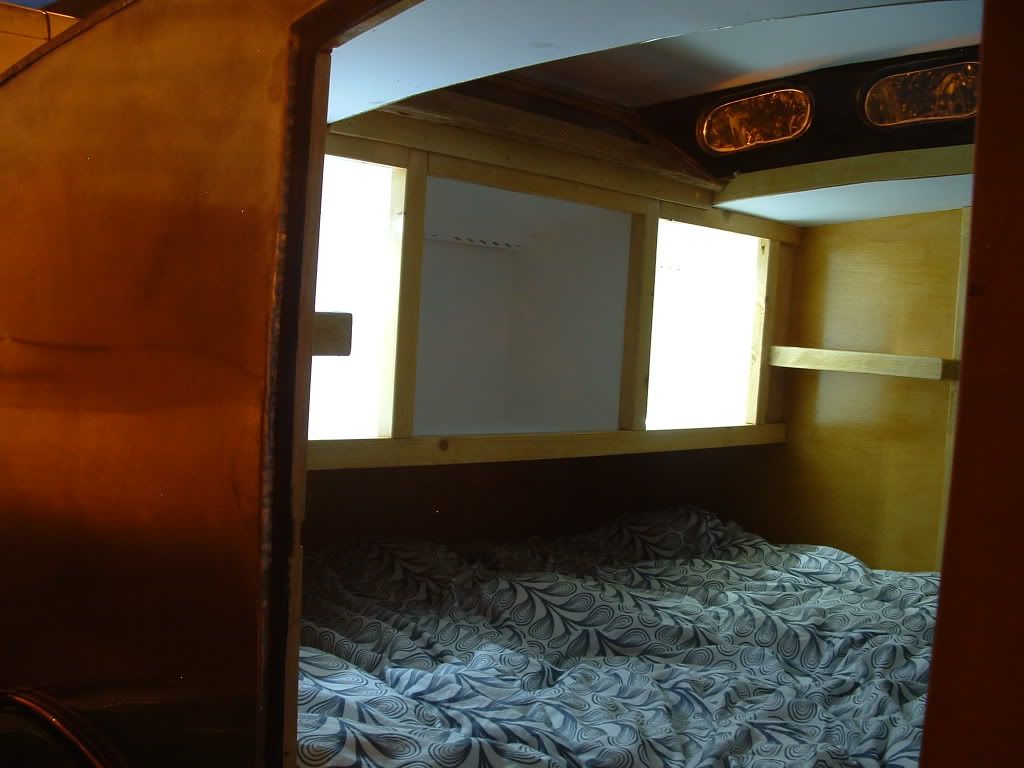
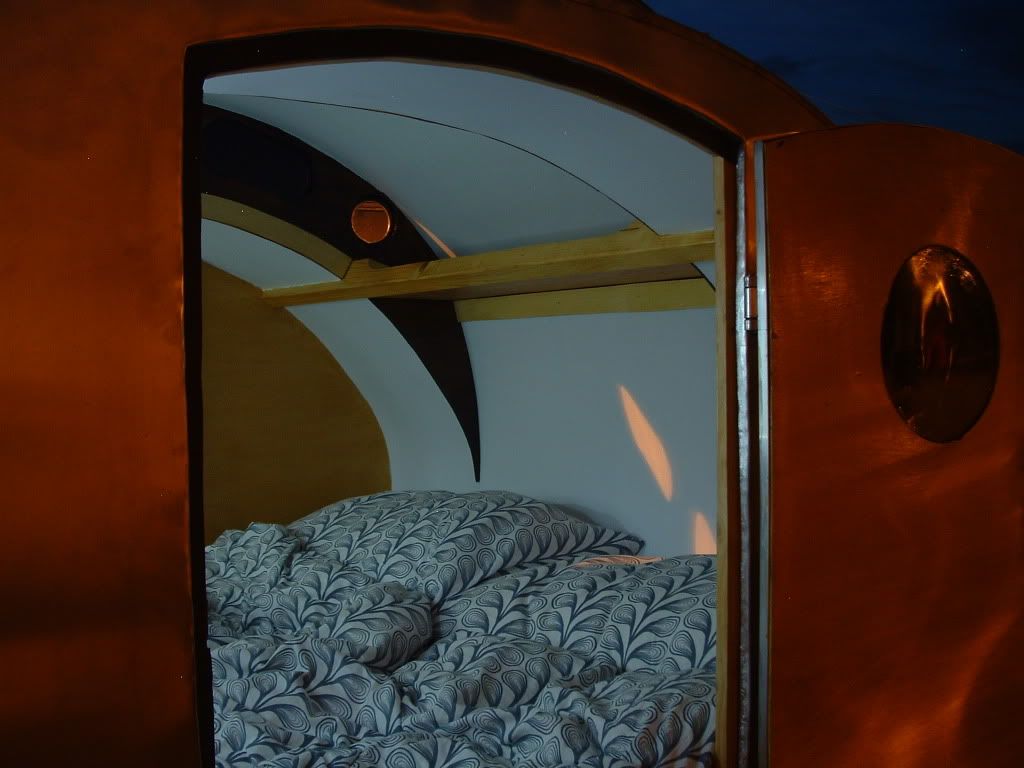
The inside, before the cupboard doors were fitted, at night time,
Nick took the trailer over to his parents. It was his first time towing , other than the ten minute shake-down we gave it together. It was like seeing one of the children leaving home. [smilie=med_cry.gif] Tears of joy and a great feeling of pride seeing going down the road.
 [smilie=econ_goldtooth[1].gif]
We had a good 4+ hour trip to Cornwall, starting at 6 the following morning. I think Nick feels prity comfortable with the trailer, but found going up the hills in Cornwall a little restrictive.
I hope you've enjoyed looking at this thread as much as I've enjoyed the build. I've got a few things to do to get it Finished, but over all , I'm quite happy wit how things have turned out. That said , if it was for me, I would have liked some more creative wheel arches and some nicer rear lights.
Cheers Dave