Red Dragons - The Build (Updated 3/17/10)

...ask your questions in the appropriate forums BUT document your build here...preferably in a single thread...dates for updates, are appreciated....

Postby dmckruit » Wed Dec 24, 2008 2:44 pm

Spent some more time on the trailer the last few weeks. I got the subfloor finished and framed.

Image

Image

Underside of subfloor:

Image

Next I put flashing over the seams of the underside of the subfloor. The next step will be to apply undercoat and bolt the subfloor down to the frame.

Image
User avatar
dmckruit
The 300 Club
 
Posts: 385
Images: 212
Joined: Thu Jul 10, 2008 1:44 pm
Location: Sarver, PA

Postby dmckruit » Fri Dec 26, 2008 5:13 pm

Applied the undercoating today.

Image

Then I varnished the main floor.

Image

Now I am literally waiting for paint to dry. Tomorrow things should start happening. I will get the subfloor attached to the frame, then I can install the insulation, and apply the top floor.

Then next I can begin on the sides. :)
User avatar
dmckruit
The 300 Club
 
Posts: 385
Images: 212
Joined: Thu Jul 10, 2008 1:44 pm
Location: Sarver, PA

Postby dmckruit » Sun Dec 28, 2008 3:46 pm

Adding the insulation to the floor:

Image

And applying the top floor:

Image

I am going to cover the floor with fancy linoleum so I wasn't concerned that the plywood was one piece or any special wood.

Now I can finally begin the task of cutting out the side profiles.
User avatar
dmckruit
The 300 Club
 
Posts: 385
Images: 212
Joined: Thu Jul 10, 2008 1:44 pm
Location: Sarver, PA
Top

Postby dmckruit » Fri Jan 02, 2009 7:08 pm

Didn't get much done today tearwise. Took the tree down and ran errands, then finally got some time this afternoon to work on my side profile.

I laid out the gridlines, then measured where the dots should go. The connected the dots. It was easier than I thought. Should have it cut tomorrow. :D

Image

Image

Image

Also, got a package slip from the mailman today. My windows are in!! Will post pics tomorrow.
User avatar
dmckruit
The 300 Club
 
Posts: 385
Images: 212
Joined: Thu Jul 10, 2008 1:44 pm
Location: Sarver, PA
Top

Postby Miriam C. » Fri Jan 02, 2009 8:36 pm

:applause: :thumbsup: No where to go but up! :thumbsup:

Image Look forward to the rest of the build. :applause:
“Forgiveness means giving up all hope for a better past.â€
User avatar
Miriam C.
our Aunti M
 
Posts: 19675
Images: 148
Joined: Wed Feb 15, 2006 3:14 pm
Location: Southwest MO
Top

Postby Todah Tear » Mon Jan 05, 2009 10:33 am

Lookin good. It will be real toasty inside your tear during those cold PA nights.

Todah
"It is not good to have zeal without knowledge, nor to be hasty and miss the way." Proverbs 19:2 Image
User avatar
Todah Tear
Platinum Donating Member
 
Posts: 1723
Images: 282
Joined: Mon Feb 13, 2006 3:30 pm
Location: Texas
Top

Postby dmckruit » Mon Jan 05, 2009 12:13 pm

Didn't get much more done this weekend, had too many other things to do. I am hoping to get the sides cut out before the weekend, but most of my week nights this week are booked.

I did get to the camper supply store on Saturday and picked up about 25 feet of 12V wire, 2 porch lights, 2 interior lights, and a roof vent. I thought that since I am sandwiching the walls with insulation, I might want to run the wires in the walls before I attach to the frame.

The porch lights are white, which I plan on painting black to match the frame and future fenders.

We are supposed to book our vacation in late July for PirateLand in Myrtle Beach any day now. I want to have my tear done for the LibertyBell TearJerkers Gettysburg gathering in May.
User avatar
dmckruit
The 300 Club
 
Posts: 385
Images: 212
Joined: Thu Jul 10, 2008 1:44 pm
Location: Sarver, PA
Top

Postby Kens » Tue Jan 06, 2009 11:11 am

Dmckruit I don't live to far From you and was wondering where is this camping store you talk about. I could use some parts for my #2 build. By the way you have a real name. Ken
Good day every day!
User avatar
Kens
500 Club
 
Posts: 580
Images: 26
Joined: Mon Aug 01, 2005 5:18 pm
Location: Valencia Pa.
Top

Postby dmckruit » Tue Jan 06, 2009 1:00 pm

It is B&R Camper Supply in East Butler, PA. They are located on Route 422 east of Butler (about 1 mile past the Bonniebrook Road intersection going east on the left hand side).

http://b-rcamper.com/

They said to stop by next month and pickup their 2009 RV supply catalog (which is as big as a phone book).

My name is Dave
User avatar
dmckruit
The 300 Club
 
Posts: 385
Images: 212
Joined: Thu Jul 10, 2008 1:44 pm
Location: Sarver, PA
Top

Postby Kens » Wed Jan 07, 2009 12:57 pm

Dave, Thanks for the info on the trailer supply. I will have to check it out one of these weekends. By the way your bulld is on its way to being first class. Ken
Good day every day!
User avatar
Kens
500 Club
 
Posts: 580
Images: 26
Joined: Mon Aug 01, 2005 5:18 pm
Location: Valencia Pa.
Top

Postby dmckruit » Thu Jan 08, 2009 6:47 pm

My windows:

Image

Some of the electrical stuff I bought this weekend:

Image

Got some work done this morning before leaving to see "Jersey Boys - The Musical". Got part of the sides cut out by clamping two pieces of masonite back to back. There is a 24" wide panel for the back that I got drawn out, which I need to cut yet. Some of my cuts with the jigsaw were a little uneven and I kind of got a little roller coaster effect on the front edge. I can't find my planer, so I will have to pick one up in the morning so that I can even it out.

Image
User avatar
dmckruit
The 300 Club
 
Posts: 385
Images: 212
Joined: Thu Jul 10, 2008 1:44 pm
Location: Sarver, PA
Top

Postby planovet » Thu Jan 08, 2009 7:03 pm

dmckruit wrote:Some of my cuts with the jigsaw were a little uneven and I kind of got a little roller coaster effect on the front edge. I can't find my planer, so I will have to pick one up in the morning so that I can even it out.


I evened mine out with a belt sander. Worked pretty good. :thumbsup:
ImageMark (& Cindi)
Visit our website: Little Swiss Teardrop

I was wondering why the water balloon was getting bigger... and then it hit me.

ImageImageImageImage
User avatar
planovet
The Cat Man
 
Posts: 5583
Images: 3
Joined: Tue Nov 27, 2007 4:48 pm
Location: Plano, Texas
Top

Postby dmckruit » Sat Jan 10, 2009 3:42 pm

Woke up this morning and this is what I found outside:

Image

Image

Looks like a good day to work on my Teardrop. :D

Got the side profile cut and checked for fit:

Image

Cut the door out:

Image

And cut the wheel well:

Image

Then I had to go out and shovel. Thats it for today.
User avatar
dmckruit
The 300 Club
 
Posts: 385
Images: 212
Joined: Thu Jul 10, 2008 1:44 pm
Location: Sarver, PA
Top

Postby dmckruit » Thu Jan 29, 2009 5:19 pm

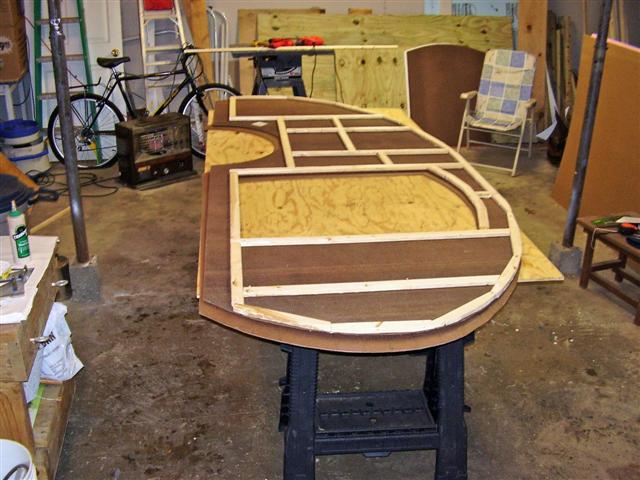
Took a snow day off from work (after 2 failed attempts to go). Roads here were a complete sheet of ice. So I fired up the kerosene and electric heaters and begain framing the walls of my tear. I still have more to complete with the studs before adding the insulation and the white (dry erase) type paneling for the interior.
Image

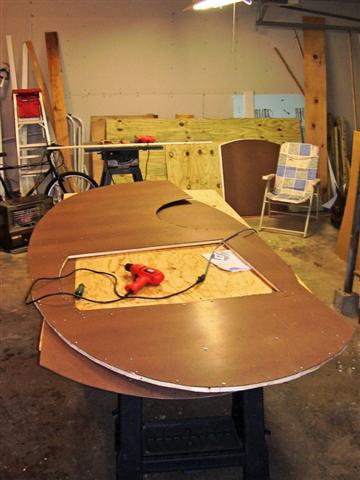
I noticed a slight bow on the front part of my floor that I can't straighten out. Because this part will be under the storage cabinet at the front, and also under the mattress, it shouldn't be noticable on the inside. I just want to make sure that its all square and level on the outside. So I am going to cut a strip wood to match the negative of the irregularity so that I will have a level piece to attach the bottom of the sides to.

I used glue and screws to attach the masonite to the studs. However, I found that masonite doesn't like to countersink the screws the way wood does. So I need to pickup a 1/4" countersink bit so that I can sink the screws flush with the masonite. I may also cover the sides with a thin sheet of foam underlayment (the type for floating wood floors) before I skin with aluminum to hide any lumps and depressions.
Image

Hopefully I can spend some more time on Saturday. I am really getting cabin fever. If my trailer was done, I would be in Florida by now. ;)
User avatar
dmckruit
The 300 Club
 
Posts: 385
Images: 212
Joined: Thu Jul 10, 2008 1:44 pm
Location: Sarver, PA
Top

Postby Nitetimes » Thu Jan 29, 2009 5:30 pm

I would highly recommend sitting all 4 corners of your trailer on stands or something else solid before you go any further. If it's not sitting solid you will have a very hard time getting it all squared up. If you level it side to side in the front and back you will know everything's going to go together the way it should. :thumbsup:
Rich


Image
ImageImage
-
The strongest reason for the people to retain the right to
keep and bear arms is, as a last resort, to protect themselves
against tyranny in government.
- Thomas Jefferson -
Personally, I carry a gun because I'm too young to die and too old to take a butt kickin'.
User avatar
Nitetimes
7000 Club
7000 Club
 
Posts: 7909
Images: 194
Joined: Sat Feb 12, 2005 12:44 am
Location: Butler,PA
Top

PreviousNext

Return to Build Journals

Who is online

Users browsing this forum: Google [Bot] and 20 guests