Astro-Benny - Updated March 1 - Improvements

...ask your questions in the appropriate forums BUT document your build here...preferably in a single thread...dates for updates, are appreciated....

Postby PhotoGuy » Sun Jun 20, 2010 8:49 pm

Looking great. I love the fact that you are still using tools handed down from the family. In some ways older family members are helping with your build. Family means a lot to me... and I use a lot of my grandfathers old tools.

I hope to start my build soon. I dont see any sign of a frame in your photos. Are you adding your build to the fame later? or do you have it already?

I really like how you are keeping track of the total hours and money spent. Kind of give me an idea of what I can do.

I like the name "Stargazer", Has me thinking of a name for mine

:applause:
PhotoGuy
Teardrop Master
 
Posts: 132
Images: 2
Joined: Wed Jun 09, 2010 1:16 am
Location: St Thomas Ont Canada

Postby DesertSkies » Mon Jun 21, 2010 12:08 am

Thanks Chuckles! Turns out I have more spare time than I thought. I have several irons in the fire but giving up sofa time really pays off.

Photoguy, I'm going to put the camper on a Tractor Supply trailer. I downloaded the blueprints from this site and compared them to an actual trailer at the store. They always keep at least one in stock. I'm hoping to have it ready to go on the chassis by the end of the summer.

The Tractor Supply trailer is designed to be planked with 2" boards or with a 4x8 sheet of plywood. I'm going to hoist it on to the chassis and bolt down. I'll construct a skirt out of a hardwood to conceal the trailer edge if I don't like the way it looks.
User avatar
DesertSkies
Donating Member
 
Posts: 49
Images: 49
Joined: Sun Jun 06, 2010 4:09 pm
Location: Midland, TX

Postby DesertSkies » Mon Jun 21, 2010 4:47 pm

I hoped to spend all day working on the camper but only got about 4 hours work done. I got all the molding done and the lower cabinet started. I spent a lot of time staring, measuring and changing things around with the cabinets. I've changed the electrical system around to spread it out a little. The battery will sit under the counter and the terminal blocks will be in the upper cabinets. That allows me to hide the main 12v power lines inside a rabbet joint space in the countertop. It'll free up some space for a power strip and converter below as well. I also cut the doors and vent holes in the paneling.

I dropped $46.07 on molding, stain, polyurethane and yet another router bit. I stained the countertop just to see what it was going to look like.

Image
User avatar
DesertSkies
Donating Member
 
Posts: 49
Images: 49
Joined: Sun Jun 06, 2010 4:09 pm
Location: Midland, TX
Top

Postby DesertSkies » Tue Jun 22, 2010 6:08 pm

The teardrop gods must be pleased. I got a call from the boss bright and early telling me the power is off all day at the office due to construction and we'd be closed. I had a full 8 hour day in the shop.

The cabinets are finished except for doors and the partition. I'm not exactly sure how I'm going to separate the interior and galley sides of the cabinet. The middle shelf isn't glued down yet.

I wasn't sure where to put the middle shelf, so I set it where the top galley shelf is just big enough for canned goods. That made plenty of space everywhere else.

I spent $12.99 on stain and some paintable silicone caulk.

Image
User avatar
DesertSkies
Donating Member
 
Posts: 49
Images: 49
Joined: Sun Jun 06, 2010 4:09 pm
Location: Midland, TX
Top

Postby PhotoGuy » Tue Jun 22, 2010 9:01 pm

Looking great... Out of all the builds that I have seen on here. this ranks in the top 5 for me
PhotoGuy
Teardrop Master
 
Posts: 132
Images: 2
Joined: Wed Jun 09, 2010 1:16 am
Location: St Thomas Ont Canada
Top

Postby DesertSkies » Mon Jun 28, 2010 5:53 pm

Thanks again, PG. It's been a fun build so far.

I invested about another 8 hours this week. The cabinet shelves are in, all that's left are the doors and cab top. I'm going to do that after the wiring.

I did some finish work on the counter and shelf faces. They're coming along nicely.

The ceiling insulation is in and I ran all of the wiring except the hatch. My LED lighting is waiting on a back order and should ship sometime this week. There's plenty to do in the meanttime. Installing the porch lights after the walls were done wasn't a big deal. I put the switch mounts directly behind them on the interior.

I caulked the interior trim for a nice finished look. The shelves are stained and coated with polyurethane.

I should probably get it on the trailer before it gets too heavy!

I spent $43.30 on electronic parts and clear caulk for the counter.


Image

Image

Image
User avatar
DesertSkies
Donating Member
 
Posts: 49
Images: 49
Joined: Sun Jun 06, 2010 4:09 pm
Location: Midland, TX
Top

Postby PhotoGuy » Mon Jun 28, 2010 6:55 pm

looking great. Just wish I had time to start my build
PhotoGuy
Teardrop Master
 
Posts: 132
Images: 2
Joined: Wed Jun 09, 2010 1:16 am
Location: St Thomas Ont Canada
Top

Postby DesertSkies » Fri Jul 02, 2010 10:28 pm

Thanks again, PG. I'm really having to squeeze time for this build but I'd like to get it rolling over the summer.

I'm down $211.27 for LED fixtures, new power supply, power strips, cable ties, switches and connectors.

I managed to put in about 7 hours this week but got a lot done.

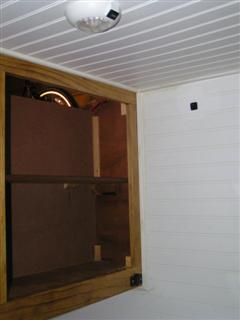
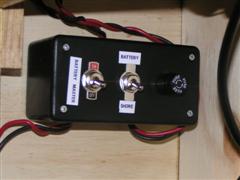
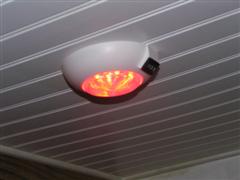
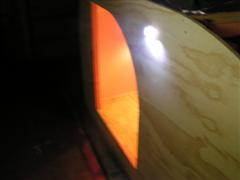
My existing power supply wasn't quite big enough to run my laptop so I upgraded a little. The SeaSense LED fixtures work well. I was skeptical about using the courtesy lights as porch lights but they're bright enough to make sure you don't step on a snake! I really like the switchable red/white dome light. The LED reading lamp has a mix of white and yellow LED's that make a warm light compared to white only. It will adjust high enough to shine inside the cabinets. I added 12v sockets to the front and back cabinets.

I'm thinking it really needs to go on the trailer this week. I'll have some help available and it's starting to get heavy. That's the second time I've said that.

I'm hoping to finish the cabinets this weekend and maybe get started on the roof.

The camera was acting up a little but I got some shots of the fixtures.

Running totals to date: $754.10 and 51 hours.

ImageImageImage

ImageImageImage
User avatar
DesertSkies
Donating Member
 
Posts: 49
Images: 49
Joined: Sun Jun 06, 2010 4:09 pm
Location: Midland, TX
Top

Postby DesertSkies » Sun Jul 04, 2010 7:25 pm

I'm going to call it 5 hours over the last two days.

I spent $407.86 for the trailer, hitch and ball. I forgot that I needed a tongue jack. That'll have to wait.

I was going to put it on the trailer next week when my band will be at the house for rehearsal but I got an idea on the way home. In about 20 minutes with a floor jack and a couple of cinder blocks I was able to skid the whole thing on the trailer myself.

The only problem I saw was that the fenders will get in the way of sealing and painting. They're very securely welded! I removed the wiring clips that came with the trailer and the whole assembly slides very easily along the rails. I checked the balance and will be able to slide the body back enough to finish behind the fenders and slide it back into place with the trailer very securely chocked. Whew!

The trailer is decent enough but I'll be fastening the wiring to the camper's underside. The wiring is a little on the cheesy side with extra wire poking out here and there.

I spent the rest of the time painting. It always amazes me how you can buy white primed material and still need 47 coats of white paint to cover everything!

Here's a shot of the wiring clips:
Image


Here it is on wheels at last:
Image
User avatar
DesertSkies
Donating Member
 
Posts: 49
Images: 49
Joined: Sun Jun 06, 2010 4:09 pm
Location: Midland, TX
Top

Postby 2bits » Sun Jul 04, 2010 11:54 pm

Yeah she's a teardrop now! I was just thinking.. Did you seal the end grain of the plywood that is sitting on the frame rails? Moisture will still get in...

Image

Luckily the swelling has gone down and I have since resealed my end grain. :roll:
Thomas

Image
User avatar
2bits
2bit Member
 
Posts: 5131
Images: 8
Joined: Thu Dec 27, 2007 6:04 pm
Location: Lake Tawakoni, TX
Top

Postby DesertSkies » Mon Jul 05, 2010 6:07 pm

2bits,

I had to sketch it out to make sense:

Image

I used the "internal cleat" attachment from the Construction Tips forum.

The floor's edge is sealed with fence paint. The wall was glued and screwed to the floor with Titebond III. I'll go over the whole thing with CPES. I could also hit the bottom 1/2 of the wall with asphalt paint just for extra precaution.

The idea is that water should be able to shed off the wall and drain between the treated 2x4 and frame rail. I could also put a woody skirt over the whole mess I suppose.

What do you think?
User avatar
DesertSkies
Donating Member
 
Posts: 49
Images: 49
Joined: Sun Jun 06, 2010 4:09 pm
Location: Midland, TX
Top

Postby YuGun » Tue Jul 06, 2010 7:39 am

Very nice lighting.
User avatar
YuGun
The 300 Club
 
Posts: 445
Joined: Sun Apr 11, 2010 1:25 pm
Location: Turkey
Top

Postby DesertSkies » Sun Jul 11, 2010 6:12 pm

Teşekkür ederim, YuGun! I LOVE LED's!. These were a great find.

I got 8 hours work done this week and spent $99.74 on cabinet hardware, another sheet of 3/4 ply and some more 1x2's for the doors and hatch.

The cabinets are completely finished. I worked mostly on lunch hours and evenings a little at a time and wrapped it up today. I spent more time on the finish than anything. The doors have 3 coats of polyurethane and probably 6 went on the counter top.

Doors and hatch are next. I'm still not completely sure how I'll handle the aluminum trim and seals. There are quite a few local sources for aluminum extrusions so I'll do a little shopping first.

Running total is $1261.70 and 64 hours.

Image

Image
User avatar
DesertSkies
Donating Member
 
Posts: 49
Images: 49
Joined: Sun Jun 06, 2010 4:09 pm
Location: Midland, TX
Top

Postby michaelwpayton » Thu Jul 15, 2010 3:27 pm

DesertSkies wrote: ... Running total is $1261.70 and 64 hours.


Looking great! Thanks for the running stats... it's interesting to watch your $'s and hours.
-Michael

"all things should be as simple as possible... but no simpler"
michaelwpayton
Teardrop Master
 
Posts: 192
Images: 4
Joined: Thu Jun 24, 2010 7:41 pm
Location: Williamsburg, VA
Top

Postby DesertSkies » Sat Jul 24, 2010 3:25 pm

Thanks, Michael. I saw a couple of other logs with that info and I thought it was pretty useful too.

I've been busy with my job(s) since the last post. I've managed to work 6 hours on the camper. The doors are framed, insulated and paneled on the inside and ready for hardware and windows.

The galley hatch frame is finished. Mike was right, it really wasn't all that tough. It turned out square with the right spacing around it. Whew!

I bought some PL Premium for paneling and skinning ($14.87). I'll be posting a few questions about that on the construction forum.

Image

Image
User avatar
DesertSkies
Donating Member
 
Posts: 49
Images: 49
Joined: Sun Jun 06, 2010 4:09 pm
Location: Midland, TX
Top

PreviousNext

Return to Build Journals

Who is online

Users browsing this forum: No registered users and 17 guests