Journey Begins

...ask your questions in the appropriate forums BUT document your build here...preferably in a single thread...dates for updates, are appreciated....

Postby fishfinder » Fri Dec 11, 2009 1:25 am

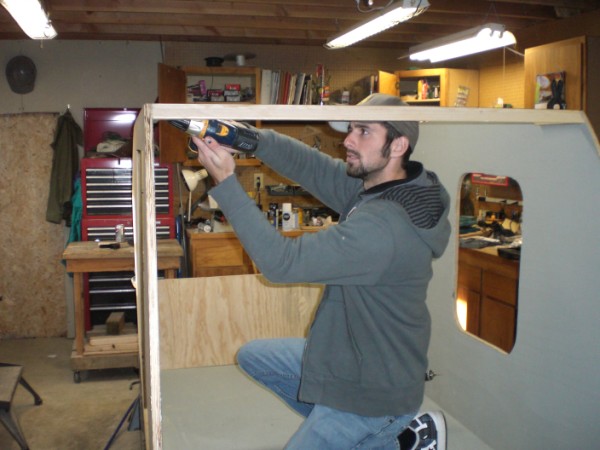
I have decided to forge ahead with the new shape. Spoke with Brad and he agrees I shouldn't have any problems. You will notice I plan on having the cooler in the galley vs the tonge. To accomplish that I had to move the lower wall toward the front a few inches. The cooler will be on a pull out shelf. My grandson may be able to come tomorrow with his truck so I can go pick up another 4x8 sheet of plywood. I need to make the lower galley wall before I put up the second side.

Dropping the galley lid 6" didn't hurt me at all. I can still stand under it when raised without any difficulty. I having a great time solving the little problems as they come up.

Mike
User avatar
fishfinder
Teardrop Master
 
Posts: 113
Images: 120
Joined: Wed Sep 23, 2009 5:05 pm
Location: Port Orchard, WA

Postby fishfinder » Fri Dec 11, 2009 4:58 pm

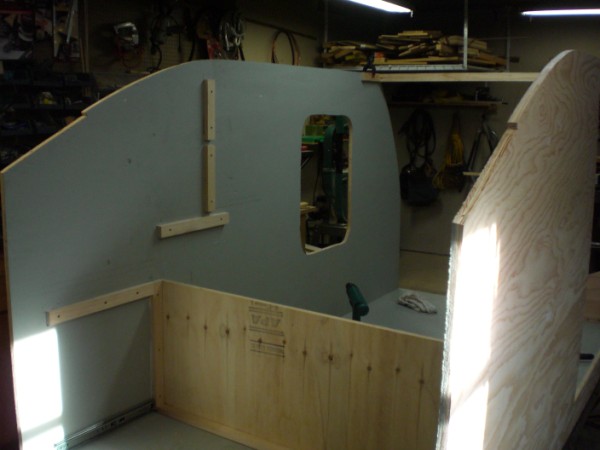
Grandson came over to help and we got a little more done.

Image

View from the galley
Image


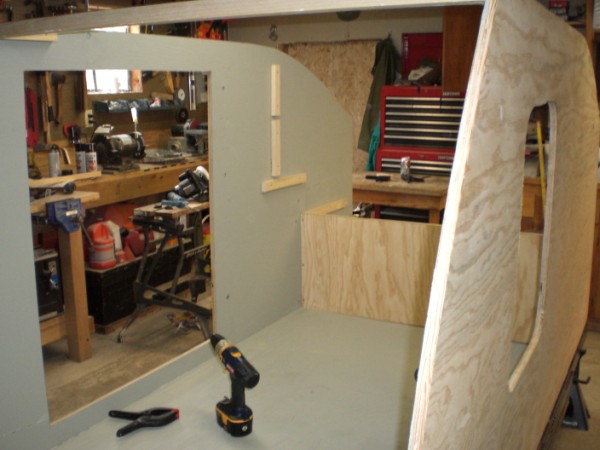
Looking through the door
Image


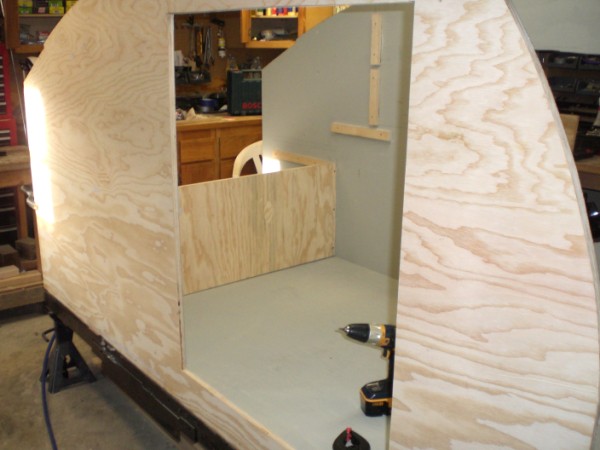
View from the front.
Image

So far I am only an 1/8" off which is fixable.

Mike[/img]
User avatar
fishfinder
Teardrop Master
 
Posts: 113
Images: 120
Joined: Wed Sep 23, 2009 5:05 pm
Location: Port Orchard, WA

Postby aggie79 » Fri Dec 11, 2009 5:46 pm

Looking good Mike! :applause: :thumbsup: :applause:

fishfinder wrote:So far I am only an 1/8" off which is fixable.

Mike


You can work with only being off 1/8". I hope you don't find an 8" goof like I did on my trailer. (I am building my teardrop body off the trailer and didn't find out this until the teardrop shell was almost complete. That's what I get for trying to add without a calculator.)
Last edited by aggie79 on Tue Dec 29, 2009 10:58 pm, edited 1 time in total.
Tom (& Linda)
For build info on our former Silver Beatle teardrop:
Build Thread

93503
User avatar
aggie79
Super Duper Lifetime Member
 
Posts: 5405
Images: 686
Joined: Tue Aug 07, 2007 5:42 pm
Location: Watauga, Texas
Top

Postby fishfinder » Fri Dec 11, 2009 9:28 pm

If you look back you will see a note where I admitted to a 6" oops but it was not life threatening. In fact it may turn out to be a blessing. 8)

Mike
User avatar
fishfinder
Teardrop Master
 
Posts: 113
Images: 120
Joined: Wed Sep 23, 2009 5:05 pm
Location: Port Orchard, WA
Top

Postby fishfinder » Sun Dec 13, 2009 8:52 pm

Got a little more done today. Installed all the spars. Tomorrow I am going to the local RV shop and see if I can get a roof top vent as well see if they have any mini-brakers for my ac-dc converter.

Great Tool
Image

Adding Spars
Image

Gluing up the hinge spar
Image

It's begining to take shape. Starting to look like it might actuall become an actual TD

Mike
User avatar
fishfinder
Teardrop Master
 
Posts: 113
Images: 120
Joined: Wed Sep 23, 2009 5:05 pm
Location: Port Orchard, WA
Top

Postby fishfinder » Mon Dec 14, 2009 8:08 pm

Finished all the spars and blocking today. Next is to go pick up some Luan for the ceiling. Each step brings new decisions. The original plans have no DC power so I am having to figure out my wiring and power source and location as I go. After I get the ceiling in place that will be my next step.

Spars complete - front view.
Image

Spars complete - rear view
http://tnttt.com/album_ ... c_id=59166[img]

Mike[/img]
User avatar
fishfinder
Teardrop Master
 
Posts: 113
Images: 120
Joined: Wed Sep 23, 2009 5:05 pm
Location: Port Orchard, WA
Top

Postby fishfinder » Tue Dec 15, 2009 7:49 pm

The work continues. My neighbor Bob came over and helped me install the inside front wall and ceiling today. The inside sure got dark in a hurry.

Front Wall
Image

T Bracing the ceiling
Image

The ceiling from outside.
Image

The luan is glued and stapled to the spars. Boy did this stiffin up the whole thing. Next I will be starting on the cabinets and then the wiring.

Mike
User avatar
fishfinder
Teardrop Master
 
Posts: 113
Images: 120
Joined: Wed Sep 23, 2009 5:05 pm
Location: Port Orchard, WA
Top

Postby fishfinder » Sun Dec 20, 2009 12:04 am

I have been making sawdust and progress as well. It is interesting how one has to make adjustments to plans as you go along. Lots of fun solving problems.

Beginning to install galley cabinets. Don't quite look like the plans but it is coming together
Image

Cabinets are looking better in the cabin.
Image

Began pulling wires today. Wiring behind the cooler are coming from the battery location and up to where the converter is going to be installed.
Image

The wires shown will be attached to the AC/DC converter when I'm ready
Image

I installed the first inch of insullation as well as wires to the lights in the cabin.
[img]http://www.tnttt.com/gallery/image.php?image_id=59390
[/img]

My progress is slow buy steady. I work on it a little every day. It really is beginning to look like a TD.

Mike
User avatar
fishfinder
Teardrop Master
 
Posts: 113
Images: 120
Joined: Wed Sep 23, 2009 5:05 pm
Location: Port Orchard, WA
Top

Postby fishfinder » Sun Dec 20, 2009 11:23 am

Gee what happened to my roof picture. Little key stroke mistakes can mess you up. I also need to mention Tim, Harvy and Jim who each answered my call for help on wiring up my American AC/DC converter. It sure looks confusing until someone shows you where to put the first wire. Thanks guys. It really is true. Members of this forum are ready to help if asked.

Now for the missing picture of the wiring running in the ceiling.
Image

Mike
User avatar
fishfinder
Teardrop Master
 
Posts: 113
Images: 120
Joined: Wed Sep 23, 2009 5:05 pm
Location: Port Orchard, WA
Top

Postby fishfinder » Tue Dec 22, 2009 6:57 pm

Made more progress today with the electrical and insulation. It started out with me stumped. I wasn't able to solve an install problem. I bought a 15 amp Inlet however the threads were the same depth as my wall. What to do. I called my neighbor Bob and old hand with lots of experience in figuring out little problems like this. He came over and after thinking it over here is what we did

The inlet socket
Image

Next we cut in a hole that was large enough to hold the backing nut.
htImage

Bob then cut out a fish where we could install the socket.
Image

This how it ended up. The trout is a nice touch for FISHFINDER.
Image

Next I pulled wires into the galley and cabin. Next electrical job will be hooking everything up just bebore I am finised.
Image

Image


The roof is ready for Luan
Image

Done for the day. Now off to meet some fly fishing buds to practice casting. Practice, practice, practice. We have an inside area so weather is not a problem.

Mike

[/img]
User avatar
fishfinder
Teardrop Master
 
Posts: 113
Images: 120
Joined: Wed Sep 23, 2009 5:05 pm
Location: Port Orchard, WA
Top

Postby fishfinder » Sat Dec 26, 2009 7:11 pm

Made a little more progress over the last few days. Took yesterday for Christmas but back at it today. Photos show some progress. I'd welcome any comments from the gallery. Nobody says anything so I don't know if it looking good or it's a disaster and everyone is taking pity on me. :thumbsup:

Luan skin goes onto the roof.
Image

Luan skin is now on the front.
Image

Shelf over head of bed. wires go to the 12v light that will be installed
Image

Left side from rear
Image

Right side from rear
Image

I started cutting out spars for the galley lid. Still have lots of little things to do but it is begnning to look like the real deal.

Mike
User avatar
fishfinder
Teardrop Master
 
Posts: 113
Images: 120
Joined: Wed Sep 23, 2009 5:05 pm
Location: Port Orchard, WA
Top

Postby Billy K » Sat Dec 26, 2009 7:41 pm

Though I've not started on my build yet.. I'd say you're going the right way.

Looks good to me.
"...influence is no government." - George Washington
Billy K
Teardrop Master
 
Posts: 276
Joined: Sun Dec 06, 2009 8:03 pm
Location: Kokomo,IN
Top

Postby John T. Hodgen » Sun Dec 27, 2009 7:03 am

Hey Mike,
As Mr. T should say--"I pity the Tool!!"
I'd say that your kicking a$$ and will be done real Soon!! Looking great, but I have only one question! Where is the trap door for icefishing???? Lol
Your flyfishing buddies are going to be
jealous!!
Til later by the fire--John T. & Linda 8)
User avatar
John T. Hodgen
The 300 Club
 
Posts: 415
Images: 8
Joined: Thu Jul 24, 2008 5:50 am
Location: Summersville, West Virginia
Top

Postby fishfinder » Mon Dec 28, 2009 12:48 am

Thanks for taking the time to post on my thread. Sorry no ice fishing in Western Washington. But I hope all my FF budies are a bit envious.

Mike
User avatar
fishfinder
Teardrop Master
 
Posts: 113
Images: 120
Joined: Wed Sep 23, 2009 5:05 pm
Location: Port Orchard, WA
Top

Postby fishfinder » Mon Dec 28, 2009 8:47 pm

Spent time today working on the hatch.

Image

Mike
User avatar
fishfinder
Teardrop Master
 
Posts: 113
Images: 120
Joined: Wed Sep 23, 2009 5:05 pm
Location: Port Orchard, WA
Top

PreviousNext

Return to Build Journals

Who is online

Users browsing this forum: No registered users and 6 guests