Tub Toys gone fishin' Update 8/7/11, cabinets etc

...ask your questions in the appropriate forums BUT document your build here...preferably in a single thread...dates for updates, are appreciated....

Postby tsmiley23 » Sat May 21, 2011 10:16 am

As you'll see in this string of pictures I've installed the interior paneling, 1/4" oak beadboard to wainscot height, and 1/4" Maple with a whitewash for the upper half. The oak has 2 coats of Watco dark walnut stain and will get 2 coats of acrylic urethane top coat;
Image
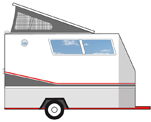
The bed deck pulls out and goes from a twin size to a double, this picture shows it as a twin:
Image
This picture shows my only 120v outlet on the inside and my switches for the battery, one connects to the truck and one connects from the battery to the breaker box:
Image
Here the bed is pulled out to a double:
Image
This shows my access lid for my battery box;
Image
And here's the battery. I still need to cut a vent to the outside for the battery:
Image
Here's a shot of the ceiling. I bought upholstery fabric to cover the ceiling and glued it on with contact cement, it was way harder than I thought it would be. I made two mistakes, first as you can see the pattern is straight lines and these are impossible to keep straight, and second the fabric had too much stretch, but over all I'm very pleased, it's a very good looking material and adds great character. I will learn from my mistakes:
Image
Next step was to build a table. I started with 1-1/4" plywood and built a frame using half laps. This made a very stable, strong, light frame, just like a hollow core door:
Image
I added a layer of luan to both sides and applied contact cement:
Image
I wanted a leather table top, so here the leather is prepped and contact cemented:
Image
And here it is installed, I'm going to stain it once I figure out what color goes with the rest of the interior;
Image
CONSISTENCY!!!!!! It's only a good thing if you're not a screw up.
User avatar
tsmiley23
Teardrop Advisor
 
Posts: 70
Images: 159
Joined: Thu Feb 04, 2010 10:44 am
Location: Woodland Park, CO

Postby tsmiley23 » Sun Jun 05, 2011 11:02 pm

Started out by building a front overhead cabinet and buying a radio, so I needed speaker boxes and here's what I came up with;
Image
The holes in the bottom are for air flow, and the ceiling fabric is glued to the inside so you can't see through:
Image
Here's the radio box I built:
Image
I wanted to be able to use it from multiple locations so I mounted it on a lazy susan:
Image
And here's the front end showing the overhead cabinet with the radio, breaker box, speaker boxes and reading lights:Image
Here are the rear speakers:
Image
Here's my counter top, fabricated with mill stainless, I built it with a 1" raised perimeter lip to minimize spills and after welding I sanded it with 100 grit paper and then brushed with a stainless wire cup on a grinder: Easy to clean, tough and I really like the look:
Image
This picture shows the plumbing connections to the stove and a catalytic heater. The stove is connected with a quick connector fitting and I can remove it and take it to the outside corner of the trailer where I installed a similar fitting:Image
CONSISTENCY!!!!!! It's only a good thing if you're not a screw up.
User avatar
tsmiley23
Teardrop Advisor
 
Posts: 70
Images: 159
Joined: Thu Feb 04, 2010 10:44 am
Location: Woodland Park, CO

Postby vtx1029 » Mon Jun 06, 2011 6:59 am

Looking awesome :thumbsup:
User avatar
vtx1029
Teardrop Master
 
Posts: 251
Images: 70
Joined: Fri Apr 23, 2010 11:42 pm
Location: MN
Top

Postby aggie79 » Mon Jun 06, 2011 8:23 am

Terry,

The interior of Tub Toys looks fantastic! I really like the speaker boxes and the swivel radio. Very nice details. The stainless steel counter is really cool too.

Your progress is getting me motivated to get back out into the garage.

Take care,
Tom
Tom (& Linda)
For build info on our former Silver Beatle teardrop:
Build Thread

93503
User avatar
aggie79
Super Duper Lifetime Member
 
Posts: 5405
Images: 686
Joined: Tue Aug 07, 2007 5:42 pm
Location: Watauga, Texas
Top

Postby GuyllFyre » Mon Jun 06, 2011 4:44 pm

Beautiful work like this makes me yearn for a teardrop of my own.

First up, need to outfit the car with a trailer hitch, "new" vehicle no longer has one available since Curt bought out Da'Lan. :(
Things I have for sale on craigslist:
http://albany.craigslist.org/search/?ar ... catAbb=sss

Things I have for sale on eBay:
http://www.ebay.com/sch/merchant/seansmith
User avatar
GuyllFyre
Donating Member
 
Posts: 209
Joined: Fri May 21, 2010 9:35 pm
Location: Scotia, NY
Top

Postby tsmiley23 » Wed Jun 08, 2011 9:35 pm

vtx1029 wrote:Looking awesome :thumbsup:


Thanks for the encouragement :shake hands: , some times I think I'll never finish, but your comments really help.
CONSISTENCY!!!!!! It's only a good thing if you're not a screw up.
User avatar
tsmiley23
Teardrop Advisor
 
Posts: 70
Images: 159
Joined: Thu Feb 04, 2010 10:44 am
Location: Woodland Park, CO
Top

Postby tsmiley23 » Wed Jun 08, 2011 9:39 pm

aggie79 wrote:Terry,

The interior of Tub Toys looks fantastic! I really like the speaker boxes and the swivel radio. Very nice details. The stainless steel counter is really cool too.

Your progress is getting me motivated to get back out into the garage.

Take care,
Tom


Thanks for the kind words :D Just knowing your still watching makes my day, this week I hope to get the windows trimmed, this should really pull things together.
CONSISTENCY!!!!!! It's only a good thing if you're not a screw up.
User avatar
tsmiley23
Teardrop Advisor
 
Posts: 70
Images: 159
Joined: Thu Feb 04, 2010 10:44 am
Location: Woodland Park, CO
Top

Postby tsmiley23 » Wed Jun 08, 2011 9:44 pm

GuyllFyre wrote:Beautiful work like this makes me yearn for a teardrop of my own.

First up, need to outfit the car with a trailer hitch, "new" vehicle no longer has one available since Curt bought out Da'Lan. :(


Thanks Guyllfyre,
Hope you can jump in the pool with the rest of us, it's exciting to think about camping in it and sharing with others. :D
CONSISTENCY!!!!!! It's only a good thing if you're not a screw up.
User avatar
tsmiley23
Teardrop Advisor
 
Posts: 70
Images: 159
Joined: Thu Feb 04, 2010 10:44 am
Location: Woodland Park, CO
Top

Postby tsmiley23 » Sat Jun 11, 2011 4:49 pm

As I've stated earlier, the windows I bought were a really good deal, but they didn't include trim rings. I took this as a challenge and here's my solution:
Image
After making a pattern, I used it and my router to make a lot:
Image
As you can see here I rabbeted them on the back side to fit the window inset:
Image
Stained and with plugs to cover the screws:
Image

Image

Here is a picture before:
Image

Image

Image

Over all a pretty easy solution and I'm happy with the result.

Next up chair rail and kitchen cabinets>>>>>........
CONSISTENCY!!!!!! It's only a good thing if you're not a screw up.
User avatar
tsmiley23
Teardrop Advisor
 
Posts: 70
Images: 159
Joined: Thu Feb 04, 2010 10:44 am
Location: Woodland Park, CO
Top

Postby tsmiley23 » Sat Jun 11, 2011 4:55 pm

And light fixtures to match:
Over the table, it still need plugs for the screw holes:Image
Over the cook top:
Image
For reading in bed:
Image
CONSISTENCY!!!!!! It's only a good thing if you're not a screw up.
User avatar
tsmiley23
Teardrop Advisor
 
Posts: 70
Images: 159
Joined: Thu Feb 04, 2010 10:44 am
Location: Woodland Park, CO
Top

Postby tsmiley23 » Sun Aug 07, 2011 3:07 pm

Well, here are the kitchen cabinets, framed and ready for drawers:
Image
I built the drawers using 1/2" baltic birch plywood and simple tongue and rabbet jointery:
Image
Staining and finishing the drawers:
Image
Image
I wanted to dress up the front of the drawers, so I removed the center wood from the faces and made metal panels using the same green siding material I used on the exterior and added some simple "v grooves" to the faces.
Image
Image
Image
Image
CONSISTENCY!!!!!! It's only a good thing if you're not a screw up.
User avatar
tsmiley23
Teardrop Advisor
 
Posts: 70
Images: 159
Joined: Thu Feb 04, 2010 10:44 am
Location: Woodland Park, CO
Top

Postby tsmiley23 » Sun Aug 07, 2011 3:17 pm

I had finished the radio installation months ago but once I started using it I found that I couldn't see the screen on the radio when I was laying flat in bed:
This was the original radio box
Image
This is the new radio box, much more elaborate and user friendly:
Image
Image
Image

The red thing sticking out of the front right corner is a flash drive and it contains 1500 songs.
CONSISTENCY!!!!!! It's only a good thing if you're not a screw up.
User avatar
tsmiley23
Teardrop Advisor
 
Posts: 70
Images: 159
Joined: Thu Feb 04, 2010 10:44 am
Location: Woodland Park, CO
Top

Postby tsmiley23 » Sun Aug 07, 2011 3:21 pm

I needed some coat hooks and just to dress things up I drew some fish and cut them out of some black lexan plastic I've had around for years. Some things you just do for fun:
Image
Image
CONSISTENCY!!!!!! It's only a good thing if you're not a screw up.
User avatar
tsmiley23
Teardrop Advisor
 
Posts: 70
Images: 159
Joined: Thu Feb 04, 2010 10:44 am
Location: Woodland Park, CO
Top

Postby tsmiley23 » Sun Aug 07, 2011 3:27 pm

For curtains I bought fabric and a seamstress is sewing them as I type, for rods I bought a stick of 1/2" round steel rod with a "bark" fisnish, you can just make out the texture in the second picture:

Image
Image

I should have the curtains this week and pictures will follow soon>
CONSISTENCY!!!!!! It's only a good thing if you're not a screw up.
User avatar
tsmiley23
Teardrop Advisor
 
Posts: 70
Images: 159
Joined: Thu Feb 04, 2010 10:44 am
Location: Woodland Park, CO
Top

Postby StandUpGuy » Sun Aug 07, 2011 3:51 pm

I am really enjoying watching this build thread. You are doing an outstanding job. I really like your layout.
User avatar
StandUpGuy
1000 Club
1000 Club
 
Posts: 1090
Images: 52
Joined: Sun Mar 27, 2011 6:15 pm
Top

PreviousNext

Return to Build Journals

Who is online

Users browsing this forum: No registered users and 5 guests