Trails in the Sand new updates 9-28-11

...ask your questions in the appropriate forums BUT document your build here...preferably in a single thread...dates for updates, are appreciated....

Postby myoung » Sun Sep 05, 2010 8:23 pm

I just came across your terrific build. Excellent detail photos and discussion. I especially like the galley features. I'll probably steal a few.
Mike Young
build thread: viewtopic.php?t=40459
User avatar
myoung
500 Club
 
Posts: 644
Images: 250
Joined: Sat Aug 07, 2010 11:21 am
Location: Nipomo, CA

Postby Alan and Lianna » Fri Sep 17, 2010 8:02 pm

For our battery charging, I chose the Battery Minder Plus after reading all the great reviews for it on the internet.
Image
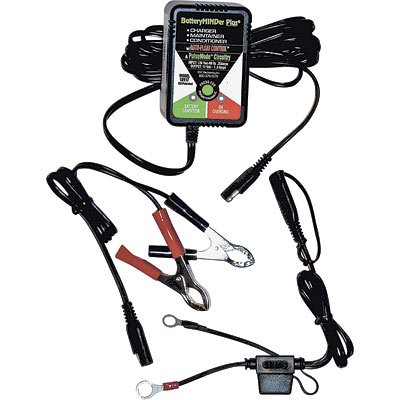
Here is some of the information on it.
Model 12117 * New and Improved at the old price!
12 Volt - 1.33 Amp BatteryMINDer®
Charger-Maintainer-Conditioner, #1 Rated
Not for use on aircraft batteries.


Don't just charge your batteries...Condition them!

The BatteryMINDer® automatically dissolves harmful power-robbing sulphation using safe, patented high-frequency pulse technology**. Guaranteed to increase your battery's life and performance, or you get 100% of your money back within 1-year.

The BatteryMINDer® is a 3-mode charger/maintainer/conditioner that extends performance and life of all types and sizes of 12 Volt lead acid batteries. These include maintenance-free, marine, deep cycle, sealed, gel, and all popular brands of AGM dry-type, valve-regulated batteries, such as InterState, Exide, Optima and Odyssey.

* Rated #1 by Motorcycle Consumers News, Feb. 05.

** Sulphation is the #1 cause of early battery failure and loss of performance as determined by the Battery Council International, Dec. 1998.

Features

Safely charges-maintains-conditions all size and type starter, deep cycle, maintenance-type, maintenance-free, sealed, gelled, AGM or dry-type batteries.
Charges and maintains from 1 to 4 batteries at a time (12 Volt batteries parallel-connected or two 6 Volt batteries series-connected) for less than 15¢ per month.
Automatically removes (dissolves) harmful sulphation using safe, U.S. patented electronic pulse technology.
The unit automatically desulphates in the maintenance mode after it completes the charging cycle.
Guaranteed to never overcharge any battery, regardless of how long connected.
No need to add water to maintenance-type batteries during long, non-use storage.
Isolation transformer and smart chip technology ensure safe, long-term performance.
Splash proof, conformal-coated circuitry ensures trouble-free life even in high-moisture marine environments.
Allows battery to be stored safely at -0°F to +120°F.
Unit comes complete with Qwik connect/disconnect battery clips and a ring terminal assembly for permanent connection with an easily replaceable fuse.
Full year 100% money-back guarantee takes the risk out of trying this great product.
Five (5) year warranty covers everything except physical abuse.


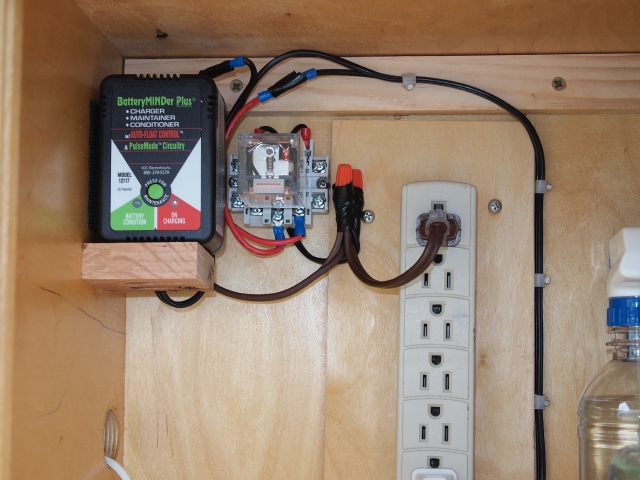
I wired the output to the battery through a fuse, and plugged it into the power strip in the galley and as you can see its taking up too much space on the power strip.
Image
The instructions also say to disconnect it from the battery when not plugged in(it can/will drain the battery), so I have been making sure to do this everytime i unplugged the tear. I purchased a 120v relay, wired the coil to the power strip and the contacts were put in line to the battery, and moved the charger. Now whenever you unplug the shore power the battery connection to the charger is automatically dropped out by the relay being deenergized.
Image

Alan and Lianna
Don't just dream about it!
Wake up and make it happen...
User avatar
Alan and Lianna
Teardrop Master
 
Posts: 120
Images: 389
Joined: Mon May 17, 2010 5:55 pm
Location: Pearland Tx

Postby Alan and Lianna » Sun Sep 19, 2010 3:38 pm

Well, it seems the different expansion rates of the wood in the door is shearing the wood. I know everyone believes that if glued up correctly that this could not happen, well after research and reading several books on wood joinery and specifically Longitudinal, Radial, and Tangential expansion rates of different wood species, I found out that this is not possible to stop. "More joints fail from wood movement due to changes in moisture than from abuse or neglect" and thats straight from the book...
Image
I removed the door, and replaced it with a temporary one.
Image
Sanded the edges down, glued any separation, and applied 2.33 fiberglass cloth to the edge, hoping that any separation in the future will not break the surface of the fiberglass and thus still be watertight.
Image
We installed a new LED light strip in the cabin, for some low level indirect lighting, the switch is next to the AC outlet below.
Image
We installed some Red Oak edge banding in the Galley

Image
And because of the horizontal rain had to move the door inside to continue the epoxying..
Image
Looks like rain all week, so we will have to improvise in order to be ready for a planned trip next weekend to Joe Poole Lake.

Alan and Lianna
Don't just dream about it!
Wake up and make it happen...
User avatar
Alan and Lianna
Teardrop Master
 
Posts: 120
Images: 389
Joined: Mon May 17, 2010 5:55 pm
Location: Pearland Tx
Top

Postby Judeyramone » Sun Sep 19, 2010 5:43 pm

I know everyone believes that if glued up correctly that this could not happen, well after research and reading several books on wood joinery and specifically Longitudinal, Radial, and Tangential expansion rates of different wood species, I found out that this is not possible to stop. "More joints fail from wood movement due to changes in moisture than from abuse or neglect" and that's straight from the book...


Generally true, however, if wood is properly sealed (not to diminish your own labors), expansion & contraction should not be a huge issue. For this reason, builders will often "back-prime" trim & other exterior components prior to installation. Another trick employed, especially by hardwood floor installers, is to let lumber acclimate for a week or 2, in the room in which it will be installed, so the moisture content of all building materials will be similar before they receive final finishing. The big benefit of plywood is that, because of the cross-grain nature of its composite construction, it's remarkably stable. Regular dimensional lumber is not, and is subject to much more expansion & contraction. If one or the other of your lumber products (plywood or dimensional lumber - i.e. 1x2), sat in your garage significantly longer than the other, that could be part of your problem, especially if there is significant humidity changes in your area (TX, no?). I suspect the sealing method you employed in your repair should do the trick.

I read & followed you entire build thread, and because of your diligence, I suspect something else is more likely the cause here, although I'm currently at a loss as to what it could be. Simple glue failure, perhaps? Inexpensive plywood ? The fact that the failure appears to have occurred between plies, rather than in one of your own glue joints (between differing lumber products) makes me suspect of expansion/contraction between species as the cause.
User avatar
Judeyramone
Teardrop Master
 
Posts: 103
Joined: Tue Aug 17, 2010 12:13 pm
Location: MI
Top

Postby Alan and Lianna » Sun Sep 19, 2010 7:37 pm

On the original glue up and sealing, all the layers were sanded even with a belt sander and epoxied, and after the separation, the oak piece in the center was protruding at least 1/8th inch in some places. Most of the wood was installed as it was bought so no telling how long or short it sat on the shelf, and yes the humidity swings here are quite large, but usually on the wet side. I suspect the oak must have shipped in from a dryer climate..

Alan and Lianna
Don't just dream about it!
Wake up and make it happen...
User avatar
Alan and Lianna
Teardrop Master
 
Posts: 120
Images: 389
Joined: Mon May 17, 2010 5:55 pm
Location: Pearland Tx
Top

Postby Judeyramone » Sun Sep 19, 2010 10:25 pm

Oak? If you're referring to the dimensional lumber in your first (damage) photo... that's not oak - looks like white pine to me. Oak doesn't expand/contract to such a degree, even when unprotected. Dimensional lumber protruding 1/8 " beyond plywood bonded to it sounds like a moisture issue to me, but... are all your glue joints having similar issues? The one damage photo you posted doesn't indicate an expansion/contraction issue between different types of lumber products to me ,so much as it indicates a stress issue only with the sheet of plywood which separated. Perhaps you have better photos of the damage? Expansion as you describe would require extraordinarily dry wood during construction, and extraordinarily humid conditions afterwards, to merit such expansion. I lived in TX for a couple yrs, and know the humidity issues, which is why I mentioned it in the first place. I doubt such humidity extremes are likely where you live.
I would look closely at all other similar joints for similar damage... keep a close eye on the other door. If differing expansion rates of lumber products was the issue, your (beautiful) trailer would be falling apart at every seam.
User avatar
Judeyramone
Teardrop Master
 
Posts: 103
Joined: Tue Aug 17, 2010 12:13 pm
Location: MI
Top

Postby Alan and Lianna » Mon Sep 20, 2010 12:23 am

This was actually one of the few places where I used a hardwood, and Lianna said she actually bought poplar. We're not having a problem anywhere I used white pine. As for the movement of oak, well I can only go with what I have read.
Image

We really do appreciate your comments.

Alan and Lianna
Don't just dream about it!
Wake up and make it happen...
User avatar
Alan and Lianna
Teardrop Master
 
Posts: 120
Images: 389
Joined: Mon May 17, 2010 5:55 pm
Location: Pearland Tx
Top

Postby Judeyramone » Mon Sep 20, 2010 5:26 pm

I'm not trying to be contrary... but your shrinkage chart shows shrinkage rates for green lumber; Shrinkage you can expect when green lumber is dried (i.e. in a kiln). What you almost certainly built your trailer with, is kiln dried lumber - which would not qualify as green. Shrinkage rates for kiln dried lumber are significantly less. Your chart may well be correct, but I don't think it applies to the lumber you used. Consider any furniture you have in your home exhibiting a 10% change in dimension (as would be the case with anything built of birch, according to the chart you posted). Not to mention, radial shrinkage no longer applies these days, generally speaking, as that type of lumber is the product of an inefficient sawing process. Almost any lumber you buy commercially is sawn tangentially. An example where you would experience radial expansion rates would be quarter-sawn oak... and that's expensive. I guarantee you didn't build those doors of quarter-sawn poplar. It's just not available commercially. What you say about proper glue joints being unable to overcome the expansion/contraction issue is true, as illustrated by the fact that your glue joint didn't fail - the failure occurred within the layers of the plywood itself. What has me jiggered is that you say the framing members (3/4" dimensional poplar) protruded 1/8" beyond the plywood skins. As I said, properly sealed lumber (either by paint, or...) should not exhibit significant expansion/contraction issues... at least not to the extent you describe. Although not by trade, I am a competent carpenter, with 20+ years of construction related experience (see my diner booth project in "off topic" section), and limited experience sawing & drying timbers. Just to reiterate, I'm not trying to be argumentative. I'm just not sure what you think is the problem is the problem.

I suspect a freak failure of lumber products in your case, and the re-glue & fibreglas should do the trick. Please be sure to keep us posted, as this is exactly the type of waterproofing failure that makes me dread building my own trailer.


BTW... Gurl (significant other) is not a camper... she needs her coffee first thing in the morning. I showed her your coffee/pantry design... and she's getting on board. Thanx for that.
User avatar
Judeyramone
Teardrop Master
 
Posts: 103
Joined: Tue Aug 17, 2010 12:13 pm
Location: MI
Top

Postby Alan and Lianna » Tue Oct 19, 2010 8:17 pm

After repairing the doors, I installed a 7oz. black fiberglass to the lower 21 inches in the front and coated it with 4 coats of epoxy mixed with graphite. This will reinforce this area and cover the splices in this area.

Image

I previously had the battery strapped down with a black rope, Lianna found these transom hold downs at Walmart, so I installed some eyebolts, strapped it down, and cut off the excess.
Image

And here is the happy camper as we were camping at Wolf Creek Park on Lake Livingston this last weekend.
Image
Oh, and as you can see, we replaced the toaster oven with a small microwave since our last update.

Alan and Lianna
Don't just dream about it!
Wake up and make it happen...
User avatar
Alan and Lianna
Teardrop Master
 
Posts: 120
Images: 389
Joined: Mon May 17, 2010 5:55 pm
Location: Pearland Tx
Top

Postby Chuckles2153 » Wed Oct 20, 2010 10:06 am

Alan and Lianna, I just found your build thread and have to give you 2 a big WOW and a :thumbsup: 
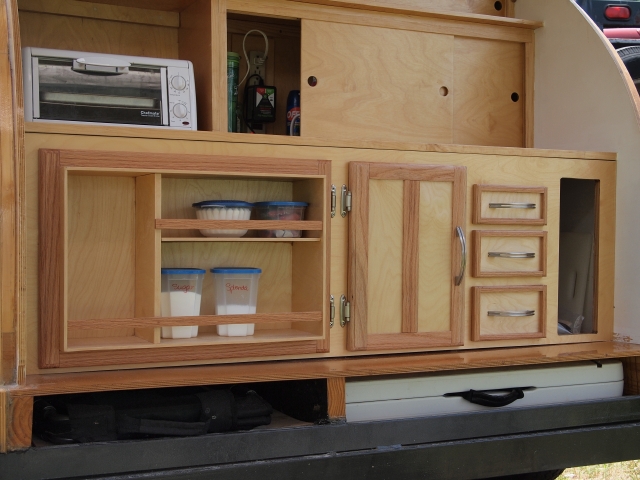
. Your galley is awesome !! How in the world did you get such a big pull out pantry??
Really sharp looking and something to to be proud of.
Chuck
Chuckles2153
Teardrop Master
 
Posts: 154
Images: 74
Joined: Wed Mar 24, 2010 2:00 pm
Location: Franklin. Indiana
Top

Postby GuyllFyre » Wed Oct 20, 2010 1:02 pm

Alan and Lianna wrote:I purchased a 120v relay, wired the coil to the power strip and the contacts were put in line to the battery, and moved the charger. Now whenever you unplug the shore power the battery connection to the charger is automatically dropped out by the relay being deenergized.
Alan and Lianna


Can you link us to the relay you bought? That's a really nifty idea and isn't hard to use.

Thanks,
-Sean
Things I have for sale on craigslist:
http://albany.craigslist.org/search/?ar ... catAbb=sss

Things I have for sale on eBay:
http://www.ebay.com/sch/merchant/seansmith
User avatar
GuyllFyre
Donating Member
 
Posts: 209
Joined: Fri May 21, 2010 9:35 pm
Location: Scotia, NY
Top

Postby S. Heisley » Wed Oct 20, 2010 3:05 pm

Thanks, Alan and Liana, for posting your build. You've done a beautiful job with it. I especially like the galley.

Alan and Lianna wrote:
We installed the new enclosure and decided for our peace of mind to switch to a 200 lumen led lamp that does not put out near as much heat, and more light.


I like the idea of changing those outside Bargman lights over to LED and would like to do the same. Where did you find your replacement bulb?
User avatar
S. Heisley
Super Lifetime Member
 
Posts: 8774
Images: 495
Joined: Mon Sep 17, 2007 10:02 am
Location: No. California
Top

Postby Alan and Lianna » Wed Oct 20, 2010 3:35 pm

Can you link us to the relay you bought? That's a really nifty idea and isn't hard to use.

Thanks,
-Sean


I bought the relay and socket at a local frys electronics, the online store is frys.com. The relay is a three pole, so if I need to add later its there.
The relay
http://www.frys.com/product/1667819?site=sr:SEARCH:MAIN_RSLT_PG

The socket
http://www.frys.com/product/1668201?site=sr:SEARCH:MAIN_RSLT_PG

I believe they had an 8pin relay that would have worked but didn't have the socket, so thats really why I ended up buying the 11 pin relay. The detailed description on the web is a generic description. The relay has no test button, but it does have an led that lights up when energized.

Alan
Don't just dream about it!
Wake up and make it happen...
User avatar
Alan and Lianna
Teardrop Master
 
Posts: 120
Images: 389
Joined: Mon May 17, 2010 5:55 pm
Location: Pearland Tx
Top

Postby Alan and Lianna » Wed Oct 20, 2010 4:18 pm

I like the idea of changing those outside Bargman lights over to LED and would like to do the same. Where did you find your replacement bulb?
_________________
...Sharon....


Sharon, I found those at at a local PPL Motorhomes parts store, they do have an online store, here is the link. We bought the Revolution 200 bulbs.
http://www.pplmotorhomes.com/parts/rv-lights/12-volt-led-bulbs.htm

You may want to search online to see if you can find it cheaper...

Alan and Lianna
Don't just dream about it!
Wake up and make it happen...
User avatar
Alan and Lianna
Teardrop Master
 
Posts: 120
Images: 389
Joined: Mon May 17, 2010 5:55 pm
Location: Pearland Tx
Top

Postby Miriam C. » Wed Oct 20, 2010 6:50 pm

:applause: :thumbsup: :thumbsup: :thumbsup: :thumbsup: Wow guys, I love the Red Oak banding! It really makes the cabinets... Your Teardrop is just Image
“Forgiveness means giving up all hope for a better past.â€
User avatar
Miriam C.
our Aunti M
 
Posts: 19675
Images: 148
Joined: Wed Feb 15, 2006 3:14 pm
Location: Southwest MO
Top

PreviousNext

Return to Build Journals

Who is online

Users browsing this forum: No registered users and 17 guests