Grizz-Pod Teardrop Trailer - New tow truck - 66 Chevy

...ask your questions in the appropriate forums BUT document your build here...preferably in a single thread...dates for updates, are appreciated....

Postby grizz » Sat Nov 14, 2009 12:40 pm

Thanks Mark, Dave and Sharon, great to have your approval.

I really have to hold myself back on this build as I usually become a bit mad with projects, and do stuff to the exclusion of Nicola and everything else in my life.

Progress is a lot slower than I would like, but then, maybe I am learning patience here too.
Greetings from England.

Rian.


Hoping to get it all done in time.
User avatar
grizz
1000 Club
1000 Club
 
Posts: 1210
Images: 29
Joined: Mon Sep 21, 2009 2:37 pm
Location: Rochester, Kent, UK

Postby grizz » Sat Nov 14, 2009 12:40 pm

Kinda short update tonight, been busy, but not a lot of progress, and want to spend the evening with Nicola, perfect thing to do on such a windy, wet miserable day.

I actually decided not to even paint the spare wheel carrier when I was done, rather to rake and sweep the backyard, a losing battle this time of year, and witht he wind not helping either.

Rum and Pepsi Max in a bit......

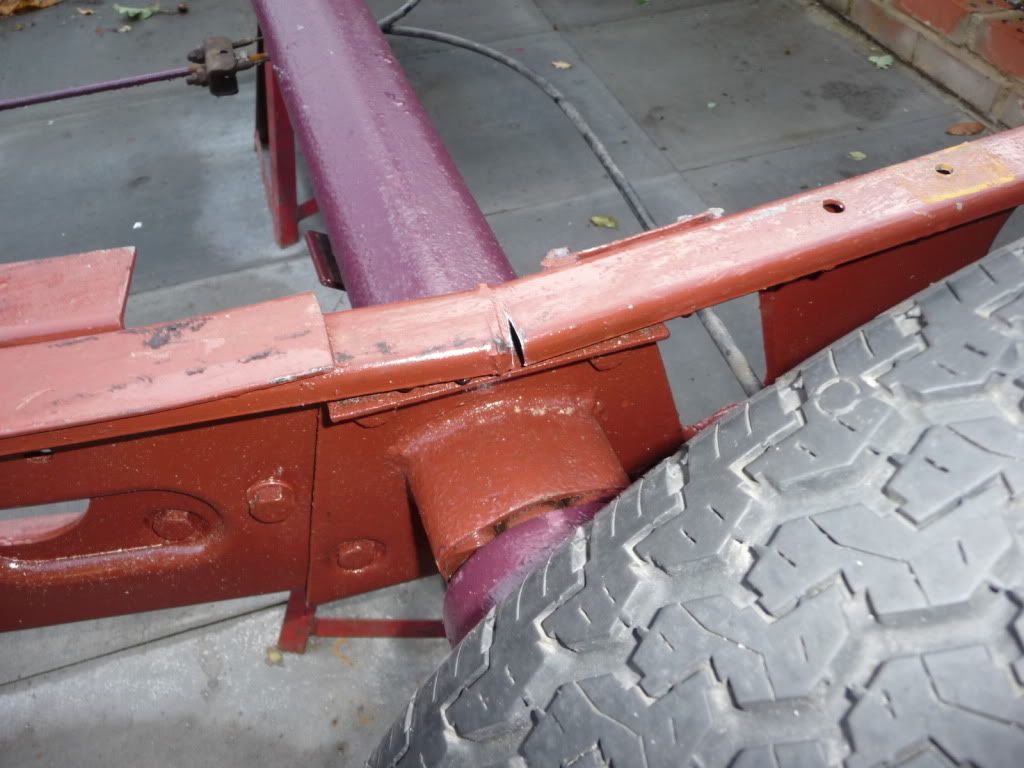
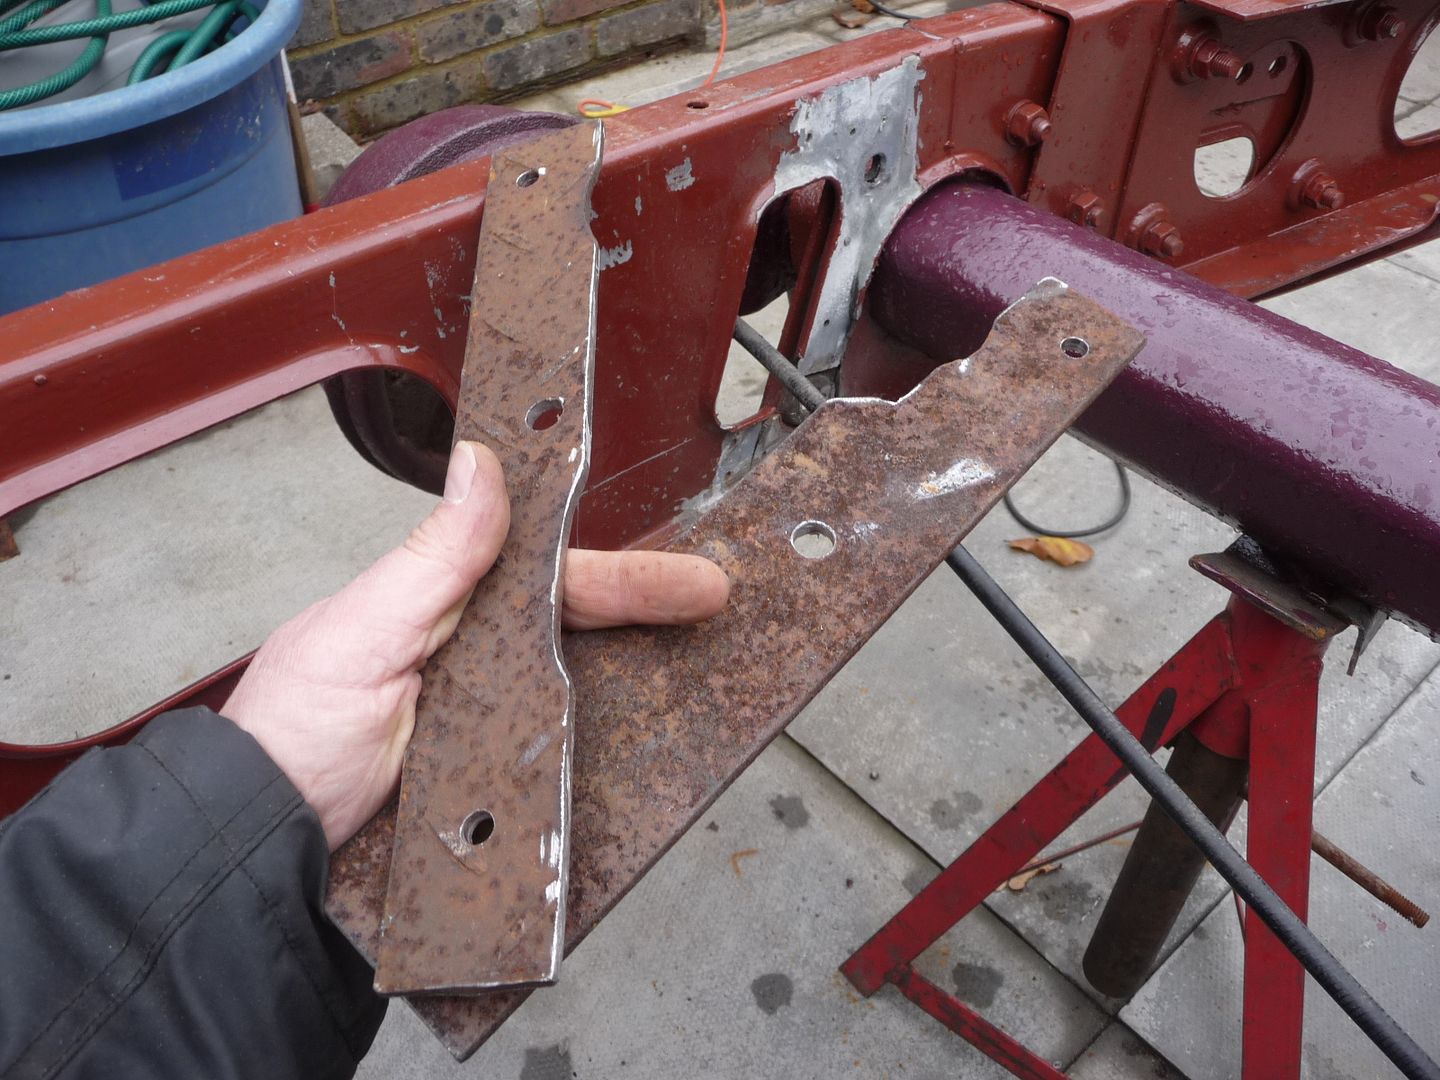
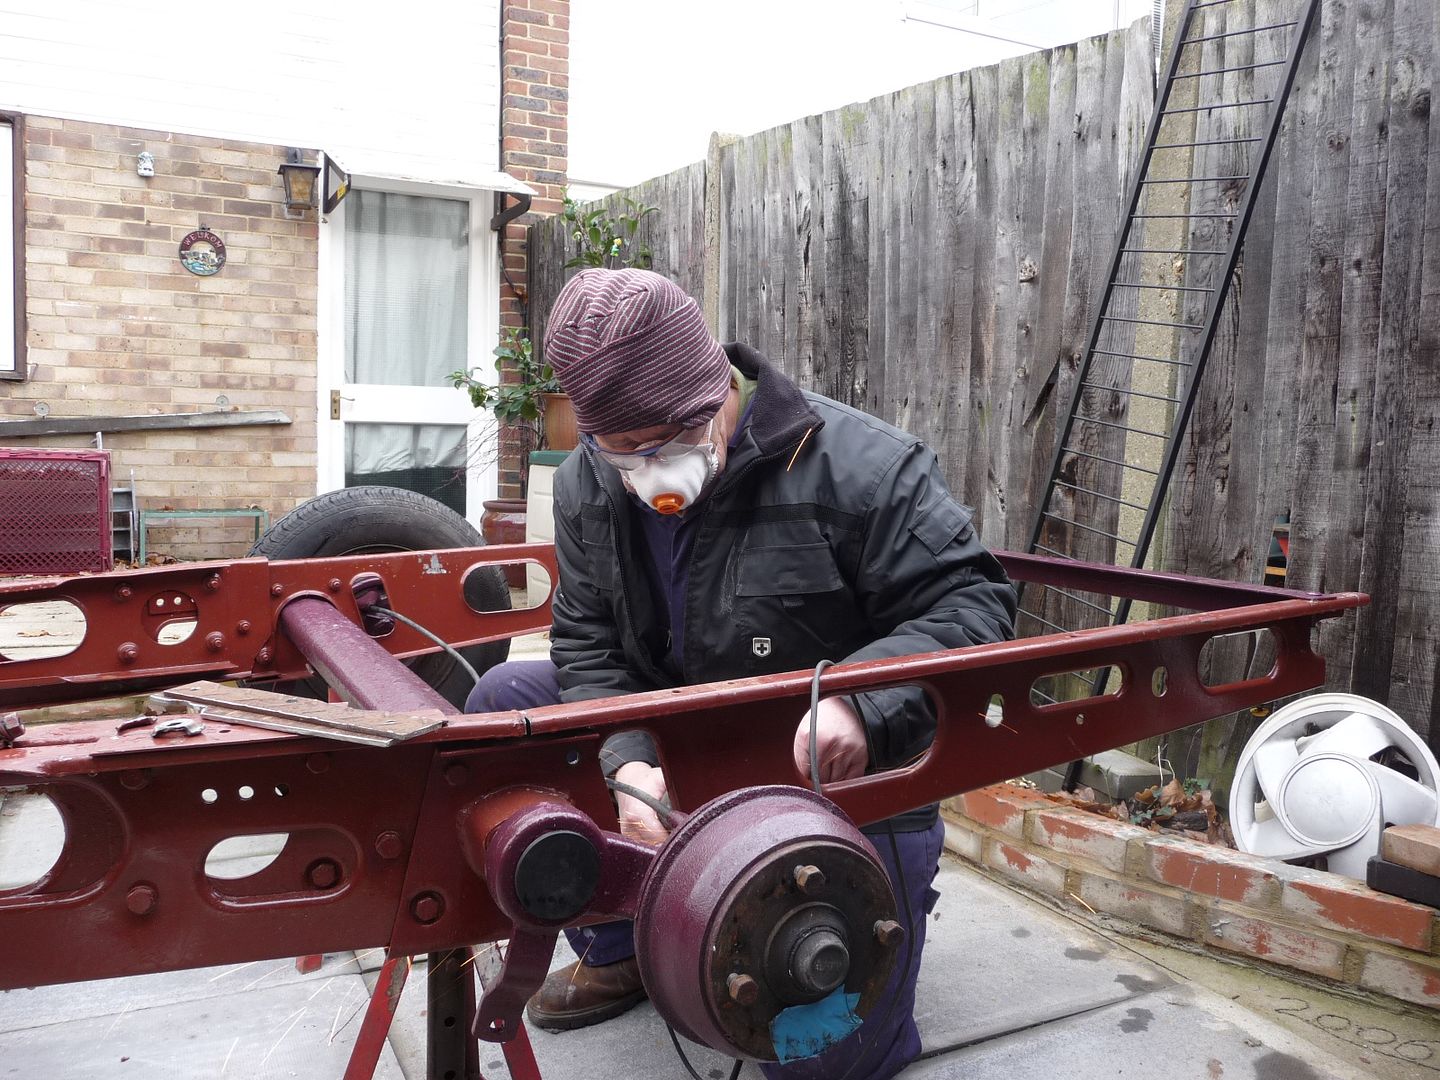
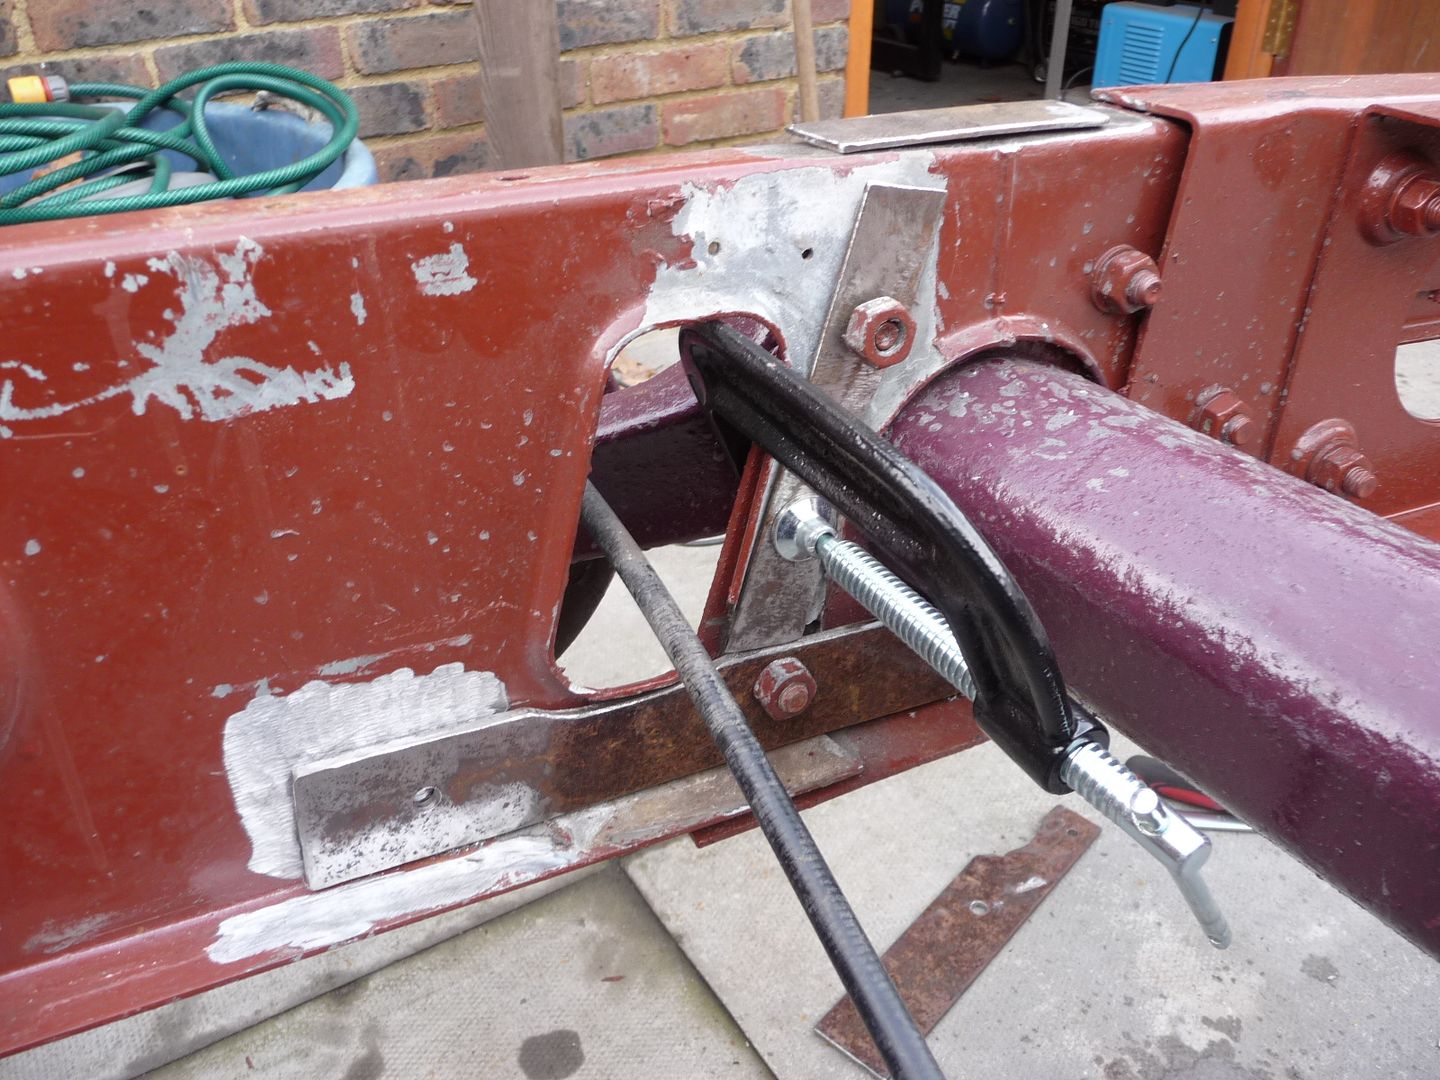
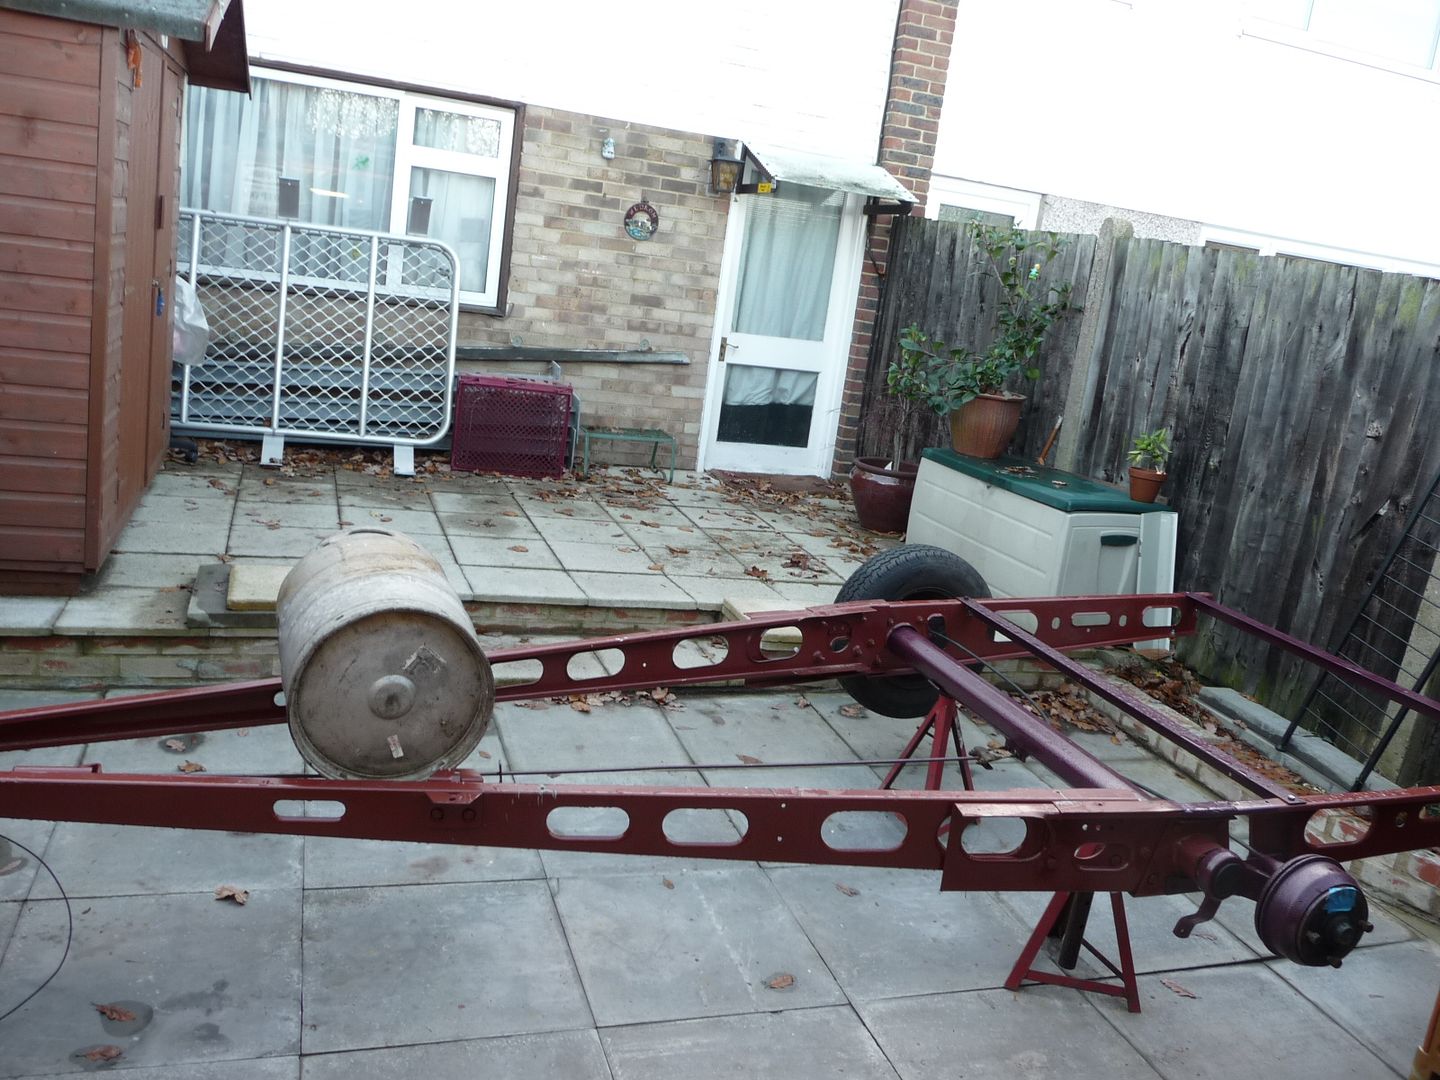
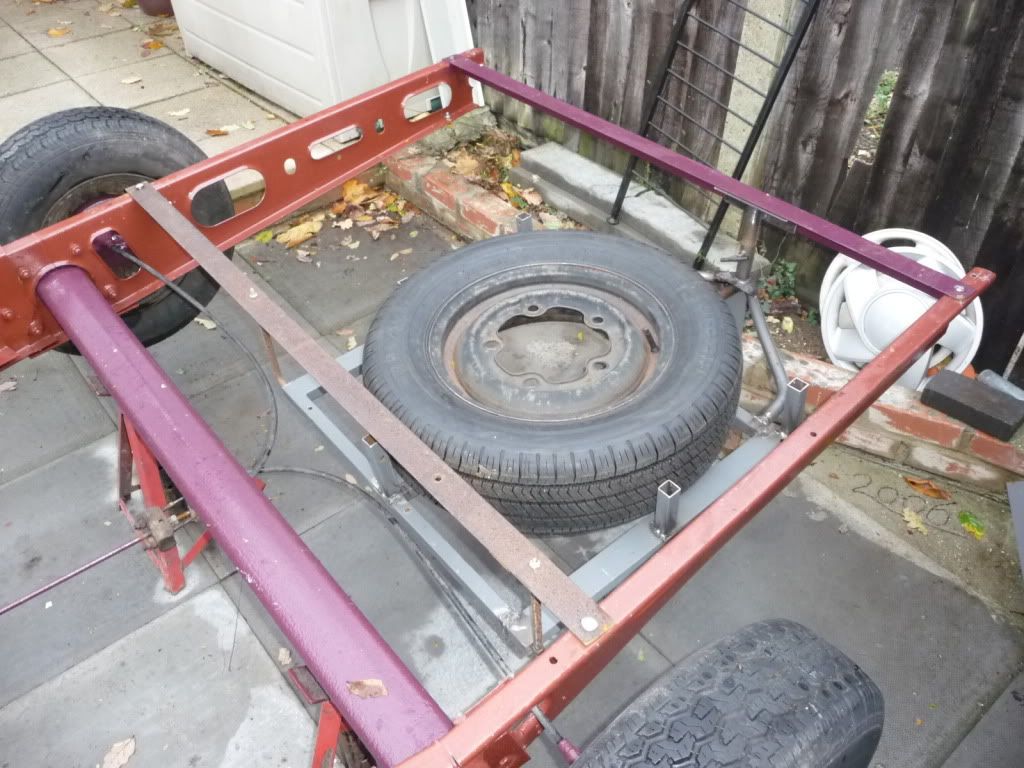
I continued with the welding up of the bits to make an underslung spare wheel carrier, which I must say, I am quite pleased with.

Image


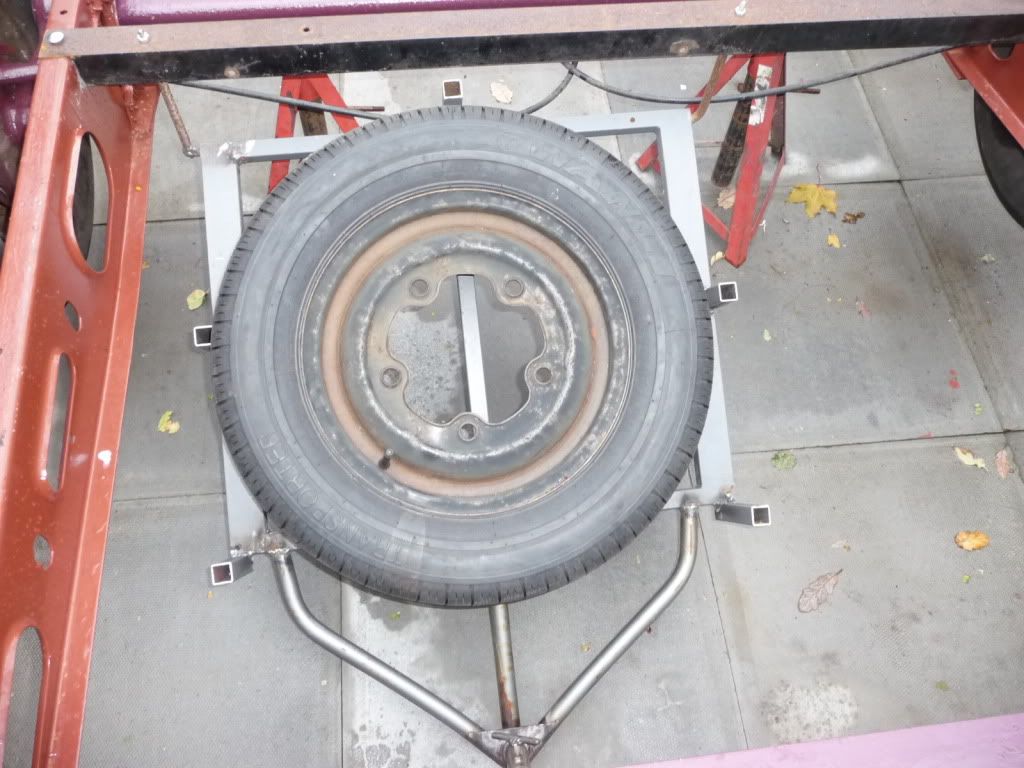
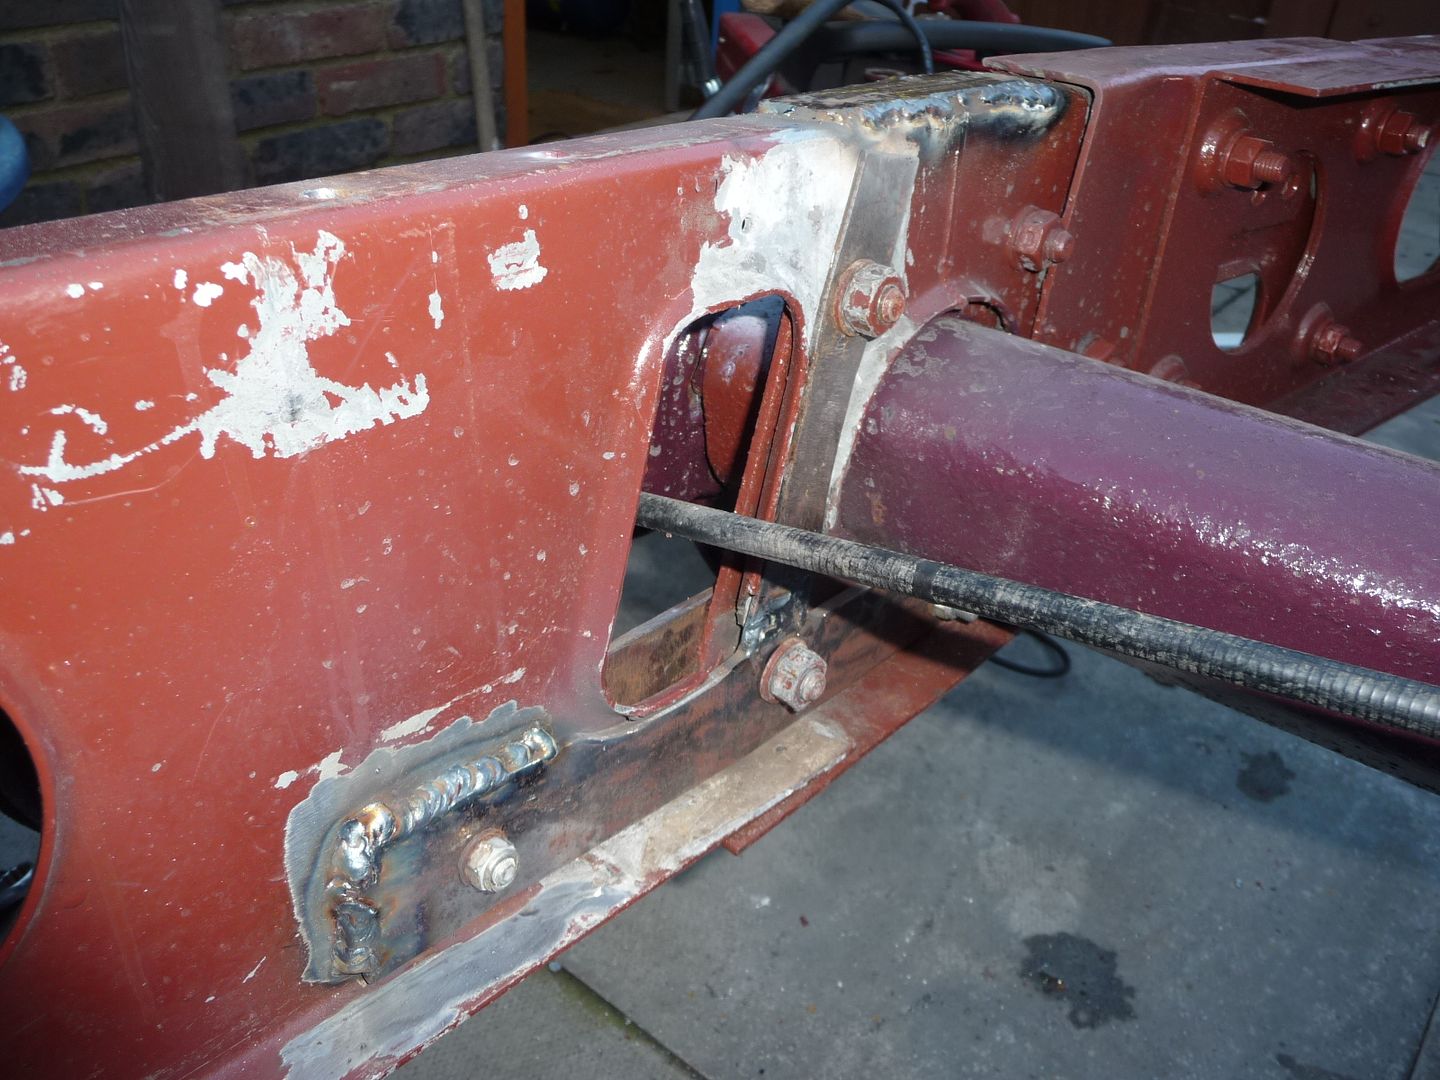
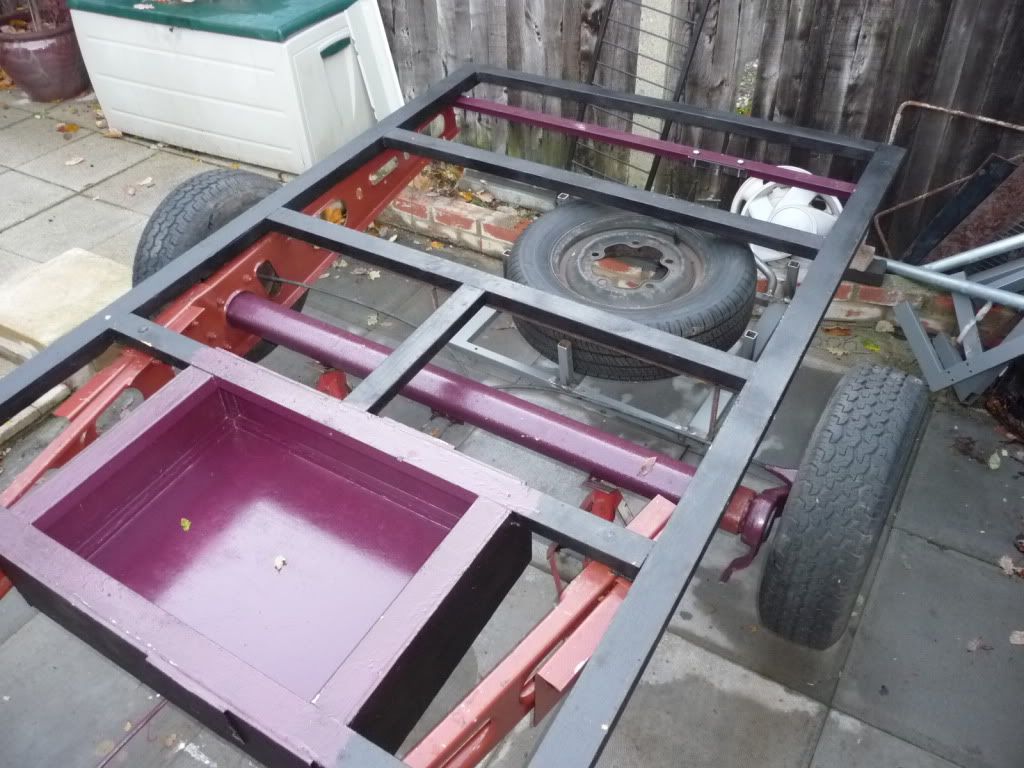
Different angle , just to get perspective.

Image

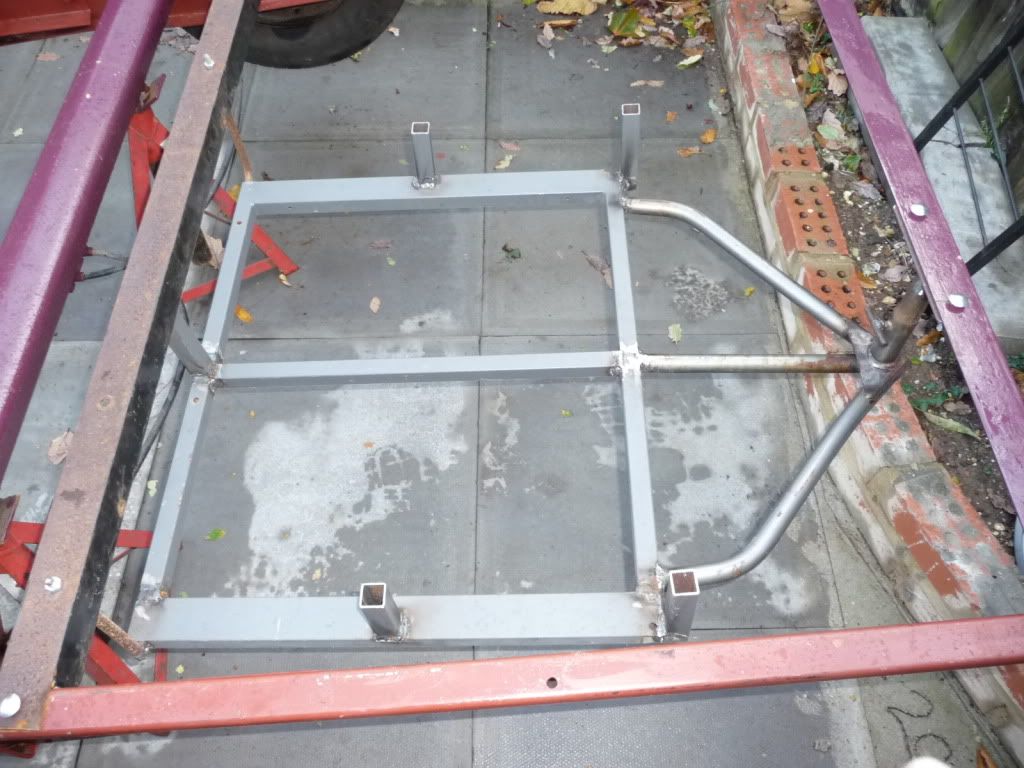
Just the frame, mocked up.

Image

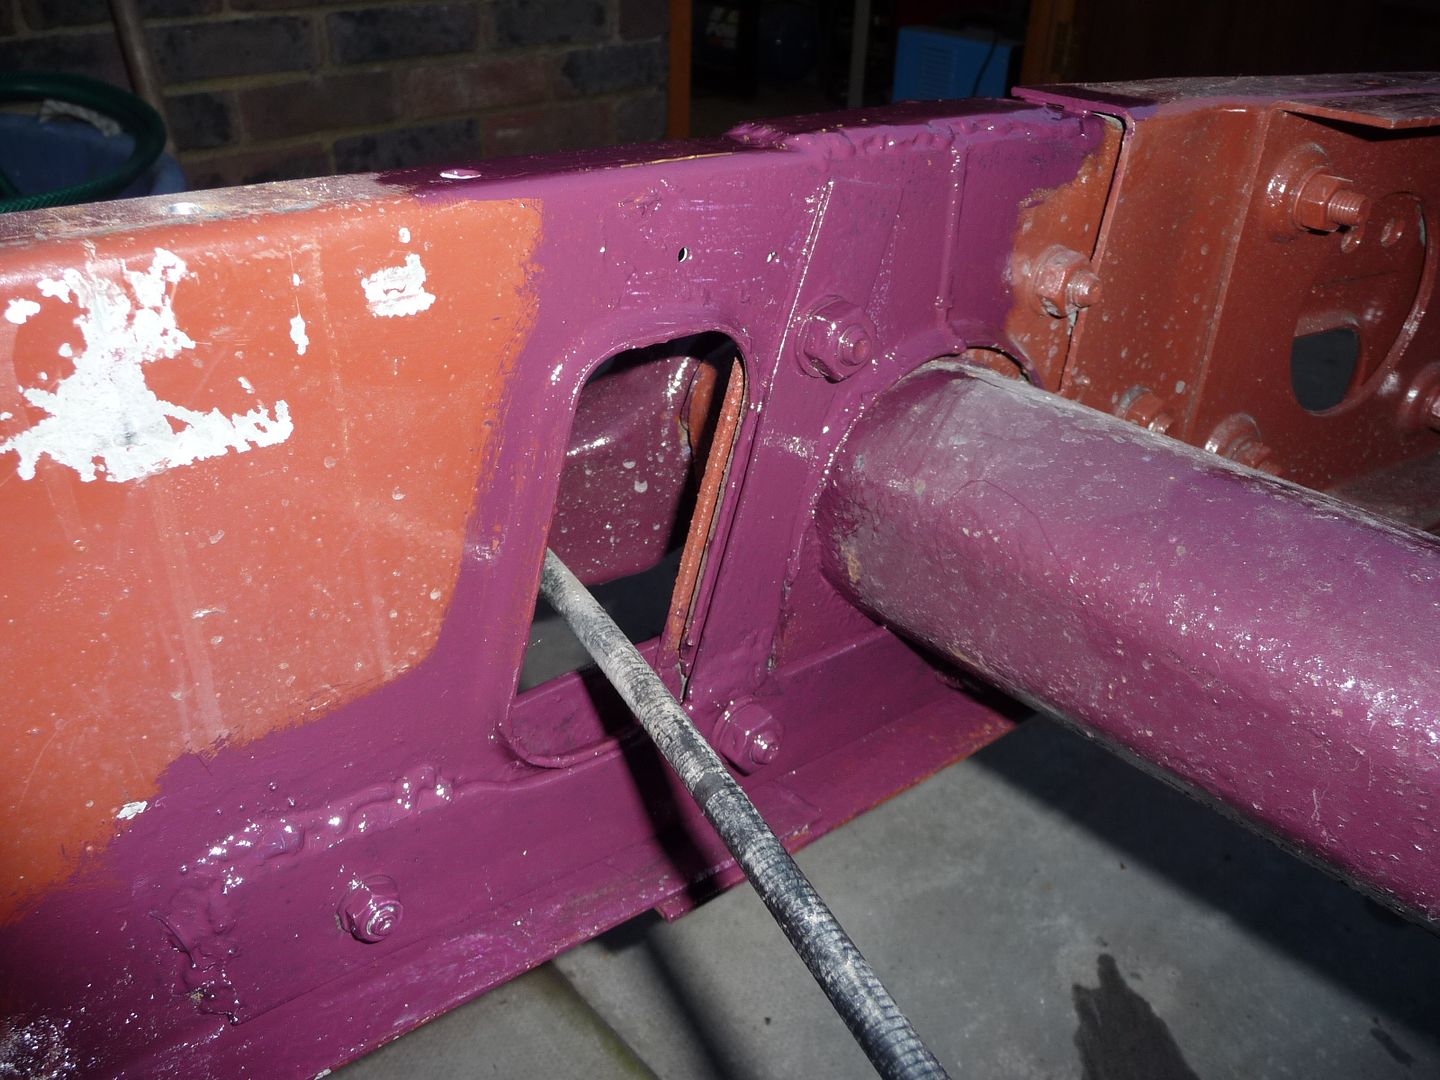
And lastly, with the floor frame in place, perfect, 15mm space between the wheel and frame.

Image

After trial fitting the spare wheel carrier I made up, I put the chassis on, now the other night when the youngsters were here, we took it off the axle stands, onto the ground and wheels for about an hour, then back up again.
Just now when I wanted to fit it all together, nothing fitted.... all skew.

I think the cutting and bolting has changed the energies exerted, but everything is out of kilter, so I suspect traction may be the only answer when I come to mounting the floor.

Anyway, this will get sorted too.
Greetings from England.

Rian.


Hoping to get it all done in time.
User avatar
grizz
1000 Club
1000 Club
 
Posts: 1210
Images: 29
Joined: Mon Sep 21, 2009 2:37 pm
Location: Rochester, Kent, UK

Postby grizz » Sun Nov 15, 2009 9:51 am

Found the flaw.... !!


I knew there was a repair to the chassis when I got it and started to cut and shorten it.

However, with the sheer force I used to re-triangulate it all, and of course the inherant weakness where the previouse repar had been made, It let go and the intact rearward arm thus pulled the weakened one untill it tore right next to an original construction weld.

Now repair or discard did go through my head, as I can get a 13 footer complete as caravan for £50 at the moment, but hey !!!! There is no fun in replacing, so I will cut the opposite end next to its weld to allow for some stress relief and then use a ratchet system to pull it all into allignment again, After which I will add in some flat bar under the chassis and bolt the lot together both sides. This should work like a gusset, and strengthen the whole lot.

Below is a piccie I edited form yesterdays post, to show the tear in the chassis, right at the bottom of the pic.

Hope you can see it, as I did not know how to make a circle in the edit programme on the pic as a whole.


Next weekend I will do this. Today I spent a lot of time clearing 5 years woth out of my loft and boarding the 2nd half of it up, and adding some old carpet to it as well. So a productive day none the less, in preparation for selling up next year and buying a new house for Nicola and her kids and myself.


Image


:x :x
Greetings from England.

Rian.


Hoping to get it all done in time.
User avatar
grizz
1000 Club
1000 Club
 
Posts: 1210
Images: 29
Joined: Mon Sep 21, 2009 2:37 pm
Location: Rochester, Kent, UK
Top

Postby grizz » Sun Nov 22, 2009 7:20 am

Not done much at all the last few days, today the rain seemed to have stopped.... I then ground out the rivets that held the terrible repair to the old fracture at the bottom of the chassis, and took the silicone off.
The idiot who had done the repair should be shot.
I will be welding the cracks, welding a brace over each, overlapping by 50mm at least and also possibly bolting the lot together.

Then it started to really rain, bucketing down !!

Now indoors, about to watch a movie with Nicola, something she enjoys too.

Maybe I will get some trailer time in next weekend, as we have taken Friday and Monday off as leave, with Sunday , Monday in London, doing touristy stuff and the Science Museum and Natural History Museum, with Sunday night in a very nice hotel.
Greetings from England.

Rian.


Hoping to get it all done in time.
User avatar
grizz
1000 Club
1000 Club
 
Posts: 1210
Images: 29
Joined: Mon Sep 21, 2009 2:37 pm
Location: Rochester, Kent, UK
Top

Postby KevinP » Mon Nov 23, 2009 3:24 pm

Hang in there man. Hopefully the weather will go our way.
:)

Build looks great. Like how you are using stuff discarded by other folks and using it to keep the costs down. :thumbsup:
KevinP
Teardrop Inspector
 
Posts: 18
Joined: Tue Nov 17, 2009 12:07 pm
Location: Nashville, TN
Top

Postby jkidd6339 » Tue Nov 24, 2009 12:48 am

Keep up the good work it is SNOWING here!
User avatar
jkidd6339
Teardrop Master
 
Posts: 198
Images: 1
Joined: Sat Jan 24, 2009 1:16 am
Top

Postby 2bits » Tue Nov 24, 2009 2:17 am

Looks like you can take care of that stuff no problem, just wait for the sun and it will all be good! :worship:
Thomas

Image
User avatar
2bits
2bit Member
 
Posts: 5131
Images: 8
Joined: Thu Dec 27, 2007 6:04 pm
Location: Lake Tawakoni, TX
Top

Postby grizz » Fri Nov 27, 2009 12:35 pm

RIGHT !!!!!

Had a day leave today.

Was up most of the night... coz I am like that.

Had John "GTVSaviour" from Belgium get here at 2am, after he had fetched a Mercedes 5cyl 300D diesel in Essex. By 3am he was asleep, and I was surfing the net, went to bed at 3.45-ish, then up at 04.55am to get him up and away to catch the Channel Tunnel train back to mainland Europe , to deliver the car to Oldbus Dave in Germany , for the engine to go into the Race car transporter Dave's building him.
After that I could not get to sleep, so sat and did company work and month end admin.....

At 7.30am I showered and went to Nicola's place to crawl in behind her back as she was off on leave as well, and her 14 year old son had the day off school.
By 09.15 the guy from the Environmental company who needed a sample of my insulation and ceiling for asbestos analysis called to say he would be here in an hour. So I trekked back here again.

His job took less than 5 minutes.... then I was faced with a dilema: Back to Nicola's and watch telly all day and fiddle with the Ford Anglia, and back here to my place tonight...... OR : Get into the garage, as the rain had cleared, but is was still bloody cold ??

I selected welder, grinder, balaclava and extra thermal protection.

So spent a few hours working out what to do, grinding, welding and comming to the conclusion that I will need to re-seat the floor frame of the caravan , as nothing is now in the same position as when I built it.

Started off with just staring at it all.

Then cut strips off the off-cuts from the welding table I made earlier this year, and ground them into shape to go around the axle, and drilled some holes in plates and chassis .

Image


Next job, grinding the galvanising back, as it is a pig to weld, and quite toxic. (hope I did not get too much of it in) Note the clothing. 2 T-shirts, one Millitary issue Norgy, overall, and a windbreaker topped off with a Balaclava..... NICE !

Image

Bottom section of steel to be a sandwich outside and inside. Also decided to attach a strap upward to stabilise it even more, and to only weld one end , rather than the lot, in case one ever needs to dismantle the whole thing.

Image

Welded the top crack up twice, ground it down, then added a section of strapping over the weld, and welded that down too.... I challenge the weld to break, which does not mean it won't break next to the weld.

Bottom welded, bolted and outside bolted in too.... here's to it all holding out.

The whole structure is now not alligned to the original timber frame I made up, but at least with timber, I can redrill and fix the lot once it is all it's wheels and on the floor.

Image


Lastly, Hammerite, not neat, not tidy, but at least functional.

I suspect I may do tho whole chassis in a single colour once the build is complete.

Tomorrow I think I may be able to sneak out a bit for some varnishing of the sides, and Sunday, Monday of course will be doing London like Tourists.

Image


Have a great weekend !!
Greetings from England.

Rian.


Hoping to get it all done in time.
User avatar
grizz
1000 Club
1000 Club
 
Posts: 1210
Images: 29
Joined: Mon Sep 21, 2009 2:37 pm
Location: Rochester, Kent, UK
Top

Postby grizz » Sat Nov 28, 2009 11:02 am

Still cold out, but the rain seems to have held off a bit today. Dressed up in about 4 layers and went garage-wards.

So I got on with painting the 1st coat of thinned down varnish on the outside of the profile.

While I was busy I also painted the second coat on yesterdays welding etc.

Image


I have been toying with the idea of mounting an old stainless or alloy beer keg on the front of the A-Frame, with a filler welded onto the top, and a side tap for filling cups and jugs , as well as emptying it when traveling. I would think that a small elbow welded into the bottom with a waterpipe running to the rear, and then feeding the powered tap in the galley may work.

Opinions ??

Image
Greetings from England.

Rian.


Hoping to get it all done in time.
User avatar
grizz
1000 Club
1000 Club
 
Posts: 1210
Images: 29
Joined: Mon Sep 21, 2009 2:37 pm
Location: Rochester, Kent, UK
Top

Postby bve » Sat Nov 28, 2009 1:08 pm

I like the idea of the keg, although I'd be a bit concerned about shifting weight on the tongue if it is not completely full or empty when travelling.

Could make a cool tongue box too, albeit it would be a lot more work to convert it to open for a 'box'.
Burke

KISS > COMPLEX
Image
Image

Build threads converted to PDFs.
As of 2008-08-08 I have added more build threads to the pdf collection
User avatar
bve
500 Club
 
Posts: 694
Images: 98
Joined: Sat Aug 25, 2007 1:44 am
Location: Edmonton, Alberta, Canada
Top

Postby grizz » Mon Nov 30, 2009 1:11 pm

I got a nice PM and photo update tonight when I got in from our trip to London.

My engineer sent me progress pics of the adaptors he is making for the trailer, to go from 4 x whatever, to 5 x 205 for the Radar wheels I am fitting.
The job is not complete as he needs to drill and countersink etc and cut the threads , and then get them to Kent from Wales .

Starting like this on the bandsaw.

Image

After some time on the lathe, this was the result. Next up holes, threads and postage.

Image
Greetings from England.

Rian.


Hoping to get it all done in time.
User avatar
grizz
1000 Club
1000 Club
 
Posts: 1210
Images: 29
Joined: Mon Sep 21, 2009 2:37 pm
Location: Rochester, Kent, UK
Top

Postby grizz » Wed Dec 02, 2009 2:01 pm

Latest PM:

Should be in the post this week.

Image

Look forward to seeing them on and the wheels bolted up, as well as the mudguards positioned.
May even add one of the sides to get perspective.
Greetings from England.

Rian.


Hoping to get it all done in time.
User avatar
grizz
1000 Club
1000 Club
 
Posts: 1210
Images: 29
Joined: Mon Sep 21, 2009 2:37 pm
Location: Rochester, Kent, UK
Top

Postby jackdaw » Wed Dec 02, 2009 7:16 pm

Wow , They look great Grizz.
I had no Idea they would need to be so thick, but I guess they need to be solid :thumbsup:

Looking forward to seeing them fitted.

Dave
User avatar
jackdaw
500 Club
 
Posts: 598
Images: 124
Joined: Fri Feb 22, 2008 2:31 pm
Location: Wltshire, UK
Top

Postby grizz » Fri Dec 04, 2009 11:51 am

Fetched the little generator for the trailer today from where it had been brought to in Seven Oaks.

Seems the thing has not even had fuel in it, so brand spanking new.

Thanks to all who had a hand in getting the generator here from Manchester.

Next job will be to start it, stick my tongue to some of the leads to see if it does generate some current, and then to make a space for it to be stored, wish I could hang it below the chassis, but I suspect it will be too tall, so it may end up in the "tongue box" alongside the gas bottle. (OK, maybe not)

With full set of destructions too.

Image
Greetings from England.

Rian.


Hoping to get it all done in time.
User avatar
grizz
1000 Club
1000 Club
 
Posts: 1210
Images: 29
Joined: Mon Sep 21, 2009 2:37 pm
Location: Rochester, Kent, UK
Top

Postby grizz » Sun Dec 06, 2009 4:41 pm

Guess this will make sense in a moment.

Just got two more pics from my engineer......

They were out of sequence, so I will now post the lot once off in sequence.

He will post the adaptors some time this week..... Postage £18 and total cost including post, for these adaptors comes in at £58.

I am not sure this is a real reflection of what they would cost in the open market, as my bus wheel adaptors were £300 for the set of 4.
And adaptors elsewhere on the VW scene are more costly too. So I count myself lucky.

Cutting the "Billet"
Image

Machined to size.
Image

Milling machine at work.
Image

Threads being cut on tapping machine.
Image

Beautifull................... Done.
Image :)
Greetings from England.

Rian.


Hoping to get it all done in time.
User avatar
grizz
1000 Club
1000 Club
 
Posts: 1210
Images: 29
Joined: Mon Sep 21, 2009 2:37 pm
Location: Rochester, Kent, UK
Top

PreviousNext

Return to Build Journals

Who is online

Users browsing this forum: No registered users and 18 guests