The Schnoodle Shack - Final Update - Goodbye My Friend

...ask your questions in the appropriate forums BUT document your build here...preferably in a single thread...dates for updates, are appreciated....

Postby S. Heisley » Thu Aug 11, 2011 8:36 am

:thinking: When/if the dog isn't along, the carabineer would be a good place to hang your keys.

It's looking good, Jim. You've got some attractive cabinets going there, too. :applause:
User avatar
S. Heisley
Super Lifetime Member
 
Posts: 8774
Images: 495
Joined: Mon Sep 17, 2007 10:02 am
Location: No. California

Postby David S » Thu Aug 11, 2011 10:03 am

Jim ,if you have a router or laminate trimer a flush cut bit is the smoothest way to trim aluminum.Just drill a hole larger than the bearing on the bit and let the bit follow the opening.You will also find that when you put the skin on the roof no matter how good a job you did building you may have some overhanging the edge on one side or the other,the router works great here too.Just watch out for the small chunks of aluminum. And Remember "The most important saftey measure are these,,Saftey Glasses"....Norm Abram,New Yankee Work Shop. 8)
User avatar
David S
Donating Member
 
Posts: 218
Images: 53
Joined: Wed Aug 05, 2009 9:18 pm
Location: Rose Hill Kansas

Postby aggie79 » Thu Aug 11, 2011 2:05 pm

Jim,

Another milestone! The roof looks great. I like the idea of the asphalt paint as a sealer.

Like David said, a router is your best friend for cutting aluminum out of the hatch. I used a solid carbide spiral bit, but any carbide template or pattern bit will work. It will throw out a ton of little aluminum slivers. One tip I saw somewhere was to mask off the bottom of the vent opening (if it already cut out) to keep from spraying aluminum inside of your teardrop.

Image

Image

Take care,
Tom
Tom (& Linda)
For build info on our former Silver Beatle teardrop:
Build Thread

93503
User avatar
aggie79
Super Duper Lifetime Member
 
Posts: 5405
Images: 686
Joined: Tue Aug 07, 2007 5:42 pm
Location: Watauga, Texas
Top

Postby David S » Thu Aug 11, 2011 3:22 pm

Good suggestion on masking of the inside Tom ,I'm still cleaning up the little pc's of aluminum.
User avatar
David S
Donating Member
 
Posts: 218
Images: 53
Joined: Wed Aug 05, 2009 9:18 pm
Location: Rose Hill Kansas
Top

OH-NO MOMENT

Postby Jim Edgerly » Thu Aug 18, 2011 6:19 am

I was feeling really good today. I made most of the trim work and attached it to The Shack, minus the glue. I will take it back off, sand it, stain it, then put it back on attached with deck screws and liquid nails. It seems that for every step forward some backward movement is being made. I took the first two pictures below then went in and had some lunch. I came back out a half hour later to find my OH-NO moment. The constant strain of the bent plywood exerted enough strain on the liquid nails joint to break it apart. I had taken the screws out a couple weeks ago because I will be screwing an aluminum bar overtop of that joint and I did not want the top screws to "find" a screw underneath it that would prevent the top screw from going through the aluminum. I had assumed that the liquid nails joint would hold the wood securely...bad assumption on my part. I'm glad that this happened before I started putting the aluminum on the roof. I will also go back in under the trim work and replace any screws I took out that I thought might interfere with the trim work. I'm really nervous about relying on just the liquid nails without the screws now. I thought I had put on plenty of liquid nails at the joint that failed!

I have fixed the problem by putting all the screws back in roof. I will take my aluminum bar and drill holes every 3 inches. Then I will place the bar just above the screws in the roof and mark where the top screws will fall. I will move any of the bottom screws as necessary to ensure that none of the top screws will hit the bottom screws. I also plan on replacing all the 1 5/8 inch bottom screws with 2 1/2 inch screws since I cannot get any liquid nails under the roof before screwing it back down.

Question for everybody: Have you had any liquid nails joints fail on you like this? I was really shocked to see this! I have never used liquid nails before this project and just assumed that liquid nails would hold as strong as "glue"...which they advertise that if a joint fails it will not be where the two pieces of wood are glued together. Ever hear of this happening...or see it yourself???

Image

Image

Image

Image
*When doing anything, if there exists no possibility of failure, then any feeling of success is diminished.
**The glass is neither half full nor half empty...it is simply twice as big as it needs to be.
***If at first you don't succeed, redefine success.
****When I die, I want to die like my grandfather, who died peacefully in his sleep. Not screaming like all the passengers in his car.
User avatar
Jim Edgerly
The 300 Club
 
Posts: 312
Images: 142
Joined: Thu Sep 30, 2010 7:23 am
Location: Leominster, MA
Top

Postby jss06 » Thu Aug 18, 2011 6:30 am

Judging from the picture it does not look like there was good surface adhesion to begin with. It does not look like the glue adhered to the roof piece very well.

My luck with liquid nails has been hit or miss with my household projects.

I will tell you the the joints I have made with both tite-bond III and gorilla glue are strong. It takes a hammer to knock them apart and then you are destroying the wood before the bond breaks. They both work much better than liquid nails in my opinion.
User avatar
jss06
Palladium Donating Member
 
Posts: 663
Joined: Mon May 12, 2008 7:48 pm
Location: Carrollton, TX
Top

Postby aggie79 » Thu Aug 18, 2011 5:10 pm

Jim,

Sorry to hear about the minor setback, but I guess if it was going to happen, better now than later.

I can't say anything about Liquid Nails as I used PL Premium. I have heard that for both, if you happen to get a tube that has set for a long time in the store, that adhesion will sometimes fail.

Other than some time setback and frustration, I'd just repair it and move along and not worry about it.

Take care,
Tom
Tom (& Linda)
For build info on our former Silver Beatle teardrop:
Build Thread

93503
User avatar
aggie79
Super Duper Lifetime Member
 
Posts: 5405
Images: 686
Joined: Tue Aug 07, 2007 5:42 pm
Location: Watauga, Texas
Top

Postby campmaster-k » Thu Aug 18, 2011 7:05 pm

Liquid Nails is a low grade inexpensive construction adhesive. Builders use it to keep floors from squeaking and other non structural situations that require a heavy bodied gap filling glue. PL Premium and other polyurethane type adhesives are better quality and cost more. There are MANY types of poly-u type adhesives some stay soft and some get very rigid. Glues like Tite bond and Weldbond have different resin systems however they are similar in the fact that they are thinner than the tube adhesives and can penetrate the wood more deeply, but they don't bridge gaps very well. Gorilla glue is a thin poly-u glue. There are many brands of that type of glue. PL makes one. It is kind of the best of both worlds, its thin so it penetrates, it waterproof and super strong, but its a huge mess and foams out of joints. And it does fill gaps because it foams and expands. There in no perfect glue, but I would recommend staying away from cheap thick construction adhesive to bind wood exposed to major heat variances.

If cost is the deciding factor and one must use a inexpensive tube adhesive you can prime the area to be glued with some thinner glue first and let it dry. Then the thicker glue will have a more substantial footing.

As was mentioned earlier poly-u glues both liquid and thick tube adhesives have a short shelf life so only buy what you need and use it up quickly.

By the way your tear is awesome and I really like the running boards.
-Kirk

>TnTTT ORIGINAL 200A LANTERN CLUB

>CEO Coleman Recovery Inc.

>Nor Cal Camping Pinewood Racing Team


Build thread -

viewtopic.php?t=45307&postdays=0&postorder=asc&start=180

Check out my Pictures -

http://s1199.photobucket.com/albums/aa4 ... 0QQtppZZ24
User avatar
campmaster-k
Lifetime member
 
Posts: 3030
Images: 17
Joined: Fri Jun 17, 2011 5:02 pm
Location: Colusa, California
Top

staining done

Postby Jim Edgerly » Fri Aug 26, 2011 4:53 pm

I took a few days vacation (from retirement) to take the wife up to the Maine coast for some rest and relaxation...what a beautiful area of the country to live in! I figured after a 2 month delay for cardiac issues that another 3 says won't matter much.

I repaired the roof by regluing it down. A little tricky to get an adequate amount of adhesive in, but I managed. I took a thin board, similar to a long yard stick...covered it both sides with lots of adhesive, then slid it into place and had my wife pull it back out while I pushed the roof in...then did the same thing on the other side. I'm assuming it got into place OK since the board had no adhesive on it once removed. The screws will remain in place permanently this time.

I stained the plywood, the trim, and glued all the trim into place today. It is starting to really look like something. Each little step gets me a little closer and I can almost taste the finished product at this point. I just pray that the impending hurricane does not deposit a tree on my garage this weekend.

Image
*When doing anything, if there exists no possibility of failure, then any feeling of success is diminished.
**The glass is neither half full nor half empty...it is simply twice as big as it needs to be.
***If at first you don't succeed, redefine success.
****When I die, I want to die like my grandfather, who died peacefully in his sleep. Not screaming like all the passengers in his car.
User avatar
Jim Edgerly
The 300 Club
 
Posts: 312
Images: 142
Joined: Thu Sep 30, 2010 7:23 am
Location: Leominster, MA
Top

Aluminim roof/started the epoxy

Postby Jim Edgerly » Thu Sep 22, 2011 1:30 pm

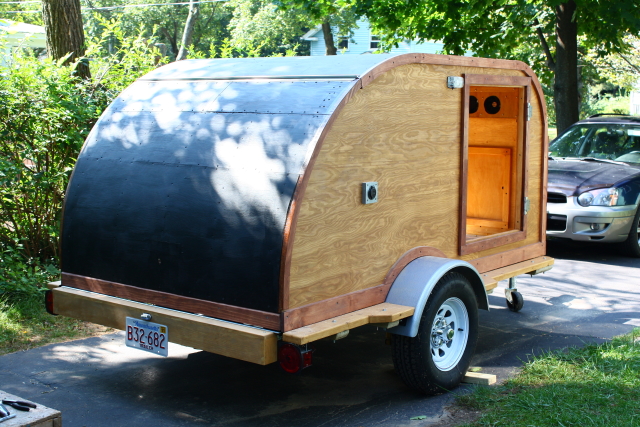
It's been a while since I have posted, but it does not mean I have been sitting idly by. I have finally installed the aluminum roof on The Shack. Used butyl tape along the seams and where the roof meets the front/back/sides. I plan on running a bead of caulking along all seams and edges. Somewhere in here somebody gave a tip about using butyl tape, and that was to use it cool/cold, not hot. I tried to unroll the tape in 75 degree weather and the tape just stuck to the paper something awful. I remembered the tip so I took the roll of tape and stuck it in the freezer for about 10 minutes and what a difference. It just unrolled as easy as could be. I stuck the remaining 3 rolls in the fridge and just used a cold roll every time I needed it.

I also have applied the first two coats of Raka epoxy resin to The Shack. Boy, that stuff stiffens up really fast...even in very moderate temperatures. The temps yesterday and today were only around 70 degrees, and I could notice the epoxy getting thicker within about 10 minutes, and too thick to use after about 20-25 minutes. I of course used gloves, but that did not keep me from getting some on my skin...and boy does it become sticky! Got some on my arm when I brushed up against fresh epoxy, and one I did to myself. My eye itched, and without thinking I stuck my pinky up under my glasses and rubbed the outside corner of my eye. Didn't notice I had a little epoxy on the glove until about 5-10 minutes later my eye started sticking when I would blink. It was driving me crazy about 5 minutes later...taking longer and longer to open my eye after blinking, so when the current batch of epoxy was gone I went in and got it off with soap and a face cloth...and lots of rubbing. I was not going to use the lacquer thinner anywhere near my eye so it was just a little soap and LOTS of rubbing. The lacquer thinner took it off my arm pretty easy.

The Shack is really starting to look like something now (see pre/post aluminum pics). The gloss epoxy really brings out the color and grain of the wood...notice the difference in color of the two pictures, and back up one post for an almost identical angle of the same picture . The hatch is propped open slightly while the epoxy dries, and the doors are in the basement for finishing. I wanted to make sure I had a good seal under the hinges, and there is no room in my garage to finish them up there. Those familiar with my build remember I started out in my basement with very little room. The garage is the same way...very little clearance on the sides, and the hitch comes right up to the garage door. I have to pull it out a little and cover the front hitch/battery box with a tarp to get at the rear.

I've got 2 coats of non-blushing Raka on so far...any advice as to how many coats to use? I am asking this question elsewhere as well. I will finish it up with 3-5 coats of gloss spar varnish after I'm done with the epoxy.

Speaking of the battery box, I wasted more than an hour with a simple problem hooking up my breakaway battery for the electric brakes. I say simple, but it was baffling at the time. My breakaway battery is in the battery box with my regular battery, hooked together. I put a meter on the breakaway switch and saw that it functioned properly when pulled out, so I spliced the switch into the brake line and hooked the other end up to the battery. I pulled The Shack on the driveway by hand and popped the switch and nothing happened. I took my meter and checked the brake line to ground with the switch "pulled" and there was no voltage. I know the brakes are hooked up right because they worked when I hit the brake controller or brakes in the car. I did lots of rechecking connections and everything looked right, but the brakes still had no power to them with the switch "pulled".

To make a long story short (too late) everything was wired correctly...minus one wire! My "camper" was all wired for the power converter and the 12 volt battery, and everything in the "camper" worked fine. The "trailer" was wired for the power coming from the car. I had no common ground between the 2 systems so that when I tried to take 12 volts from the "camper battery" and apply it to the "trailer brakes" I did not have a complete circuit that allowed the 12 volts to get to the trailer ground. I ran a ground wire from my battery ground to the trailer ground (frame) and the breakaway brakes work as they should, as does everything else. As I say...wasted over an hour figuring that one out.

Well. I guess that's it for now. I'm just really upset that I lost the 2 months to heart problems this summer. I should be coming into the home stretch the end of July instead of the end of September. But looking at the bright side, it will give my wife the whole winter to plan out next summers itinerary with an "almost new" Shack.

Image

Image
*When doing anything, if there exists no possibility of failure, then any feeling of success is diminished.
**The glass is neither half full nor half empty...it is simply twice as big as it needs to be.
***If at first you don't succeed, redefine success.
****When I die, I want to die like my grandfather, who died peacefully in his sleep. Not screaming like all the passengers in his car.
User avatar
Jim Edgerly
The 300 Club
 
Posts: 312
Images: 142
Joined: Thu Sep 30, 2010 7:23 am
Location: Leominster, MA
Top

Postby aggie79 » Thu Sep 22, 2011 2:11 pm

Jim,

It's good to hear from you. I was wondering when we were going to get an update. Sounds like you had a great vacation. My wife and I need to get up to that part of the world some day.

The Shack looks great. You're right about the epoxy bringing out the beauty of the wood grain. Very nice!. The roof aluminum looks fantastic with the woody sides.

Take care,
Tom
Tom (& Linda)
For build info on our former Silver Beatle teardrop:
Build Thread

93503
User avatar
aggie79
Super Duper Lifetime Member
 
Posts: 5405
Images: 686
Joined: Tue Aug 07, 2007 5:42 pm
Location: Watauga, Texas
Top

Postby wired » Thu Sep 22, 2011 2:29 pm

aggie79 wrote:Jim,

Another milestone! The roof looks great. I like the idea of the asphalt paint as a sealer.

Like David said, a router is your best friend for cutting aluminum out of the hatch. I used a solid carbide spiral bit, but any carbide template or pattern bit will work. It will throw out a ton of little aluminum slivers. One tip I saw somewhere was to mask off the bottom of the vent opening (if it already cut out) to keep from spraying aluminum inside of your teardrop.

Image

Image

Take care,
Tom


If you have a local saw or sharpening shop, have them gring a 0 degree or slightly negative hook angle on your router bit. It will have less of a tendency to grab the aluminum, and will also cut smoother, leaving more of a finished edge. Also use some lubricant, like a wax stick. It will keep the aluminum from sticking to the router bit.
User avatar
wired
The 300 Club
 
Posts: 387
Joined: Wed Jul 20, 2011 3:40 pm
Location: Concord, CA
Top

Postby wired » Thu Sep 22, 2011 2:29 pm

aggie79 wrote:Jim,

Another milestone! The roof looks great. I like the idea of the asphalt paint as a sealer.

Like David said, a router is your best friend for cutting aluminum out of the hatch. I used a solid carbide spiral bit, but any carbide template or pattern bit will work. It will throw out a ton of little aluminum slivers. One tip I saw somewhere was to mask off the bottom of the vent opening (if it already cut out) to keep from spraying aluminum inside of your teardrop.

Image

Image

Take care,
Tom


If you have a local saw or sharpening shop, have them grind a 0 degree or slightly negative hook angle on your router bit. It will have less of a tendency to grab the aluminum, and will also cut smoother, leaving more of a finished edge. Also use some lubricant, like a wax stick. It will keep the aluminum from sticking to the router bit.
User avatar
wired
The 300 Club
 
Posts: 387
Joined: Wed Jul 20, 2011 3:40 pm
Location: Concord, CA
Top

Re: Aluminim roof/started the epoxy

Postby GuyllFyre » Thu Sep 22, 2011 5:03 pm

Jim Edgerly wrote:I'm just really upset that I lost the 2 months to heart problems this summer.


Don't think of it as months lost but years gained!
If you hadn't taken care of your heart, the Teardrop wouldn't be much of a concern.
Things I have for sale on craigslist:
http://albany.craigslist.org/search/?ar ... catAbb=sss

Things I have for sale on eBay:
http://www.ebay.com/sch/merchant/seansmith
User avatar
GuyllFyre
Donating Member
 
Posts: 209
Joined: Fri May 21, 2010 9:35 pm
Location: Scotia, NY
Top

Postby Facemeltingly Epic » Thu Sep 22, 2011 7:38 pm

Lookin' good! The epoxied wood looks very nice.

As I have said in my own build thread, next time around any wood that shows will be better quality than what I used on the Track Shack.
Scot

My build journal: http://www.tnttt.com/viewtopic.php?t=42585

Not enough photos there? Try here:
http://www.facebook.com/media/set/?set= ... c3e73ca184

Or here:
http://www.facebook.com/media/set/?set= ... cf567dd7b7

"Politicians are like diapers. They should be changed often, and for the same reason." - Mark Twain
User avatar
Facemeltingly Epic
Teardrop Master
 
Posts: 143
Joined: Sun Jul 11, 2010 8:27 pm
Location: San Jose, CA
Top

PreviousNext

Return to Build Journals

Who is online

Users browsing this forum: No registered users and 5 guests