Bear's Lair

...ask your questions in the appropriate forums BUT document your build here...preferably in a single thread...dates for updates, are appreciated....

Re: Bear's Lair West Texas

Postby Nobes » Wed Jun 01, 2016 10:27 pm

Ha! I look forward to that!

I didn't get a lot done yesterday due to other commitments--just took all the clamps & weights off side 1, & glued a piece to the back of the skin, below the wall frame, that will reinforce the skin and cover the trailer frame.

Tonight, I got side 2 to a point ahead of side 1--in less than 1/3 the time it took to do side 1. Guess I can learn stuff after all. Side 2 is cut to shape except the lower edge, the door is cut out, marker lights are in, it is clamped and weights are on where I can't clamp. It didn't need anywhere near the weight the other one did.

142162142161

the exciting moment tonight came when I was almost finished clamping and I realized I had forgotten to insert the side marker lights. Fortunately I was able to release a few clamps around the insertion points and get them in.

Back on track...
Nobes
Teardrop Master
 
Posts: 214
Images: 508
Joined: Sun Dec 20, 2015 5:01 am

Re: Bear's Lair West Texas

Postby Nobes » Thu Jun 02, 2016 9:04 pm

I'm sure I've left out 14 significant steps, but:
If I haven't
And if everything goes to plan not filled with problems
And if I have guessed correctly how much I can get done on a daily basis...

I think I will be done in 2 weeks. !!!!!

Tonight I:
finished routing the profile and door cutout of side 1, and gave the fiberglass a light sanding;
Glued and clamped the lower edge of the frame on side 2
Got the screws I need to attach the walls to the deck;
Drilled pocket hole screws in side 2 for attaching the bulkhead upon final installation;
Made more of The Mix and finished up the rear edge 'sill' that the hatch lower edge will sit on.

Tomorrow I will raise the walls and install the bulkhead, front and upper cabinets and the galley, and hopefully wrap up the AC electrical build, and get some spars temporarily placed.
Nobes
Teardrop Master
 
Posts: 214
Images: 508
Joined: Sun Dec 20, 2015 5:01 am

Re: Bear's Lair West Texas

Postby KCStudly » Fri Jun 03, 2016 10:08 am

Nobes wrote:If...

If only. :lol:

Er', I mean... good luck! :thumbsup:
KC
My Build: The Poet Creek Express Hybrid Foamie

Poet Creek Or Bust
Engineering the TLAR way - "That Looks About Right"
TnTTT ORIGINAL 200A LANTERN CLUB = "The 200A Gang"
Green Lantern Corpsmen
User avatar
KCStudly
Donating Member
 
Posts: 9616
Images: 8169
Joined: Mon Feb 06, 2012 10:18 pm
Location: Southeastern CT, USA
Top

Re: Bear's Lair West Texas

Postby plectrudis » Sat Jun 04, 2016 8:41 pm

Good Lord, Nobes--I go away for a few weeks, and when I come back you've built a freaking teardrop trailer!

I know you're not done, but I'm agog at your progress. You'll be in New Mexico before I'll have even finished my floor. I'm looking forward to seeing all that pretty stained wood in place. I hope you're planning to post pictures of the trailer at the campsite in NM so we can see it in its glory?
User avatar
plectrudis
Teardrop Master
 
Posts: 117
Images: 98
Joined: Tue Mar 10, 2015 3:12 pm
Location: central Texas
Top

Re: Bear's Lair West Texas

Postby Nobes » Sat Jun 04, 2016 10:21 pm

Of course of course! Great to see you are back & I look forward to reading your post on Little Ferdie. I had a great 2 days of work yesterday and today--started putting the ceiling on. I am not as far along as my plan called for--ha what a surprise--but still I am happy about my status. It's starting to look like a teardrop, and I am seeing the benefit of staining/finishing ALL those pieces before assembly! More to come...
Nobes
Teardrop Master
 
Posts: 214
Images: 508
Joined: Sun Dec 20, 2015 5:01 am
Top

Re: Bear's Lair West Texas

Postby Nobes » Sat Jun 04, 2016 11:05 pm

Several good days in a row now. By Thursday night, there were just a few odds and ends to manage before raising the walls. I had those done by Friday around 5, and that's when my son showed up to help me get all the 2-person stuff done. Here are the last pics of the walls on the bench/deck:

142210142211

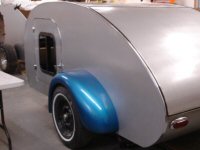
We talked though the process. Shiny side out, curve in front, slope in back. Cleats go on the INSIDE this time. Let's go.

142217142230142229

We had some curious onlookers who got a chance to come and check things out.

142231142216142218142219

After getting the walls and bulkhead we slid the galley in place (it's still not screwed in, just sitting ther) and attached the upper cabinets.

142212142213

Then right before dark we got the front cabinets in. I still have to make all the doors.

Saturday morning I spent a few hours wrapping up the AC electrical, except for the 30 amp inlet port--I need some sealant for the inside of the port. After lunch a friend came over--that IT guy I've mentioned before--and we really knocked out a lot of stuff.

142225142224142223

That last picture shows all the tools I needed to make the hole for the electrical inlet. It turned out there was a screw in the way, and well it got complicated.

My buddy pulled out all the stainless screws I put in yesterday and gave each a little titebond 3 waterproof glue, so hopefully no water enters my ply from those holes. Meanwhile I finished the waterproofing on the DC side marker lights.

142227

Good man, great help today.

Our last task was to start putting on the ceiling. We thought we would start with the hardest piece, the front, pulling it on with ratcheting straps. We did a lot better after we figured out we should put the spars on it. Right now it is strapped in place, hopefully it will conform a bit to the shape. Tomorrow I will take it down, glue the spars on, and put it back. At dinner after working we talked about the benefit of starting from the back, so I think I will start with the ceiling nearest the galley/hinge first and work my way down to the front. Hopefully that will go easier.

With the ceiling in, wow I am really pleased with the look.

142225142226
Nobes
Teardrop Master
 
Posts: 214
Images: 508
Joined: Sun Dec 20, 2015 5:01 am
Top

Re: Bear's Lair West Texas

Postby S. Heisley » Sun Jun 05, 2016 5:45 pm

You're making progress and it's looking good. :thumbsup:
Keep going! We're watching! :SG
User avatar
S. Heisley
Super Lifetime Member
 
Posts: 8774
Images: 495
Joined: Mon Sep 17, 2007 10:02 am
Location: No. California
Top

Re: Bear's Lair West Texas

Postby Nobes » Sun Jun 05, 2016 9:24 pm

Dang y'all--ceilings are HARD! I thought I had a nice gentle slope front & back, and maybe I do, but I am not using 1/8 ply because I could not find any out here in the hinterlands. Today I glued the spars to the 2 ceiling 1/4 ply pieces starting at the galley, then glued and cranked them down with ratcheting straps. Lots of creaks, groans, snaps, and bangs. It all went down into place BUT my spars are too high, they are not flush with the top of the walls. What I NEED is a hand planer. What I HAVE is a belt sander. Hopefully it will get the job done. Planning on a hump in the middle because I don't think I can belt sand all the way across these 62.5" spars. There are 14 plus the framing for the vent. And the pieces between the spars along the wall edge. I will draw some lines and put a 12-15" slope coming down to the wall edge.

Let me know if that is a bad idea.

Based on this info I re-worked my timeline and hopefully I will be done 3 weeks from today. Which is just 5 days from my trip to New Mexico. The roller coaster swings down and I am again nervous about finishing on time.

Thanks for watching. Please feel free to throw in advice. I have to do the whole ceiling adventure again when I install the roof. Should I wet it? Kerf it? Kerfing the inner hatch cover led to breaks along the kerfs, so I am leery of that. Maybe I need to spray water on it before roof installation. Maybe this is just how it works when you put on a ceiling or roof.

Pics in the next post.
Nobes
Teardrop Master
 
Posts: 214
Images: 508
Joined: Sun Dec 20, 2015 5:01 am
Top

Re: Bear's Lair West Texas

Postby Nobes » Sun Jun 05, 2016 9:46 pm

Pics of the upper cabinets I didn't get on here yesterday

142274142271142263142262

Pics of the front cabinets.

142264

Close ups of electrical--marker lights and plugs below upper cabinets, and the shelf under the elec plugs. I decided I didn't want to have to stick my hand all the back in a hole to plug something in so I built a little run that allowed the plugs to be brought forward. Not the most elegant solution but it works.

142272142265142261142260

Pics of straps in place holding down 2 of the 3 ceiling sections, the 2 closest to the galley. Nose section is tomorrow.

142273142270142269142268

In that last st of pics, notice the clamps along the edges. Over the door, I was able to clamp the ceiling down. I put some screws through the 1/4 ply as I began, to hold everything in the right place. As the pressure increased on the straps the ply started tearing through the screws. I am going to try to screw through the spars after I belt sand the spars flush with the wall edge.

Also in that last set you can see the elec outlets in the galley. I cut the holes for those outlets just measuring where they should go, since I didn't mark the spots before I took the bulkhead down for final wall skinning & glassing. Proud to say my math/measurements were spot on. I took the galley out again today to make it easier to ratchet down the ceiling, but had it in there and those plugs are just right.

I spent approx $100 on 2 GFCI plugs for the galley and a plug with 2 USB ports in the cabin. Spent extra for 30 amp inlet and extension cord to plug into shore power. I am being told my battery will be about $125-- just to run the fan. As I decided to do puck lights (batteries inside) in the cabin, plus battery-powered reading lamps. I still have to buy all that. Plus get to spend extra on a 15 amp adapter. Basically, if there was a way to spend extra $$ I did it. Yikes.

But, I am pleased with the look and I think we will really enjoy it. We dang well better anyway after all this work!
Nobes
Teardrop Master
 
Posts: 214
Images: 508
Joined: Sun Dec 20, 2015 5:01 am
Top

Re: Bear's Lair West Texas

Postby Nobes » Mon Jun 06, 2016 7:55 am

I got it! Man I love sleeping on a problem. Woke up this morning with the answers in my head.

First, it's the support pieces between the spars that do all the work of holding the ceiling panels in. They will be glued and screwed to the wall sides, leaving the ceiling panels with no where to go. I have already made these pieces, they just need to be cut to length and installed. That is first tonight.

I'm sure this was stated somewhere, and I read it, but it didn't register. I'm glad it bubbled to the top now.

Then, I will run the pattern bit over them to get them all flush with the roof edge. I will still have to use the belt sander to smooth the spars out going toward the center of the trailer but I will have a true, flat edge for the roof to sit on. And I don't risk ruining my wall edges with the belt sander.

I also figured out why my spars are proud of the wall edge: 3 coats of poly and a layer of adhesive. That doesn't fix it, but at least it explains it. I measured the ledge I created in the wall, and test fit the pieces--all good. But, I didn't allow for finishing and gluing.

I've already run the router over the glass a time or two and I have some scratches in the glass. So, I will tape the router base and hopefully avoid any more scratches.

Woo hoo! I love having at least some idea of what I am doing. That has been the challenge here, for a lot of this build it has been just guessing and hoping. That will wear you out.
Nobes
Teardrop Master
 
Posts: 214
Images: 508
Joined: Sun Dec 20, 2015 5:01 am
Top

Re: Bear's Lair West Texas

Postby KCStudly » Mon Jun 06, 2016 8:13 am

The whole build process is a giant mind twisting puzzle... that's why I enjoy it so much, keeps the brain busy. :thumbsup:

In reading your post about wrenching the ratchet straps over the spars it gave me some concern that you might actually be bowing the spars and ceiling down, which could in turn curl the ceiling up away from your ledge (at least in theory).

When I attempted to put my ceiling skin on top of my walls it wanted to sag in the middle, so I ended up gluing the spars on top of the ceiling skin before installing. It was a lot easier to clamp the spars onto the ceiling (once I figured out how to do it) on the flat bench top, than it would have been to try and do it in place with prop rods, etc., and know that all of the gaps pulled up well.

Let me go look and find the method I used... here it is: http://www.tnttt.com/viewtopic.php?p=1085357#p1085357 .

Hope this helps.
KC
My Build: The Poet Creek Express Hybrid Foamie

Poet Creek Or Bust
Engineering the TLAR way - "That Looks About Right"
TnTTT ORIGINAL 200A LANTERN CLUB = "The 200A Gang"
Green Lantern Corpsmen
User avatar
KCStudly
Donating Member
 
Posts: 9616
Images: 8169
Joined: Mon Feb 06, 2012 10:18 pm
Location: Southeastern CT, USA
Top

Re: Bear's Lair West Texas

Postby Nobes » Mon Jun 06, 2016 9:17 am

Thanks KC, good stuff there.

I did glue the spars to the ceiling panels before installation. I tried to dry fit the ceiling panel and spars with the straps, but they would not stay in position. If I had tried that with the pieces between spars (wish I knew of a name for those) in place, it would have gone better.

I like your point about the straps causing some of the 'uplift' on the sides. I hadn't thought of that, but I agree. I used the straps I had, which are 1" wide--not ideal. Then, I should have put them closer to the edges. So I think there would have been improvement with four or more 2" or better straps better placed across the space. There is definitely inward bowing in the center of the panel now due to strap pressure. All I can do now is hope that the spars will spring back when I take the straps off. Perhaps the spars will not be as high at the edges when I take the pressure off--again I hope so--but unfortunately I think I will still have some trimming to do.

The plan to deal with the proud spars is to insert the pieces between spars then time the entire edge with a flush trim bit, then sand toward the middle to get a gentle slope that will not be easily observed. And, having that slight slope in the roof might even be helpful in getting good drainage. I feel good about that plan--do you see any other issues I am missing?
Nobes
Teardrop Master
 
Posts: 214
Images: 508
Joined: Sun Dec 20, 2015 5:01 am
Top

Re: Bear's Lair West Texas

Postby KCStudly » Mon Jun 06, 2016 11:19 am

A block plane is your friend, and very therapeutic to operate once you get one running right. There's just something about peeling off a big long curly chip of wood. If your can't afford the entry level $30 Buck Bros. at the big box hdwr stores, you might be able to find a decent used one at a tool swap meet or flea market. They are perfect for blending things like spars where you have a fair bit of material to remove and want the surface to stay nice and flat. Also very good for things like getting the tops of cabinet face frames to match the profile curve.

Even a small palm plane or matchbox plane can be put to good use for this sort of thing.

If you've never used one before and decide to try one, I'll just add that it is good to get into the practice of laying it down on its side, that way you don't inadvertently dull the blade.
Last edited by KCStudly on Mon Jun 06, 2016 3:39 pm, edited 1 time in total.
KC
My Build: The Poet Creek Express Hybrid Foamie

Poet Creek Or Bust
Engineering the TLAR way - "That Looks About Right"
TnTTT ORIGINAL 200A LANTERN CLUB = "The 200A Gang"
Green Lantern Corpsmen
User avatar
KCStudly
Donating Member
 
Posts: 9616
Images: 8169
Joined: Mon Feb 06, 2012 10:18 pm
Location: Southeastern CT, USA
Top

Re: Bear's Lair West Texas

Postby Nobes » Mon Jun 06, 2016 12:08 pm

Have read a lot about them, never had one. Great excuse to get a new tool! I have some scrapers, and have enjoyed using them--I know it's different but along the same lines. Great idea, thanks!
Nobes
Teardrop Master
 
Posts: 214
Images: 508
Joined: Sun Dec 20, 2015 5:01 am
Top

Re: Bear's Lair West Texas

Postby Nobes » Wed Jun 08, 2016 12:15 am

Look at that. Reading all the reviews on lowes.com, I expected this tool to be a dull pretzel. It's flat and sharp. Just a few minutes and it was doing this. I'm glad the parts I'm planing won't be visible, as I'm not skilled enough to make them pretty, but I think I can get the spars to the shape I need to make the roof work.

142330

Given how hard it was to get the ceiling on, and that it was the pieces screwed to the wall edge that really holds it down, how do you make the roof stick?

Tomorrow it's time to figure out hatch locks and get the back skin on the hatch.
Nobes
Teardrop Master
 
Posts: 214
Images: 508
Joined: Sun Dec 20, 2015 5:01 am
Top

PreviousNext

Return to Build Journals

Who is online

Users browsing this forum: No registered users and 7 guests