Building "Cloud 9" - 4x8 Generic Benroy

...ask your questions in the appropriate forums BUT document your build here...preferably in a single thread...dates for updates, are appreciated....

Building "Cloud 9" - 4x8 Generic Benroy

Postby lopazopy » Sun Feb 17, 2008 11:07 pm

I've been a member and lurker long enough, so I decided it was time to start building. This is the first thing I've ever built, and its been fun collecting tools for it. I'm building a 4x8 Generic Benroy on a folding HF trailer and am heavily influenced by Mike's first Generic Benroy and Bruce's current Benroy. Thanks for all the pics and info. It will have a sky and cloud theme when I'm done with it, hence the name Cloud 9. I will also be happy when I am in my teardrop and it will be my cloud 9. I enjoy hiking and photography and the teardrop will be my base for both.

Anyways, I actually started building a couple of months ago and decided I better start posting the pictures before that bubble oil starts sloshing around. Here's my start:

12/10/07 - Purchased folding trailer from HF.

12/12/07 - Got around to assembling my trailer and ran into the first snag...two of the same parts. Dang.

Image

1/9/08 - Got the right rail and holidays over, back to teardrop building. Got the frame together. Axle is moved back and sanded down frame for painting. You can see where I did some test painting on that stupid extra rail in the background.

Image

1/12/08 - Painted the visible parts of the frame with Rustoleum gloss black. Surprised me that it only took a little over 1 can.

Image

1/23/08 - Completed painting the frame. Installed the axle and wheels. Also installed the coupler. (That reminds me, I guess I have to get around to getting a hitch installed on the tow vehicle.) Test fitted the 1/2" ply for the floor so I can see how much I need to trim off the sides. If it isn't obvious by now, I'm installing the walls on top of the frame.

Image

2/12/08 - Got the subfloor done. Also have mounting points for the spare tire and Atwood stabilizing jacks.

Image

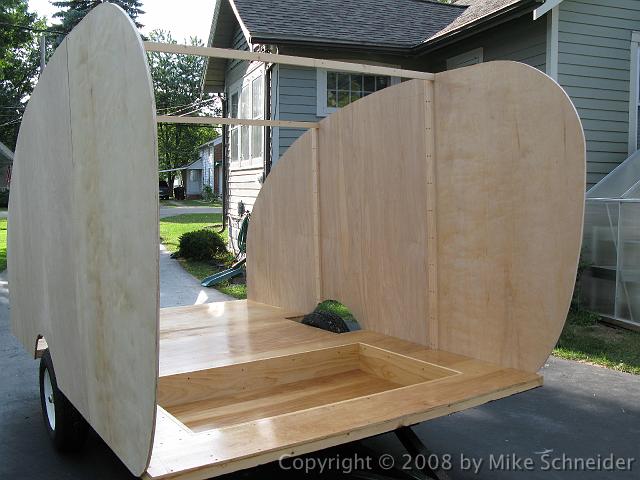
2/12/08 - Sometime before I did the subfloor I cut my profile out for the curb side, but never took a picture of it until this day. It's 1/2" ply also and I cut the door out too. Don't be confused about the picture, it is just leaning up against the wrong side of the trailer facing the wrong way.

Image

2/12/08 - And the door with the eerie eyes looking at you

Image

2/17/08 - Today I drilled my holes for mounting it to the frame (only 5..3 in the rear and 2 up front) and applied the black goo to the underside. I probably put on way too much, but that stuff doesn't spread around too easily. I'm sure it will be dry by summer. Hahaha.

Image

2/17/08 - I also coated the bottom edges of the sides. Still only one profile cut out. Maybe one of these days I'll get my new router out of the box and get the other side cut.

Image

Sorry for such the long post, but I'm sure you don't mind with all the pics. I'll post more as I go along. If you have any questions or want more information about the build, just let me know.

Cloud 9 here I come!
Michael
Cloud 9 here I come!
Seeking professional results with amateur skills.
User avatar
lopazopy
Teardrop Builder
 
Posts: 31
Images: 21
Joined: Sun Apr 15, 2007 10:16 pm
Location: Owensboro, Ky 42301

Postby Lynn Coleman » Sun Feb 17, 2008 11:13 pm

Great start, keep up the good work you'll be camping in your Cloud 9 by summer.

Lynn
User avatar
Lynn Coleman
Donating Member
 
Posts: 959
Images: 115
Joined: Sun Jan 14, 2007 12:28 am
Location: Florida, Keystone Heights

Postby ijason » Sun Feb 17, 2008 11:37 pm

yes it sure dose look like it's going good keep posting new update pictures
:)
User avatar
ijason
Teardrop Builder
 
Posts: 27
Joined: Thu Feb 07, 2008 8:51 pm
Location: Connecticut
Top

Postby jdarkoregon » Mon Feb 18, 2008 12:25 am

looks like you're having fun. Looking good

John
Innovation is essential
The world can be better
ImageImage
User avatar
jdarkoregon
Donating Member
 
Posts: 1236
Images: 47
Joined: Mon Aug 22, 2005 7:07 pm
Location: Oregon, Sublimity
Top

Postby lopazopy » Mon Feb 18, 2008 9:54 am

Thanks for the comments. I also wanted to post to see my new signature as I updated it after this post. I was expecting it to show up on all of my previous posts, but I guess it isn't retroactive like that.

I was really surprised that no one has called their teardrop Cloud 9. I did a search on the forum and couldn't find anything. Am I right about this?

Also, I did a search for a Cloud 9 logo and came across this:
Image

I will probably redesign it a little and have myself a teardrop logo.
Michael
Cloud 9 here I come!
Seeking professional results with amateur skills.
User avatar
lopazopy
Teardrop Builder
 
Posts: 31
Images: 21
Joined: Sun Apr 15, 2007 10:16 pm
Location: Owensboro, Ky 42301
Top

Postby Miriam C. » Mon Feb 18, 2008 10:28 am

:applause: :thumbsup: :thumbsup:
All up from here Michael. New logo is great too. It should convert to tear shape easily. :thumbsup:

Keep up the good work
Image Image
“Forgiveness means giving up all hope for a better past.â€
User avatar
Miriam C.
our Aunti M
 
Posts: 19675
Images: 148
Joined: Wed Feb 15, 2006 3:14 pm
Location: Southwest MO
Top

Postby Kens » Mon Feb 18, 2008 11:45 am

I think I have seen that profile somewhere?????? :thumbsup:
Good day every day!
User avatar
Kens
500 Club
 
Posts: 580
Images: 26
Joined: Mon Aug 01, 2005 5:18 pm
Location: Valencia Pa.
Top

Back at it!

Postby lopazopy » Sat May 03, 2008 6:39 pm

Sorry it has been a while since I've posted....life got in the way. I got laid off and had to find a new job, got engaged, etc, etc. Anyways, I'm back in the swing of things and got some new pictures for you!

I have my Atwood stabilizer jacks installed. They are a little short to reach the ground, but I'll just shove some wood under there when needed.

Image

I got my spare tire mounted.

Image

I got some goodies. Yay! Some windows, a power converter, door latch, fridge, roof vent (with fan), some butyl tape (not pictured), and some 1x2 wood for framing my walls (also not pictured).

Image

After I got my window, I could cut out the profile for the street side.

Image

And now for my first goof. I was framing up my side walls for my galley today (sandwich construction) and got to looking at the hatch notch that I cut out. It is way too far forward. I measured it at about 53" from the front and the Generic Benroy plans that I'm following has it about 75" from the front. I started my notch where the radius for the rear end met the edge of the plywood and that is why it is too far forward. Any suggestions on how to roll with it? I thought I could add some wood back in where I want the notch to start, but I'm still pondering on it. The way it sits now, the top of my interior cabinets would be showing when my hatch is up. Hmmm :thinking:
Michael
Cloud 9 here I come!
Seeking professional results with amateur skills.
User avatar
lopazopy
Teardrop Builder
 
Posts: 31
Images: 21
Joined: Sun Apr 15, 2007 10:16 pm
Location: Owensboro, Ky 42301
Top

Postby mikeschn » Sat May 03, 2008 6:44 pm

Michael,

I would just blend that notch into the existing profile with a jig saw. Make a nice big generous radius so the profile looks like it's supposed to be that way.

Then once you have your spars mounted, come back and cut a new notch for the hatch!

Mike...

P.S. If you had to you could glue a piece of plywood into the upper corner, by backing it up with a piece of wood, kinda like the way we build the walls when the trailer is larger than 4x8...

You can see the backer board in this shot...
Image
The quality is remembered long after the price is forgotten, so build your teardrop with the best materials...
User avatar
mikeschn
Site Admin
 
Posts: 19202
Images: 479
Joined: Tue Apr 13, 2004 11:01 am
Location: MI
Top

Re: Back at it!

Postby Jst83 » Sat May 03, 2008 7:36 pm

Looks Good Michael :thumbsup:

lopazopy wrote:The way it sits now, the top of my interior cabinets would be showing when my hatch is up. Hmmm :thinking:


As long as the hatch doesn't hit it when you close it you've got another shelf to set stuff when your working in the galley.


I'd have to agree with Miriam, that logo would be fun to convert to teardrop shape.


We've got a couple gatherings coming up this summer down your way. One in a couple weeks at Brown County and one in Aug at Madison right on the river. You should think about coming for a visit, if your campable bring the tear or heck bring a tent and join the fun.

Scott
Image
User avatar
Jst83
3000 Club
3000 Club
 
Posts: 3606
Images: 215
Joined: Thu Jul 20, 2006 7:33 pm
Location: Indiana, Greenfield
Top

Postby lopazopy » Sat May 03, 2008 8:02 pm

Yeah, I've been out in the garage measuring and pondering and I think I'm gonna add some wood back to where I want the notch to be. It won't be noticeable after I get my skins on. I'll just have to make sure when I go to attach my hatch spar that I put a screw in at least 3/8" from the edge to bite in the true sidewall. The only reason why I need to fill it with something is so that I have something to attach my edge trim to when I get to that part.

Scott, I'm already planning on having a shelf on top of my galley cabinets. If I start the hatch where it is now, and line my bulk head up with it, I can have a really large shelf (meaning a deep galley cabinet that I would have to divide in two to give me some interior cabinets). I don't think that I'm going to be able to make it to the gathering, but thanks for the invite. Maybe I'll see you in August in Madison.

PS: I see why people move a computer into their garage now ;)
Michael
Cloud 9 here I come!
Seeking professional results with amateur skills.
User avatar
lopazopy
Teardrop Builder
 
Posts: 31
Images: 21
Joined: Sun Apr 15, 2007 10:16 pm
Location: Owensboro, Ky 42301
Top

Postby TheDuke » Sun May 04, 2008 10:04 pm

Looking at your photo of the stabilizer jack from May 3rd, it seems that you've attached the jack to the wooden floor structure. Wouldn't it be better mounted to a steel bracket welded into the corner? Otherwise you might jack the body of the trailer right off the frame. It might help your jack reach the ground, too.

TheDuke
User avatar
TheDuke
Teardrop Master
 
Posts: 207
Images: 68
Joined: Sun Mar 25, 2007 8:15 pm
Location: Lynden, WA
Top

Postby Mary K » Sun May 04, 2008 11:35 pm

:thumbsup: Nice build. Sorry about the hatch boo boo. :( Keep us posted on how you fix it.

Mk
Mary K

I don't know half of you half as well as I should like; and I like less than half of you half as well as you deserve. Bilbo Baggins
User avatar
Mary K
6000 Club
6000 Club
 
Posts: 6425
Images: 44
Joined: Wed Aug 02, 2006 3:07 pm
Location: Florida, Pensacola
Top

Slowly, but surely.

Postby lopazopy » Tue Jul 08, 2008 8:14 pm

Yes, I'm still at it. Definitely on TD time. Here is my progress:

I've got my walls framed out and my interior skins are cut. I went with the 5.0 Luan.

Image

I've also got my walls up! Although they lean a little in the same direction, hopefully adding the cabinetry will straighten this up. As you can also see, I've got my insulation in. I may have to add some framing for shelves and cabinets when I figure out where everything is going. I still haven't fixed my notch problem (probably should have done this while the walls were down, but I wanted to get them up and in place) and you can see where I haven't trimmed off my insulation and interior skins in that spot.

Image

EDIT: Somehow I forgot about the "using the cutouts as a brace" trick. I will brace it up tomorrow and this will help me with my leaning problem.
Michael
Cloud 9 here I come!
Seeking professional results with amateur skills.
User avatar
lopazopy
Teardrop Builder
 
Posts: 31
Images: 21
Joined: Sun Apr 15, 2007 10:16 pm
Location: Owensboro, Ky 42301
Top

Re: Building "Cloud 9" - 4x8 Generic Benroy

Postby lopazopy » Thu Nov 10, 2016 3:07 pm

Ummmm....so, it's been over 8 years since my last update, but the build is back in progress! I figure it was about time to post some more pictures and get back to completing the teardrop. I've always been great at starting projects, but not so great at finishing projects. Let's see, some things that have happened since I've last worked on the teardrop: 1) got married 2) had 2 kids 3) moved to the country and 4) bought a camper (23 ft.) to upgrade the family trips from tent camping. Due to a recent layoff, I find myself with lots of time on my hands, so time to make some more progress on the teardrop. Enough talk, lets get to some pictures!

8/18/2009 - Apparently I worked on it some about a year after my last post. Got the bulkhead in and skinned the galley side.
Image

8/21/2009 - Got the roof spars in.
Image

12/11/2014 - Pulled to the new house in the cover of darkness. Pulled great.
Image

11/9/2016 - Installed the double Poplar hatch spars. I have a little notch sitting on the sidewall to fix my previous goof when I cut the hatch notch. Got the hole cut for my air conditioner. Installed the converter and got electrical ran. You can also see where I clamped the interior wall in to cut the hole for my window.
Image

11/10/2016 - And this brings us to today. Got one of the interior sides glued up. You really can't ever have too many clamps. Ended up making some more with some PVC I had laying around. Also using some furring strips wedged in from the other side.
Image

It's amazing the tools I've collected since I've started building the teardrop and also the skills I've learned from other projects built along the way. Hopefully I can get it completed this time. :thinking:
Michael
Cloud 9 here I come!
Seeking professional results with amateur skills.
User avatar
lopazopy
Teardrop Builder
 
Posts: 31
Images: 21
Joined: Sun Apr 15, 2007 10:16 pm
Location: Owensboro, Ky 42301
Top

Next

Return to Build Journals

Who is online

Users browsing this forum: No registered users and 8 guests