Red Dragons - The Build (Updated 3/17/10)

...ask your questions in the appropriate forums BUT document your build here...preferably in a single thread...dates for updates, are appreciated....

Postby planovet » Thu Jun 04, 2009 9:56 pm

dmckruit wrote:When checking the vent for fit, I realized that the predrilled holes for the vent flashing where farther out than my wood frame. So I had to extend the frame out a little.


That seems to be a common mistake. That's why it's recommended to double up on the framing around the fan opening.

Great cabinets and you are progressing very nicely. :thumbsup:
ImageMark (& Cindi)
Visit our website: Little Swiss Teardrop

I was wondering why the water balloon was getting bigger... and then it hit me.

ImageImageImageImage
User avatar
planovet
The Cat Man
 
Posts: 5583
Images: 3
Joined: Tue Nov 27, 2007 4:48 pm
Location: Plano, Texas

Postby 2bits » Thu Jun 04, 2009 10:32 pm

planovet wrote:
dmckruit wrote:When checking the vent for fit, I realized that the predrilled holes for the vent flashing where farther out than my wood frame. So I had to extend the frame out a little.


That seems to be a common mistake. That's why it's recommended to double up on the framing around the fan opening.

Great cabinets and you are progressing very nicely. :thumbsup:


Going from the group and Mike's Benroy plans, I thought I was doubling up for strength LOL Glad I listened for one reason or another!

Those cabinets get me to thinking. I hated making cabinet doors when I worked in a woodworking shop. This looks like you got some crown molding, cut it at a 45' angle and attached it to an 1/8" piece of wood and were done with it! Nice!
Thomas

Image
User avatar
2bits
2bit Member
 
Posts: 5130
Images: 8
Joined: Thu Dec 27, 2007 6:04 pm
Location: Lake Tawakoni, TX

Postby dmckruit » Fri Jun 05, 2009 6:57 am

2bits wrote:Those cabinets get me to thinking. I hated making cabinet doors when I worked in a woodworking shop. This looks like you got some crown molding, cut it at a 45' angle and attached it to an 1/8" piece of wood and were done with it! Nice!


Actually if you look at the back of the doors they look a little crude. I just cut the door squares out of the same sheet of plywood I used for the cabinet facing. Then I took crown molding strips (like you said) and framed them up and glued them on the squares. I added a few screws in the back for strength. I figured that nobody will see the inside of the cabinet, and I didn't want to buy any more wood than I had to.
User avatar
dmckruit
The 300 Club
 
Posts: 385
Images: 212
Joined: Thu Jul 10, 2008 1:44 pm
Location: Sarver, PA
Top

Postby del » Sat Jun 06, 2009 1:33 pm

dmckruit wrote:
Image

When I framed my vent, the paper work with the vent said I needed a 14 x 14 hole to install the vent. The generic plans said a 14.5 x 14.5. I have come to the conclusion Mike S is smarter than the guy who wrote the directions for the vent, and smarter than me (14.25 x 14.25).

del
User avatar
del
5000 Club
5000 Club
 
Posts: 5674
Images: 410
Joined: Fri Sep 08, 2006 3:27 pm
Location: washington, yakima but tell Mary K Fairbanks
Top

Postby Anthony J Grant » Sat Jun 06, 2009 4:06 pm

I've got to go check my vent, I think I'm going to cry! :cry:
Where are we going and why am I in this hand basket?

Tony G.
the HOBO HILTON
User avatar
Anthony J Grant
Teardrop Master
 
Posts: 232
Images: 119
Joined: Wed Dec 31, 2008 8:42 pm
Location: Milan Mi
Top

Postby dmckruit » Mon Jun 08, 2009 7:01 am

Started on my electrical this weekend. I got the DC wiring installed in the cabin area and ran the lights. I also installed the AC and DC outlet in the front of the cabin.

Image

I also ran a wire to the vent (for future use) even though I don't have a fan.

Image

I ran all the wiring through the roof and down a piece of angled PVC pipe. This will come out on the back galley wall where the elecrical panels will be.

Image

Then I started on wiring the AC electric. I wired an electric outlet box (located on the other side of the wall) to a pilot switch light. This will run the power to the air conditioner and the exhaust fan. I wanted to be sure that the exhaust fan is always on when the air conditioner is running. The light will tell me that it is switched on.

Image

Then I installed another outlet on the other side. This will run the refrigerator (off a different circut, and the outlet on the other side of the wall inside the cabin).

Image

Then I started on the electric box panel. I wired up a 3 prong 30A (male) RV outlet plug and installed it to the electric box. I was originally going to put it inside my outside service panel, but I decided not to. I will leave this plug inside, then plug in my 30 ft RV extension cord to it, by feeding it through the outside service panel. This will keep the connection point dry.

Image

I still have a lot to do yet, had to run to the store to get more parts/supplies before continuing.
User avatar
dmckruit
The 300 Club
 
Posts: 385
Images: 212
Joined: Thu Jul 10, 2008 1:44 pm
Location: Sarver, PA
Top

Postby 2bits » Mon Jun 08, 2009 11:22 pm

I have now learned, and am still learning that the details can take more time than putting up the big things like walls, roof, anything... but the details gotta be done and even thought they are small now, God is in the details and you are gonna have a supreme trailer! !
Thomas

Image
User avatar
2bits
2bit Member
 
Posts: 5130
Images: 8
Joined: Thu Dec 27, 2007 6:04 pm
Location: Lake Tawakoni, TX
Top

Postby dmckruit » Tue Jun 09, 2009 8:10 pm

Got some more done on the electrical. I finished wiring the electrical box and added the DC fuse and terminal boxes.

Image

Then I finished wiring up the electric outlets. I also drilled a hole in the floor for a pvc pipe which will carry the electical lines to the battery that will be located on the tongue at the front of the tear.

Image

I got an adapter that goes from 30A down to 110V and plugged in the breaker box. I checked all the outlets with a drill and everything fired up perfectly. :thumbsup:

Then I ran a temporary line to the battery to check the DC lights and outlets. I had one set of lights that worked fine, and another set that I could not get any juice. After checking the wires I could not locate the problem so I turned in for the night.

Went out today to look at the lights and realized that my ground terminal block on the DC circuit does not have a common ground to each terminal. So I quickly made jumpers to each terminal and everything fired right up!! It's funny what you overlook when you are tired.

I also found an old tv that had a DC cord, so I got to try out the DC outlet at the front of the tear cabin. That worked also. Hopefully, I can get the outer roof on soon.

I also finished framing up the galley door.

Image

Tomorrow I need to mow the grass, so probably no work will get done on the teardrop. Unless it rains... :worship:
User avatar
dmckruit
The 300 Club
 
Posts: 385
Images: 212
Joined: Thu Jul 10, 2008 1:44 pm
Location: Sarver, PA
Top

Postby dmckruit » Wed Jun 10, 2009 7:58 pm

Decided to blow off mowing today.

Yesterday, I decided to return my roof vent and see if I could get the Fantastic Fan that everyone was talking about. When I bought the vent they said that I could get and install the motor and fan later. When I went in a couple weeks ago, they told me that they are no longer made.

Anyway, they said that they could order me the Fantastic Fan and have it here by Friday for $189!! I told them I would go home and think about it.

This morning I found an RV supplier in Ohio (listed on the Fantastic Fan website). I got the fan for $119 plus $15 shipping. So I saved about $60 bucks. I don't want to put the outer roof on until I get the fan in case I have to relocate the wires.

Picked up a fender at tractor supply for $40. I will have a guy at work cut it in half and add weld mounting brackets.

Image

Tonight I touched up some polyurethane that was scratched up when I cut the holes in the bulkhead for the outlets. Then I decided to cut the tiles for the floor. The adhesive for the floor said that you have to let the adhesive sit for 5-6 hours once its applied before you can place the tiles on. I think I will wait until Saturday to do that.

Image

Image

Then I figured that I would start preparing the sides for the aluminum skin. I got the foam underlayment (used for Pergo floors) and some spray adhesive and covered the sides up. This would eliminate any bumps and depressions caused by the screws in the masonite, plus it would add and extra layer of insulation, and prevent squeeking.

It went on quickly and I got it trimmed up.

Image

Image

thats all for today.
User avatar
dmckruit
The 300 Club
 
Posts: 385
Images: 212
Joined: Thu Jul 10, 2008 1:44 pm
Location: Sarver, PA
Top

Postby 2bits » Wed Jun 10, 2009 10:20 pm

That's an interesting idea about the foam underlayment, nice thinking!

Kudos for the Fantastic Fan too, you will thank yourself and I don't even own one. I was thinking "I have an air conditioner" :oops: You can't run an air conditioner when you are rural camping, and it is nice to have when you want to leave the windows open and to have a gentle breeze and be one with nature rather than being "indoors" with the AC on. dang, I am gonna be putting that on my remodel list now I can see... :lol:

How are you gonna finish your fenders? I am going to use the same kind. Painting black would be optimal for me, but I hate painting things because I guess I am a crappy painter, and it always peels. What cha got planned?
Thomas

Image
User avatar
2bits
2bit Member
 
Posts: 5130
Images: 8
Joined: Thu Dec 27, 2007 6:04 pm
Location: Lake Tawakoni, TX
Top

Postby dmckruit » Thu Jun 11, 2009 7:16 am

I work for a company that makes alkyd resins for enamel/oil based paints.

My boss the technical director recommends using an epoxy enamel paint, because the fender is galvanized steel. He doesn't think a primer will be necessary.

We used to make a black epoxy paint here in spray paint cans, and I was hoping to scrounge up some that were left over. If not, Krylon makes an epoxy appliance paint (for stoves and refrigerators) that I will use. I checked at Sprawl Mart this morning and they only had it in white. I will have to check Home Depot or Lowes for the black.

We have a small spray booth at work, so I will just paint it up there.
User avatar
dmckruit
The 300 Club
 
Posts: 385
Images: 212
Joined: Thu Jul 10, 2008 1:44 pm
Location: Sarver, PA
Top

Postby dmckruit » Sat Jul 04, 2009 6:28 pm

Its been a while since I last posted. I'll start with the oldest photos first.

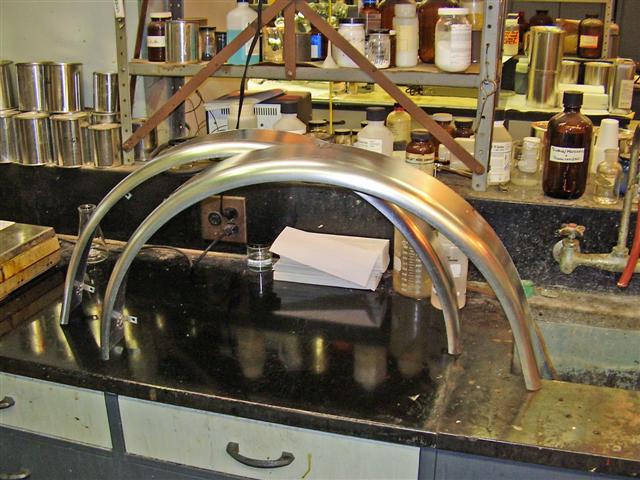
I took my fender into work and had a guy cut them in half and weld mounting brackets.

Image

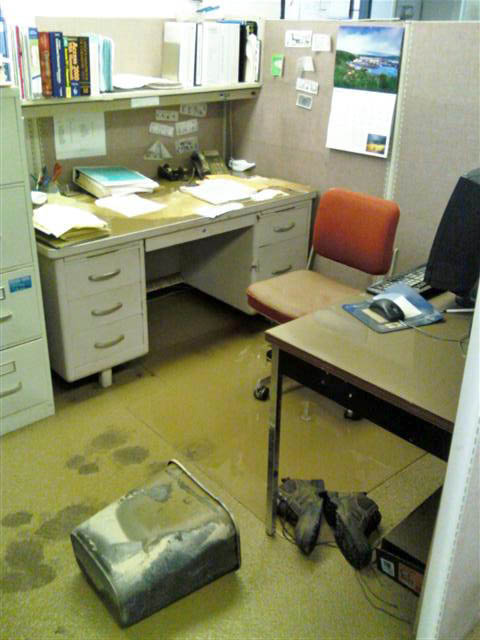
The photo above is a picture of my lab bench at work.

On Wednesday, June 17, 2009 the towns of Harrison City and Manor, PA Westmoreland County got hit with heavy rains. They got something like 3-4 inches of rain an hour for about 4-5 hours. The plant that I work at got hit hard with flash flooding. We got about 4 feet of flooding throughout the whole plant and a lot of things were destroyed. When the water subsided the whole place looked like Beirut. The water level came to the halfway point of the edge of the countertop. So everything that was below the countertop was destroyed.

My desk was not lucky. The water came up to about an inch below the bottom of the calendar. My phone, computer, papers that I was working on (pretty much everything was destroyed). I have been working long hours since, cleaning up. I finally got a computer on Wednesday, a desk chair on Thursday, and am still waiting on a desk and phone.

Image

So I haven't had much time for building, as I am pretty much wiped out when I get home.

I do however have a deadline to meet (Myrtle Beach, SC the last week of July) so I am trying to go into hyperspeed. But you guys are right when you say the last 10% takes 90% of the time.

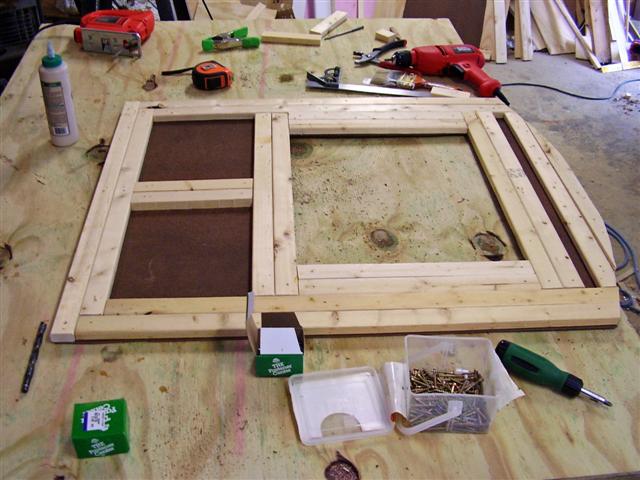
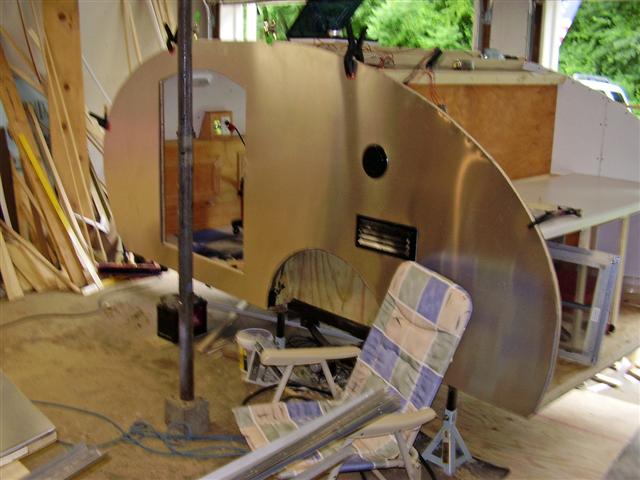
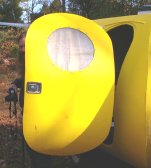
I started by building a door and installing the aluminum.

Image

Image

Image

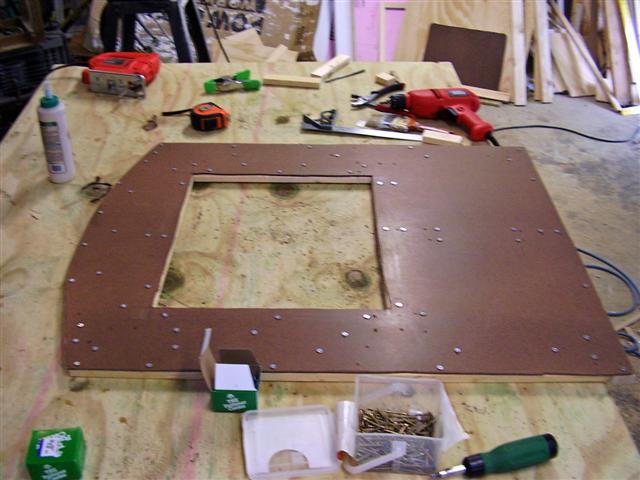
I cut most of the aluminum with shears, and what I couldn't get with the shears I used a jigsaw with a fine blade.

Image

Then I went to install the door and found that it was too snug for the opening (not including trim pieces). So my brother came over and we trimmed the door to fit and added the trim work. With the lights, vents and cable installed it looks like its coming together.

Image

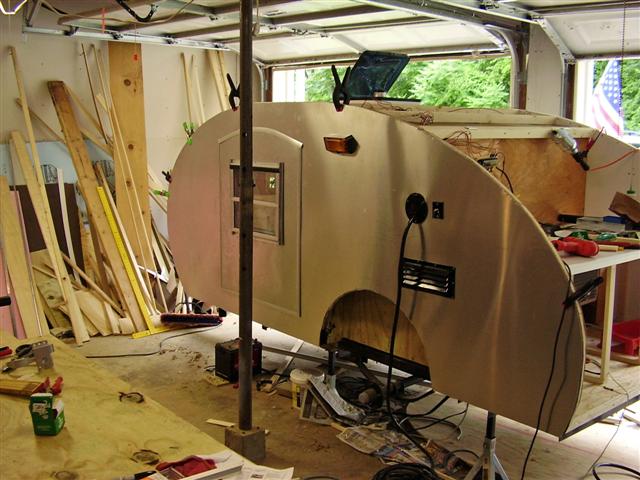
Now we just have to do the other side.

The inside, I will add some wood trim to finish out the door. I still need to install the door knob.

Image

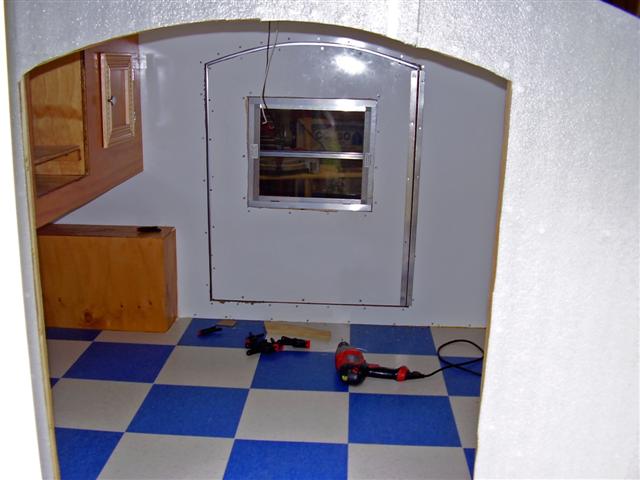
Then I finished connecting all the wiring up inside the roof on the one side and than started putting the pink insulation in the roof. Ran out of the pink stuff so I need to get some more tomorrow.
User avatar
dmckruit
The 300 Club
 
Posts: 385
Images: 212
Joined: Thu Jul 10, 2008 1:44 pm
Location: Sarver, PA
Top

Postby Miriam C. » Sat Jul 04, 2009 6:39 pm

:thumbsup: Lookin really beautiful! I love the idea of the foam under the alum. You will be water proof in no time. Get that roof on. :thumbsup:

Image
“Forgiveness means giving up all hope for a better past.â€
User avatar
Miriam C.
our Aunti M
 
Posts: 19675
Images: 148
Joined: Wed Feb 15, 2006 3:14 pm
Location: Southwest MO
Top

Postby godskid » Wed Jul 08, 2009 8:01 pm

I love the blue and white flooring! Great work!!

Deb
bought a teardrop - wanted it NOW, and not enough wood skills to build one.
User avatar
godskid
The 300 Club
 
Posts: 365
Images: 10
Joined: Wed Jul 01, 2009 5:53 pm
Location: Chicago area
Top

Postby dmckruit » Wed Jul 08, 2009 9:46 pm

Got some more done over the past few days.

Rescued my painted fenders from work. They were spared from the flood as they were above the flood line.

Image

Then I worked on hitching up the exhaust fan. This will vent the heat from the air conditioner exhaust.

Image

Then I began work on my "A/C Condensate Collection and Disposal Device" (Patent Pending). :R

I used a bread loaf pan, a funnel, some 1/2 inch pvc pipe and viola:

Image

I let the air conditioner run for an hour yesterday and didn't collect a drop of water. Must not have been humid enough.

Then I figured I would start on the roof. I put in the insulation, then started on the roof top.

Image

Image
User avatar
dmckruit
The 300 Club
 
Posts: 385
Images: 212
Joined: Thu Jul 10, 2008 1:44 pm
Location: Sarver, PA
Top

PreviousNext

Return to Build Journals

Who is online

Users browsing this forum: No registered users and 28 guests