Standie Build - Took First Camping Trip.... updated 8/26

...ask your questions in the appropriate forums BUT document your build here...preferably in a single thread...dates for updates, are appreciated....

Postby ktm_2000 » Sat Aug 29, 2009 11:14 am

Tropical Storm Danny put a squash on the end of our vacation so we are back home 2 days early. The 6" drop hitch made a significant difference as well as loading all our camping gear in the front of the camper. The increase in tongue weight kept the trailer from swaying unless there was a 18 wheeler with an unusual load. The gas mileage increased as well from the changes and the run to the Cape is alot less hilly so this run we tanked up before leaving and we got 13mpg when the normally we get 14-14.5mpg.

I still can't back this trailer down well as it seems that it has a mind of its own but I'm getting a little better at it. I'm not sure why I am having issues with backing down as I have had trailered my boats for years and am quite good at it. It has to be the ratio of trailer size to vehicle size as usually the boat trailer has been longer than my tow vehicle.

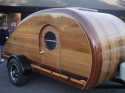
We have all this wonderfull space in the front of the camper and are questioning how to use it. Our original plan was to put a closet on the non-door side and a table and 2 chairs which could drop down to create a single bed. Now we are thinking of a couch that goes accross the front and some type of table that can be stored away when not in use. We still haven't figured it out.....
ktm_2000
Teardrop Master
 
Posts: 101
Joined: Tue Nov 18, 2008 8:08 pm
Location: Central, MA

Postby ktm_2000 » Thu Sep 03, 2009 8:21 pm

With no good plans for the long weekend, we've decided to get the exterior of the camper sealed up and primer on the epoxy so it is protected from sun's UV rays.

So far I have 6oz glass over everything and just went out today and bought 25yds of 1708 biax cloth and another gallon of epoxy. The plan is to cover just the top of the camper with a thicker layer of glass to protect the top in case of a tree limb coming down on it. I hope to glass the top saturday morning and then sand and fair things out sunday and get primer on monday.
ktm_2000
Teardrop Master
 
Posts: 101
Joined: Tue Nov 18, 2008 8:08 pm
Location: Central, MA

Postby PanelDeland » Thu Sep 03, 2009 9:05 pm

Your backing problems are from a longer TV than trailer.It's a common problem and everyone has it.It's also one of the reasons semi trucks have shorter cabs than trailers.Even the UK and other European countries which use a tractor trailer where the truck is longer still use a longer trailer.The wheel spacing also makes a difference.It's just a different learning curve.
"I know the voices in my head aren't real,but they have some really good Ideas!"
PanelDeland
Teardrop Master
 
Posts: 226
Joined: Sun Jul 20, 2008 3:32 pm
Location: Greensboro NC
Top

Postby john » Thu Sep 03, 2009 10:18 pm

Sweet!

Where did you find the door?

Any interior pics?
Build I -- Scenic ---
http://www.flickr.com/photos/8121727@N04/
Goto the Tear Build file

Build II -- Scenic II ---
viewtopic.php?t=29603

Build III -- Scenic Solo---
viewtopic.php?f=50&t=50324

Travel Blog----Now without Political Commentary
http://polifrogblog.blogspot.com/2009/0 ... -2009.html

The Constitution was ratified, not an interpretation thereof...

Penomeli ikibobo
john
User avatar
john
500 Club
 
Posts: 663
Images: 261
Joined: Tue Oct 05, 2004 6:26 pm
Location: eden nc
Top

Postby ktm_2000 » Fri Sep 04, 2009 9:03 am

The doors and windows are from ebay. Out of everything the door was the most expensive single thing that I bought, $180 + 100 shipping, but it is well worth it in that the time I would have spent trying to make something 1/4th as good would have been tremendous.

These pics aren't great but here are some interior shots:

The Bed - Full size - we borrowed our guest bedroom mattress
Image

Image

Image
Last edited by ktm_2000 on Fri Sep 04, 2009 10:35 am, edited 1 time in total.
ktm_2000
Teardrop Master
 
Posts: 101
Joined: Tue Nov 18, 2008 8:08 pm
Location: Central, MA
Top

Postby ktm_2000 » Fri Sep 04, 2009 10:33 am

I got the seams of the birch ply pretty tight but they are still a little unsightly and I've been thinking of putting a thin strip of wood over the seams. What is the typicall covering?? I've yet to see solid Birch stock anywhere. We've been trying to decide on maple, red-oak, sapelle, or just plain pine.
ktm_2000
Teardrop Master
 
Posts: 101
Joined: Tue Nov 18, 2008 8:08 pm
Location: Central, MA
Top

Postby Miriam C. » Fri Sep 04, 2009 1:12 pm

:applause: :applause: :thumbsup: :thumbsup: Very nice. I wish I had done mine with the bed in back most of the time. Would miss the galley though.

You will need to cover the seams if they bother you. If you want the color similar use clear pine screen bead or something similar. Just pick through the stacks to find some light ones.

You have a very nice TTT. Glad you are enjoying it.

:thumbsup:
“Forgiveness means giving up all hope for a better past.â€
User avatar
Miriam C.
our Aunti M
 
Posts: 19675
Images: 148
Joined: Wed Feb 15, 2006 3:14 pm
Location: Southwest MO
Top

Postby ktm_2000 » Mon Sep 07, 2009 6:10 pm

spent more time having fun than working on the camper......

We did get the extra glass over the roof and it made a significant difference in the front and rear were the bendable plywood was used. I can bang on the front with a closed fist with a significant amount of force and my hand just bounces off, a good thud but no "I'm gonna break" sounds. I seriously underestimated the amount of epoxy that we'd need and ended up going out to get another gallon.

Epoxy has now taken the lead in the single most expensive item on the camper. I have 1/2 gallon remaining and hopefully it gets me fully through fairing.

I'd post pics but it doesn't look any different.
ktm_2000
Teardrop Master
 
Posts: 101
Joined: Tue Nov 18, 2008 8:08 pm
Location: Central, MA
Top

Postby Steve_Cox » Mon Sep 07, 2009 7:18 pm

:thumbsup: KTM,

From your batten enabled design technique to the bi-axial glass cloth choice. You're build will be a classic!
Steve
User avatar
Steve_Cox
4000 Club
4000 Club
 
Posts: 4903
Images: 196
Joined: Sun Apr 03, 2005 8:46 am
Location: Albuquerque New Mexico
Top

Postby ktm_2000 » Tue Sep 08, 2009 9:50 pm

thanks for the good words. I've received the magazine wooden boat for years and read alot of the building articles. I used lofting techniques to transfer the design I put together in a CAD program to my building jig. We transferred the design acurately but it didn't look very good when rendered full size with the windows and doors traced out so we spent hours tweaking the design using drywall screws to hold the positions of the batten till we found what we liked. The final product ended up taller and wider than we started off with.

As for the glass, it is probably overkill but a major requirement we had for us to build a camper was to have it not leak. I think that we have taken enough steps to ensure this.
ktm_2000
Teardrop Master
 
Posts: 101
Joined: Tue Nov 18, 2008 8:08 pm
Location: Central, MA
Top

Postby ktm_2000 » Sun Sep 20, 2009 7:48 pm

Not alot of pics to post but we did make some progress.

1. We got our received our Fantastic Vent purchased from ebay in the mail this week.
2. We started to install the electrical system from the old pop-up. I installed the circuit breaker box and roughed in 4 electrical outlets.

Question to go GFCI or Standard outlets? I've heard that the grounding systems at campgrounds aren't all that good would a GFCI work properly? I put in a new ground wire to the frame but should I then attach a chain or something else to drag on the ground and provide another ground path? I need some help on this one as I'm quite comfortable with wiring but don't quite get 120v in a trailer. I'm mostly concerned with getting a good ground.

3. I made a couch in the front of the camper as well as made a cabinent on the right side of the camper. I ended up re-using the old 1/2" plywood beds and storage locker doors from the pop-up by doing glue ups with 1/4" birch ply. I made sure that the birch ply being attached was oversized for the base ply and then used a router and a flush trim bit to true it up.

3. We did round 2 of fairing the 1708 cloth. I have to say the structural cloth made the camper alot stronger but it has used alot of epoxy and requires alot of fairing to make this thing look good.

We ended up putting a second pass of epoxy and cabosil on saturday afternoon and it wasn't going to cure quick enough to take off by dark and it isn't worth it to reinstall the running lights for a night run so we packed up the truck with all our tent camping stuff and took off for the cape.

After the trip driving around with a truck packed with junk looking like sanford and son really drove home why we are building a camper. I can't wait to get this thing painted.
ktm_2000
Teardrop Master
 
Posts: 101
Joined: Tue Nov 18, 2008 8:08 pm
Location: Central, MA
Top

Postby bohemian » Sat Sep 26, 2009 8:55 pm

Fantastic trailer! not to long from now I'm going to have me one of them beauties. How about this for the interior. notice left of the door knob Image
User avatar
bohemian
Donating Member
 
Posts: 500
Images: 233
Joined: Tue Aug 04, 2009 8:09 am
Top

Postby ktm_2000 » Wed Sep 30, 2009 11:52 am

That is an interesting interior. My wonderful triangle of commuting is displayed on the map.

I live in Worcester in the far left, Work in Providence RI to the south, And camp and fish on Cape Cod. My boat is kept right near the door jam.
ktm_2000
Teardrop Master
 
Posts: 101
Joined: Tue Nov 18, 2008 8:08 pm
Location: Central, MA
Top

Postby ktm_2000 » Sun Oct 04, 2009 8:06 pm

we decided that the raining was winning and we wouldn't have enough time to finish the exterior this season. We thought that the epoxy coating needed some protection UV rays till spring so after it stopped raining this morning we wnd to home depot and bought 3 quarts of rustoleum el-cheapo paint and painted the camper in the sun of this afternoon.

All this watching the National Park series on PBS has us wanting to goto Acadia national park so the painting will allow us to put full set of running lights on and go out of state for the long weekend next week. It's supposed to not rain till wendnesday so I'll have time to crimp on the connections and silicone the lights to the camper.
ktm_2000
Teardrop Master
 
Posts: 101
Joined: Tue Nov 18, 2008 8:08 pm
Location: Central, MA
Top

Postby ktm_2000 » Mon Oct 05, 2009 6:12 pm

I took off the masking tape and paper covering the doors and windows and here's a peak. I have to say that even though I'm not done and I did a crappy job painting just to protect it from uv rays for winter I'm not happy with the way it looks.... Seems to boring being all white and you can clearly see the shortcomings of how I built her.

What is good about it is that I've got all winter to figure out what to do about it. To begin with I'm thinking of fender covers like on old fords

Image

then maybe a creative paintjob or some graphics?


Image

Image

Image
ktm_2000
Teardrop Master
 
Posts: 101
Joined: Tue Nov 18, 2008 8:08 pm
Location: Central, MA
Top

PreviousNext

Return to Build Journals

Who is online

Users browsing this forum: No registered users and 48 guests