Canceled due to hopelessness, lack of money & skill

...ask your questions in the appropriate forums BUT document your build here...preferably in a single thread...dates for updates, are appreciated....

Canceled due to hopelessness, lack of money & skill

Postby robertaw » Thu Sep 17, 2009 10:49 pm

This build journal is for my 1966 Aristocrat Land Liner. It's not a TD it's a tad bigger than a TTT but it IS vintage.

I bought her in June 2009 for $400 and this what she looked like at that time. The seller advertised the "palmetto camo" paint job like it was a plus. :roll:

Image

It was also advertised to have "new carpet" which even if it was true we would be ripping out.

Image

I figured worst case scenario we had a decent tandem axle trailer. The wheels and bearings were replaced 3 years ago and it has a newly welded on hitch.

The previous owner had a thing for spray foam and used it to make numerous "repairs" both inside and outside the trailer. This is one of the roof vents we removed.

Image

We started ripping out the parts that were clearly rotten and quickly reached the "what have we gotten ourselves into?" point.

Three fumigations and several bon fires later it was completely gutted.

I'll skip the part about the fridge being too big to come out the door and getting the coils punctured creating a toxic ammonia cloud in our yard for a week... :oops:

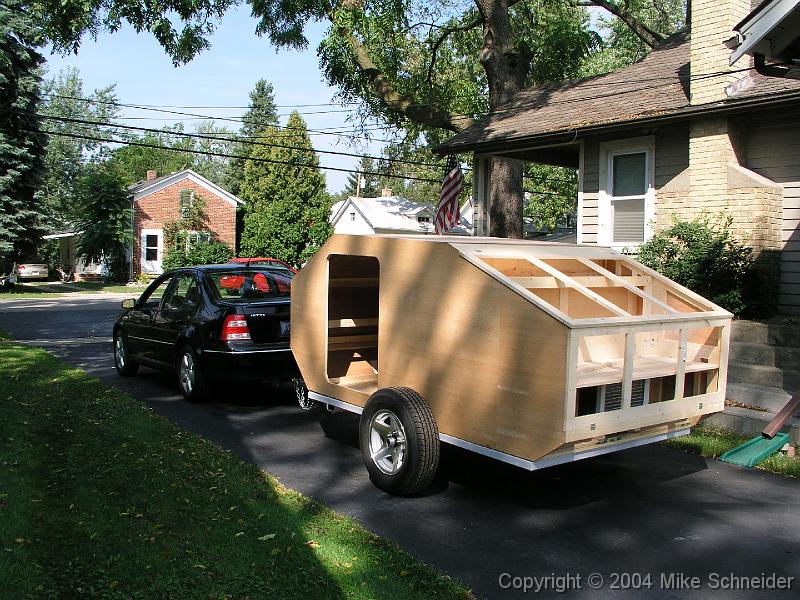
So here we today with the roof completely sealed with new framing and new vents installed, the rear third of the floor and side framing replaced, and a cheap temporary car port on order to try to keep things dry.


Image
Last edited by robertaw on Wed Feb 09, 2011 1:31 am, edited 3 times in total.
Roberta
User avatar
robertaw
500 Club
 
Posts: 523
Images: 56
Joined: Mon Jul 13, 2009 3:02 pm
Location: Lake City, Florida

Postby S. Heisley » Fri Sep 18, 2009 12:58 am

It looks like you're doing a good job on her. Someday, she'll be a thing of wonder! (But right now, she's a thing of wondering what you got yourself into! :lol: ) You'll get there, Roberta. :thumbsup: Thanks for sharing your build. It will be fun to watch the progress.
User avatar
S. Heisley
Super Lifetime Member
 
Posts: 8774
Images: 495
Joined: Mon Sep 17, 2007 10:02 am
Location: No. California

Postby robertaw » Tue Sep 22, 2009 10:13 pm

Got my temporary car port the other day. It was easy to set up and is exactly what it was advertised to be. Unfortunately I can't guess-timate measurements very well so it's not quite tall enough.

We are going to buy six 5 gallon buckets and fill them half way with concrete to add some height. Only about 12" more is needed.

Once we get the trailer in there and determine the fit is okay I will order the $85 wall kit for it. The walls won't touch the ground since we are adding height but should be enough to keep things dry while we are working on it.

Image
Roberta
User avatar
robertaw
500 Club
 
Posts: 523
Images: 56
Joined: Mon Jul 13, 2009 3:02 pm
Location: Lake City, Florida
Top

Postby robertaw » Fri Oct 09, 2009 1:06 am

Just when you thought things couldn't get any more ghetto...

Here it is folks...A HOA's worst nightmare.

A gutted, windowless, palmetto/camo/graffitti painted, aluminumly challenged, vintage beauty crammed under a cheap canopy being held up by six bright orange Home Depot buckets of cement!

Well, that's not exactly true...the trailer is actually holding up the canopy and the six orange buckets are just for effect at this point. :lol:

I LOVE this trailer and one day she is going to be a knock-out! In the meantime I'm sure glad we live back in the woods...


Image
Roberta
User avatar
robertaw
500 Club
 
Posts: 523
Images: 56
Joined: Mon Jul 13, 2009 3:02 pm
Location: Lake City, Florida
Top

tent

Postby laoutdoorsman » Fri Oct 09, 2009 5:30 am

those were my thoughts when you had posted about the carport...didnt thinkk it was tall enough, for mine....i hadnt put 2 and 2 together yet and realized what you were building....
mike breaux...its pronounced "bro".....
i think i should have taken notes along the way, because ive forgotten waaaay more than i remember...
User avatar
laoutdoorsman
Teardrop Master
 
Posts: 263
Images: 44
Joined: Thu Sep 03, 2009 6:25 pm
Location: amite, la
Top

Postby lauriandgary » Fri Oct 09, 2009 9:16 pm

Hey Mike & Roberta,

Here's what I did to increase the height of my canopy:

Image

I used a 2" section of PVC pipe secured in the concrete and put the leg thru it. I put a cover on the bucket to prevent rain water from filling the bucket. I also used coated wire as anchors from the top frame to the buckets.

Oh, good job on the rebuild. Just keep telling yourself that you're doing the right thing and it will be worth it.

Go to the www under my signature for more pics.
Gary

__________

And if I don't see you tomorrow, hello.
User avatar
lauriandgary
Teardrop Master
 
Posts: 112
Images: 36
Joined: Thu Jan 19, 2006 9:30 pm
Location: Sunset, LA
Top

Postby robertaw » Sat Oct 10, 2009 10:15 am

lauriandgary wrote:
Here's what I did to increase the height of my canopy:

Image

I used a 2" section of PVC pipe secured in the concrete and put the leg thru it. I put a cover on the bucket to prevent rain water from filling the bucket. I also used coated wire as anchors from the top frame to the buckets.


:applause: Great idea! Plus the white buckets look alot nicer than my orange ones.
Roberta
User avatar
robertaw
500 Club
 
Posts: 523
Images: 56
Joined: Mon Jul 13, 2009 3:02 pm
Location: Lake City, Florida
Top

Postby grizz » Sun Oct 11, 2009 1:10 pm

You guys do make me smile humbly, when I see the sort of ptojects you take on, and the results.

Well done so far and keep it going.
I did nothing ot my TD today, but did manage to buy a friend a 4x8 foot "Conway Corniche L" Camping trailer for £120 from a bootfair ad.

He has been looking for a "Trailer Tent" for about a year now, but most tend to be somewhat overpriced.
Greetings from England.

Rian.


Hoping to get it all done in time.
User avatar
grizz
1000 Club
1000 Club
 
Posts: 1210
Images: 29
Joined: Mon Sep 21, 2009 2:37 pm
Location: Rochester, Kent, UK
Top

Postby robertaw » Sat Oct 17, 2009 9:02 pm

grizz wrote:You guys do make me smile humbly, when I see the sort of ptojects you take on, and the results.


:) Thanks. I can't promise great results on mine. This is our first hardcore rebuild.

We did make some decent progress today with the arrival of fall in Florida. Got the rear floor framed and topped with 3/4" plywood and then 3/4" OSB. It makes our floor at total of 2 1/2" thick but that's how it was originally and has lasted nearly 50 years so...

Image

Image

Image
Roberta
User avatar
robertaw
500 Club
 
Posts: 523
Images: 56
Joined: Mon Jul 13, 2009 3:02 pm
Location: Lake City, Florida
Top

Postby robertaw » Tue Oct 27, 2009 11:42 pm

We have a name - she will be painted orange, yellow, and red and be called "Sunset".

We've gotten a huge amount of work done in the past week on our rebuild. I have pictures on my blog but can't get my picture shrinker to work so I can post them here also.

We got the rear angle from hell put back together and the street side framing done and skin on. We only have a few more boards to put in before the curb side skin.

Next step will be floor between the wheel wells which will take about 5 minutes since it only invovles laying another piece of plywood on top of what is there. :applause:

That will leave only the floor and framing in the front to be done before the fun parts start. YAY Finally
Roberta
User avatar
robertaw
500 Club
 
Posts: 523
Images: 56
Joined: Mon Jul 13, 2009 3:02 pm
Location: Lake City, Florida
Top

Postby S. Heisley » Wed Oct 28, 2009 11:04 am

What a lot of work! You've really got to be able to see the dream in your head to be able to tear something like that apart and put it back together. It's like rebuilding a whole house! More power to ya, Roberta! :thumbsup: :applause:
User avatar
S. Heisley
Super Lifetime Member
 
Posts: 8774
Images: 495
Joined: Mon Sep 17, 2007 10:02 am
Location: No. California
Top

Postby robertaw » Wed Oct 28, 2009 6:58 pm

Thanks Sharon!

It's not back together all the way yet but honestly further than I ever thought it would be.

We are rookies and went about this rebuild all backwards but no regrets... we have learned lots. This one will have the vintage cool exterior but the inside designed to meet our needs.

Our next trailer (yep..gonna do it again! :lol: ) will be approached differently and hopefully kept more original.
Roberta
User avatar
robertaw
500 Club
 
Posts: 523
Images: 56
Joined: Mon Jul 13, 2009 3:02 pm
Location: Lake City, Florida
Top

Postby aggie79 » Thu Oct 29, 2009 11:27 am

Roberta,

That is one cool trailer. :applause: :thumbsup: :applause:

You've taken on a pretty big project. I really like the work you've done so far!

Tom
Tom (& Linda)
For build info on our former Silver Beatle teardrop:
Build Thread

93503
User avatar
aggie79
Super Duper Lifetime Member
 
Posts: 5405
Images: 686
Joined: Tue Aug 07, 2007 5:42 pm
Location: Watauga, Texas
Top

Postby robertaw » Sun Nov 15, 2009 7:11 pm

Made some progress on the Sunset TOW this weekend. BTW, for those of you who don't know - T.O.W is an acronym for Tenement on Wheels which was our trailer's original handle. (Affectionately named for Cousin's Eddie's RV in Christmas Vacation)

Anyway, Sunset TOW has a bit of a weight problem compared to most on this forum. But she maintains that she is just "large framed". That's her story and she's sticking to it! :thumbsup:

We have now got the new framing complete on the rear street side corner. She is all skinned back up and her first piece of exterior trim has been puttied and replaced.

Image

We have started the framing for the full time rear bed and one of the bathroom walls. We started this mainly to add stability while we work on other areas of the trailer.

With a couple of temporary roof supports in place we removed the door from it's rotten framing. This was easier said than done. After the struggle the door is resting peacefully against a tree and the trailer is looking unreasonably mangled.

Image

Image

We will be ripping out all of the front floor and building from the metal up just as we did in the rear section.

Image

On a side note, I'm still working on getting all the windows and drip caps cleaned up. I have all the jalouise windows working smooth as silk now but still have some reassembly, sanding, and polishing to do. Here they all are in various stages of restore.

Image

Our goal is to be campable by April. Labor-wise it wouldn't be a problem but the $$ for project materials is slim. We'll see...
Roberta
User avatar
robertaw
500 Club
 
Posts: 523
Images: 56
Joined: Mon Jul 13, 2009 3:02 pm
Location: Lake City, Florida
Top

Postby lauriandgary » Sun Nov 15, 2009 8:49 pm

Progress, its a good thing.

:applause:

Good job on polishing the windows & trim.
Gary

__________

And if I don't see you tomorrow, hello.
User avatar
lauriandgary
Teardrop Master
 
Posts: 112
Images: 36
Joined: Thu Jan 19, 2006 9:30 pm
Location: Sunset, LA
Top

Next

Return to Build Journals

Who is online

Users browsing this forum: No registered users and 19 guests