Modified 2+2 trolley top - Dinette Table - pg 15

...ask your questions in the appropriate forums BUT document your build here...preferably in a single thread...dates for updates, are appreciated....

Re: Modified 2+2 trolley top - roof plywood started -pg 11

Postby nevadatear » Sun May 04, 2014 9:53 pm

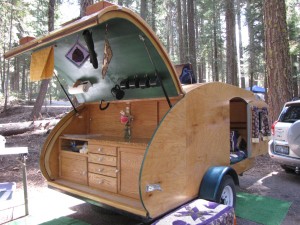
Randy was wondering why he didn't see you guys at the Dam. So sorry about your accident, we hadn't heard. Hope you are doing better. Trailer is looking great.
Debbie (with Randy looking over my shoulder)
Our build thread: http://www.tnttt.com/viewtopic.php?t=41295&highlight=monstero
2009 Homebuilt woody, Kenskill inspired 5 wide
ImageImage
User avatar
nevadatear
Silver Donating Member
 
Posts: 2362
Images: 171
Joined: Mon Nov 10, 2008 2:37 pm
Location: No. Nevada

Re: Modified 2+2 trolley top - roof plywood started -pg 11

Postby danlott » Sun May 04, 2014 10:08 pm

Would have liked to have gone to the Dam gathering this weekend, but could not get enough time off to make the trip and have more than one day camping. I do currently have time off for IRG, so hopefully should be able to make that one.

Dan
Hoplite Traveler Build thread
Image Image
Life is what happens to you while you're busy making other plans.
User avatar
danlott
Donating Member
 
Posts: 874
Images: 264
Joined: Fri Mar 06, 2009 2:18 pm
Location: Winnemucca, Nevada

Re: Modified 2+2 trolley top - roof plywood started -pg 11

Postby nevadatear » Sun May 04, 2014 10:22 pm

Great! We will see you there.
Debbie (with Randy looking over my shoulder)
Our build thread: http://www.tnttt.com/viewtopic.php?t=41295&highlight=monstero
2009 Homebuilt woody, Kenskill inspired 5 wide
ImageImage
User avatar
nevadatear
Silver Donating Member
 
Posts: 2362
Images: 171
Joined: Mon Nov 10, 2008 2:37 pm
Location: No. Nevada
Top

Re: Modified 2+2 trolley top - roof plywood finished -pg 12

Postby danlott » Tue May 13, 2014 10:55 pm

Got the last of the second layer of roof plywood glued on today.

Image

Also started working on the hatch, but did not take any pictures of that. Will post some after I make a little more progress on it.

Dan
Hoplite Traveler Build thread
Image Image
Life is what happens to you while you're busy making other plans.
User avatar
danlott
Donating Member
 
Posts: 874
Images: 264
Joined: Fri Mar 06, 2009 2:18 pm
Location: Winnemucca, Nevada
Top

Re: Modified 2+2 trolley top - roof plywood finished -pg 12

Postby danlott » Tue May 20, 2014 10:43 pm

My orginal idea for fender flares was to use Pacer universal fender flare material.

Image


My wheels will stick out about 2 inches beyond the sidewall of the trailer, so I need some sort of fender flares to cover them.

Image


I then saw someone use Jeep CJ fender flares on another build on here, so I decide to get one to see how it would fit.

Image

It is a little undersized in that about 1.25" of the wheel cutout is exposed on the front and the back. Had I know about these fender flares from the start of my build I would have sized the wheel cutouts to match the size of the Jeep fender flares.

Even though the fender flare is slightly undersized I believe I will probably buy another one and use these instead of the universal fender flare material.

What do you all think?

Dan
Hoplite Traveler Build thread
Image Image
Life is what happens to you while you're busy making other plans.
User avatar
danlott
Donating Member
 
Posts: 874
Images: 264
Joined: Fri Mar 06, 2009 2:18 pm
Location: Winnemucca, Nevada
Top

Re: Modified 2+2 trolley top - fender flare option? -pg 12

Postby KCStudly » Wed May 21, 2014 6:40 am

Maybe if you run a band of black paint around the lowest edge of the wall the same height as the bottom of the fender lip, you could avoid the "flood pants/white socks" look. Not sure how that would fit into the rest of your paint/graphics scheme, but it would take a lot of the mismatch out of the visual picture. Even if you just extend the line of the arc of the fender down with a blackout treatment under the little overhanging section and blackout the area behind the wheel and tire it could make a big difference visually. Maybe try it with some black duct tape or a scrap of cardboard spray painted black.)

Is there a particular reason to not choose the Pacer stuff?

You are doing such a good job on the build, and wheels and tires (er go fenders) are such a big part of the visual look, it will pay to be sure you are 100/ct happy with how it turns out.
KC
My Build: The Poet Creek Express Hybrid Foamie

Poet Creek Or Bust
Engineering the TLAR way - "That Looks About Right"
TnTTT ORIGINAL 200A LANTERN CLUB = "The 200A Gang"
Green Lantern Corpsmen
User avatar
KCStudly
Donating Member
 
Posts: 9611
Images: 8169
Joined: Mon Feb 06, 2012 10:18 pm
Location: Southeastern CT, USA
Top

Re: Modified 2+2 trolley top - fender flare option? -pg 12

Postby danlott » Wed May 21, 2014 4:54 pm

KCStudly wrote:Is there a particular reason to not choose the Pacer stuff?


I was going to use the Pacer stuff because I could cut it to length.

I do think I will wait until I get the whole trailer finished before I decide on the fender flares. Should have the trailer painted by then and will get a better idea of what the Jeep fender flares look like.

Dan
Hoplite Traveler Build thread
Image Image
Life is what happens to you while you're busy making other plans.
User avatar
danlott
Donating Member
 
Posts: 874
Images: 264
Joined: Fri Mar 06, 2009 2:18 pm
Location: Winnemucca, Nevada
Top

Re: Modified 2+2 trolley top - fender flare option? -pg 12

Postby Starseeker » Wed May 21, 2014 5:20 pm

You have an awesome build going on. Great work :applause:
Aaron
KF5VBV
User avatar
Starseeker
Teardrop Builder
 
Posts: 37
Images: 10
Joined: Wed Nov 07, 2012 2:53 pm
Location: Midwest City, Oklahoma
Top

Re: Modified 2+2 trolley top - Hatch started -pg 12

Postby danlott » Wed May 21, 2014 6:27 pm

Windy and raining here the last two days, but I did manage to get out and do a little cutting and fitting on my hatch.

Image

I am building my hatch per the Steve Frederick Shop Manual guide. So far so good...

Dan
Hoplite Traveler Build thread
Image Image
Life is what happens to you while you're busy making other plans.
User avatar
danlott
Donating Member
 
Posts: 874
Images: 264
Joined: Fri Mar 06, 2009 2:18 pm
Location: Winnemucca, Nevada
Top

Re: Modified 2+2 trolley top - Hatch started -pg 12

Postby danlott » Sun Jun 01, 2014 5:14 pm

Have been working on my hatch. I have the inside layer of plywood installed. The wiring and blocking is finished. Now I am ready to put on the outside layers of plywood.

Here is the hatch after I removed it from the trailer.
Image


This is after I applied the inside layer of plywood.
Image


Here it is on it's side beside my house. This is a BIG hatch. It is 78 inches wide.
Image


Back on the trailer after the inside layer of plywood was installed.
Image


Blocking for the gas struts.
Image

Wiring completed in the hatch.
Image


Now on the to the outside layers of plywood.

Dan
Last edited by danlott on Sun Jun 01, 2014 6:19 pm, edited 2 times in total.
Hoplite Traveler Build thread
Image Image
Life is what happens to you while you're busy making other plans.
User avatar
danlott
Donating Member
 
Posts: 874
Images: 264
Joined: Fri Mar 06, 2009 2:18 pm
Location: Winnemucca, Nevada
Top

Re: Modified 2+2 trolley top - Hatch started -pg 12

Postby mallymal » Sun Jun 01, 2014 5:16 pm

Nice job
User avatar
mallymal
The 300 Club
 
Posts: 308
Images: 18
Joined: Fri Sep 26, 2008 4:20 am
Location: manchester, UK
Top

Re: Modified 2+2 trolley top - Hatch building continued -pg

Postby Wolfgang92025 » Sun Jun 01, 2014 8:12 pm

Looking good Dan,
Getting closer to that finish line....... :thumbsup: :applause: :D
Wolfgang

Image
User avatar
Wolfgang92025
Lifetime member
 
Posts: 1060
Images: 651
Joined: Fri Apr 18, 2008 10:16 pm
Location: Salt Lake City area, Utah
Top

Re: Modified 2+2 trolley top - Hatch building continued -pg

Postby Gunguy05 » Sun Jun 01, 2014 8:21 pm

Glad to see someone building one with a hatch that is wider than mine :o

If you are working on the hatch, then you are getting oh so closer!

Looking good!
Brian


Checkout my buildThe Regal Eagle Bow front for 4
Image
Also my teardrop updates from blog on Dad Rambles
User avatar
Gunguy05
The 300 Club
 
Posts: 385
Images: 6
Joined: Mon Dec 02, 2013 4:45 pm
Location: South GA
Top

Re: Modified 2+2 trolley top - Hatch building continued -pg

Postby danlott » Sun Jun 01, 2014 11:57 pm

Gunguy05 wrote:If you are working on the hatch, then you are getting oh so closer.


It is getting closer, but probably not ready until next year. Have to many things planned and not enough time to finish this camping season.

Will keep working at it though.

Dan
Hoplite Traveler Build thread
Image Image
Life is what happens to you while you're busy making other plans.
User avatar
danlott
Donating Member
 
Posts: 874
Images: 264
Joined: Fri Mar 06, 2009 2:18 pm
Location: Winnemucca, Nevada
Top

Re: Modified 2+2 trolley top - Hatch finished - pg 12

Postby danlott » Mon Jun 23, 2014 11:58 pm

Finished the hatch and dragged my trailer out into the sun light to get some decent pictures.

Here is the trailer from the side.

Image


Front view.

Image


Rear view.

Image


Next up is filling holes, flaring and sanding.

Dan
Hoplite Traveler Build thread
Image Image
Life is what happens to you while you're busy making other plans.
User avatar
danlott
Donating Member
 
Posts: 874
Images: 264
Joined: Fri Mar 06, 2009 2:18 pm
Location: Winnemucca, Nevada
Top

PreviousNext

Return to Build Journals

Who is online

Users browsing this forum: No registered users and 16 guests