Modified 2+2 trolley top - Dinette Table - pg 15

...ask your questions in the appropriate forums BUT document your build here...preferably in a single thread...dates for updates, are appreciated....

Re: Modified 2+2 trolley top - Door cut out - page 7

Postby danlott » Fri Oct 19, 2012 3:47 pm

Thank you guys for the kind compliments.

Dan
Hoplite Traveler Build thread
Image Image
Life is what happens to you while you're busy making other plans.
User avatar
danlott
Donating Member
 
Posts: 874
Images: 264
Joined: Fri Mar 06, 2009 2:18 pm
Location: Winnemucca, Nevada

Re: Modified 2+2 trolley top - Door cut out - page 7

Postby tathead40 » Thu Nov 01, 2012 8:56 am

:thumbsup: :thumbsup: :thumbsup: :thumbsup: :thumbsup: :thumbsup: :thumbsup: :thumbsup: :thumbsup: :thumbsup: :thumbsup: :thumbsup: :thumbsup: :thumbsup: :thumbsup: :thumbsup: :thumbsup: :thumbsup: :thumbsup: :thumbsup: :thumbsup: :thumbsup: :thumbsup: :applause: :applause: :applause: :applause: :applause: :applause: :applause: :applause: :applause: :applause: :applause: awesome build :)
tathead40
Teardrop Inspector
 
Posts: 2
Joined: Thu May 31, 2012 11:13 am

Re: Modified 2+2 trolley top - Door cut out - page 7

Postby Fishingtomatoseed » Thu Mar 14, 2013 9:36 pm

Hi Dan. Hope everything is well. Just stopped by your build thread to see how it is going. Been able to get anything done on the project?
User avatar
Fishingtomatoseed
Donating Member
 
Posts: 261
Images: 9
Joined: Sun Aug 21, 2011 4:47 pm
Location: North Texas
Top

Re: Modified 2+2 trolley top - Door cut out - page 7

Postby danlott » Fri Mar 15, 2013 6:44 pm

Have not did anything over the winter. Has been too cold and work seems to get in the way. It is starting to warm up, now just need to devote some time to it.

Here are a couple of pictures of my progress before winter set in. I did manage to get the walls attached to the floor.

Image

Here I put one of the trolley top sides on the side wall just to see how it looked and fit. Of course the trolley top will not be sitting on the side wall when finished.

Image

Dan
Hoplite Traveler Build thread
Image Image
Life is what happens to you while you're busy making other plans.
User avatar
danlott
Donating Member
 
Posts: 874
Images: 264
Joined: Fri Mar 06, 2009 2:18 pm
Location: Winnemucca, Nevada
Top

Re: Modified 2+2 trolley top - Door cut out - page 7

Postby bonnie » Sat Mar 16, 2013 1:05 am

I so like the trolley tops. Warming up here too. Glad to be able to work on the trailer a bit.
Remember, the turtle won. :)
User avatar
bonnie
Donating Member
 
Posts: 1390
Images: 107
Joined: Sun Jul 24, 2011 4:14 pm
Location: Roxana, IL
Top

Re: Modified 2+2 trolley top -Galley walls and rear shelf-pa

Postby danlott » Thu May 16, 2013 8:21 pm

Having a little inspiration from recently attending the best DAM gathering ever and also having a few days off with really nice weather I was able to make some progress.

I am following Steve Frederick's construction guide on most of my build, although I am not following the order that he uses. I mention this, so those that know will understand my galley side wall construction methods.

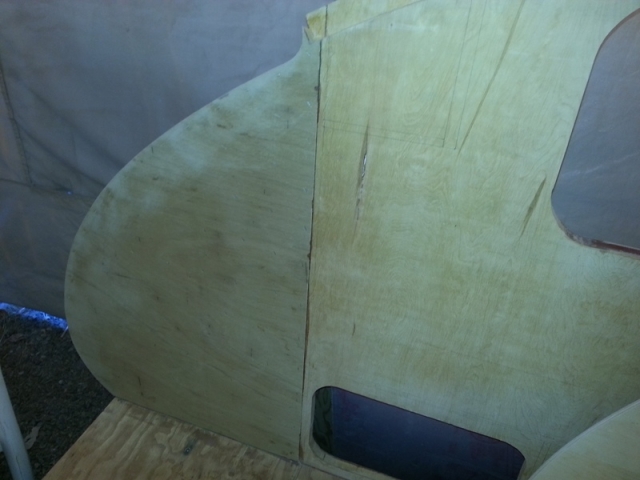
Here I am installing the 1/8 plywood spacer in the galley sidewall area. This is to allow space for the hatch and seal area.
Image

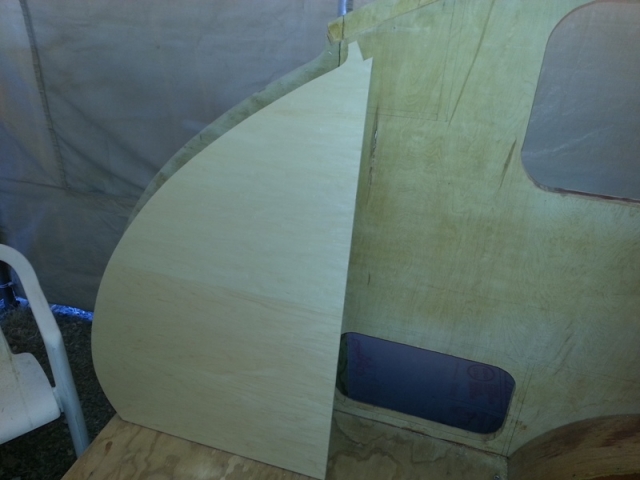
Here is the finished galley side wall cut out.
Image

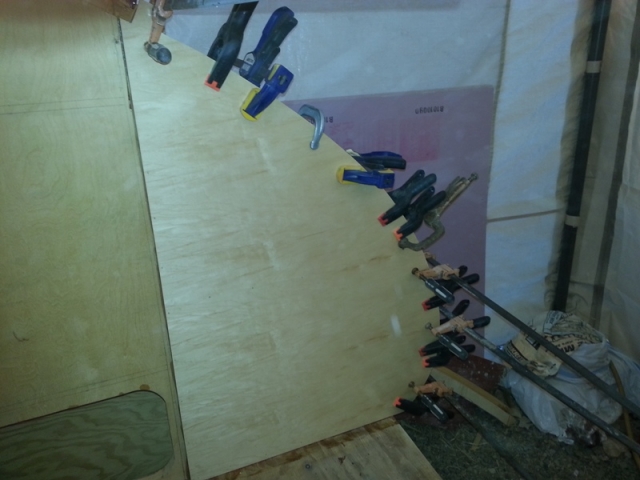
I glued the walls on with thickened epoxy. The bottom and cabin side edges were finish nailed, while the hatch edge was clamped.
Image

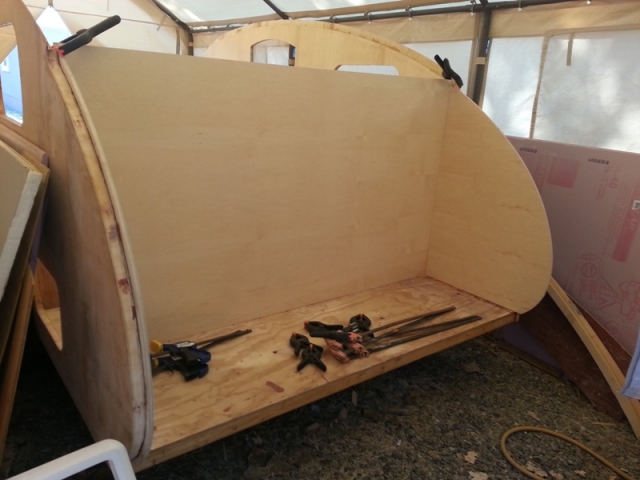
This is the galley area with the finished walls epoxied in and ready to be fitted out at a later date.
Image

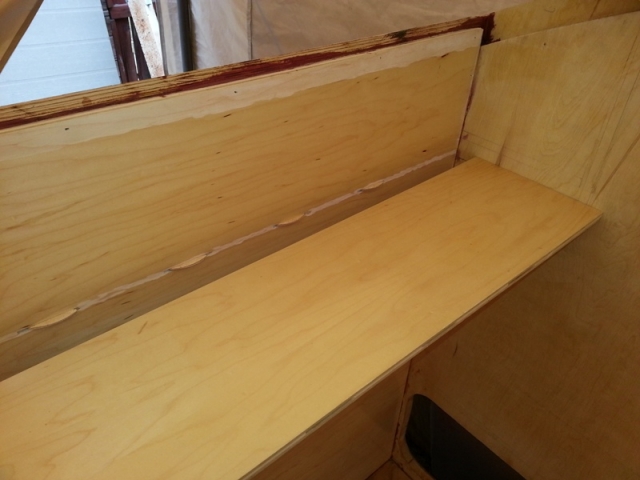
Next I worked on the rear shelf. This is the rear shelf being test fitted. The sides of the shelf has a slot to slide on wood biscuits that are in the side walls. The shelf then is futher supported by the biscuits in the rear galley wall.
Image

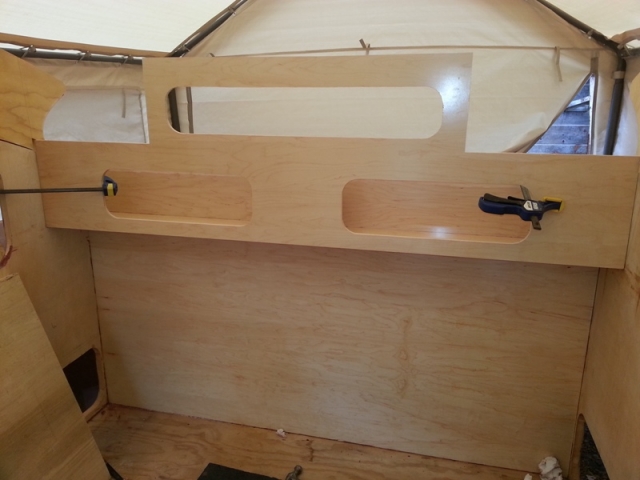
Here is a picture of the rear shelf/radio area and rear window area put together and epoxied in to place. Still have to install some dividers inside the cubby areas and make cutouts for the radio, speakers and whatever else I decide to install. The window is in the trolley top section and will look out over the hatch area when the hatch is closed.
Image

Well that is it for now, have to go back to work. More to hopefully follow soon.

Dan
Hoplite Traveler Build thread
Image Image
Life is what happens to you while you're busy making other plans.
User avatar
danlott
Donating Member
 
Posts: 874
Images: 264
Joined: Fri Mar 06, 2009 2:18 pm
Location: Winnemucca, Nevada
Top

Re: Modified 2+2 trolley top -Galley walls and rear shelf-pa

Postby Fishingtomatoseed » Fri May 17, 2013 6:02 am

Looking good Dan. Glad too see the project back going.
User avatar
Fishingtomatoseed
Donating Member
 
Posts: 261
Images: 9
Joined: Sun Aug 21, 2011 4:47 pm
Location: North Texas
Top

Re: Modified 2+2 trolley top -Galley walls and rear shelf-pa

Postby DMcCam » Fri May 17, 2013 4:50 pm

Great work Dan!!! Love that trolly top buddy; Go Dan Go!!!

Dave
User avatar
DMcCam
Gold Donating Member
 
Posts: 883
Joined: Wed Jan 06, 2010 8:30 pm
Location: Reno, Nevada
Top

Re: Modified 2+2 trolley top -Galley walls and rear shelf-pa

Postby donnan » Sat Jun 01, 2013 10:17 pm

Hi Dan,

Your build looks like a great project. :thumbsup:

Just asking about your drop down floor section. Did you end up putting angles around the bottom edges to help support anyone standing in the dropdown. I would be worrying whether the bottom would come out if I stood in it?

Did you already purchase the weatherstrip for your galley seal? I am just wondering what thickness to allow for doors or openings if you don't have the seal yet.

I am looking forward to watching your progress. :D It shows you are very skilled and have a great eye for design.

Paul
Life is too short not to enjoy it :)
When I gamble I like to win.
http://www.realpayers.com
User avatar
donnan
Teardrop Advisor
 
Posts: 64
Images: 8
Joined: Sun May 12, 2013 12:18 pm
Location: Tamworth Australia
Top

Re: Modified 2+2 trolley top - more progress 6/25/13 -page 8

Postby danlott » Tue Jun 25, 2013 4:12 pm

Got a little more done on the trailer.

Got the back cubby area closed in.
Image

Then moved on the front cubby area. The trolley top will be supported off the front and back cubby area.
Image

Image

The seam in the front cubby plywood will be covered by the bunk bed platform.
Image

In this picture you can also see the bunk bed platform lying against the inside wall.
Image

Here are some pictures of the trolley top sides setting in place. The next step will be to get the inside roof skin installed.
Image

In this picture you can see where the rear window will be in the trolley top.
Image


Dan
Last edited by danlott on Sat Apr 26, 2014 10:24 am, edited 1 time in total.
Hoplite Traveler Build thread
Image Image
Life is what happens to you while you're busy making other plans.
User avatar
danlott
Donating Member
 
Posts: 874
Images: 264
Joined: Fri Mar 06, 2009 2:18 pm
Location: Winnemucca, Nevada
Top

Re: Modified 2+2 trolley top - more progress 6/25/13 -page 8

Postby KCStudly » Tue Jun 25, 2013 9:03 pm

Zowie! You've been busy and it is looking great! :applause: :thumbsup: :applause: :thumbsup:
KC
My Build: The Poet Creek Express Hybrid Foamie

Poet Creek Or Bust
Engineering the TLAR way - "That Looks About Right"
TnTTT ORIGINAL 200A LANTERN CLUB = "The 200A Gang"
Green Lantern Corpsmen
User avatar
KCStudly
Donating Member
 
Posts: 9615
Images: 8169
Joined: Mon Feb 06, 2012 10:18 pm
Location: Southeastern CT, USA
Top

Re: Modified 2+2 trolley top - roof spars -page 8

Postby danlott » Sat Jul 27, 2013 10:53 pm

I have made some pretty good progress on my trailer. I have the trolley top sides installed, all the roof spars installed and some of the interior roof skin installed. I still have the plywood to install on the interior of the trolley top and then I will be able to start installing the wiring.

Here are a few pictures of what my trailer looks like today.

Image

Image

Image

Image

Image

Image

Dan
Hoplite Traveler Build thread
Image Image
Life is what happens to you while you're busy making other plans.
User avatar
danlott
Donating Member
 
Posts: 874
Images: 264
Joined: Fri Mar 06, 2009 2:18 pm
Location: Winnemucca, Nevada
Top

Re: Modified 2+2 trolley top - roof spars -page 8

Postby Fishingtomatoseed » Sun Jul 28, 2013 7:59 am

Wow!! Beautiful work Dan. [CLAPPING HANDS SIGN][CLAPPING HANDS SIGN][CLAPPING HANDS SIGN][CLAPPING HANDS SIGN]
User avatar
Fishingtomatoseed
Donating Member
 
Posts: 261
Images: 9
Joined: Sun Aug 21, 2011 4:47 pm
Location: North Texas
Top

Re: Modified 2+2 trolley top - roof spars -page 8

Postby KCStudly » Sun Jul 28, 2013 9:16 am

That is looking fabulous. Very nice craftsmanship! :thumbsup:

Is that a flat spot in the rear of the trolley top for a third brake light? Nice touch! :applause:
KC
My Build: The Poet Creek Express Hybrid Foamie

Poet Creek Or Bust
Engineering the TLAR way - "That Looks About Right"
TnTTT ORIGINAL 200A LANTERN CLUB = "The 200A Gang"
Green Lantern Corpsmen
User avatar
KCStudly
Donating Member
 
Posts: 9615
Images: 8169
Joined: Mon Feb 06, 2012 10:18 pm
Location: Southeastern CT, USA
Top

Re: Modified 2+2 trolley top - roof spars -page 8

Postby danlott » Sun Jul 28, 2013 11:28 am

KCStudly wrote:Is that a flat spot in the rear of the trolley top for a third brake light? Nice touch! :applause:


Yes it will be third brake light. It will be a brake light and also additional turn indicator.

Image

You can also see one of my mistakes in this photo. I forgot to include the thickness of the roof plywood in the rear radius off the trolley top sides. I plan on filling this area with fiberglass reinforced bondo or thickened epoxy after I install the roof plywood.

Dan
Hoplite Traveler Build thread
Image Image
Life is what happens to you while you're busy making other plans.
User avatar
danlott
Donating Member
 
Posts: 874
Images: 264
Joined: Fri Mar 06, 2009 2:18 pm
Location: Winnemucca, Nevada
Top

PreviousNext

Return to Build Journals

Who is online

Users browsing this forum: No registered users and 21 guests