Our Little Tin Can(Done!!!)

...ask your questions in the appropriate forums BUT document your build here...preferably in a single thread...dates for updates, are appreciated....

The journey begins for real

Postby gregp136 » Sat Feb 20, 2010 3:00 pm

We have begun. We could not pass up the deal at HF and bought the trailer, on sale, plus 20% off. While it was unloaded in the garage, yet not yet put together I started on the floor.

Image

Once that was done, I coated with with roofing cement.

Image

I bult the trailer in the garage, and then attached the floor.

Image

Then, back into the basement. I am using kuffle Creeks plans so I followed his advice and made many many many one inch squares on the plywood, to transfer the profile. Heack, it got me through art class in high school.

Image

And then I cut.

Image

So here I am today, taking time to update the buld journal. It, so far, is going quite well. Not sure if I will have it moving by the end of April, but am going to try.

Greg (and Laurie)
Image
User avatar
gregp136
The 300 Club
 
Posts: 329
Images: 100
Joined: Sun Jan 03, 2010 8:11 am
Location: West Allis, Wisconsin

moving right along

Postby gregp136 » Tue Mar 16, 2010 9:54 am

As I mentioned in a different thread, I have decided to do as much of the build in the basement as possible in order to stay warm, and so I will not have to crawl around and sand and varnish in our 4x8 tin can.

I also have trouble getting to the computer to add to this build journal when I am busy building. But here we go!

Image

Here are the walls, ready to be skinned.

Image

And here are the walls skinned. You will notice the fan I have put in the side, and my fuse box built into the wall. I have also notched the skin(1/8 hard maple plywood) for the spars.

Image

Finished getting the trailer ready. The vinyl flooring is just one of the addtions which I did not figure into the original price, but I figure on rainy days we can roll back the foam matress and play checkers. :lol:

Image

Here Laurie is holding up the side, ready for me to screw it down.

Image

The walls are attached, and the spars are set in place.

Image

And this is where we ended the night last night. The bulkhead is in, and, darnit, it is beginging to look like a teardrop!
Image
User avatar
gregp136
The 300 Club
 
Posts: 329
Images: 100
Joined: Sun Jan 03, 2010 8:11 am
Location: West Allis, Wisconsin

Great work!

Postby Alfred » Wed Mar 17, 2010 8:29 am

Hey Wow! It is starting to look like a TD! Very cool! I like the checkerboard floor, too. Looks great!

Al in Asheville :thumbsup:
4 minute video of our build - A 5x8 Camper for a family of 5 - http://youtu.be/CYGTlkfpIhY
How we built a 5x8 camper for a family of 5, using a utility trailer with an incorporated bunk bed for the kids.
From plain trailer to campground!

ImageImageImage
Also - More pictures here: http://flic.kr/ps/225piC
User avatar
Alfred
Silver Donating Member
 
Posts: 1633
Images: 368
Joined: Sun Jun 03, 2007 9:18 pm
Location: NC, Asheville
Top

Postby absolutsnwbrdr » Wed Mar 17, 2010 8:40 am

I really like that floor. I'm still trying to decide what to do with mine... can I borrow yours?! :lol:
Zach
Coming Soon...
Image Image
User avatar
absolutsnwbrdr
Donating Member
 
Posts: 2657
Images: 412
Joined: Mon Jan 25, 2010 6:10 pm
Location: Hanover, PA
Top

the floor

Postby gregp136 » Wed Mar 17, 2010 9:46 am

It helps to be married to an artist. I planned the tear, but Laurie is the one that is making sure it looks good.

Greg (and Laurie)
Image
User avatar
gregp136
The 300 Club
 
Posts: 329
Images: 100
Joined: Sun Jan 03, 2010 8:11 am
Location: West Allis, Wisconsin
Top

Postby DMcCam » Wed Mar 17, 2010 11:04 am

Hey Greg, your TD is coming along nicely :applause: . I can't wait to make sawdust too. Thank you for posting your build pictures.

Cheers, Dave
User avatar
DMcCam
Gold Donating Member
 
Posts: 883
Joined: Wed Jan 06, 2010 8:30 pm
Location: Reno, Nevada
Top

Postby aggie79 » Wed Mar 17, 2010 2:12 pm

Greg,

Your teardrop is looking great and I really like the floor too. I bet that was quite a good feeling when you had the walls up for the first time!

I'll add your name to the (long) list of those that started building after I did but will be finished ahead of me.

Tom
Tom (& Linda)
For build info on our former Silver Beatle teardrop:
Build Thread

93503
User avatar
aggie79
Super Duper Lifetime Member
 
Posts: 5405
Images: 686
Joined: Tue Aug 07, 2007 5:42 pm
Location: Watauga, Texas
Top

Postby Miriam C. » Wed Mar 17, 2010 2:39 pm

:woohoo: :hammer: :clapping hands:
Looking like a really beautiful TD. All that work will pay off big time when camping season starts..

Image
“Forgiveness means giving up all hope for a better past.â€
User avatar
Miriam C.
our Aunti M
 
Posts: 19675
Images: 148
Joined: Wed Feb 15, 2006 3:14 pm
Location: Southwest MO
Top

Postby gregp136 » Sat Mar 27, 2010 9:29 am

We are continuing to work, when there is time. I have done some work on the galley so that Laurie can paint it while she is on spring break (she is an art teacher).

Image

I have almost all of the insulation cut and attached, still a few more holes to fill.

Image

And yes, my big accomplishment, at least in my head, was completing the electrical. We are both amazed at how bright it is with those three little lights.

Image

My next step, besides continuing on the galley, is to construct the hatch. Whish me luck.

Greg (and Laurie)
Image
User avatar
gregp136
The 300 Club
 
Posts: 329
Images: 100
Joined: Sun Jan 03, 2010 8:11 am
Location: West Allis, Wisconsin
Top

Postby rboser » Sat Mar 27, 2010 9:36 am

Great job! Your big TD is turning out even better than your model.
-Bob
Camp-Inn 560
User avatar
rboser
Donating Member
 
Posts: 30
Images: 1
Joined: Mon Jan 25, 2010 9:58 pm
Location: Holland, PA
Top

Postby gregp136 » Fri Apr 09, 2010 10:09 am

OK, here we go again. I ordered the Aluminum from a local sign company, and some other stuff, including the windows, from a local RV dealer, so we are stuck waiting for these supplies to come in.So what do while we wait? Lets finish the galley.
Image

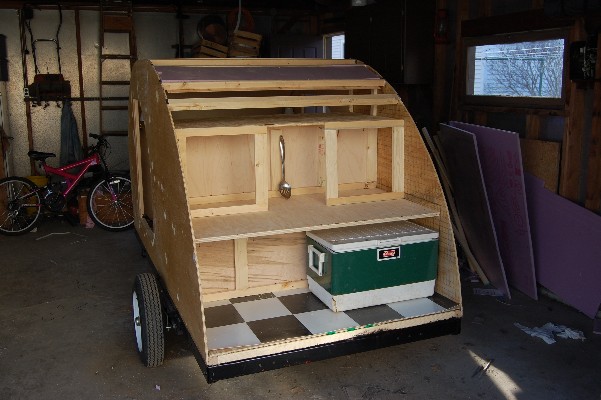
We took our wood over to my brother in law John, since he has all the needed saws, and skill. We cut up the wood we needed. We then put it all together in a week, since teacher Laurie is on spring break. So the results are below.
Image

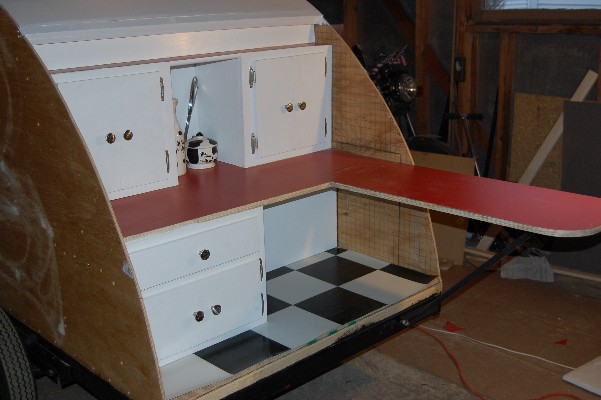
Laurie wanted a "50's diner" Galley.
Image

And while we love the look, we admit that Greg's carpentry skills are not yet up to union quality.

Image
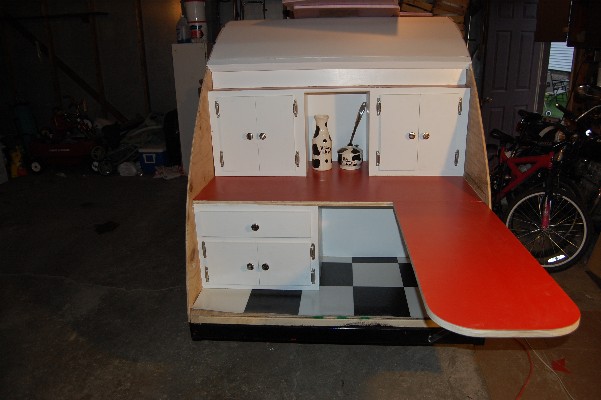
Laurie also wanted an extended counter for more work space, and to challenge Greg's engineering abilities. It is attached by clips and dowels, with a peice of 1/2 black pipe for support. It is removable to store when hatch is shut.
Image

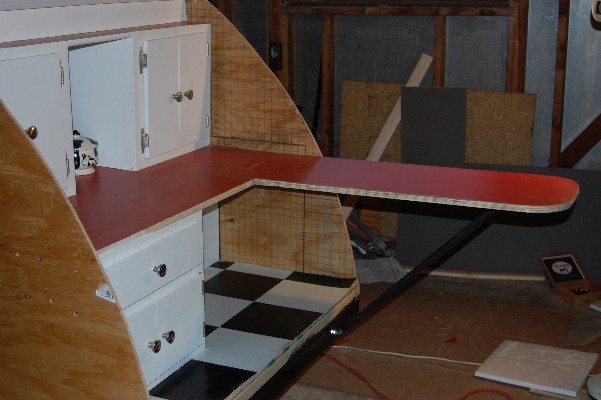
So the galley is almost complete. Still need to put aluminum on the inside walls, add some white quarter round, and add aluminum trim to the edge of the counter.

Now off to John's to cut the wood for the inside cabinets, and continue to hound the sign guys to get us our aluminum!

Greg (and Laurie)
Image
User avatar
gregp136
The 300 Club
 
Posts: 329
Images: 100
Joined: Sun Jan 03, 2010 8:11 am
Location: West Allis, Wisconsin
Top

Postby TwilightLane » Fri Apr 09, 2010 11:37 am

That L shape countertop is awesome. What a great idea. What material is that??

Can you take some more pictures of how you attached the pipe. Pretty please!! Thanks!

:lol: :lol: :lol:
Rob & Lori
Aspen & Tundra
My Instructable: http://www.instructables.com/id/Teardro ... l-Trailer/
User avatar
TwilightLane
The 300 Club
 
Posts: 484
Joined: Thu May 14, 2009 4:59 pm
Top

Postby gregp136 » Sat Apr 10, 2010 7:36 pm

Sure, here are the extra pics. I really tried to kee it as simple as possible.

Image

As you can see, with the counter upside down, it has two clips to hold it against the other counter, and the pipe is completely rewmovable. It fits into the hunk of extra plywood I glued on.

It is all 3/4 inch plywood, with Formica.

Image

I added a bolt for the pipe to rest against on the frame. I did not want to deal with a telescoping rod.

And here is the rest of the underside. All together.

Image

I hope that helps.

Greg (and Laurie)
Image
User avatar
gregp136
The 300 Club
 
Posts: 329
Images: 100
Joined: Sun Jan 03, 2010 8:11 am
Location: West Allis, Wisconsin
Top

Postby parnold » Sat Apr 10, 2010 7:40 pm

:thumbsup:
User avatar
parnold
Donating Member
 
Posts: 2344
Images: 302
Joined: Mon Feb 08, 2010 4:49 pm
Location: Northwest New Jersey
Top

Postby S. Heisley » Sat Apr 10, 2010 11:34 pm

That "L" shaped counter top really is pretty slick. That was definite thinking on your feet! I suspect that is going to be your "signature piece" for the build. People will love that. :thumbsup:
User avatar
S. Heisley
Super Lifetime Member
 
Posts: 8772
Images: 495
Joined: Mon Sep 17, 2007 10:02 am
Location: No. California
Top

PreviousNext

Return to Build Journals

Who is online

Users browsing this forum: No registered users and 50 guests