The Urabus Scuttlebutt from PA *Update 10/11/2011 PAGE 23*

...ask your questions in the appropriate forums BUT document your build here...preferably in a single thread...dates for updates, are appreciated....

Postby grizz » Mon Aug 01, 2011 12:19 pm

Your package deal solution makes me grin madly mate.

Well solved.
Greetings from England.

Rian.


Hoping to get it all done in time.
User avatar
grizz
1000 Club
1000 Club
 
Posts: 1210
Images: 29
Joined: Mon Sep 21, 2009 2:37 pm
Location: Rochester, Kent, UK

Postby S. Heisley » Mon Aug 01, 2011 8:47 pm

Great ideas, Zach, and good looking fabric. :thumbsup: Thanks for continuing to share your updates with us. :applause:
User avatar
S. Heisley
Super Lifetime Member
 
Posts: 8774
Images: 495
Joined: Mon Sep 17, 2007 10:02 am
Location: No. California

Postby absolutsnwbrdr » Tue Aug 02, 2011 5:11 pm

Thanks Rian and Sharon!

Its been a year and a half since I built the convertible and it seems like its almost finished! :R

I dropped some fabric off at my friends' house today. So hopefully I'll have a quilt to match the curtains in the near future!

I also took some pictures of wire channel that I installed the other day. Since I don't have sandwich walls, I had no where to run the wires for the side lights and roof fan. They just ran up along the door frames and were masked with black electrical tape. It worked, but was 'unfinished'.

You can see the crappy exposed wires in this picture from last Fall...

Image

And here are pics with the wire channels. They'll probably get painted at some point.

Image

Image


The hatch graphics are done also! Definitely a lot better with all that blue space broken up a little!

Image
Zach
Coming Soon...
Image Image
User avatar
absolutsnwbrdr
Donating Member
 
Posts: 2657
Images: 412
Joined: Mon Jan 25, 2010 6:10 pm
Location: Hanover, PA
Top

Postby Deryk the Pirate » Tue Aug 02, 2011 11:07 pm

Nice! Much more appealing to the eye.
Build Thread lil vardo 1: http://tinyurl.com/baqe6py
Build Thread lil vardo 2: http://tinyurl.com/b3rwffm
User avatar
Deryk the Pirate
500 Club
 
Posts: 809
Images: 158
Joined: Tue Aug 18, 2009 11:03 am
Location: Parlin NJ
Top

Postby absolutsnwbrdr » Fri Aug 05, 2011 7:06 am

Thanks Deryk! Can't believe you're already building your second vardo! I can't wait to start #2!
Zach
Coming Soon...
Image Image
User avatar
absolutsnwbrdr
Donating Member
 
Posts: 2657
Images: 412
Joined: Mon Jan 25, 2010 6:10 pm
Location: Hanover, PA
Top

Postby eaglesdare » Fri Aug 05, 2011 7:20 am

:thumbsup: that is looking really good zach! :applause:
Louella
May the foam be with you.
User avatar
eaglesdare
Donating Member
 
Posts: 3168
Images: 13
Joined: Tue Aug 26, 2008 7:06 pm
Top

Postby absolutsnwbrdr » Tue Aug 09, 2011 12:17 pm

Thanks Louella! Looking forward to seeing you at the next gathering! (Elk Neck?)
Zach
Coming Soon...
Image Image
User avatar
absolutsnwbrdr
Donating Member
 
Posts: 2657
Images: 412
Joined: Mon Jan 25, 2010 6:10 pm
Location: Hanover, PA
Top

Postby absolutsnwbrdr » Tue Aug 09, 2011 1:06 pm

One issue that I'm still having with my teardrop is the fact that I bust my knuckles trying to adjust the tongue jack height. Since my trailer extends 1'-0" in front of the trailer frame, it forces my tongue box to sit a little too close to my tongue jack.

The solution? Follow what a few other people have done, and extend the tongue.

I just called a local welding and fabricating shop and ordered a 7ft piece of 2"x2"x3/16" steel. Its going to cost right around $30, which isn't bad. Its only about $6 more than the 1/8" tube. I told them that I'd swing in on Friday around lunch time to pick it up. I'll also pick up a few grade 5 stainless steel nuts and bolts.

The 7ft piece of tube steel will run from the trailer's second cross member, forward through though the flipped coupler mounting bracket. It will be attached with 2 bolts through the coupler mounting bracket, and one bolt in each of the trailers front and second cross members.
Zach
Coming Soon...
Image Image
User avatar
absolutsnwbrdr
Donating Member
 
Posts: 2657
Images: 412
Joined: Mon Jan 25, 2010 6:10 pm
Location: Hanover, PA
Top

Postby Woodstramp » Tue Aug 09, 2011 1:33 pm

The graphics on you trailer are great. Not too much....just enough to be sharp.

The little tribal dude is perfect. Thought about something simular on mine. Most little tribal graphics I've seen show the characters in action (hunting/running or like yours, playing music).

I'd like to make one of a guy just vegging out. :lol:

Something like this..
Image
User avatar
Woodstramp
The 300 Club
 
Posts: 438
Joined: Fri Nov 20, 2009 9:28 pm
Location: Aladambama
Top

Postby absolutsnwbrdr » Tue Aug 09, 2011 2:44 pm

:lol:

I like it!! :thumbsup:
Zach
Coming Soon...
Image Image
User avatar
absolutsnwbrdr
Donating Member
 
Posts: 2657
Images: 412
Joined: Mon Jan 25, 2010 6:10 pm
Location: Hanover, PA
Top

Postby Tom U » Tue Aug 09, 2011 9:22 pm

Woodstramp wrote:The graphics on you trailer are great. Not too much....just enough to be sharp.

The little tribal dude is perfect. Thought about something simular on mine. Most little tribal graphics I've seen show the character in action (hunting/running or like yours, playing music).

I'd like to make one of a guy just vegging out. :lol:

Something like this..
Image


I saw your graphic the other day so since it was mentioned by another member here is the description of the character:

The mysterious Kokopelli character is found in a number of Native American cultures. Kokopelli is distinguished by his dancing pose, a hunchback and flute. Kokopelli is considered a symbol of fertility who brought well-being to the people.
Visit my Build Journal at viewtopic.php?t=45536&postdays=0&postorder=asc&start=0
Its not how smart you are, its how long you're willing to feel dumb until you find the answer.
User avatar
Tom U
Teardrop Builder
 
Posts: 34
Joined: Sat Jan 22, 2011 8:02 am
Location: Springfield, Mo.
Top

Postby Deryk the Pirate » Tue Aug 09, 2011 9:51 pm

Fertility....uh oh lol
Build Thread lil vardo 1: http://tinyurl.com/baqe6py
Build Thread lil vardo 2: http://tinyurl.com/b3rwffm
User avatar
Deryk the Pirate
500 Club
 
Posts: 809
Images: 158
Joined: Tue Aug 18, 2009 11:03 am
Location: Parlin NJ
Top

Postby absolutsnwbrdr » Wed Aug 10, 2011 8:30 am

Tom U wrote:I saw your graphic the other day so since it was mentioned by another member here is the description of the character:

The mysterious Kokopelli character is found in a number of Native American cultures. Kokopelli is distinguished by his dancing pose, a hunchback and flute. Kokopelli is considered a symbol of fertility who brought well-being to the people.


:thumbsup:

Deryk the Pirate wrote:Fertility....uh oh lol


:lol: :lol:

The Kokopelli also represents the god of music, and is often considered a joker/prankster.
Zach
Coming Soon...
Image Image
User avatar
absolutsnwbrdr
Donating Member
 
Posts: 2657
Images: 412
Joined: Mon Jan 25, 2010 6:10 pm
Location: Hanover, PA
Top

I have a longer tongue.

Postby absolutsnwbrdr » Sat Aug 13, 2011 4:57 pm

Well, the tongue extension is finished! Took a heck of a lot longer than I had thought it would, but it turned out great!

The steel I used was 2"x2"x 3/16" x 7' long ($32.99).

Came home right after work, gave it a light sanding, and wiped it down with mineral spirits to remove the dirt and grime. Once it was clean, I sprayed it with Rust-oleum Professional Grade Primer.

Image

After a few quick light coats of that, I immediately sprayed it with a few coats of the "hammered" Rust-oleum spray paint, and let it dry overnight.

I got up this morning expecting to drill a few holes, attach the extension, and be done in time for lunch. HAHAHAAHA wow thats a good joke. Just got everything cleaned up around 5pm.

Original plate position:

Image

Flipped into its new position. The new tongue extension will go through the bracket between the frame rails.

Image

Here was the first hole drilled. 1/4" hole through 3/16" steel, using a carbide drill bit, and cutting oil. After the 1/4" pilot holes were drilled, we came back and used a 1/2" carbide bit. All of the drilling definitely took the longest.

Image

Its bolted to the front and second frame cross members, and also the original coupler mounting bracket, with Grade 5 nuts and bolts.

Image

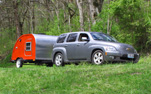
I replaced the HF coupler with one designed for a 2" tongue ($19.99). Overall extension moved the coupler location forward about 23", which ended up being PERFECT length to allow for the relocation of the tongue jack. If it were much shorter, the jack would not be able to fold up and lock into position.

The red piece will get painted this week sometime, once the weather is a little nicer. We got POURED on, but I had my 10x10 canopy up so we could keep working.

Image

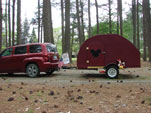
Hitched up and ready to go!

Image

Definitely A LOT of work! But I'm happy with it. Taking it out for a spin in a few minutes to see how differently it handles.

Also... when you move the coupler from its original position to the end of the steel tube extension, it raises your tongue height by 2". My teardrop now sits much more level than before. I know this can be achieved by a hitch draw-bar, but I don't think anyone mentioned this change in height before. I guess maybe it was obvious to most people, but I hadn't even thought about it.

:thumbsup:
Last edited by absolutsnwbrdr on Wed Jan 23, 2013 9:24 am, edited 4 times in total.
Zach
Coming Soon...
Image Image
User avatar
absolutsnwbrdr
Donating Member
 
Posts: 2657
Images: 412
Joined: Mon Jan 25, 2010 6:10 pm
Location: Hanover, PA
Top

Postby Billy K » Sat Aug 13, 2011 8:09 pm

Nice work from start to.....well, current.. :applause:

I think you'll find backing much easier. Shorter trailers turn much quicker and take more attention to detail than their longer counterparts.

I doubt it with your setup but....you may feel a bit of drag now, due to the extra space from roof to roof...

Like I said though; Nicely done. Good luck and Thanks for the updates and knowledge shared.
"...influence is no government." - George Washington
Billy K
Teardrop Master
 
Posts: 276
Joined: Sun Dec 06, 2009 8:03 pm
Location: Kokomo,IN
Top

PreviousNext

Return to Build Journals

Who is online

Users browsing this forum: No registered users and 23 guests