Mueller Teardrop Cargo Hauler

...ask your questions in the appropriate forums BUT document your build here...preferably in a single thread...dates for updates, are appreciated....

Mueller Teardrop Cargo Hauler

Postby mark6mueller » Thu Apr 01, 2010 12:29 am

I'm starting a teardrop toy hauler project. The main design points are that the trailer should ride really smooth and track well behind my Beamer, and carry my bicycles and gear inside and protected.

It doesn't need to haul a heavy payload. I expect to carry several hundred pounds of streamlined recumbent trike and camping gear. It's hard finding a pre-made trailer large enough to haul a few recumbents or a streamliner that won't beat the load up because it's made to be overloaded with bricks or firewood.

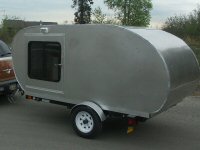
Here are some pictures:

http://picasaweb.google.com/mark6muelle ... directlink
Best Regards,

Mark.
User avatar
mark6mueller
Donating Member
 
Posts: 58
Images: 51
Joined: Thu Mar 25, 2010 11:50 pm
Location: Eureka, California

Postby mark6mueller » Thu Apr 01, 2010 12:33 am

Today I completed the strut tower supports. I have been keeping a photo album on Picassa which is very easy. My computer automatically resizes and uploads the pictures that I select. Anyhow my brother and I jumped up and down on the suspended frame in unison and I like the way it bounces. It will be a soft ride. I think it will be about the right spring rate too.

http://picasaweb.google.com/mark6muelle ... directlink

I'll check out the build journals area and look into posting there.

I was a little concerned about the weight adding up. My son looked up weights of Saturn Coupés and found the the rear is about 1300 lbs. That goes with what I hope the gross vehicle weight of this trailer to be.

I am towing with a 2001 BMW 325i. Manoeuvring is a pain with this car but once it's going it has all the power necessary. I am thinking of using the drum brakes that came with the suspension. I could even use the parking brake cables I suppose (parking brake lever in trailer to keep it from rolling away). Any thoughts on this?

Best Regards,

Mark.
Best Regards,

Mark.
User avatar
mark6mueller
Donating Member
 
Posts: 58
Images: 51
Joined: Thu Mar 25, 2010 11:50 pm
Location: Eureka, California

Nice Start, Mark

Postby down under tech » Thu Apr 01, 2010 7:19 am

Hi Mark: WELCOME !!! I like your chassis design. It looks like it will work out great. What size tubing is that? It looks like it will ride on a pillow as it is pulled by your Beamer. Where are you from? Add this info in your profile so we don't keep asking. I will keep an eye on this innovative build. Just make sure you seal (Epoxy) this sucker up good so it will last you a couple of days or more. Take care, 8)
Johnny D.

"If you think you can, you can. If you think you can't, your right !" ... Henry Ford

"The Silver Nugget" Build
viewtopic.php?t=35314&postdays=0&postorder=asc&start=0
User avatar
down under tech
Silver Donating Member
 
Posts: 565
Images: 571
Joined: Sat Feb 06, 2010 10:01 pm
Location: Reno, Nevada
Top

Postby synaps3 » Thu Apr 01, 2010 10:12 am

:o

Your frame is HEAVY-duty. It's way overkill, but on the plus side will be strong enough for anything.

Do you have any plans, or are you just winging it?
-- Dave

Build log: here
User avatar
synaps3
The 300 Club
 
Posts: 433
Images: 254
Joined: Sun Nov 08, 2009 1:09 am
Location: Marietta, GA
Top

Design Q's

Postby mark6mueller » Fri Apr 02, 2010 12:11 am

Dave, I have a rough drawing of my own that I am using as plans. The towers and wheels are supported inboard of the wheels so I figure the frame needs to handle torsional flex at the towers. There isn't a roof integrated into the frame to help with strength like on the car.

The trailer is large for how much weight I expect to carry so I figure a stout (heavy) frame will help keep it right side up in side winds and when I am cornering about half as hard as I like when I'm not towing.

Johnny, What do you know about finishing for the metal? I noticed you said use epoxy sealer. What kind of paint would you use?
Best Regards,

Mark.
User avatar
mark6mueller
Donating Member
 
Posts: 58
Images: 51
Joined: Thu Mar 25, 2010 11:50 pm
Location: Eureka, California
Top

Front control arms, looking ahead

Postby mark6mueller » Fri Apr 02, 2010 12:31 am

Today I looked at the forward control arms. Trying to come up with a plan for those. Ordered some 1" x 1/8 wall square tube and some 1-1/2" angle to make control arm mounting points.

I looked at marine grade plywood at the local speciality lumber yard. I think that 9mm will be fine for the sides. They have 4mm that I think would work nice for the headliner. Still cogitating on the fender design. I am thinking long box like structures like on a Porsche 944. Curved plywood with an angled 2x speciality wood at the joint.

Bought a lot of zinc-plated steel flat head Torx machine screws 1/4"-20 x 1" to fasten the floor to the frame. The sides will be fastened to the floor. I'm going to weld angle tabs to the frame so that I don't have bolts going through the frame (keep the water out).

I guess soon I need to think about trim and lighting.

I really want this trailer to have a sanno wiring system. I spent a lot of time on the last "professionally" built trailer sussing out shorts and open circuits. I guess it's time to look around to see what folks are doing with wiring.
Best Regards,

Mark.
User avatar
mark6mueller
Donating Member
 
Posts: 58
Images: 51
Joined: Thu Mar 25, 2010 11:50 pm
Location: Eureka, California
Top

Postby down under tech » Fri Apr 02, 2010 1:23 am

Hi Mark: Eureka !!! That is what I was after. Now we know where you are from. What I meant was to seal the outer wooden structure of the body. This will give you the best protection from the elements so it stays waterproofed. I used West System epoxy on mine I got at West Marine. You can find it cheaper online. I was in a hurry to get some and we have a West Marine here in Reno. 2 to 3 coats will waterproof the wood. Then you can paint it however you please. You could get it painted to match your car's paint color (it sands well and will accept automotive finish) at a body shop or ?. It, (epoxy) needs to be covered by something because the sun's UV rays will kill it. It must be over-coated by a UV stable finish. The epoxy is to waterproof the wood. It is up to you. Keep reading the posts of others here as you go, for ideas. The metal frame could be powder coated or spray painted by body shop. Powder coating is the best. It depends on how much money you have available after buying the beamer. (LOL) You have many options for your build. Just take the necessary time to make your decisions. You will need to be about three steps ahead of yourself before proceeding on to the next step. This saves time & money incase you make the wrong choices of what to do next.
Good Luck, Mark :thumbsup:
Johnny D.

"If you think you can, you can. If you think you can't, your right !" ... Henry Ford

"The Silver Nugget" Build
viewtopic.php?t=35314&postdays=0&postorder=asc&start=0
User avatar
down under tech
Silver Donating Member
 
Posts: 565
Images: 571
Joined: Sat Feb 06, 2010 10:01 pm
Location: Reno, Nevada
Top

Postby High Desert » Fri Apr 02, 2010 1:38 am

Mark, looks like you're well on your way. :thumbsup:

On your idea of the drum brakes and utilizing the parking brake; I've seen pics of many trailers from Europe and Austrailia with just that kind of setup. It may be a requirement in those places, perhaps one of our members from one of those countries can shed more light on that. Use some kind of break-over lever or ratchet handle and viola. I think its a great idea as the brakes are already there.
Shaun

"it's not the years honey, it's the mileage"
High Desert
Platinum Donating Member
 
Posts: 8780
Images: 27
Joined: Wed Apr 08, 2009 1:46 pm
Location: SW Washington state
Top

Parking Brake

Postby mark6mueller » Fri Apr 02, 2010 10:30 pm

Shaun,

I just ordered a parking brake lever. I think I want to put it inside the trailer somewhere rather than outside.

Best Regards,

Mark.
Best Regards,

Mark.
User avatar
mark6mueller
Donating Member
 
Posts: 58
Images: 51
Joined: Thu Mar 25, 2010 11:50 pm
Location: Eureka, California
Top

Bits and Pieces

Postby mark6mueller » Fri Apr 02, 2010 10:45 pm

Today I added cross members for floor support and started the finishing work (hey that's funny) on the tongue. Nothing too major.

http://picasaweb.google.com/mark6mueller/MuellerTeardrop?feat=directlink
Best Regards,

Mark.
User avatar
mark6mueller
Donating Member
 
Posts: 58
Images: 51
Joined: Thu Mar 25, 2010 11:50 pm
Location: Eureka, California
Top

Postby teardrop_focus » Sun Apr 04, 2010 1:37 pm

Other than the slightly-overbuilt (heavy) chassis and the idea that the tongue tubing would serve you better standing on edge, you have a brilliant thing going here. I salute you.

Chassis weight isn't needed for stable handling (but a lower cg will; build light and place heavy items low); I'd remove every other crossmember and lighten that baby a little.

Your chassis as seen here is more than enough support for it's floor.

As for your finely-edumacated guesstimation on the trailer suspension spring rate, I'd say you're about as spot on as one could be. Again, I salute you! and you have superior damping as well. Utilize some aftermarket (Saturn has had their cars in competition) struts to acheive at least some "fresh" damping characteristics if not altogether superior damping ability and your trailer will ride like a dream if it weighs in the neighborhood of 1100 to 1400 lbs... but then you're approaching the need for trailer service brakes.

A surge-brake system is what High Desert was thinking of... and can utilize the Saturn components... but an appropriately-sized master cyl and telescoping tongue apparatus and brake hardline will need to be incorporated.

The park-brake handle should go as close to the tongue as possible so that when "one-manning" it while pushing the trailer by hand into a parking spot, one can immediately actuate the park brake without having to run and open a door and reach inside somewhere to grab at the handle.

Looking foward to seeing the profile you come up with. How long will the trailer be?
Last edited by teardrop_focus on Sun Apr 04, 2010 1:47 pm, edited 1 time in total.
.
Image

"There is something about these little trailers that brings out the best in people." - BigAl, Scotland, 2010

"Climb the mountains and get their good tidings. Nature's peace will flow into you as sunshine flows into the trees...
The winds will blow their own freshness into you and the storms their energy, while cares will drop away like autumn leaves..." - John Muir, 1898


Chris Squier / teardrop_focus :-)~
User avatar
teardrop_focus
Donating Member
 
Posts: 5975
Images: 127
Joined: Sat Apr 11, 2009 3:18 pm
Location: SoCal
Top

Postby teardrop_focus » Sun Apr 04, 2010 1:43 pm

Slightly off topic, but, what in the hell is that thing sitting beyond your chassis and in the shadows in your pic I linked to above?

:scratchthinking:


Whatever it is, it looks like it has plenty of traction.

:lol:
.
Image

"There is something about these little trailers that brings out the best in people." - BigAl, Scotland, 2010

"Climb the mountains and get their good tidings. Nature's peace will flow into you as sunshine flows into the trees...
The winds will blow their own freshness into you and the storms their energy, while cares will drop away like autumn leaves..." - John Muir, 1898


Chris Squier / teardrop_focus :-)~
User avatar
teardrop_focus
Donating Member
 
Posts: 5975
Images: 127
Joined: Sat Apr 11, 2009 3:18 pm
Location: SoCal
Top

Handling, Wieght, Brakes

Postby mark6mueller » Sun Apr 04, 2010 3:16 pm

Chris,

Thank you for your comments regarding my design. Looking at many of the other frames I've seen on this sight, mine does look overbuilt. Like you said weight low in in the trailer should help stability. I like your point about putting the P brake near the hitch. I could put it in a box to keep it from rusting up and to limit access. Things rust here a lot here.

I am thinking of buying after-market struts for the trailer. The dampening does seem a little weak.

The first picture in this link has the planned profile. I am going to change the tail surface a little so the is a vertical portion for the lighting to install into. I want the lighting to be integrated rather than sticking out to reduce wind drag.

That vehicle in the background is my brother's 10 person kinetic sculpture.
10 people pedalling.
Four wheels using dirt track race car tires.
made to go over sand and float on water as well as pavement.
Built on a Ford Ranger 4WD chassis.
The kinetic sculpture race is a race of human powered art machines.
Here's a link. No idea if this will work for you. Let me know either way.

http://www.facebook.com/profile.php?id=100000130563446&ref=nf#!/profile.php?v=photos&ref=nf&id=100000130563446
Best Regards,

Mark.
User avatar
mark6mueller
Donating Member
 
Posts: 58
Images: 51
Joined: Thu Mar 25, 2010 11:50 pm
Location: Eureka, California
Top

Floor support

Postby mark6mueller » Sun Apr 04, 2010 3:19 pm

Chris,

Those two sets of 3 x 3 under the floor are really for supporting strut towers.
Best Regards,

Mark.
User avatar
mark6mueller
Donating Member
 
Posts: 58
Images: 51
Joined: Thu Mar 25, 2010 11:50 pm
Location: Eureka, California
Top

Sealing - Finish

Postby mark6mueller » Sun Apr 04, 2010 3:35 pm

Johnny,

Thank you for explaining using epoxy to finish the wood parts. Other's have talked about using spar varnish. I'll look into this some more.
Best Regards,

Mark.
User avatar
mark6mueller
Donating Member
 
Posts: 58
Images: 51
Joined: Thu Mar 25, 2010 11:50 pm
Location: Eureka, California
Top

Next

Return to Build Journals

Who is online

Users browsing this forum: No registered users and 11 guests