Astro-Benny - Updated March 1 - Improvements

...ask your questions in the appropriate forums BUT document your build here...preferably in a single thread...dates for updates, are appreciated....

Postby DesertSkies » Tue Sep 07, 2010 11:57 pm

Thanks, I really appreciate the comments. I saw a couple of build logs with the running totals and I found it helpful. Thus far I'm still within budget and there have been no big problems. I'm still waiting for my last batch of parts to arrive from Lil Bear and I'll finish up.

Azmo, I understand your thoughts. Building is fun but using it is even better! If I could get one close to what I want for the build cost I would have done it in a second.

In the last couple of days I put in 2 hours enlarging the windows to the correct rough-in size for the windows from Lil Bear and I made the edges to cover the pie cuts on the side rails. I'll get them attached in the next couple of days.
User avatar
DesertSkies
Donating Member
 
Posts: 49
Images: 49
Joined: Sun Jun 06, 2010 4:09 pm
Location: Midland, TX

Postby DesertSkies » Mon Sep 27, 2010 9:53 pm

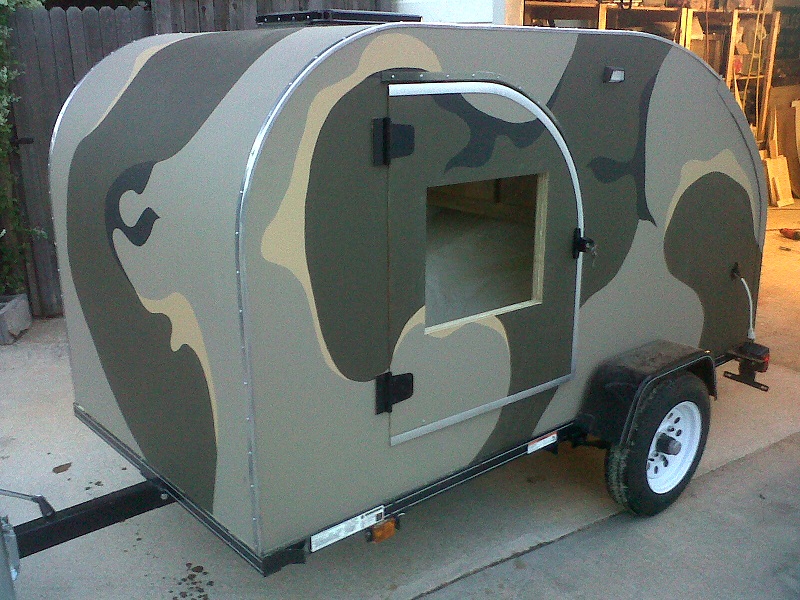
All of the aluminum is done: T-molding on the doors, edge molding and drip caps. I also installed the door handles.

I'm still waiting on my windows and seals from Grant. The windows got backordered and should be here anytime.

I'm going to finish painting in the mean time.

I added windows, trim, latches (door and hatch), more screws, T and drip molding and the hurricane hinge to the totals.

RUNNING TOTALS: $2435.85 and 119 hours.

Image
User avatar
DesertSkies
Donating Member
 
Posts: 49
Images: 49
Joined: Sun Jun 06, 2010 4:09 pm
Location: Midland, TX

Postby Miriam C. » Tue Sep 28, 2010 9:07 am

:applause: :thumbsup: :thumbsup: :thumbsup: Image

Wow, you are almost there! Have you taken a nap yet. You came in with a great price too... :thumbsup:

Image
“Forgiveness means giving up all hope for a better past.â€
User avatar
Miriam C.
our Aunti M
 
Posts: 19675
Images: 148
Joined: Wed Feb 15, 2006 3:14 pm
Location: Southwest MO
Top

Postby mikeschn » Tue Sep 28, 2010 5:08 pm

I see the Benny part... can you show us the Astro part yet?

Mike...
The quality is remembered long after the price is forgotten, so build your teardrop with the best materials...
User avatar
mikeschn
Site Admin
 
Posts: 19202
Images: 479
Joined: Tue Apr 13, 2004 11:01 am
Location: MI
Top

Postby DesertSkies » Fri Oct 01, 2010 7:45 pm

Mike, I seem to remember this whole project had something to do with telescopes!

Here's a pic with the scopes set up for use. One is a 12" Newtonian/Dobsonian and the other is an 80mm refractor on an equatoral tripod mount. The rest of the gear fits in a small briefcase sized box and a backpack.

Image

Here they are packed for travel. The big one will be in a zippered bag and they'll be padded with a furniture blanket.

Image

By sheer luck the regular Benroy profile makes it possible to load all of this gear without any hassle and has the bonus of all your gear riding on a mattress!

+2 hours of additional paint and details. Details keep popping up. Miriam, I managed to catch a nap in the camper a few days ago. The mattress is perfect!
User avatar
DesertSkies
Donating Member
 
Posts: 49
Images: 49
Joined: Sun Jun 06, 2010 4:09 pm
Location: Midland, TX
Top

Postby mikeschn » Fri Oct 01, 2010 7:53 pm

Hey, I gotta drag my telescope out this weekend... where's that cleardarksky chart?

Good picture by the way... that's what we need to see!!! ;)

Mike...

P.S. Here's the chart for my neighborhood... http://cleardarksky.com/c/RchstrHYkey.html :thumbdown:
The quality is remembered long after the price is forgotten, so build your teardrop with the best materials...
User avatar
mikeschn
Site Admin
 
Posts: 19202
Images: 479
Joined: Tue Apr 13, 2004 11:01 am
Location: MI
Top

Postby DesertSkies » Sat Oct 02, 2010 10:40 am

My neigbors were curious about the camoflage "thing" I built in my garage. I think they were more concerned when I parked the mortar tube telescope next to it.

Mike, I can't resist... have to rub it in:

http://www.cleardarksky.com/c/OddMidTXkey.html
User avatar
DesertSkies
Donating Member
 
Posts: 49
Images: 49
Joined: Sun Jun 06, 2010 4:09 pm
Location: Midland, TX
Top

Postby mikeschn » Sat Oct 02, 2010 3:37 pm

Well, you have a much better chart than I do. So where are your deep sky images... ? Got any you can turn into a desktop wallpaper?

Image

Mike...

P.S. Found this one somewhere on the web... :roll:
The quality is remembered long after the price is forgotten, so build your teardrop with the best materials...
User avatar
mikeschn
Site Admin
 
Posts: 19202
Images: 479
Joined: Tue Apr 13, 2004 11:01 am
Location: MI
Top

Postby DesertSkies » Sat Oct 02, 2010 3:51 pm

I've never done deep sky, just eyepiece stuff and the occasional clamped camera stuff. I snapped this through the dob with a dslr and use it for my background.

Image
User avatar
DesertSkies
Donating Member
 
Posts: 49
Images: 49
Joined: Sun Jun 06, 2010 4:09 pm
Location: Midland, TX
Top

Postby mikeschn » Sat Oct 02, 2010 3:54 pm

that looks really good!!!

Mike...
The quality is remembered long after the price is forgotten, so build your teardrop with the best materials...
User avatar
mikeschn
Site Admin
 
Posts: 19202
Images: 479
Joined: Tue Apr 13, 2004 11:01 am
Location: MI
Top

Postby starleen2 » Sat Oct 02, 2010 3:56 pm

:thinking: mortar tube, telescope sighting glass, cammo transportation thingy in the garage - yep, I bet they're talking behind your back - unless they know you REAL good! :lol:
User avatar
starleen2
5th Teardrop Club
 
Posts: 16272
Images: 224
Joined: Sat May 12, 2007 8:26 pm
Location: Pea Ridge ,AR
Top

Postby DesertSkies » Fri Oct 22, 2010 3:11 pm

The neighbors seem to have caught on. Everyone's come over to see it. They may be checking on my sanity...

I bought hardware and metal to finish the back bumper, hatch latches and hatch supports. $24.50 and 4 hours.

It's now completely finished except for touch-up paint on the new stuff and my windows. I'm still waiting for Grant's supplier to make them. According to the last email they could show up any day now.

I'm going to cover the inside of the hatch now that I've put the supports in. I was undecided on how to do it, so I went non-committal with a minimalist setup until I come up with something better.

The cheesy stock license plate frame on the tail light isn't gonna cut it. It's too frail and close to the ground. I guess I'll need to come up with a lighted frame and run a wire to the hatch. Oh well, another day...


Image

Image
User avatar
DesertSkies
Donating Member
 
Posts: 49
Images: 49
Joined: Sun Jun 06, 2010 4:09 pm
Location: Midland, TX
Top

Postby DesertSkies » Wed Nov 03, 2010 11:10 pm

Totals were 127 hours and $2485.33.

My wife was thrilled to have the garage back! The windows held me up for quite a while. As I explained before, they were backordered from Grant's supplier and took an unusually long time to get here. I really enjoyed dealing with Grant from Lil' Bear. He was a huge help.

The "wallpaper" on the galley hatch isn't complete, despite saving labels for quite some time. I'm thinking about throwing a party and collecting donations! There are plenty of little things I'll work on here and there, like powder coating the wheels black, etc. I don't think something like this is ever truly finished but it's ready to go.

Many thanks to Mike and all those who commented, and posted their own work to help me along. This has been a fun first build and I'm proud of the results. I would never had tried had it not been for this site.

I have no idea where we're taking it for the first trip. We're going to pick someplace nice to take a good "Hall of Fame" pic. I hope to meet some of you at a get-together sometime!

Image

Image

Image
User avatar
DesertSkies
Donating Member
 
Posts: 49
Images: 49
Joined: Sun Jun 06, 2010 4:09 pm
Location: Midland, TX
Top

Postby S. Heisley » Thu Nov 04, 2010 9:36 am

One of the fun things about building your own is that you get to make it uniquely yours. That beer label hatch definitely does that for you and it adds a lot of character to the trailer. Your trailer looks great. Good job! :thumbsup: :applause:
User avatar
S. Heisley
Super Lifetime Member
 
Posts: 8774
Images: 495
Joined: Mon Sep 17, 2007 10:02 am
Location: No. California
Top

Postby DesertSkies » Fri Nov 19, 2010 11:56 am

Thanks, Sharon! The wallpaper took three attempts to get the adhesives right. The falling temperatures made the adhesive fail completely so I had to use wood glue backed with staples.

We took the new camper out for the first time last weekend. We made a trip to the state park in Ft. Davis, TX. All went well except for a few minor things.

The first thing to change is bedding. We're ditching the sleeping bags in favor of flannel sheets for cold weather. Second, the "pillows" I made out of scrap mattress material were not comfortable. They're out the window as well. We improvised curtians for the trip but the permanent ones are int he works.

I'm making a bottom hatch seal out of paintable garage door weatherstripping. Some road dust had worked its way in as did water when I washed it after the trip.

That's it for the negatives. Other than those few hitches it was perfect. It towed so well I forgot it was back there. We pre-heated it with a stove before going to bed and stayed comfortable. We're veteran campers so it took one trip to completely square away the galley. All we need for a weekend getaway is waiting for us!

Future projects include a forward battery box/spare rack and powder-coating the wheels black. The white is really annoying me!

We weren't far from McDonald Observatory and the entire area has pretty firm light polution rules so the skies were great!

Image

Image
User avatar
DesertSkies
Donating Member
 
Posts: 49
Images: 49
Joined: Sun Jun 06, 2010 4:09 pm
Location: Midland, TX
Top

PreviousNext

Return to Build Journals

Who is online

Users browsing this forum: Google [Bot] and 17 guests