Astro-Benny - Updated March 1 - Improvements

...ask your questions in the appropriate forums BUT document your build here...preferably in a single thread...dates for updates, are appreciated....

Postby AJP » Tue Jul 27, 2010 2:08 am

I am also toying with the idea of making a benroy on a 4x8 frame so I am following your build to pick up some tips along the way, thanks.
AJP
Teardrop Inspector
 
Posts: 18
Joined: Sun Jul 25, 2010 7:15 pm

Postby DesertSkies » Thu Jul 29, 2010 5:03 pm

That's how I did it, AJP! Hope my log helps. It seems the things I worried about the most were the least problematic.

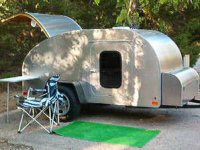
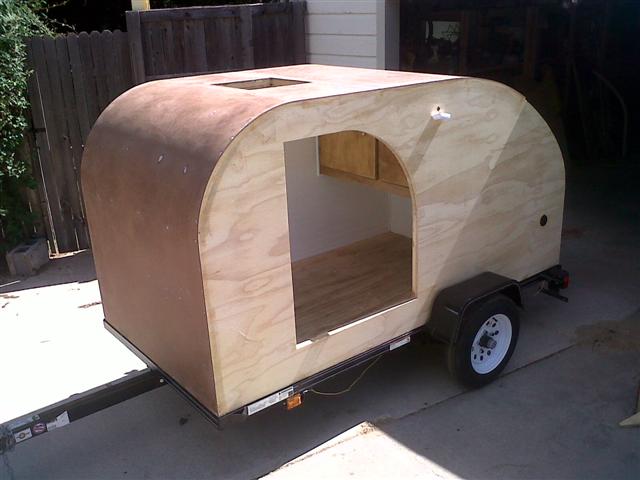
It's now completely skinned! The PL Premium was great. Plenty of working time in hot/dry weather and it bonded well. I trimmed the edges and cut the vent hole with my allmighty router trim bit.

I bought some epoxy filler ($18.26) for the staple holes. I'm going to be prepping everything for resin with a little fiberglass here and there for good measure.

This part went really quickly. I've worked about 5 hours since the last update.

RUNNING TOTALS: $1294.83 and 75 hours.

Image
User avatar
DesertSkies
Donating Member
 
Posts: 49
Images: 49
Joined: Sun Jun 06, 2010 4:09 pm
Location: Midland, TX

Postby DesertSkies » Wed Aug 04, 2010 12:55 pm

8 hours and $255.55 later I'm working on the epoxy. I bought a gallon of Silvertip, paint and misc supplices like chip brushes, etc.

It's been a love/hate part of the process. It's been really tough to get a smooth finish but it looks like it'll be really durable. I fiberglassed the roof seam and the rest is resin over wood in 2-3 coats. I didn't include pics in this update since there's not much to show!
User avatar
DesertSkies
Donating Member
 
Posts: 49
Images: 49
Joined: Sun Jun 06, 2010 4:09 pm
Location: Midland, TX
Top

Postby DesertSkies » Sat Aug 07, 2010 7:59 pm

I took some time off work last week to work on the finish. The paint went over the epoxy MUCH smoother than I expected. Although the camo paint job takes a lot of time, I think it's worth it. I went with a MERDC Desert Gray scheme. My first choice of colors wasn't matched carefully and it came out pink and green. No, no pictures of that. I'm trying to forget it. Fortunately it was only a $20 mistake.

I'm going to finish sand the paint to even it out a little and finish with a flat enamel clear coat of some kind.

I guess this opens another realm for names!

15 hours since last update.

Here it is with the resin done:
Image

And here's the camo paint (most of it, anyway!:
Image
User avatar
DesertSkies
Donating Member
 
Posts: 49
Images: 49
Joined: Sun Jun 06, 2010 4:09 pm
Location: Midland, TX
Top

Postby DesertSkies » Mon Aug 09, 2010 12:00 am

My wife and I spent 4 hours finishing the details on the paint. It has to cure for a week or so before anything else can be done. I'm in the home stretch!

Image

Image
User avatar
DesertSkies
Donating Member
 
Posts: 49
Images: 49
Joined: Sun Jun 06, 2010 4:09 pm
Location: Midland, TX
Top

Postby Ratkity » Mon Aug 09, 2010 6:46 am

Amazing paint job!! Had to squint to see it LOL. Serious, that's an awesome job.

I lub these build journals.

Hugs,
Ratkity

ETA an "s"
Last edited by Ratkity on Mon Aug 09, 2010 9:11 pm, edited 1 time in total.
Ratkity
Gold Donating Member
 
Posts: 1065
Images: 0
Joined: Wed May 26, 2010 1:01 pm
Top

Postby xddorox » Mon Aug 09, 2010 8:46 pm

Awesome paint job! Do you plan on putting markings or some nose art?
User avatar
xddorox
Teardrop Advisor
 
Posts: 82
Joined: Tue Jul 06, 2010 10:19 pm
Location: Montreal, Canada
Top

Postby DesertSkies » Tue Aug 10, 2010 9:28 pm

Thanks, Ratkity! It looks like an oil painting up close but I'm happy with the "curb appeal."

Xddorox, some nose art sounds great! I'll start brainstorming.

The white porch lights are driving me crazy. I just may have to Krylon them a more suitable color.

I'm going to have the aluminim trim powder coated if I cant find a good way to paint it. The wheels definitely need to be black.
User avatar
DesertSkies
Donating Member
 
Posts: 49
Images: 49
Joined: Sun Jun 06, 2010 4:09 pm
Location: Midland, TX
Top

Postby vtx1029 » Wed Aug 11, 2010 1:19 am

Looks nice :thumbsup:

Too bad you don't live closer I'd let ya loose with my powder coating equipment 8)
User avatar
vtx1029
Teardrop Master
 
Posts: 251
Images: 70
Joined: Fri Apr 23, 2010 11:42 pm
Location: MN
Top

Postby DesertSkies » Sat Aug 28, 2010 4:40 pm

Thanks, VTX. I'd take you up on it in a second!

+1 hour and $143.99 for a Fantastic Vent 4000R. rvvent.com is awesome. I sent the dimesions and they pre-cut everything. It popped right in!

I also painted the porch lights to match the paint scheme. I'll do the same with the exposed parts of the fan after the caulk dries.

Grant with Lil Bear has also been a pleasure to deal with. I got my hinge and rain caps. There was a little problem getting the windows ordered but they'll be along shortly. I'll probably buy some molding from him as the local RV shop doesn't appear to want to deal with some guy building a camper in his garage. I asked about molding and they told me to look around their lot and find something on a new camper and they'd try to order it. I decided to go with Lil Bear.


Image

Image
User avatar
DesertSkies
Donating Member
 
Posts: 49
Images: 49
Joined: Sun Jun 06, 2010 4:09 pm
Location: Midland, TX
Top

Postby DesertSkies » Mon Aug 30, 2010 5:24 pm

In two more hours I managed to get the body bolted to the trailer and the mattress cut to size and put in. I used the leftover foam to cut four pillows. I used the 4" foam topper memory foam that several people here recommended.

Since the last update I bought some extra paint, the mattress, hinge, windows, and drip rail.

Running totals: 105 Hours, $1872.03

Image
User avatar
DesertSkies
Donating Member
 
Posts: 49
Images: 49
Joined: Sun Jun 06, 2010 4:09 pm
Location: Midland, TX
Top

Postby DesertSkies » Sat Sep 04, 2010 9:51 pm

6 hours and $50.78 on the pile. I picked up the aluminum and hardware for the hatch edges.

I really dreaded trimming the edge of the hatch because I didn't overlap the skin over the sides. I don't know why I didn't, but I had to come up with something to fix it. I used 2" x 1/16 aluminum angle to span the gap and made pie cuts to smooth the corners. I'll laminate something to the sides of the angle to cover the pie cuts. I'm not sure what that'll be just yet, but it will be thin and waterproof! I scuffed the aluminum and primed it with similar-colored enamel paint.

While I was waiting for paint to dry, I bent and painted the drip caps and painted the white base of the Fantastic Fan.

Image

Image
User avatar
DesertSkies
Donating Member
 
Posts: 49
Images: 49
Joined: Sun Jun 06, 2010 4:09 pm
Location: Midland, TX
Top

Postby myoung » Sun Sep 05, 2010 8:16 pm

Thanks for posting the running time and expense totals. Wish others had or would do the same because it is quite informative to newbies like me.
Last edited by myoung on Mon Sep 27, 2010 10:15 pm, edited 1 time in total.
Mike Young
build thread: viewtopic.php?t=40459
User avatar
myoung
500 Club
 
Posts: 644
Images: 250
Joined: Sat Aug 07, 2010 11:21 am
Location: Nipomo, CA
Top

Postby myoung » Sun Sep 05, 2010 8:17 pm

Thanks for posting the running time and expense totals. Wish others had or would do the same because it is quite informative to newbies like me.
Last edited by myoung on Sat Sep 11, 2010 11:33 pm, edited 1 time in total.
Mike Young
build thread: viewtopic.php?t=40459
User avatar
myoung
500 Club
 
Posts: 644
Images: 250
Joined: Sat Aug 07, 2010 11:21 am
Location: Nipomo, CA
Top

Postby azmotoman » Tue Sep 07, 2010 10:44 am

Just as myoung said, good info to have. The more I read these 'build' logs, the more I wish I had built mine, but I got what I wanted at a price that I could afford and there is NO WAY I could have built a Rayme for so little. It was a steal!


Image
Money isn't everything, but it keeps the kids in touch!
*************
Dinero isn' ¡t todo, pero él mantiene el interés de los niños!
User avatar
azmotoman
Silver Donating Member
 
Posts: 165
Images: 10
Joined: Fri Jul 02, 2010 10:07 am
Location: AZ ('bama transplant)
Top

PreviousNext

Return to Build Journals

Who is online

Users browsing this forum: reaver and 66 guests