The MinneBago - (7/29 update - Campable!!)

...ask your questions in the appropriate forums BUT document your build here...preferably in a single thread...dates for updates, are appreciated....

The MinneBago - (7/29 update - Campable!!)

Postby Elmosaurus » Mon Jun 21, 2010 2:09 pm

"Damn the torpedoes, Full steam ahead!"


I had planned on making a travel trailer for the better half and I at some point so that our trips to our annual family reunion at the family farm would be more comfortable, but with the reality of our plans changing, my 'someday' became 'right now'.

So, I have to design, build, and finish our trailer before the end of July. (long story; basically, we waited to long to make hotel arrangements this year, and I'm NOT willing to sleep on an air mattress in a tent ever again)

The decision was actually made just under 4 weeks ago, but I am only getting a chance to start this build log now because the bulk of my design, research, planning and procurement of major items is complete. Now that I'm solidly into the 'build' phase, I can spend a little bit of my 'off' time documenting the build for posterity. (in truth, its so I can pinpoint where I screwed up when the inevitable mistakes are revealed later! LOL. Feel free to point out flaws in my design/build when you see them!)

So, any way you shake it, this is going to be a VERY exhausting, and possibly exciting (or depressing) conclusion come the 8th week into the build!!! (when it has to be ready for at least a maiden voyage)

Hope you all enjoy the posts!

E.
Last edited by Elmosaurus on Thu Jul 29, 2010 9:22 pm, edited 5 times in total.
User avatar
Elmosaurus
Teardrop Advisor
 
Posts: 51
Images: 71
Joined: Mon Jun 21, 2010 1:06 pm
Location: Northeast Pennsylvania

Postby Elmosaurus » Mon Jun 21, 2010 2:44 pm

The decision is made, and the trailer is bought post-haste! (back on 6/5/2010)

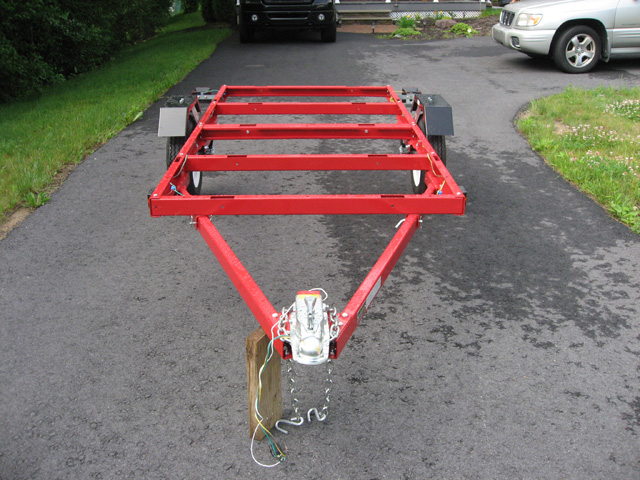
I bought the HF 1800lb trailer about 2 weeks ago while it was on sale. Used a 20% off coupon, so $319 + tax out the door. Had the trailer built and ready in under two days. (built the first day, wired and ready for inspection the second)

Unfortunately, in PA, kit built trailers are a PITA. PennDoT makes you jump through LOTS of hoops to get it titled and registered. This has apparently deterred many people from the kits. There is hope though, if you want one. I found an excellent 'guide' that one person put together on how to do the process as painlessly and quickly as possible.

The big hurdles are the 'enhanced' inspection station, and having your ducks in a row so you are not wasting lots of time backtracking!

The 'enhanced' inspection station are basically a small list of stations that are able and willing to do 'kit built' or 'restoration' inspections. The list is available from PennDoT; I suggest you call EVERY shop nearby you until you find one that is willing to do it for a reasonable fee. There were FOUR in my area charging $125+ for the service. The one I found 15 minutes further away (35 minute total drive) who charged only $25.00 for it. In all cases, they check the springs and hitch, make sure nothing is loose, then check the lighting. If all is well, they apply the sticker, sign off on the paperwork and photos, and send you on your way. Total time, 20 minutes if you want to wait for the ink to dry on the paper. (SOO not worth $125!!)

Here is the order of ten 'easy' steps for what you want to do if you ever want to buy and own a Harbor Freight Trailer in the State of PA:

1 - Buy trailer, ensure you get completed invoice of sale and Manufacturers Certificate of Origin. (MCO) (signed by manager, store number stamped on the MCO, etc)

2 - Build trailer kit COMPLETELY. (just because you don't plan on using the included fenders, doesn't mean it will pass inspection without them!) A plywood deck is not needed however; only the parts the came with the kit are required; everything else is 'extra' and should not be an issue as long as it doesn't interfere with the lighting, tires, or hitch integrity.

3 - Test your wiring yourself; This seems obvious, but small problems in your wiring can cause issues! Do not assume your lights work just because you put everything together.

4 - Take four photos during the day; one from the front, one from the back, and one from each side. Ensure the photos contain the whole trailer with no obstructions. (you may need to back up a bit) Print the photos out in color and add them to the Invoice and MCO pile.

5 - Locate a rock quarry or weigh station in your area; take the trailer there and get an unladen (empty and unhitched) weight of the trailer. it should be in the neighborhood of 260lbs. (or at least, that's what mine was) The station will print you off a unladen weight slip receipt. You will likely have to pay a $5 fee. Add that slip to the pile of paperwork.

6 - Make a photocopy of the Harbor Freight Trailer manual. (or, alternatively, print it out from their website PDF) Add that to the document pile.

7 - Print out a copy of form MV-426B from PennDoT. Fill in as much information as you are SURE of. At this point, you have the purchase price and taxes paid, the unladen weight, and all your personal information. The only things missing are the fees, and the inspectors notations. Add that document to the pile.

8 - Take the trailer to an enhanced inspection station, along with your whole pile of paperwork, which should include: Form MV-426B, Sales Invoice, MCO, 4 photos, Unladen Weight slip, and Assembly Manual. Pay the inspector for his work, while he: completes the walkaround inspection (and that literally is all it really is!), fills out the form MV-426B, attaches the inspection sticker, and signs and dates the back of each of your photographs.

(note: if you plan on using AAA as your titling/registration agent, do NOT let the inspector check the checkbox for online registration; they are not capable of doing it online!)

9 - Photocopy all the documents in your pile for your own records; you will have to surrender the originals during the application process if it is done 'manually' (mailed into Harrisburg), and you will not get them back! (obviously, you should not need to copy the assembly manual)

10 - Go to your chosen titling agent, and pay fees (if applicable) to have them file the paperwork. Likely, it may have to get sent to Harrisburg for processing. They will include all the documents in your 'pile'.


Then, wait until it gets approved, and as long as you didn't make any mistakes, leave anything out, or the inspector wrote something wrong on the application, you should see your title and plate within a few weeks!


Image

Tah Dah!!!


E.
Last edited by Elmosaurus on Mon Jun 21, 2010 9:45 pm, edited 4 times in total.
User avatar
Elmosaurus
Teardrop Advisor
 
Posts: 51
Images: 71
Joined: Mon Jun 21, 2010 1:06 pm
Location: Northeast Pennsylvania

Postby Cliffmeister2000 » Mon Jun 21, 2010 3:37 pm

Sounds like you have the time (barely :D ) and the desire! I'm ready for photos!
God Bless

Cliff

♥God. ♥People.
1 John 4:9-11

My Teardrop build pictures
User avatar
Cliffmeister2000
Titanium Donating Member
 
Posts: 3622
Images: 157
Joined: Thu Jul 26, 2007 10:18 pm
Location: Phoenix, AZ
Top

Postby Elmosaurus » Mon Jun 21, 2010 4:32 pm

Build notes on the trailer:

Couple of things I should write down:

When building the two square assemblies for the trailer, make sure they are perfectly square. (measure the diagonal carefully!) Do this for each 'square section' before tightening down the bolts, or attaching anything else. (like the front section's towing point arms) Also, make sure the two sections are the same overall width, and lined up when they are joined together. I'm frequently called Capt. OCD, but to me, having the frame the same width for the whole length means a more uniform surface for your floor to sit on. This is also means less unexpected gaps if your plywood side skin is going to overlap the frame at all. Gaps = water hiding spots = premature problems! My frame's outer width is exactly 48 9/16" the entire length, and I was within 1/32" when measuring diagonals for the WHOLE trailer. To me, that is pretty darn square and true for a bolted assembly!

The instructions show that you should install the cross members with the stake pocket holes all facing upwards. For the first cross member, you don't have a choice, since the tow arms go into the welded brackets. (unless you have a die grinder and a welder to reposition them) For the remaining cross members, I suggest you contemplate if you want to use the pre-drilled mounting holes for bolting the frame to your floor frame. I realized this after the fact (luckily before I began making sawdust) and flipped them so that they would line up with my longitudinal lag bolt mounting points easier. Saved me the hassle of drilling through the cross member. (Plus, there are five predrilled holes on the side opposite the stake pocket, which only has three holes) My photo above was taken 'pre-flip', but if you can imagine it, I flipped #2 and #5. (these are the two 'middle' cross members of each square half)

If you have trouble with the wiring, look for a bad ground using a multi-meter. Something I would have liked for the instructions to spell out was that the ground for all lights was the frame. (I really should have just known from all my years of working on cars though) For the rear mounted tail light assemblies, that means you're going through at least seven different frame members before you reach the ground wire screwed into the hitch receiver. (and that's assuming frame tube to frame tube contact; if the joint relies on the bolt, it's adding more items) Needless to say, I plan on wiring dedicated ground wires when the TTT is built up and I run wiring for the final light assemblies.

E.
User avatar
Elmosaurus
Teardrop Advisor
 
Posts: 51
Images: 71
Joined: Mon Jun 21, 2010 1:06 pm
Location: Northeast Pennsylvania
Top

Postby glassice » Mon Jun 21, 2010 4:36 pm

look like you have this well planed out
Last edited by glassice on Tue Jun 22, 2010 1:22 am, edited 1 time in total.
It is not the return ON my investment that I am concerned about; it is the return OF my investment
User avatar
glassice
Silver Donating Member
 
Posts: 588
Joined: Fri Sep 22, 2006 1:23 am
Location: E nev
Top

Postby Elmosaurus » Mon Jun 21, 2010 5:25 pm

Let's make some dust!! (Friday 6/18/2010)

I took the second half of the day off from work and headed to the lumber yard.

(NB: when you want choice lumber, it's a lot of work. I called many many yard before I found someone that had Douglas Fir. DFir is stronger than typical 2-by-X Spruce-Pine-Fir, but weighs about the same. It took me a WEEK to find a yard that had some...)


Brought home four 2x12x8 DFir boards, and 3 sheets of CDX grade 3/4"x4x8 plywood. I chose Douglas Fir because I wanted the ability for this framed floor to be liftable off the trailer someday. I don't see it happening often, but I want that ability. If my planning and design is about right, I should be able to unbolt the frame from this platform, jack the platform, and roll the trailer out from underneath without the floor even breaking a sweat.

Began ripping the 2x12s in earnest, figured I'd need about 16, thought there might be some unlocked tension so three or so would go to waste. I ripped 2 of the boards entirely, and about four more off the third board. Produced only two with wierd tension in them, and at least half of each of those was still usable for short pieces. I chose the four best pieces of knot free, tight grained 2x2 for the center four spars, (two that run longitudinal and the two that they tie into) so I expect them to remain strong and straight and help with the 'liftable' concept.

Dialed in the Miter saw, and got to work cutting all my pieces out. Here's what it looked like when they were all laid out. (two longitudinal spars that frame the wheel well have not been cut yet)

Image

Image

FWIW, the frame when complete will hang off the sides of the trailer frame by about 5.25" on each side, and 6" on each end. I'm shooting for a final outer dimension of 59" x 108" for the floor. (the front will have a slight forward protrusion that gives me another 6" of interior length)

I began assembling in the center, working my way outwards. To me, the two center longitudinal spars were the most important; they will provide the needed longitudinal support so I wanted them to be spaced perfectly.


The following morning, I did some dust cleanup, and got to work building the rest of the frame. By noon, I had the frame 90% completed, and the center piece of decking in place, but the sun was killer, and we had to go out for some errands, so I took a break.

When I returned that evening, I got to work and laid the remaining pieces and the final two pieces of decking. By nightfall, (9PM) the frame was about 90% complete.

Image

Image


The next morning, I finished up the final cross spars, and the shorty longitudinal spars, then cleaned up the extra Gorilla glue foam with a chisel. By dinner time I was able to finally break out the new Bosch Router and with a 1/2" x 1" flush trim bit, I cleaned up the plywood all around, and produced what looked like an almost finished floor!

Before it got dark, I managed to precut the pieces of my fender wells and assemble them so the glue could dry overnight.

I took some people's thoughts into consideration, and have decided to make separate fender wells, that are removable and replaceable if need be. Stories about a blowout puncturing plywood and making a mess gave me the willies. To further add to my protection, I'm reusing the steel fenders from the Harbor Freight kit, and basically building my plywood wells to 'house' the steel ones. I figure this will produce a very durable fender well with minimal protrusion into the cabin. (even though there will be dinette cabinets there eventually, I wanted to minimize storage space loss there)

Compound Miter saws ROCK!

Image

With that, I tarped up my work so that it could dry and went to bed after a shower.

E.
Last edited by Elmosaurus on Mon Jun 21, 2010 8:23 pm, edited 2 times in total.
User avatar
Elmosaurus
Teardrop Advisor
 
Posts: 51
Images: 71
Joined: Mon Jun 21, 2010 1:06 pm
Location: Northeast Pennsylvania
Top

Postby mikeschn » Mon Jun 21, 2010 5:57 pm

When someone says MiniBago, this is what comes to mind...

Image

Mike...
The quality is remembered long after the price is forgotten, so build your teardrop with the best materials...
User avatar
mikeschn
Site Admin
 
Posts: 19202
Images: 479
Joined: Tue Apr 13, 2004 11:01 am
Location: MI
Top

Postby Elmosaurus » Mon Jun 21, 2010 7:59 pm

Final stages of the floor...


So I got home from work a little late today, but wanted to get 'something' done.

Image

So with the glue dry, I chiseled away the extra, and broke out the flush cut bit again. Really loving this Bosch Router!

Image

The little 'ears' you notice on the ends are so that the plywood inner wall of the fender housing mates with the thickness of the floor frame. I debated bevel cutting a piece of stock to fill the gap, but I think it'll be un-needed. Slid the fender housings into place, and predrilled, then screwed (no glue) them to the frame. (this way there will be removable if I crack the layer of black goo sealing them in, and back out the decking screws)

Image

The floor is done! It's supported on some 2x2 stock off the trailer frame in this pic.

Now, it's time for final floor prep. Flip it over, and raise it off the frame. (note fancy height pedestals. yes, those are concrete blocks.)

I had transferred the pre-drilled hole marks where the bolts will go through the trailer frame, into the floor frame. I also transferred the location of the only bolts that will prevent the floor frame from sitting flush on the trailer frame. (the four bolts that hold the trailer frame members together that are located directly over the axle) I got to work drilling. 1/4" holes for the 3/8" lag bolts that will attach the trailer frame to the floor frame, and using a 1" spade bit to create a recess for the frame bolt heads to sit in for a nice flush mounting.

Image

With that, the floor is ready for the black goo tomorrow!

Image

Image

Stay tuned for more updates!

E.
User avatar
Elmosaurus
Teardrop Advisor
 
Posts: 51
Images: 71
Joined: Mon Jun 21, 2010 1:06 pm
Location: Northeast Pennsylvania
Top

Postby Elmosaurus » Mon Jun 21, 2010 8:02 pm

mikeschn wrote:When someone says MiniBago, this is what comes to mind...

Image

Mike...


LOL. I wish I could make mine out of cardboard! I'd be done in like 2 hours!

I will add, that's the stripey logo my wife and I decided on though! Guess we're not the only ones with the idea!


E.
User avatar
Elmosaurus
Teardrop Advisor
 
Posts: 51
Images: 71
Joined: Mon Jun 21, 2010 1:06 pm
Location: Northeast Pennsylvania
Top

Postby grizz » Tue Jun 22, 2010 2:13 am

Holy Potato Salad Batman !!

That is one I will be watching.

Stellar progress and delivery.

Well done so far.

Know it will be a beauty.
Greetings from England.

Rian.


Hoping to get it all done in time.
User avatar
grizz
1000 Club
1000 Club
 
Posts: 1210
Images: 29
Joined: Mon Sep 21, 2009 2:37 pm
Location: Rochester, Kent, UK
Top

Postby Elmosaurus » Wed Jun 23, 2010 9:07 pm

Thick. Sticky. And Stinky. And did I mention thick?

So the rain abated finally, and today the sun came out. It was officially time to apply the stinky black goo. I've come to realize it's sort of a right of passage for members here; when you're laying it down, trying not to make a mess, trying to make sure you coat all your hard work and protect it from road debris and water, and most important, trying not to get high off the fumes, you realize your build is truly underway now, and there's really no turning back!

I searched high and low for the Henry's 107 Asphalt emulsion that many of you have used, but could not source a gallon of it no matter what. My local HD stores only carries the 201 version. I even tried to locate the Tractor Supply version that a few of you had used, the 'Black Beauty' fence post asphalt coating; no luck, the only version they had was the fifty dollar 5 gallon bucket. After doing a bunch of reading on Henry's website I realized the 201 will serve just fine; it's just a solvent based version instead of the water based 107. It's also 'fibered' which makes it's consistency thicker during application and after curing; I figure that's not necessarily a bad thing.

So, with the sun shining after yesterdays murky rain-ey-ness, my lovely wife started the first coat while I was at work today. When I got home I went over the spots that had totally soaked in the Henrys asphalt emulsion, and then since we had a half can leftover, I decided to just go over the whole thing again, paying special attention to knots in the wood where penetration wasn't perfect, in the wheel wells where protection is most desired, and in the joints where the 2x2s are mounted to the plywood.

A couple of tips:

The application of this stuff is like troweling molasses laden mud. (did I mention it's sticky?) Do not even waste your time trying to stir it with paint stir sticks you'd bring home for free from the store. (they'll snap like toothpicks) My wife was very glad I decided to rip a piece of ~18" long scrap 2x2 into three 3/8" thick stir sticks for her before I left for work this morning. (not sure the neighbors liked the sounds of my table saw at 8 in the morning though...)

When I picked up the can, I had bought a '3-knot' bristle brush to apply it. They are sold in the area at HD with the cans of emulsion, and are meant to be used on a stick to 'broom sweep' the emulsion on a normal roof application. Realizing the brush body was way too wide and unwieldy to dip into the can, I cut the wood body into two pieces at the 1/3 mark; This produced a single 'one knot' brush, and another 'two knot' brush. I forgot to take a picture, but I'll grab one tomorrow in the daylight. Trust me when I say, this makes using the brush(es) much easier. Before cutting, make sure you hold the brush in various angles to figure out where the best place to cut is; my brush had a bias 'slant' on one side, that made much more sense to have in the palm of one's hand after being cut. Had I decided where to cut it while holding the brush from the other side, I'm sure it'd be a lot less comfortable to grip. I used some 80 grit sandpaper to hand round the now sharp edges for easier handling. It definitely made a difference.

My wife also pointed out it would have been easier if we had scraped the excess glue off before we began sealing; the squeezed out glue created extra nooks and crannies that made it harder to completely seal around. (wasn't impossible, just took more shoving of the brush, and more emulsion to saturate the area)

Before I left for work, I also dug out a small 1/2" plastic bristle soldering flux brush for her to do tiny detail work, 'just in case'; it turns out she said she found that invaluable for the tighter corners. When I was touching up the knots or gaps between the 2x2 and plywood, I found it to be as well. So keep a smaller brush handy for the tiny details.

Here's the aftermath of the can, the brushes, and the stir sticks:

Image


Also, we've been having threats of rain lately, so on the tip of another member's thread in General Discussion (Sorry, I forgot your name, but thanks!!) I stopped by our local Big K (Kmart) because they have pop up canopies on sale. I looked over the loss leader product, a $60 pop up by quikshade, but found it wasn't quite was I wanted. We've been looking for a canopy in general for a while, and wanted one that has straight legs; the $60 model had slanted legs, so it had a larger 12x12 footprint, but actually only covered a 9x9 area. I settled on the $80 quikshade that is a true 10x10, straight legs, covers 10x10 area. This works best for our application, and will allow us to place it right up along side the trailer eventually. With the higher chance of rain overnight tonight, I decided to set up the canopy and then drape a portion of enormous 25 x 40 foot gray tarp over it. We figured there was no point extending the legs for maximum height since we just need to keep the rainwater off the asphalt emulsion so it can dry. (you can see the new canopy and tarp in the picture)

Now, we just have to wait for ol' stinky to fully cure. I plan on bringing home the pinkboard insulation and cutting/fitting it into place with long decking screws with washers on Friday after work.

Image

E.
User avatar
Elmosaurus
Teardrop Advisor
 
Posts: 51
Images: 71
Joined: Mon Jun 21, 2010 1:06 pm
Location: Northeast Pennsylvania
Top

Postby Rigsby » Thu Jun 24, 2010 5:44 pm

Great going there E. Im liking the woodwork around the wheel wells :applause:
DOOIN IT THE YAARKSHA WAY--FA NOWT, THA NUS !!
User avatar
Rigsby
500 Club
 
Posts: 587
Joined: Sun Aug 31, 2008 12:21 pm
Location: Doncaster, England
Top

Postby planovet » Thu Jun 24, 2010 5:58 pm

I like your avatar :lol: Image
ImageMark (& Cindi)
Visit our website: Little Swiss Teardrop

I was wondering why the water balloon was getting bigger... and then it hit me.

ImageImageImageImage
User avatar
planovet
The Cat Man
 
Posts: 5583
Images: 3
Joined: Tue Nov 27, 2007 4:48 pm
Location: Plano, Texas
Top

Postby BillZ » Sat Jun 26, 2010 11:27 am

I let my floor sit out in the hot sun and the tar mostly dried in one day.
User avatar
BillZ
The 300 Club
 
Posts: 308
Images: 0
Joined: Tue Feb 16, 2010 7:39 pm
Location: College Park, Maryland
Top

Postby GregB » Sun Jun 27, 2010 3:42 am

Elmosaurus wrote:
mikeschn wrote:When someone says MiniBago, this is what comes to mind...

Image

Mike...


LOL. I wish I could make mine out of cardboard! I'd be done in like 2 hours!

I will add, that's the stripey logo my wife and I decided on though! Guess we're not the only ones with the idea!


E.


E.

Brilliant minds think alike, don't they? The original, cardboard MiniBago now looks like this, though:

Image

Greg
I'm not dead, yet. I'm feeling better.
User avatar
GregB
500 Club
 
Posts: 528
Images: 108
Joined: Thu Sep 29, 2005 2:22 pm
Location: UT, Lehi
Top

Next

Return to Build Journals

Who is online

Users browsing this forum: No registered users and 16 guests