2010 Build, First Tear

...ask your questions in the appropriate forums BUT document your build here...preferably in a single thread...dates for updates, are appreciated....

2010 Build, First Tear

Postby ktnc30 » Thu Jun 24, 2010 9:41 pm

Have built previous camper on a pop up frame, sold that last year. Have some experience building boats, furniture but no expert. Built this beginning of the year and now getting around to pics. Will post a few here each day. Have used it 4 times in SC and FL and love it. Next trip planned for Aug in NC mountians. Have made some changes since building as I learn something each trip that could be better. Already planning the "next build". Still drawing those plans up and will post once done. Built 4X8, next 5X14? -two tears in one for two sleeping areas. Thinking stretched Tear. Boys in tent for now.

Told the wife I can build anything for $400; after 2 campers and a few other things, she now doesnt believe me... [img]:lol:
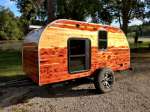
Image
End result.
Image
Trailer after bolting on deck, 1/2 ply with 1X4 framing.
Image
Sides on.
Image
Spars going in, used 1X2s
User avatar
ktnc30
Teardrop Builder
 
Posts: 38
Images: 93
Joined: Sat Apr 14, 2007 7:24 pm
Location: Palm Bay, Florida

Postby Carl01234 » Fri Jun 25, 2010 11:54 am

How many bolts did you use to bolt the floor to the frame?
2nd Build 5x10 Benroy Complete! viewtopic.php?f=50&t=70427
Image
User avatar
Carl01234
Teardrop Master
 
Posts: 100
Images: 116
Joined: Mon Jun 21, 2010 12:36 pm
Location: Chattanooga, TN

Postby bushido41 » Fri Jun 25, 2010 2:31 pm

Hello KTNC 30,

I am glad to see that there is somoone else in Palm Bay with a TTT besides me. I did not build mine but I just purchase my Cassette trailer last May. I live in the NW side of town west of the canal. Hopefuly will see you around in one of the parks.

CHeers,

Ed
Ed
K4BQN
ImageImageImage
User avatar
bushido41
Teardrop Master
 
Posts: 135
Images: 57
Joined: Wed Feb 17, 2010 7:35 am
Location: Palm Bay, Fl
Top

Postby ktnc30 » Sat Jun 26, 2010 10:05 pm

Used (4) 3/8 inch carriage bolts down each side and 2 on front. Think just the 4 on each side would be enough.

Live in NE, near NW side. Camp mostly at state parks, try to hit those within an hour and half of here. Lots around that distance that are nice. Get to SC and NC a few times each year as well.
User avatar
ktnc30
Teardrop Builder
 
Posts: 38
Images: 93
Joined: Sat Apr 14, 2007 7:24 pm
Location: Palm Bay, Florida
Top

more pics

Postby ktnc30 » Sat Jun 26, 2010 10:15 pm

some more of the build.

Image
I built my cabs by doing frames and then building rest of cabinet piece by piece, mounting each piece as I went. Probably be easier to build as a unit but was worried I'd put together something wrong and it wouldnt fit since didnt go by any specific plans.
Image
Front spars and a cubby for shelf. Since trailer I bought was a tilt, it had a front area framed so just built on top of that for the shelves. Wasnt doing a tongue box. Tilt was welded so no worries....
Image
Front cubby for inside shelves. Just used ply for "walls" of shelves and then skinned just like the tear. Turned out to be very solid.
Image
Kitchen cabs built same as inside cabs, pieces added as cut. Made some of it harder but turned out ok. Chose not to put cab doors on. May add for inside later but doubt ever will for kitchen. Notice I said doubt, not never...
User avatar
ktnc30
Teardrop Builder
 
Posts: 38
Images: 93
Joined: Sat Apr 14, 2007 7:24 pm
Location: Palm Bay, Florida
Top

Postby ktnc30 » Sun Jun 27, 2010 3:44 pm

Image
Kitchen finished. Placed fridge and cooler in to see how it would be. Fridge just slides in so can slide it out when camping as it needs more space around it for venting.
Image
Electrical going in, didnt do 12v. We always camp in state campgrounds so just did 110. Making a track to hide wires since leaving spars exposed.
Image
Pic of wire track to hide wires from one side to another. Did same for wires coming up to first light/switches on the side and just put same on opposite side so was same.
Image
Made a bumper out of a 2X8. Lights including plate light are flush mount. Bolted bumper to rear member of trailer with 5/16 carriage bolts.
User avatar
ktnc30
Teardrop Builder
 
Posts: 38
Images: 93
Joined: Sat Apr 14, 2007 7:24 pm
Location: Palm Bay, Florida
Top

More pics

Postby ktnc30 » Mon Jun 28, 2010 6:27 pm

Image
Hatch frame made, probably was most part I dreaded and that took most time in the build. Not as bad as I expected but was time consuming.
Image
Stained after installing, took more time but was easier since not enough room in garage to have things layed out to dry.
Image
Same. Stained trim in Dark Mahogany while walls and shelves are in Red Mahogany. Contrast looks great.
Image
Stained all then coated with 3coats of polyurethane. Sanded between coats.
User avatar
ktnc30
Teardrop Builder
 
Posts: 38
Images: 93
Joined: Sat Apr 14, 2007 7:24 pm
Location: Palm Bay, Florida
Top

Postby ktnc30 » Wed Jun 30, 2010 9:19 am

Image
Skinned in 1/4 ply.
Image
Skinned hatch, not as bad as I thought it would be.
Image
Hatch hinge on. I used a regular SS hinge. Later pics will show how I made it waterproof.
User avatar
ktnc30
Teardrop Builder
 
Posts: 38
Images: 93
Joined: Sat Apr 14, 2007 7:24 pm
Location: Palm Bay, Florida
Top

more pics

Postby ktnc30 » Sat Jul 03, 2010 6:06 pm

Image
Glassed top, front and hatch. Glass laid out ready for resin.
Image
Glassed.
Image
Glassed using one layer of 3/4oz. mat.
Image
Sides and top coated with several coats of exterior primer.
User avatar
ktnc30
Teardrop Builder
 
Posts: 38
Images: 93
Joined: Sat Apr 14, 2007 7:24 pm
Location: Palm Bay, Florida
Top

more pics

Postby ktnc30 » Fri Jul 09, 2010 8:40 pm

Image
Testing fender frames with a wheel cut out from scrap ply.
Image
Fenders on. New axle from Northern tool on sale, spent 100 on axle and hubs. Looked better with the larger tires instead of the 8" ones. Later sold small axle and tires for 50.
Image
Painted Candy Apple Red, too many coats to count. Red is a hard color to paint, wont do it again. Too much bleed through. Trimmed in black.
User avatar
ktnc30
Teardrop Builder
 
Posts: 38
Images: 93
Joined: Sat Apr 14, 2007 7:24 pm
Location: Palm Bay, Florida
Top

Postby ktnc30 » Fri Jul 09, 2010 8:46 pm

Image
Used shower liner as a seal for hatch hinge.
Image
Just painted wood strips black to match trim. Sealed with clear exterior caulk. Plumbing co. gave me some for free after I explained what I was using it for. Will send him a pic. Big stores only had grey liner. NO LEAKS!!
Image
Used curtians we had made for other camper that was sold.
User avatar
ktnc30
Teardrop Builder
 
Posts: 38
Images: 93
Joined: Sat Apr 14, 2007 7:24 pm
Location: Palm Bay, Florida
Top

AC

Postby ktnc30 » Fri Jul 09, 2010 8:52 pm

Originally had ducts from a larger ac but was too heavy to take with us. Small one kept freezing up even after adding duct volume so went to this:
Image
Made a cover for opening when not in.
Image
Inside view, need to stain and varnish trim. Doesnt stick in there much so didnt lose much room, maybe a inch.
Image

Keeps it cold, even in Florida heat as long as put up tarp above camper so sun isnt beating directly on it since just 1/2 ply with no insulation.
User avatar
ktnc30
Teardrop Builder
 
Posts: 38
Images: 93
Joined: Sat Apr 14, 2007 7:24 pm
Location: Palm Bay, Florida
Top

Question on building from the beginning

Postby jessicagypsyjane » Sat Jul 10, 2010 4:54 pm

Dear ktnc30


I just checked out your posts on making your teardrop, it's adorable and I like the red even though it was a pain. I would like to know how exactly you bolt the plywood to the trailer frame itself? I don't get that part.

Also, can you tell me does plywood really bend that easily so that you can bend it to make the hatch? I don't see how you get the wood to be curved like that. Any information you could provide would be so appreciated. I want to build one myself and am researching the best way to go about it.

Thank you!

Jessica in Santa Barbara, CA
User avatar
jessicagypsyjane
Teardrop Inspector
 
Posts: 6
Joined: Fri Jul 09, 2010 4:28 am
Top

Postby ktnc30 » Sun Jul 11, 2010 12:29 pm

Thanks. Below is a crude drawing of how mine is done, there are many different ways to do it and there is a post on site that shows pictures of different ways.
Image
Bending ply- I used 1/4 plywood on this one. I have bent 3/8 ply on another one I did and it was difficult. The 3/8 was soaked to get it to bend without breaking. The 1/4 bends with no issues. For the hatch, you need to have strong and enough hatch ribs or it will spring back putting your hatch out of whack. I used 1/4 since I was glassing the top/hatch this time. Some types of hardwood wouldnt bend as easily as the pine ply so I went with it.
User avatar
ktnc30
Teardrop Builder
 
Posts: 38
Images: 93
Joined: Sat Apr 14, 2007 7:24 pm
Location: Palm Bay, Florida
Top

Postby nevadatear » Sun Jul 11, 2010 2:12 pm

We used 1/8" ply for our roof and hatch. Bends pretty easily, without soaking, but only in one direction. We used two layers of 1/8". 1/8" ply is not usually at your big box hardware store, need to go to specialty wood shops. We also bought 1/4" bendy plywood, which we used to skin the inside of the hatch. But the quality is not nearly as good, very fiberous, but it does bend very easily.
Debbie (with Randy looking over my shoulder)
Our build thread: http://www.tnttt.com/viewtopic.php?t=41295&highlight=monstero
2009 Homebuilt woody, Kenskill inspired 5 wide
ImageImage
User avatar
nevadatear
Silver Donating Member
 
Posts: 2365
Images: 171
Joined: Mon Nov 10, 2008 2:37 pm
Location: No. Nevada
Top


Return to Build Journals

Who is online

Users browsing this forum: No registered users and 48 guests