The Beaver Build (Updated August 30/10)

...ask your questions in the appropriate forums BUT document your build here...preferably in a single thread...dates for updates, are appreciated....

Postby Cliffmeister2000 » Thu Aug 05, 2010 6:17 pm
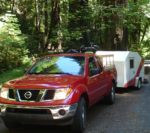
lindstrand wrote:

Image

Built the front box. Didn't have enough fiberglass to do the front box.


Very nice. :applause: :applause:
Do you have enough room to crank the handle on the tongue jack? :thinking:
God Bless

Cliff

♥God. ♥People.
1 John 4:9-11

My Teardrop build pictures
User avatar
Cliffmeister2000
Titanium Donating Member
 
Posts: 3622
Images: 157
Joined: Thu Jul 26, 2007 10:18 pm
Location: Phoenix, AZ

Postby lindstrand » Thu Aug 05, 2010 9:54 pm

Cliffmeister2000 wrote:
lindstrand wrote:

Image

Built the front box. Didn't have enough fiberglass to do the front box.


Very nice. :applause: :applause:
Do you have enough room to crank the handle on the tongue jack? :thinking:


Good catch, i was wondering if anyone would notice. To answer the question no and now yes. After I built the box set it on went to crank it up... crap. I had to grind the jack barrel off of the plate that it was welded to and reweld it after rotating it about 45 deg. Not ideal but it works.

Image

This is after it was rotated.
User avatar
lindstrand
Teardrop Builder
 
Posts: 28
Images: 92
Joined: Tue Jul 06, 2010 10:01 pm
Location: Canada

Postby lindstrand » Mon Aug 09, 2010 11:07 pm

Another weekend gone. The goal was to have it campable for August 14 which is less than a week away.

Image

Door trim installed. Wires run for my switches. Insulated and Paneled.

Image

Just another shot

Image

Box fibre glassed.

Image

Shiney door.

Image

Box lid fibre glassed.

Image

Fuse box and a mess of wires.

Image

More wires and roof vent installed

Image

Window installed. Would like to get some trim to cover the screws.

Image

Tail lights installed. Roof vent installed. Rubber strip reinforced with aluminum strip and screws with liquid silicone underneath installed over piano hinge.
Last edited by lindstrand on Fri Aug 27, 2010 10:52 am, edited 1 time in total.
User avatar
lindstrand
Teardrop Builder
 
Posts: 28
Images: 92
Joined: Tue Jul 06, 2010 10:01 pm
Location: Canada
Top

Postby Cliffmeister2000 » Tue Aug 10, 2010 7:36 am

:thumbsup:

You are working fast! :applause:
God Bless

Cliff

♥God. ♥People.
1 John 4:9-11

My Teardrop build pictures
User avatar
Cliffmeister2000
Titanium Donating Member
 
Posts: 3622
Images: 157
Joined: Thu Jul 26, 2007 10:18 pm
Location: Phoenix, AZ
Top

Beaver Builder

Postby Wild Bill » Wed Aug 11, 2010 10:16 pm
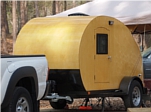
Great job and lightening Speed, I thought about building longer that you took to build, Any friend of the Beaver is a friend of mine. Enjoy Sleeping in the Beaver. Bill
Beavers are Naughty!
User avatar
Wild Bill
The 300 Club
 
Posts: 409
Images: 63
Joined: Sat Jul 07, 2007 7:01 pm
Location: Northern Illinois
Top

Postby lindstrand » Tue Aug 17, 2010 10:52 am

Image

Finally got the lights working right. Tip: If your signals,brakes and running lights all work correct. But, when you left signal and brake and then your right signal flashes bright with the other 3 flashing dim and a whole bunch of other weird things happend when you do combinations its probably your ground wire.

Image

Door complete. Aluminum trim was salvaged from the old camper. That thing was truly a gold mine as far as salvaging. Wish i had a little more time to shine up the aluminum.

Image

Box painted and installed. Had to move and reweld the jack again. PITA, should have extended my tongue from the beggining. O well works now.

Image

Installing the struts with my dad helping hold up the hatch. Went to NAPA and told the guy what I was doing. He responded with a "oh well it doesn't matter where you put them it only depends on how much the door weighs", with a duh are you stupid kind of attitude. Nothing bugs me more than when old guys talk down to me like I am stupid. This goes against what engineering school taught me but also what 22 years of common sense has told me. It can be as simple as a thought experiment with a rusty nut, a wrench, and a snipe or as complicated as a static force analysis of the free body diagram. Both of which you will end up with the conclusion that the longer the stroke, the further you can put it away from the hinge, the less force you need. Anyway as you can probably tell this kinda bugged me and to summarize this long story 60#er's were not enough had to go with 100#ers and they work like a dream.

Image

Hooked up and ready to go. First trip was about 180 km round trip to my future-wife's grandpa's 90th birthday get together. Pulled great on the highway, bounced around a bit on the gravel but not to bad. Some of the relatives had pretty fancy units, you know the type wind sensored awnings and like 400 sq. ft. But mine was still the most talked about.


Next weekend get to start the fun part for me, finishing the inside.
User avatar
lindstrand
Teardrop Builder
 
Posts: 28
Images: 92
Joined: Tue Jul 06, 2010 10:01 pm
Location: Canada
Top

Postby David S » Tue Aug 17, 2010 5:08 pm

:applause: Look's good :thumbsup:
User avatar
David S
Donating Member
 
Posts: 218
Images: 53
Joined: Wed Aug 05, 2009 9:18 pm
Location: Rose Hill Kansas
Top

Postby S. Heisley » Tue Aug 17, 2010 7:24 pm

Just like a beaver dam! It went up seemingly overnight!

Congratulations on getting it camp-able! :applause:
User avatar
S. Heisley
Super Lifetime Member
 
Posts: 8774
Images: 495
Joined: Mon Sep 17, 2007 10:02 am
Location: No. California
Top

Postby lindstrand » Sun Aug 22, 2010 8:45 pm

Image

Finally got my door latch from ebay. Inside shot of the latch.

Image

Outside shot of my latch.

Image

Sink installed. Countertop being made.

Image

Countertop made. Cooler draw made.

Image

Stove and stereo installed.

Image

Plate made for my reading lights with a switch installed.

2 weeks till our big camping trip of the year. Still lots to do. Need to finish the cabinets, make doors for them, varathane everything, install knobs, put laminate on top of stove, .... ya i could go on for a while. Need a productive weekend next weekend.
User avatar
lindstrand
Teardrop Builder
 
Posts: 28
Images: 92
Joined: Tue Jul 06, 2010 10:01 pm
Location: Canada
Top

Postby lindstrand » Mon Aug 30, 2010 9:58 am

Very productive weekend. Got lots of the finishing stuff done. We are leaving on our big camping trip this wednesday. I think I have pretty much got everything done I needed to. Minus a few things I wanted to but didn't have time. Should be about 1500 km total so should be a good test to see how it holds up. It is getting pretty cold at night so going to have to take lots of warm clothes and blankets.

Image

After I had attached the 5 piece doors to the cooler pullout and the under sink storage. I made them out of 1x2 spruce and 1/8" rotary mahogany. Pocketed holed the frame together and inserted the middle panel into grooves I had cut with the table saw. Stained the spruce dark and then everything needs to be Varathaned.

Image

Sleeping storage framed in. Will be 2 areas accesable from the sleeping side. The left and the right side. The middle area will be accessed from the galley side.

Image

Doors on the sleeping side.

Image

Like above.

Image

Reading light installed

Image

Kitchen sink is sunk in. Countertop piece made to go into hole and make everything flush. Middle storage with sliding door. Zinc U-Channel for a track with an 1/8" door. Some shelves for spices etc will go behind the sink.


Image

Stove all done. Drawer front on. Will upload another picture of the propane attachment. Took a lot of messing around but worked out very well. Put arborite onto my stereo box. I have a stero, a 6x9, a 4x6, and a cigerette lighter for my FM transmitter. Works great. Sounds ok could use new speakers but i have long since passed my budget.


Image

Cooler Pull out. Can see the fuse box tucked away.

Image

Undersink storage. Needs a shelf but that will come later. Sink is routed straight out the side of the trailer. I will have a hose and a pail so I do not have a place to store water and waste space.

Image

Installed a magazine rack from the old camper i got. You can see the storage beside the bed. Will have another ciggerette light there to charge our phones.
User avatar
lindstrand
Teardrop Builder
 
Posts: 28
Images: 92
Joined: Tue Jul 06, 2010 10:01 pm
Location: Canada
Top

Postby lindstrand » Mon Aug 30, 2010 5:35 pm

Image

Missed 1 picture in the last post.
User avatar
lindstrand
Teardrop Builder
 
Posts: 28
Images: 92
Joined: Tue Jul 06, 2010 10:01 pm
Location: Canada
Top

Postby Ratkity » Mon Aug 30, 2010 6:29 pm

:applause: :thumbsup: :thumbsup:

Great job!

Hugs,
Ratkity
Ratkity
Gold Donating Member
 
Posts: 1065
Images: 0
Joined: Wed May 26, 2010 1:01 pm
Top

Postby Alan and Lianna » Wed Sep 01, 2010 8:36 pm

Nice quick build, I am sure it will make your trip more enjoyable. Just wordering what size fiberglass cloth you used on the corners and did you get any air bubbles there?

Alan
Don't just dream about it!
Wake up and make it happen...
User avatar
Alan and Lianna
Teardrop Master
 
Posts: 120
Images: 389
Joined: Mon May 17, 2010 5:55 pm
Location: Pearland Tx
Top

Postby starleen2 » Wed Sep 01, 2010 9:58 pm

:applause: :applause: Lookin' good so far! :applause: :applause:
User avatar
starleen2
5th Teardrop Club
 
Posts: 16272
Images: 224
Joined: Sat May 12, 2007 8:26 pm
Location: Pea Ridge ,AR
Top

Previous

Return to Build Journals

Who is online

Users browsing this forum: No registered users and 57 guests