The Beaver Build (Updated August 30/10)

...ask your questions in the appropriate forums BUT document your build here...preferably in a single thread...dates for updates, are appreciated....

The Beaver Build (Updated August 30/10)

Postby lindstrand » Tue Jul 06, 2010 10:38 pm

This is my first build and post so we will see how it goes. I have pretty much nailed down my design, although you can see that there are some details that are missing.

Image

Door is missing but other than that most of its there.

Image

Ignore the floating axle

Image

Toyed around with the idea of building an ice box but decided against it. I also want to Install a stereo and speakers on an arm that can swing out. Couple reasons I can always point the speakers at the fire and I can use my remote without getting up.

Image

Pretty basic. I am thinking of making the sink sunk so that a cover will keep the countertop flush.

Some specs...
100" long 66" wide and about 66" tall. Has to be under 1000 lbs for my car to tow it. I got the frame from an old tent trailer for a case of beer. I will post those pictures later.

Let me know what you think.
Last edited by lindstrand on Mon Aug 30, 2010 9:59 am, edited 9 times in total.
User avatar
lindstrand
Teardrop Builder
 
Posts: 28
Images: 92
Joined: Tue Jul 06, 2010 10:01 pm
Location: Canada

The trailer that can...

Postby lindstrand » Wed Jul 07, 2010 10:49 pm

As you can see not much to salvage on this but it will serve a greater purpose.

Image

Image

Image

Image
User avatar
lindstrand
Teardrop Builder
 
Posts: 28
Images: 92
Joined: Tue Jul 06, 2010 10:01 pm
Location: Canada

Postby teardrop_focus » Thu Jul 08, 2010 2:26 am

Welcome aboard. :peace:


:lol:

That last pic is pure comedy! ..all hooked up to the truck yet stuff's falling out of the trailer...

Pretty much sums up the heap I'm trying to build in my backyard yet have it ready to tow in 5 days...

:?
.
Image

"There is something about these little trailers that brings out the best in people." - BigAl, Scotland, 2010

"Climb the mountains and get their good tidings. Nature's peace will flow into you as sunshine flows into the trees...
The winds will blow their own freshness into you and the storms their energy, while cares will drop away like autumn leaves..." - John Muir, 1898


Chris Squier / teardrop_focus :-)~
User avatar
teardrop_focus
Donating Member
 
Posts: 5975
Images: 127
Joined: Sat Apr 11, 2009 3:18 pm
Location: SoCal
Top

Postby Woodbutcher » Thu Jul 08, 2010 7:03 am

Seems a little rough.....but I think it will buff out!

Have fun with your build, there is no going back now!
User avatar
Woodbutcher
Platinum Donating Member
 
Posts: 4187
Images: 45
Joined: Fri Mar 10, 2006 10:01 pm
Location: Chicago Suburbs
Top

Postby Miriam C. » Thu Jul 08, 2010 9:43 am

Image Yep, you have some tearing up to do. Looks fine to me. You will want to watch your balance or move that axle back some. :thumbsup:
“Forgiveness means giving up all hope for a better past.â€
User avatar
Miriam C.
our Aunti M
 
Posts: 19675
Images: 148
Joined: Wed Feb 15, 2006 3:14 pm
Location: Southwest MO
Top

Day 1 & 2 of the build

Postby lindstrand » Thu Jul 08, 2010 9:49 am

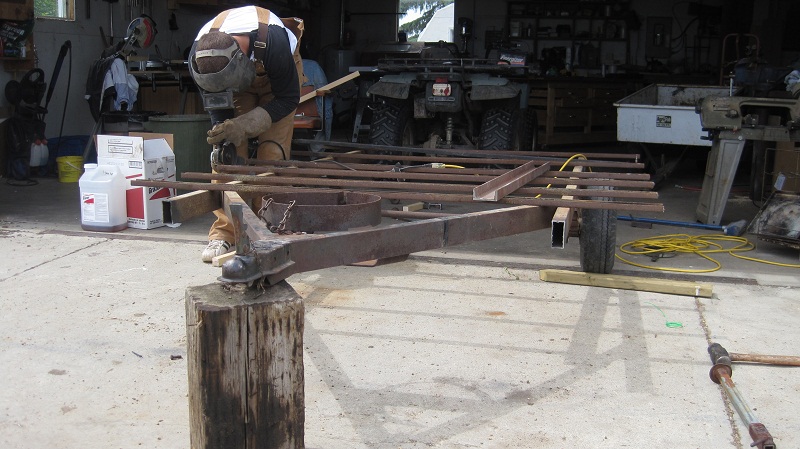
I stripped the trailer which only took about 45 minutes. Which surprised me considering how good of shape it was in. The frame is rusty but not to bad. Axle is straight, bearings are in good shape just need to be repacked, and I need one new tire. So all in all not to bad.

Image

The trailer was 6' wide so I trimmed that down to be closer to the width of my car.


Image

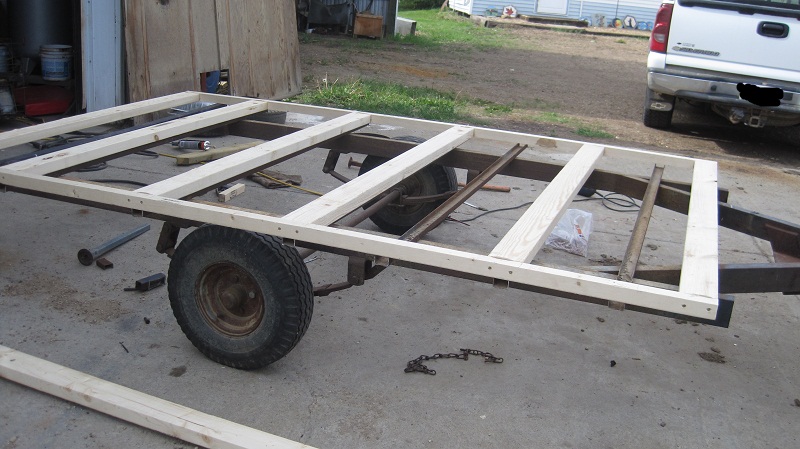
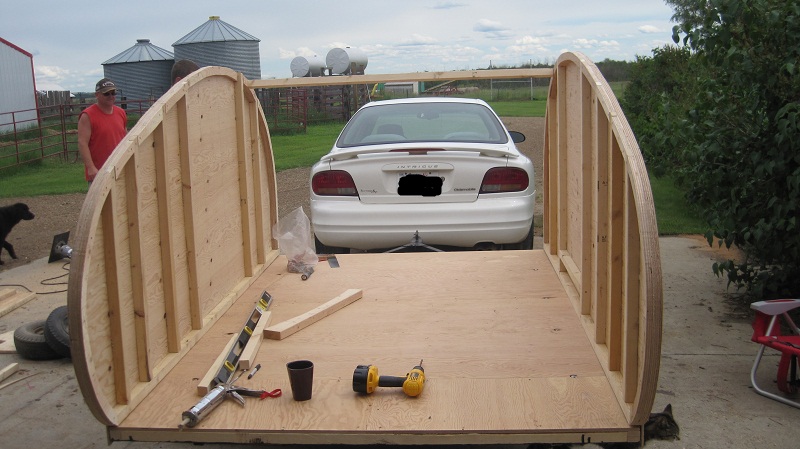
Made the wood frame and set it in place to see what it looks like


Image

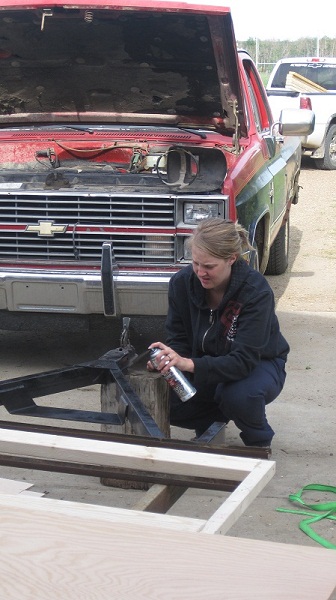
My beautiful wife to be doing some painting. Well she doesn't look all that happy about it but she was. At first my plan was only to paint the exposed frame but later found out that you can see more than I thought from the side so I ended up painting the whole frame


Image

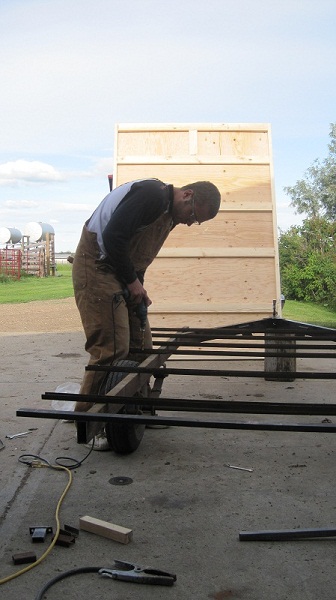
Drilling the holes to bolt the floor to the trailer. The tent trailer was bolted down with only x4 1/4" bolts. I used x8 3/8" bolts so it shouldn't go anywhere.


Image

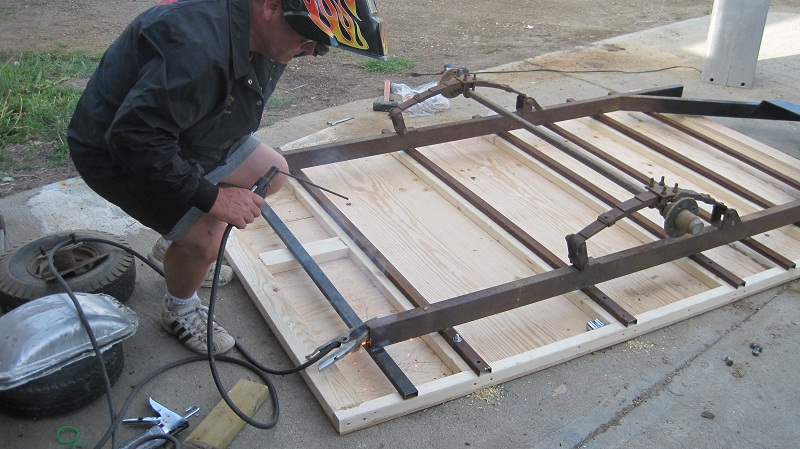
My hired welder laying beads. Well thats a stretch more like a farmer (my dad) with a welder burning holes in my trailer haha.


Image

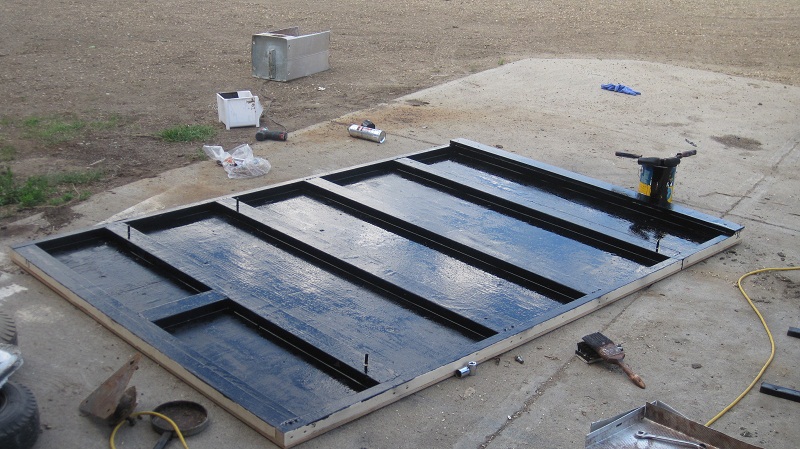
Applied some foundation tar to the bottom of my floor. Just a wonderful product. I can't imagine garbage like this floating around the Gulf.


Image

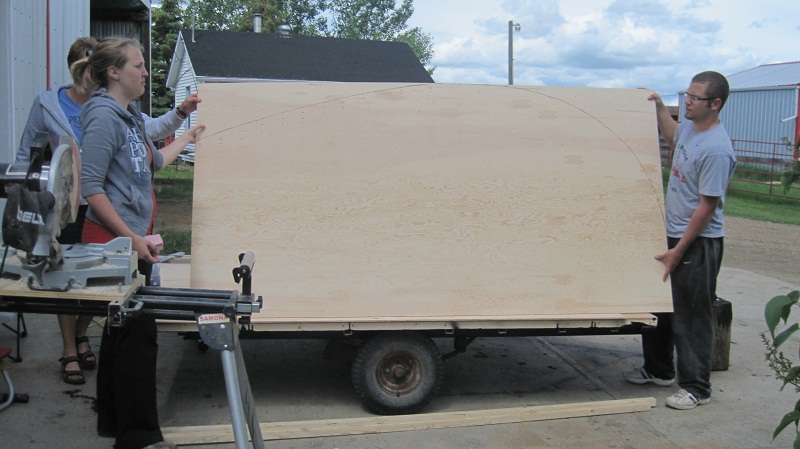
Sketched out my profile. The profile consists of 3 parts. The front goes vertical up 14" to allow for a box in the front. Then it curves with a complex parametric curve for a "teardrop". Finally it curves back with an ellipse.


Image

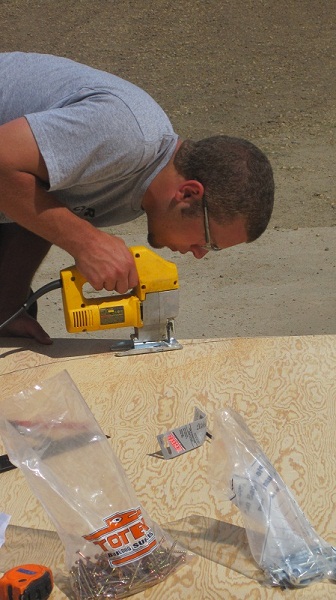
Intense jigsawing and...


Image

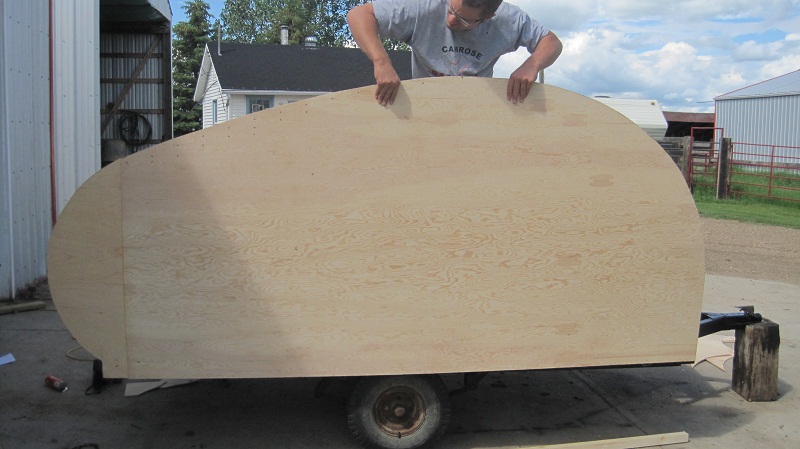
Wala there's my profile


Image

Camera went dark for a while. Installed top and bottom plates and the studs in the walls. Cut one roof spar just for a temperary assembly.


Image

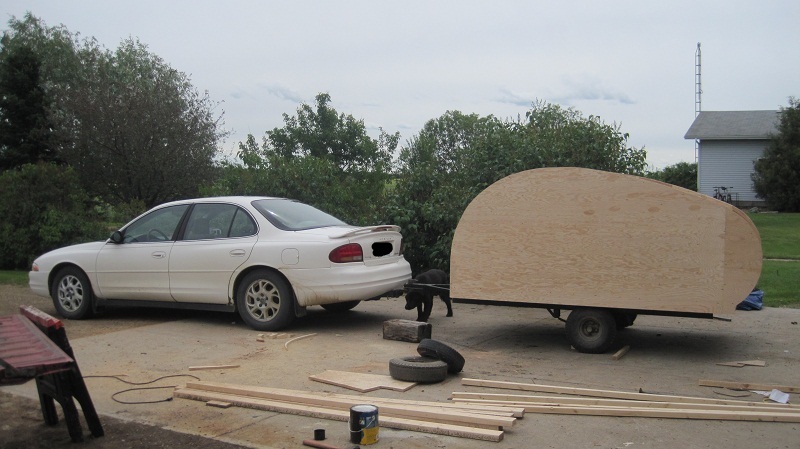
So here is the end of day 2. Would like to get some new wheels but as the university pretty much sucks me dry I will probably blast and paint these ones.

Has anyone used a product called Snow Roof for waterproofing their tear? If so how did it work if not what dowhat do you think.

http://www.paintdocs.com/webmsds/webPDF.jsp?SITEID=KST&prodno=016904100012&doctype=PDS&lang=E
User avatar
lindstrand
Teardrop Builder
 
Posts: 28
Images: 92
Joined: Tue Jul 06, 2010 10:01 pm
Location: Canada
Top

Postby lindstrand » Thu Jul 08, 2010 9:55 am

Miriam C. wrote:Image Yep, you have some tearing up to do. Looks fine to me. You will want to watch your balance or move that axle back some. :thumbsup:


Ya we spent alot of time talking about the balance. I actually shortened my orginal design. I am hoping that the front box will give me enough room to pack it so it is balaced. Worst case scenario (I hope) I take my cooler out and put in the front of the trailer for travel.
User avatar
lindstrand
Teardrop Builder
 
Posts: 28
Images: 92
Joined: Tue Jul 06, 2010 10:01 pm
Location: Canada
Top

Postby Miriam C. » Thu Jul 08, 2010 10:12 am

lindstrand wrote:
Miriam C. wrote:Image Yep, you have some tearing up to do. Looks fine to me. You will want to watch your balance or move that axle back some. :thumbsup:


Ya we spent alot of time talking about the balance. I actually shortened my orginal design. I am hoping that the front box will give me enough room to pack it so it is balaced. Worst case scenario (I hope) I take my cooler out and put in the front of the trailer for travel.


It is perhaps my having viewed so many with wheels back. With yours under you can heavy load the middle and should be good. You can always come back and have Dad help with moving the axle.

Image
“Forgiveness means giving up all hope for a better past.â€
User avatar
Miriam C.
our Aunti M
 
Posts: 19675
Images: 148
Joined: Wed Feb 15, 2006 3:14 pm
Location: Southwest MO
Top

Postby grizz » Thu Jul 08, 2010 12:43 pm

Cool speedy build.

I guess those are not Rugby posts in the background ?

Gridiron practice space ?
Greetings from England.

Rian.


Hoping to get it all done in time.
User avatar
grizz
1000 Club
1000 Club
 
Posts: 1210
Images: 29
Joined: Mon Sep 21, 2009 2:37 pm
Location: Rochester, Kent, UK
Top

Postby lindstrand » Thu Jul 08, 2010 1:00 pm

grizz wrote:Cool speedy build.

I guess those are not Rugby posts in the background ?

Gridiron practice space ?


Not as speedy as you think. I will only be able to work on it weekends for a while now.

Not rugby, baseball. A backstop where I practiced pitching.
User avatar
lindstrand
Teardrop Builder
 
Posts: 28
Images: 92
Joined: Tue Jul 06, 2010 10:01 pm
Location: Canada
Top

Postby lindstrand » Sat Jul 10, 2010 11:59 am

Right now I am leaning towards a piano hinge with rubber siliconed over top. Has anyone done this with sucess. I am trying to find some good rubber has anyone ordered anything like this from McMaster Carr?
User avatar
lindstrand
Teardrop Builder
 
Posts: 28
Images: 92
Joined: Tue Jul 06, 2010 10:01 pm
Location: Canada
Top

Postby starleen2 » Sat Jul 10, 2010 8:09 pm

lindstrand wrote:Right now I am leaning towards a piano hinge with rubber siliconed over top. Has anyone done this with sucess. I am trying to find some good rubber has anyone ordered anything like this from McMaster Carr?


Garage door gasket worked well for me on the ladybug. its water and UV stable and remains pliable for years - you can get it at Lowes or Home depot.

Image
Image
User avatar
starleen2
5th Teardrop Club
 
Posts: 16272
Images: 224
Joined: Sat May 12, 2007 8:26 pm
Location: Pea Ridge ,AR
Top

Postby lindstrand » Mon Jul 12, 2010 9:28 am

Not a whole lot of build progress this weekend but progress of a different kind. I started looking for some good deals on windows, roof vent, aluminum trim, etc. I started by going to a RV salavage store only to find everything was quite expensive. Looking for alternatives I caught wind of a neighbor that was taking an old camper to the dump. So for a case of beer I managed to get 2 pretty nice windows, aluminum trim, a propane stove, a stainless steel sink, and a whack of aluminum trim. I need to find some good weatherstripping now before I can do much more. What has everyone else used for weatherstripping?

How do I change the name of my build thread?
User avatar
lindstrand
Teardrop Builder
 
Posts: 28
Images: 92
Joined: Tue Jul 06, 2010 10:01 pm
Location: Canada
Top

Postby Elmosaurus » Mon Jul 12, 2010 9:41 am

lindstrand wrote:
How do I change the name of my build thread?


Just edit the original first post, and change the subject line.


Sneaky cat, sneaks under the trailer and into picture!

:lol:

Image


Speedy build. Did you use CDX for the exterior plywood? That looks like a thick skin! :)

E.
User avatar
Elmosaurus
Teardrop Advisor
 
Posts: 51
Images: 71
Joined: Mon Jun 21, 2010 1:06 pm
Location: Northeast Pennsylvania
Top

Postby lindstrand » Mon Jul 12, 2010 11:07 am

Speedy build. Did you use CDX for the exterior plywood? That looks like a thick skin! :)


No I used 1/4" fir plywood.
User avatar
lindstrand
Teardrop Builder
 
Posts: 28
Images: 92
Joined: Tue Jul 06, 2010 10:01 pm
Location: Canada
Top

Next

Return to Build Journals

Who is online

Users browsing this forum: No registered users and 24 guests