Canned Ham Toy Hauler Camper

...ask your questions in the appropriate forums BUT document your build here...preferably in a single thread...dates for updates, are appreciated....

Postby Weirdnerd » Sat Oct 09, 2010 10:32 pm

looking good there!
This is my build thread...
Weirdnerd's teardrop
User avatar
Weirdnerd
The 300 Club
 
Posts: 318
Joined: Thu Sep 23, 2010 3:03 pm
Location: Denver, Co ( USofA)

Holding Pattern

Postby Cyclicpitcher » Wed Oct 13, 2010 1:19 am

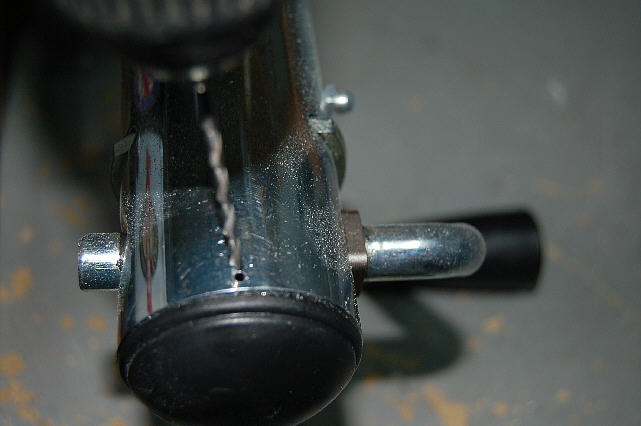
Tinksdad, I took you up on your suggestion to add a small set screw to keep the cap on the jack. I had a heck of a time doing it tho... I drilled and then put a small sheet metal screw and it broke off. So I drilled again and broke off another screw. It was one of those times when you quit while you can. I believe the screws will hold the cap on tho...

Image

Weirdnerd, thanks for the comments, I am kinda in a holding pattern right now as I am waiting on my windows to get here this week. I finished the vinyl flooring. It's a brown pebble finish and should go with anything as my wife says..

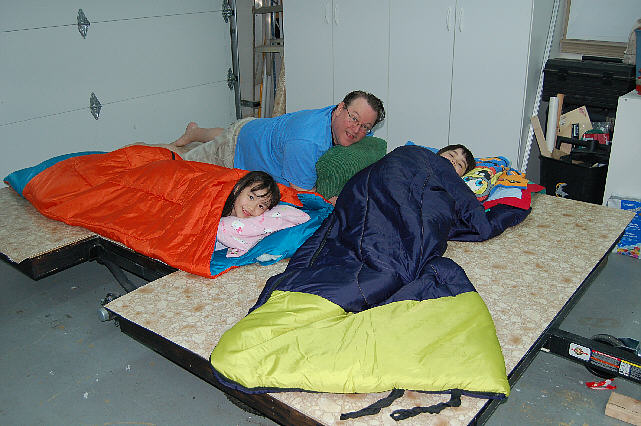
The floor install instructions calls for a one hundred pound roller to get good contact with the foundation. Since I didnt have a roller I figured a couple of fifty pounders and a fat guy would suffice. :lol:
I think the kids would be happy if we pulled it to the campgrounds as it is!


Image

Next some walls!
Regards,
CP
Cyclicpitcher
Teardrop Builder
 
Posts: 37
Images: 70
Joined: Sun Sep 26, 2010 7:47 am
Location: Memphis TN

Updated OCT 17

Postby Cyclicpitcher » Sun Oct 17, 2010 12:54 am

Hello! More pictures of my build! Hope someone enjoys reading!

Here is the master template to cut 1/4 ply to make the front former for the trailer.

Image

Two sheets of 4 x 8 - 1/4 ply cut at Home Depot lengthwise. Transfer the shape to 4 -2 foot wide sections and cut out the shape.


Image

Placed all 4 sheets into a sandwich and use a jigsaw to cut the formers out.

Image

Layout 1x4s to be used as filler for the plywood formers and cut
Image

Sandwich all pieces and glue and clamp and staple. Note the drywall screws are placed into drilled holes to maintain alignment on top and bottom plywood formers.
Image
Using bandsaw to trim the extra 1x4 fillers between the formers.

Image
Edge routing the remaining wood on the face of the formers.
Image
Finally clamping the two formers and a little sanding to even up the two profiles.
Image
These formers will be used for the front of the trailer and are amazingly strong!

Thanks for viewing!

CP
Last edited by Cyclicpitcher on Mon Oct 18, 2010 11:25 pm, edited 1 time in total.
Cyclicpitcher
Teardrop Builder
 
Posts: 37
Images: 70
Joined: Sun Sep 26, 2010 7:47 am
Location: Memphis TN
Top

starting the wall

Postby Cyclicpitcher » Mon Oct 18, 2010 8:04 pm

Now moving into wall construction... Cut a new panel from 1/8 Luan using the master sheet and glue the former to the panel.

Image

once squared glue the base stud to the panel

Image

Test fitting the panel and prepare to measure and square the window location and
place a stud horizonal for the support for the back of the seat of the dinette as well as two horizonal studs to frame the window location.
(pictures soon on window placement)

Image

Once this panel is completed then the other side panel will be built to match this one.

Thanks for viewing my build!

CP
Cyclicpitcher
Teardrop Builder
 
Posts: 37
Images: 70
Joined: Sun Sep 26, 2010 7:47 am
Location: Memphis TN
Top

Postby Miriam C. » Mon Oct 18, 2010 10:09 pm

:applause: :thumbsup: :thumbsup: Wow! Great toys you have there! :lol: I wish you had done yours before I did so I could use it to buy some tools...

Seriously you have done a great job documenting and it is appreciated! We are watching 8)
“Forgiveness means giving up all hope for a better past.â€
User avatar
Miriam C.
our Aunti M
 
Posts: 19675
Images: 148
Joined: Wed Feb 15, 2006 3:14 pm
Location: Southwest MO
Top

Wall Attachment

Postby Cyclicpitcher » Tue Oct 19, 2010 9:35 pm

Hi Miriam,
Thanks for the encoragement! I love the toys! This build is a great chance to use them too! I grew up with my Dad's tools and he always bought them at carport sales. We had plenty but if you needed a drill you had to try out about 2 or 3 to find the best one! :shock:

Here is an update to the wall attachment process.

I broke it down to show what I did, hope it's a good solution

:thinking:

Image

A: shows a 5/16 x 3 inch Lag bolt. Looks like it will pass through the ply deck and into the 1x4 side.
B: Wall removed and 5/16 hole drilled from bottom up to get a straight hole that fits the lag bolt shank.
C:Place the wall back into place and use a hammer to tap marks into the flooring to prepare for drilling pilot holes.
D: Remove wall find marks and drill a 9/16 pilot hole as deep as the lag bolt length EDIT: Correction: use a smaller 3/16 bit
E: Wall back in place and a socket wrench used to screw the lag bolt tightly into place. I am placing one about every 20 inches.

Thanks for viewing!
CP
Last edited by Cyclicpitcher on Wed Oct 20, 2010 3:25 pm, edited 1 time in total.
Cyclicpitcher
Teardrop Builder
 
Posts: 37
Images: 70
Joined: Sun Sep 26, 2010 7:47 am
Location: Memphis TN
Top

Postby Chuckles2153 » Wed Oct 20, 2010 9:52 am

You are building that thing to last :thumbsup: More pics. please.

I also had a ts trailer ( 5' x 10' ) that i used and like it alot.
Chuckles2153
Teardrop Master
 
Posts: 154
Images: 74
Joined: Wed Mar 24, 2010 2:00 pm
Location: Franklin. Indiana
Top

Re: Wall Attachment

Postby GuyllFyre » Wed Oct 20, 2010 12:53 pm

Cyclicpitcher wrote:D: Remove wall find marks and drill a 9/16 pilot hole as deep as the lag bolt length
CP


I hope you mean 3/16" pilot holes.
Things I have for sale on craigslist:
http://albany.craigslist.org/search/?ar ... catAbb=sss

Things I have for sale on eBay:
http://www.ebay.com/sch/merchant/seansmith
User avatar
GuyllFyre
Donating Member
 
Posts: 209
Joined: Fri May 21, 2010 9:35 pm
Location: Scotia, NY
Top

Correction

Postby Cyclicpitcher » Wed Oct 20, 2010 3:22 pm

3/16 is correct !! :o
Cyclicpitcher
Teardrop Builder
 
Posts: 37
Images: 70
Joined: Sun Sep 26, 2010 7:47 am
Location: Memphis TN
Top

Postby Cyclicpitcher » Sun Oct 24, 2010 12:28 am

Things slowed down a bit as I needed to clean up my garage but here is a picture of a test fit of a window on the front wall panel section. I still have to build the right side matching panel and that will take a few days.

Image

More pictures to follow!

CP

:thumbsup:
Cyclicpitcher
Teardrop Builder
 
Posts: 37
Images: 70
Joined: Sun Sep 26, 2010 7:47 am
Location: Memphis TN
Top

KREG JIG

Postby Cyclicpitcher » Sun Oct 24, 2010 10:40 pm

Image

One tool that I am really impressed with and expect to use alot is the Kreg Jig Jr. It sells at lowes for about 40 dollars

Image

A - shows the kit with the instructions
B - The instructions show that you set the collar on the drill bit to your depth recommended by the size of the wood stock you are joining.
C - The blue plastic guide also has a depth guide you have to set for the wood stock you intend to join.
D - The guide has two slots for using two screws on wider stock but for 1 1/4 inch wood studs I only use one slot.

Image

E - I am using a common wood clamp however Kreg does sell a better all metal clamp for this part of the job plus the grey round thing is designed to work with the Kreg clamp.
F - Once clamped your ready to drill by setting the drill bit into the jig's drill slot
G - work the drill in and out to clear the sawdust and make a clean cut

H - Here I show how the recommended screw is set into place. The instruction manual recommends 2" Kreg screws

I - The kit comes with a long square head driver made for the Kreg screws
Notice how long the screw run into the joined wood would be

J - The final results is a perfectly bonded joint. Very light, very strong! Just like a pro cabinet maker! :twisted:

Image
Cyclicpitcher
Teardrop Builder
 
Posts: 37
Images: 70
Joined: Sun Sep 26, 2010 7:47 am
Location: Memphis TN
Top

weights

Postby Cyclicpitcher » Mon Oct 25, 2010 2:22 pm

Quick note about the weight. Placed the front wall panel and a window on the scales and found out that the window weighs 6 pounds.

Image

The main front wall panel weighs 22 pounds.

Image

22 pounds plus the 6 pounds and say 2 pounds for foam insulation and 30 pounds per side is not too bad. Hard to project total weight but interesting to know... :thinking:
Cyclicpitcher
Teardrop Builder
 
Posts: 37
Images: 70
Joined: Sun Sep 26, 2010 7:47 am
Location: Memphis TN
Top

Postby Miriam C. » Mon Oct 25, 2010 5:02 pm

:applause: :thumbsup: Your getting there... It is hard to anticipate the finish weight but you are lookin good.
“Forgiveness means giving up all hope for a better past.â€
User avatar
Miriam C.
our Aunti M
 
Posts: 19675
Images: 148
Joined: Wed Feb 15, 2006 3:14 pm
Location: Southwest MO
Top

Postby pete42 » Tue Oct 26, 2010 9:03 am

I like others here on this site use the Kreg Jig I have the K3 master and have used it for a couple of projects, a bunk bed set and a portable router table. while "they" say glue isn't needed I use titebond III on all the joints I started doing this after reading about it from a fellow Kreg user on the Kreg web site.

nice build by the way, and looks like the kids will have some great memories getting them involved must be great fun.

ol'pete
User avatar
pete42
Super Lifetime Member
 
Posts: 2203
Images: 13
Joined: Sat Nov 07, 2009 11:52 am
Location: SouthWest Ohio
Top

Postby Prem » Tue Oct 26, 2010 12:31 pm

What's the exterior going to be--painted or aluminum?

Good work! :thumbsup:
My goal...

_____________________________________________
...is to live in a trailer.
User avatar
Prem
Gold Donating Member
 
Posts: 3222
Images: 144
Joined: Thu Aug 21, 2008 11:25 am
Location: State of Jefferson (Oregon side)
Top

PreviousNext

Return to Build Journals

Who is online

Users browsing this forum: No registered users and 39 guests