Tub Toys gone fishin' Update 8/7/11, cabinets etc

...ask your questions in the appropriate forums BUT document your build here...preferably in a single thread...dates for updates, are appreciated....

Tub Toys gone fishin' Update 8/7/11, cabinets etc

Postby tsmiley23 » Mon Feb 21, 2011 9:55 pm

After spending a year lurking on this site, gathering info, materials and making drawings, I'm finally starting. Here's what I'm starting with. a 5' x 10' flat bed trailer that I bought in 1993. I've used it in my construction business for the last 18 years and yes it shows. It has a 3500 lb capacity, 16" wheels and electric brakes:

Image

And here's one of my first drawings:
Image

And here's the drives side elevation to give you an idea what I have in mind:
Image

Followed by a floor plan:Image
Last edited by tsmiley23 on Sun Aug 07, 2011 2:50 pm, edited 12 times in total.
CONSISTENCY!!!!!! It's only a good thing if you're not a screw up.
User avatar
tsmiley23
Teardrop Advisor
 
Posts: 70
Images: 159
Joined: Thu Feb 04, 2010 10:44 am
Location: Woodland Park, CO

Postby tsmiley23 » Mon Feb 21, 2011 10:26 pm

Sorry I screwed up the last picture. Here it is again[img]http://www.tnttt.com/gallery/image.php?image_id=75928[img][/img]

So here's my needs list:

Stand up camper with cooking abilities, for use at the end of forest service roads throughout the rocky mountains. Put me within 5 miles of the fish and give me a warm dry place to sleep and eat, let me hike in and out and do it all again tomorrow and I'm your Huckleberry. 8)

So to start the build I tore the old girl down to the ground, I thought I could save most of the frame, until I got the planks off the floor, then I realized even in Colorado we have rust, as if you couldn't see that on the outside of the frame :o So I tore it all apart, saved the "A" frame, the axle and wheels and went to the steel shop and dropped off these parts at the sand blaster.

Well here it is back from sandblasting (all of the grey parts) and partly built with new black mild steel:

Image

Just a reminder what she looked like before:Image

Well let me know what ya think and I'll post more tomorrow.

Tight Lines :D
CONSISTENCY!!!!!! It's only a good thing if you're not a screw up.
User avatar
tsmiley23
Teardrop Advisor
 
Posts: 70
Images: 159
Joined: Thu Feb 04, 2010 10:44 am
Location: Woodland Park, CO

Postby Corwin C » Mon Feb 21, 2011 10:34 pm

Looks nice ... simple, clean design.

A couple of small details:

1. The three markers on the back should be wired to the rest of the marker lights, not the right turn/brake.

2. Watch your balance closely. With the axle in the middle and all of the cabinets/appliances/storage/etc. toward the back you could be a little light up front.

I'm looking forward to watching your build ... Enjoy!
Corwin
Image Image Image
If I am unwilling to stand up straight before the world and admit what I have accomplished during the day, without excuses, in complete and honest detail, then I can do better ...
and no one should be expected to accept anything less.
-- myself
User avatar
Corwin C
500 Club
 
Posts: 916
Images: 78
Joined: Mon Oct 19, 2009 10:27 am
Location: Junction, Piute County, UT
Top

Postby LDK » Tue Feb 22, 2011 7:04 am

I'm with Corwin on the balance thing unless you plan on adding weight up front some how. This should be a neat build. :thumbsup:
LDK
Gold Donating Member
 
Posts: 1419
Images: 1
Joined: Fri Jan 22, 2010 8:29 pm
Top

Postby tsmiley23 » Tue Feb 22, 2011 9:35 am

You're right on the lights Corwin, thanks for the heads up. As to the weight distribution issue the trailer was very close to this lay out originally and I've spent a lot of time with it on the road. I will be very aware of loading and here's more on my plans to that end: Image

The bed will have storage under with outside access as well as a tongue box and the cabinet above the bed. My battery, propane tank and electrical will be placed in these locations as well as 6-14lb batteries I use to propel my float tube. I will focus on putting all of my heavy items forward. Right now the tongue probably weighs 90 pounds and the trailer frame when I brought it home from paint weighs 680 lbs.

So here are more pictures of the build, but first, more drawings: I know the 3 marker lights high on the rear are misplaced and need to be 6 inches on center. I need to revise my drawings. Please tell me if you see anything else.
Image

Continuing with the frame, here's the wheel wells I built:Image

With one installed:
Image

And with both installed:
Image
CONSISTENCY!!!!!! It's only a good thing if you're not a screw up.
User avatar
tsmiley23
Teardrop Advisor
 
Posts: 70
Images: 159
Joined: Thu Feb 04, 2010 10:44 am
Location: Woodland Park, CO
Top

Postby tsmiley23 » Tue Feb 22, 2011 9:56 am

More frame work:

You can see, I've added leveling jacks on the rear corners, a tongue jack and a rear step bumper.
Image

I'm real happy with the bumper gives me a great place to set and the grate will be perfect for mud.
Image

I miscalculated the height on the tongue jack originally and I couldn't get it low enough to flip my rear leveling jacks so here's my solution. The good thing is it also raised the tongue wheel and I feel more comfortable with it's clearance improved when towing:
Image
CONSISTENCY!!!!!! It's only a good thing if you're not a screw up.
User avatar
tsmiley23
Teardrop Advisor
 
Posts: 70
Images: 159
Joined: Thu Feb 04, 2010 10:44 am
Location: Woodland Park, CO
Top

Postby tsmiley23 » Tue Feb 22, 2011 10:09 am

I cheated on the paint.

My build concept is simple, tough and long lasting, any input which improves these characteristics is greatly appreciated. I was going to paint the trailer myself but my shop is only heated with an electric portable heater and it's been cold here in Colorado at 8700 feet. Also I wanted a durable finish so I opted to take it to a car paint shop. We won't tell my wife what it cost. Hopefully it's worth it. So here it is home from paint:
Image


Image

Let's build a floor!!! ;)
CONSISTENCY!!!!!! It's only a good thing if you're not a screw up.
User avatar
tsmiley23
Teardrop Advisor
 
Posts: 70
Images: 159
Joined: Thu Feb 04, 2010 10:44 am
Location: Woodland Park, CO
Top

Postby tsmiley23 » Tue Feb 22, 2011 8:56 pm

I've been thinking about it for a long time and I decided to put aluminum pans under the floor of my trailer to protect the underside from water and road hazards. I've been a roofer for 28 years and water where I don't want it is bad :thumbdown: very bad. My idea may be a little over the top, see what you think:

Image

I bought 040 aluminum and made 8 pans to fit in the different frame bays and lap on the frame members, I turned them up on the sides 1 1/2" and screwed them down with 1/4-20 stainless truss head machine screws and to the sides with stainless 10 x 5/8 self drilling pan head sheet metal screws.

Image

The wood frame is attached from underneath using deck screws every 6 inches and before any of this is installed I caulk it down using "Dow Corning 795 silicone caulk"
Image
Image

And here's the underside:
Image

Here's the finished product ready for insulation, wiring and propane piping:
Image

Three days worth of work, 2- 4x10 sheets of aluminum and 350 screws.

Tomorrow I install the tail lite wires, propane piping, insulate with 2" foam board, and cover it all up in prep for some walls. :thinking:
CONSISTENCY!!!!!! It's only a good thing if you're not a screw up.
User avatar
tsmiley23
Teardrop Advisor
 
Posts: 70
Images: 159
Joined: Thu Feb 04, 2010 10:44 am
Location: Woodland Park, CO
Top

Postby droid_ca » Wed Feb 23, 2011 3:41 am

this is a good build :thumbsup: 
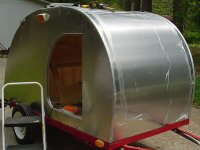
I like the bumper step and the water shield good progress :applause: :applause: :applause:
There is a world, just beyond now,
where reality runs a razor thin seam between fact and possibility;

Anywhere I roam where I lay my head is home....
Image
“Fide Canem”
Please check out my build thread
viewtopic.php?f=5&t=52816
User avatar
droid_ca
Donating Member
 
Posts: 1981
Images: 176
Joined: Thu Sep 30, 2010 5:08 am
Location: Prince George BC Canada
Top

Postby myoung » Wed Feb 23, 2011 10:07 am

Very, very nice design. Looks like we'll be seeing quite a few innovative ideas like the boot-scraping step. Excellent.
:thumbsup:

I do wonder about the overall height, however. Seven feet will help in the spaciousness department, but might be a bit much in a TTT. But, hey, everyone has his or her own needs, desires, interests, and ideas, which is what makes this forum so interesting and entertaining.

In terms of the axle location, I would have chosen a position much farther aft with all the weight the you are likely to have in the rear. Certainly, you tow vehicle could handle hundreds of pounds on the hitch. The other advantage of moving the axle rearward would be the opportunity to eliminate the rear stabilizers. The offset might be some interior reconfiguration around the wheel wells.
Mike Young
build thread: viewtopic.php?t=40459
User avatar
myoung
500 Club
 
Posts: 644
Images: 250
Joined: Sat Aug 07, 2010 11:21 am
Location: Nipomo, CA
Top

Postby tsmiley23 » Wed Feb 23, 2011 4:47 pm

Hi Mike,

Thanks for the encouraging words :) I really appreciate your input as well as respecting the vast experience of this group. As to the height issue I'm taking that under advisement and am going to mock it up before I proceed ( I get the groups opinion). 7 feet is my dream but shrinking it may make more sense ( updates to follow). I've viewed your build and I'm duly impressed, best of luck :applause:

Now to address the axle location, can you or anyone here help me with determining what this should be. As I stated I've used this trailer for 23 years (carrying building materials and tools). I typically found that my loads were tongue heavy and that everything road better if I tried to make the tongue weigh no more than 500 lbs (my Tundra has an 800 lb tongue rating but she also has a very soft rear :lol: which makes the bumps very hard if overloaded). In building this trailer I did actually move the axle to the rear 6" from the original. It is a 10' trailer (box only) and the center of the axle is 65" from the front and 55" from the rear. I'm really surprised at the consensus of concern over this design. As I've stated, everything heavy is being put to the front of the trailer and on the tongue. I'm very interested in your opinions. :thinking: Thanks to all in advance :shake hands:
CONSISTENCY!!!!!! It's only a good thing if you're not a screw up.
User avatar
tsmiley23
Teardrop Advisor
 
Posts: 70
Images: 159
Joined: Thu Feb 04, 2010 10:44 am
Location: Woodland Park, CO
Top

Postby tsmiley23 » Wed Feb 23, 2011 9:10 pm

So today I made a mock up of the planned height. Here it is:
Image

And here's an explanation of what your looking at; the Tundra is 72" tall off the ground the top of the plywood is 103" off the ground. This gives me a 6' 8" interior height. If you look closely at the plywood you'll see a black arched line on the top right which represents the front arched roof line. The bottom of this arch is at 77". You'll also notice a black line towards the bottom of the sheet which represents the bottom side of the trailer.

So here's the issue, should I lower the height and sacrifice head room, if so how much? Please vote and tell me your thoughts. :thinking: :worship:
CONSISTENCY!!!!!! It's only a good thing if you're not a screw up.
User avatar
tsmiley23
Teardrop Advisor
 
Posts: 70
Images: 159
Joined: Thu Feb 04, 2010 10:44 am
Location: Woodland Park, CO
Top

Postby LDK » Wed Feb 23, 2011 9:29 pm

tsmiley23 wrote:So today I made a mock up of the planned height. Here it is:
Image

And here's an explanation of what your looking at; the Tundra is 72" tall off the ground the top of the plywood is 103" off the ground. This gives me a 6' 8" interior height. If you look closely at the plywood you'll see a black arched line on the top right which represents the front arched roof line. The bottom of this arch is at 77". You'll also notice a black line towards the bottom of the sheet which represents the bottom side of the trailer.

So here's the issue, should I lower the height and sacrifice head room, if so how much? Please vote and tell me your thoughts. :thinking: :worship:


It should be okay by the looks of it. You mentioned that the interior height was 6' 8". Are you tall, do you need that much interior height? I'm sure whatever you decide it will look okay :thumbsup: .
LDK
Gold Donating Member
 
Posts: 1419
Images: 1
Joined: Fri Jan 22, 2010 8:29 pm
Top

Postby Corwin C » Wed Feb 23, 2011 9:40 pm

I'm not so concerned about the balance now that I know that there's storage for heavy items under the bed.

As far as the ceiling height ... put on your favorite hat and stand on your tip-toes. If there's nothing hanging down from the ceiling, there's no reason to be any higher.

Very nice metalwork. If your woodwork skills are anything like your metalwork, this is going to definitely be a build to watch.

Thanks for sharing.
Corwin
Image Image Image
If I am unwilling to stand up straight before the world and admit what I have accomplished during the day, without excuses, in complete and honest detail, then I can do better ...
and no one should be expected to accept anything less.
-- myself
User avatar
Corwin C
500 Club
 
Posts: 916
Images: 78
Joined: Mon Oct 19, 2009 10:27 am
Location: Junction, Piute County, UT
Top

Postby Wolfgang92025 » Wed Feb 23, 2011 9:47 pm

Nice looking built and it looks like you are wasting no time.

For the trailer balance question, click the radio button for the design library on top of the web site. In the library on the right side you will find a trailer balance excel worksheet. It's easy to use and worked out real good for my trailer.
Wolfgang

Image
User avatar
Wolfgang92025
Lifetime member
 
Posts: 1064
Images: 651
Joined: Fri Apr 18, 2008 10:16 pm
Location: Salt Lake City area, Utah
Top

Next

Return to Build Journals

Who is online

Users browsing this forum: No registered users and 4 guests