6x10 Vardo update 4/18

...ask your questions in the appropriate forums BUT document your build here...preferably in a single thread...dates for updates, are appreciated....

6x10 Vardo update 4/18

Postby Blotto Bros » Sat Mar 26, 2011 4:55 pm

I have been lurking for a while now and am ready to start my build. I have come to realize from reading over the posts that the COLLECTIVE knowledge of this group is far greater than the sum of its parts. This leads me to the idea of posting my goal and resources and letting the group vote on how I should procede and what methods will be best for achieving that goal.

HGTV did something like this when building a house a couple years ago and the results were outstanding!!

So having said that here are my goals:

6x10 VARDO trailer that serves the following needs

1. Sleeps 2 and has a standing head room of 6'3"
2. Able to be stored outside
3. Have heat and AC
4. Serves as a "toy hauler" for my Harley
5. Completed in time to attend Sturgis 2011 in August
6. Cost of no more than $2000

I am confident that it can be done and done WELL!

Here are my resources so far

1. A 2009 6x10 trailer with 3500# single axle and PT deck
2. Basic framework welded to the trailer to support roof/walls
3. 10 sheets of 1/2" cdx plywood
4. 30 2x2 8ft sticks of whitewood lumber
5. 20 2x4 8ft sticks of whitewood lumber
6. screws/fasteners out the wazoo
7. Almost every carpentry/woodwork tool known to exist
8. Primers/paints/sealers and coatings
9. $1,175.00 in my build acount

I purchased the trailer for $450, registration $25, steel and welding $350 for a total of $825 spent so far.

Image

Image

Thanks in advance!!

I would like to begin with the upper walls. I was thinking 2x2 framing to fit inside the rails...possibly 1/4" bolts through the wood framing and steel to secure the completed wall assembly to the framework.. Then possibly skin it with 1/2" cdx. The door will be in the rear as in a traditional Vardo.

I was very interested in the Mineral spirits/urathane mix as a sealer(3 coats)..then a solid color wood stain as a color coat. I would like the finished product to feature the wood grain texture but not the blemishes of cdx. I was considering the seal coats on all framing lumber as well as the plywood...better safe than sorry.

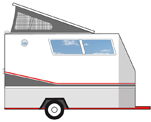
My inspiration is this:
Image
Last edited by Blotto Bros on Mon Apr 18, 2011 8:45 pm, edited 1 time in total.
Even those souls that are found must occasionally become lost to appreciate what they have.
User avatar
Blotto Bros
Silver Donating Member
 
Posts: 174
Images: 51
Joined: Sat Mar 19, 2011 4:11 pm
Location: Jacksonville, FL

4/3/2011

Postby Blotto Bros » Sun Apr 03, 2011 4:45 pm

I had the day off so I was able to get started today. Spent 4 hours of actual work not including "dry time".

Started out ripping 2x4s down to 2x2 and then cut them to length for the first side panel.

Image
Next I used an idea from this forum and mixed mineral spirits/spar urathane in a 70/30 mix and began brushing on 3 coats with 3 hours dry time between each coat. I also came up with an easy way to REALLY saturate the end grain.

Image
When everything was dry to the touch I assembled the 1st insert using Titebond3 and screws. I also installed huicane trype corner connectors in such a way that every board had at least 2 connected to it.

Image

Test fit the side and it was perfect..I hope that this is a good omen of things to come.

Image

The second side is just a copy of the first. I also was returning from the hardware store and noticed a new roof going on a Macys store...what was interesting was the huge pile of 1.5" poly insulation near the dumpster. I stopped and was able to purchase 8 sheets for $50. There are some small holes in it..but nothing I cant work around.

So now I need advice on how to secure the panels to the frame. I am still thinking 1/4" hex head bolts with washers and nylon stop nuts. Any suggestions???
Even those souls that are found must occasionally become lost to appreciate what they have.
User avatar
Blotto Bros
Silver Donating Member
 
Posts: 174
Images: 51
Joined: Sat Mar 19, 2011 4:11 pm
Location: Jacksonville, FL

Postby Deryk the Pirate » Mon Apr 04, 2011 9:02 pm

Well looks interesting. Im envious of you haveing a standup trailer. Hopefully 1 day soon I will be able to do that. Vardo's are a great look and the photo you posted of your inspiration, both of them are real sharp but I really like the door on the towable vardo.

Looking forward to more pictures!

Good Luck
Build Thread lil vardo 1: http://tinyurl.com/baqe6py
Build Thread lil vardo 2: http://tinyurl.com/b3rwffm
User avatar
Deryk the Pirate
500 Club
 
Posts: 809
Images: 158
Joined: Tue Aug 18, 2009 11:03 am
Location: Parlin NJ
Top

Postby tsmiley23 » Tue Apr 05, 2011 9:11 pm

For what it's worth your build is going to be bullet proof. 1/2" ply will give you a very strong wall and bolting it together with a steel corner is really over the top. I would probably just use wood screws counter sunk through the steel and into the wood. Either way it will not lack strength.

Here's some of my ideas on a similar build, not a toy hauler but a similar size and configuration:
http://tnttt.com/viewto ... 463#799463

You've got a great start and I look forward to your ideas,

Keep up the good work :applause: :thumbsup:
CONSISTENCY!!!!!! It's only a good thing if you're not a screw up.
User avatar
tsmiley23
Teardrop Advisor
 
Posts: 70
Images: 159
Joined: Thu Feb 04, 2010 10:44 am
Location: Woodland Park, CO
Top

Postby Blotto Bros » Mon Apr 18, 2011 8:45 pm

A couple weeks have gone and I have a little progress to report.

I was able to get the roof on. I fabricaed this by cutting 4 identical arcs from a sheet of 1/2" plywood. I then glued and screwed them together with 70" 2x4 lumber. I made the roof in 2 sections since I had no help in lifting it up onto the top. I then screwed the 2 sections together and then screwed the whole structure to the frame. I finished the basic structure by screwing 3 pieces of 1/2" ply over the frame to form the roof.

I then started to stretch my EPDM sheet over the roof and I must have goofed when we cut it...too short!! :x

So I decided to go old school and use canvas and glue much like the old deck covers from old wooden boats. First I found an old canvas drop cloth and stretched it over the roof.
Image

Next mix 1 gallon of Titebond(2) with 2 quarts of warm water. Next I used a clean paint roller to roll on a thick coat of the glue solution. Be sure to work it into the fibers evenly. This is my roof half glued down.
Image
While that was drying I put up the outer wall skins. They were 1/4" Luan.
Image

Next comes 2 coats of tinted primer.
Image
Then 2 coats of white elastomeric roof paint after the glue dried overnight.
Image

I did take advice given and used 3" treated construction screws to connect everything instead of bolts...seems like it will be plenty strong. I was able to walk on the roof and it was as strong or stronger than my house roof.

Next week I will be fabricating the swing out rear door. Well on my way to campable...a LOOONG way from done!
Even those souls that are found must occasionally become lost to appreciate what they have.
User avatar
Blotto Bros
Silver Donating Member
 
Posts: 174
Images: 51
Joined: Sat Mar 19, 2011 4:11 pm
Location: Jacksonville, FL
Top

Postby Blotto Bros » Mon Apr 18, 2011 8:54 pm

The first call for suggestions is here.
If the elastomeric paint proves a failure what type of roof to cover it with? I was leaning towards metal roofing available from big box but not opposed to other options. My main concern is wind getting under it and tearing it off while in tow....has anyone ever used used this?
Even those souls that are found must occasionally become lost to appreciate what they have.
User avatar
Blotto Bros
Silver Donating Member
 
Posts: 174
Images: 51
Joined: Sat Mar 19, 2011 4:11 pm
Location: Jacksonville, FL
Top

Postby StandUpGuy » Mon Apr 18, 2011 8:55 pm

Looking good! You are making great progress. If you end up being unhappy with the canvas roof, you can always add over it later.
User avatar
StandUpGuy
1000 Club
1000 Club
 
Posts: 1090
Images: 52
Joined: Sun Mar 27, 2011 6:15 pm
Top

Postby StandUpGuy » Mon Apr 18, 2011 8:58 pm

I posted my response while you were posting your question.

I would suggest simply buying another piece of rubber roof membrane. You could glue it right over the canvas later.
User avatar
StandUpGuy
1000 Club
1000 Club
 
Posts: 1090
Images: 52
Joined: Sun Mar 27, 2011 6:15 pm
Top

Postby Blotto Bros » Mon Apr 18, 2011 9:01 pm

Thanks, thats probably the most cost efective...next time its measure twice cut once!!! I have found another use for the other piece so it won't be a total waste.
Even those souls that are found must occasionally become lost to appreciate what they have.
User avatar
Blotto Bros
Silver Donating Member
 
Posts: 174
Images: 51
Joined: Sat Mar 19, 2011 4:11 pm
Location: Jacksonville, FL
Top

Postby StandUpGuy » Mon Apr 18, 2011 9:03 pm

The canvas is going to work fine. They used to build row boat hulls that way.
User avatar
StandUpGuy
1000 Club
1000 Club
 
Posts: 1090
Images: 52
Joined: Sun Mar 27, 2011 6:15 pm
Top

Postby Deryk the Pirate » Tue Apr 19, 2011 7:58 am

Looks Greeat Man! Im so envious.

There are flexible epoxy out there that you could paint the roof with which will seal it and give it a little flex. Cheapest is probably getting another piece of EPDM and going that route. They do sell something to join 2 pieces of EPDM togther...that would be probably the cheapest solution.

I really like the over hang, is that for getting out of the elements or do you have another plan for it? Overall this is looking to be a real strong build with the welded metal framework!
Build Thread lil vardo 1: http://tinyurl.com/baqe6py
Build Thread lil vardo 2: http://tinyurl.com/b3rwffm
User avatar
Deryk the Pirate
500 Club
 
Posts: 809
Images: 158
Joined: Tue Aug 18, 2009 11:03 am
Location: Parlin NJ
Top

Postby Blotto Bros » Tue Apr 19, 2011 9:32 am

The overhang is my ac on the roof...er in the roof hidey hole. The exhaust portion will be "outside" in the overhang and the cold stays in the 6x10 enclosed portion. If it works out people won't even know it's up there. Translate that to not gonna get stolen or bashed off by trees.
Even those souls that are found must occasionally become lost to appreciate what they have.
User avatar
Blotto Bros
Silver Donating Member
 
Posts: 174
Images: 51
Joined: Sat Mar 19, 2011 4:11 pm
Location: Jacksonville, FL
Top

Postby bobhenry » Tue Apr 19, 2011 9:52 am

I think you will find the rubber roof coating will work well.

I have a sweat shirt that has been washed 50 - 60 times in the last 3 years and the polar seal I slopped on it is surviving real well :rofl2:
Growing older but not up !
User avatar
bobhenry
Ten Grand Club
Ten Grand Club
 
Posts: 10355
Images: 2617
Joined: Fri Feb 09, 2007 7:49 am
Location: INDIANA, LINDEN
Top

Postby Deryk the Pirate » Tue Apr 19, 2011 8:48 pm

Thats an awesome idea for hideing the air conditioner and its an overhang over then door.

But I agree the EPDM roof is the best of ideas.
Build Thread lil vardo 1: http://tinyurl.com/baqe6py
Build Thread lil vardo 2: http://tinyurl.com/b3rwffm
User avatar
Deryk the Pirate
500 Club
 
Posts: 809
Images: 158
Joined: Tue Aug 18, 2009 11:03 am
Location: Parlin NJ
Top

Postby StandUpGuy » Tue Apr 19, 2011 9:14 pm

Blotto Bros wrote:The overhang is my ac on the roof...er in the roof hidey hole. The exhaust portion will be "outside" in the overhang and the cold stays in the 6x10 enclosed portion. If it works out people won't even know it's up there. Translate that to not gonna get stolen or bashed off by trees.
So it is a window unit? That is an interesting idea.
User avatar
StandUpGuy
1000 Club
1000 Club
 
Posts: 1090
Images: 52
Joined: Sun Mar 27, 2011 6:15 pm
Top

Next

Return to Build Journals

Who is online

Users browsing this forum: Bing [Bot] and 57 guests