First build of a 5x 9, Updated 9-13-11, Final Details

...ask your questions in the appropriate forums BUT document your build here...preferably in a single thread...dates for updates, are appreciated....

Postby oregonguy » Wed Jul 27, 2011 3:10 pm

Very impressive. You've done a great job of planning out your process, that is obvious. I'll be keeping tabs of your build for sure. :thumbsup:
Check out our Website: www.oregontrailer.net
User avatar
oregonguy
Teardrop Master
 
Posts: 197
Images: 48
Joined: Tue May 27, 2008 1:30 pm
Location: Eugene Oregon

Postby kentucky bryan » Wed Jul 27, 2011 7:44 pm

Thanks for all your comments folks.

Didn't know if anybody was looking at this or not.

Wednesday week 2 was a good day but the heat is really starting to take it's toll. Not stepping near as high as yesterday but still made out alright.

Didn't get any in process shots. Saw the the battery on the camera was low and the charger was back at the house so todays shots are a summary of what we got done.

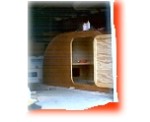
Had a good run on getting the interior ceiling skin in.

Image

Image

Image

Image

You can also see the most of the wiring got done.

Image

I've had to do wiring in all of my jobs with corporate America
:noyes:
But never enjoyed it or got good at it.

Image

If I'm pulling wires at the galley the tool , part , or my glasses are inside the teardrop at the foot of the bed.

Image

Image

It's a slow tedious process and I know I'll probably end up redoing this one, but I whanted to get power to everthing and make sure it works.

And at the end of the day I get a rat's nest like this.

Image

But it all gets covered with the WFCO

Image
Seems like as soon as we got done paying for the "Sins of Our Youth" , We needed to start saving for our retirement.

My Build at:http://www.tnttt.com/viewtopic.php?t=45264
User avatar
kentucky bryan
Teardrop Inspector
 
Posts: 24
Joined: Sun Jun 26, 2011 11:09 am
Location: Lexington, Kentucky

Postby CliffinGA » Thu Jul 28, 2011 6:51 am

Bryan we all are just saying "WOW", your doing amazing work, and doing it very fast compared to a lot of us on here. Keep on booking with it and we'll keep on watching.

Cliff
In God we trust, shoot the rest and he will sort out!

My Build:

viewtopic.php?f=50&t=42628
User avatar
CliffinGA
1000 Club
1000 Club
 
Posts: 1499
Images: 207
Joined: Sat Nov 14, 2009 1:29 pm
Location: Jefferson, GA
Top

filon

Postby kentucky bryan » Thu Jul 28, 2011 4:06 pm

I'll be posting todays progress in a couple hours, still at the shop prepping for installation of the filon skins.

What is your experience with the surface prep for this stuff.

Does every screw hole need to be perfectly smooth like a kitchen laminate surface to prevent telegraghing of the counter sinks or is it more forgiving.

I've done several searches on here for this info and it's probably been discussed, but stuck in a thread that doesn't hit me.

Thanks
Seems like as soon as we got done paying for the "Sins of Our Youth" , We needed to start saving for our retirement.

My Build at:http://www.tnttt.com/viewtopic.php?t=45264
User avatar
kentucky bryan
Teardrop Inspector
 
Posts: 24
Joined: Sun Jun 26, 2011 11:09 am
Location: Lexington, Kentucky
Top

Postby kentucky bryan » Thu Jul 28, 2011 7:26 pm

Thursday Week 2

Another day in the sweat lodge.

We left off yesterday with my rats nest wiring

While I worked on wiring the Diehard Battery with the WFCO and shore power , Billy finished up the Radio Power and Speakers

By first break we had all the lights working and listening to Allen Jackson on the CD player.

Image

Image

Image

And the rats nest at power central now looks like this.

Image

Speaker wires need a little cleanup

Image

But the most amazing thing was everything worked first time :woohoo:

OnWard

Using the 2 layers of 3/4" pink foam for ceiling insulation. At the begining you saw a green foam from Lowes.

Well their 3/4" measures about 7/8 so stacking 2 of them together we were about 1/4" to tall for the outer baltic birch to lay on the spars.

Tried the pink stuff but it was still to tall.

Saw somewhere on here that foam could be planned down.

Let's try it !!!! :lightbulb:

Image

Image

I took the dust collection off because we have a local horse farm that uses our shavings and I didn't want the horses passing pink polystyrene.

So yes you can plane it but you'll look like a pink Easter Chick when you get done.

The front curve was too tight to bend the foam so we ran kerf cuts to make it more flexible.

Image

And by end of day we had the top

Image

And right side skin on.

Image

Tomorrow - left side and we're ready for filon.

Image

Still hoping for some info on how sensitive filon is to telegraphing.

And here's a shot of our new shop sign.

Image

Alot of the sign is made from Extira , an outdoor MDF ,

It's pretty good stuff but nothing I would use on a teardrop
Seems like as soon as we got done paying for the "Sins of Our Youth" , We needed to start saving for our retirement.

My Build at:http://www.tnttt.com/viewtopic.php?t=45264
User avatar
kentucky bryan
Teardrop Inspector
 
Posts: 24
Joined: Sun Jun 26, 2011 11:09 am
Location: Lexington, Kentucky
Top

Postby kentucky bryan » Sat Jul 30, 2011 9:32 am

Friday of week 2

Not much exciting happening today

After cleaning up what looked like a tornado had gone thru the shop.

Image


It was Bondo , Sand , Repeat

Image

Image

Did lay the galley hatch in place to get a feel for what it'e going to look like

Image

Image

And that's going to be all the postings for awhile.

We've got some projects coming thru the shop that are going to need to take priority.

May be able to show some small progress over the next several weeks, but nothing like the whirlwind we've been doing.

Would like to take it out for her maiden voyage Labor Day Weekend.

If not that, there's a Tearjerker gathering in Mid september.

Thanks for all your comments, they've been very encouraging the last couple of weeks
Seems like as soon as we got done paying for the "Sins of Our Youth" , We needed to start saving for our retirement.

My Build at:http://www.tnttt.com/viewtopic.php?t=45264
User avatar
kentucky bryan
Teardrop Inspector
 
Posts: 24
Joined: Sun Jun 26, 2011 11:09 am
Location: Lexington, Kentucky
Top

Postby kentucky bryan » Tue Aug 16, 2011 7:48 pm

Finally able to get in a couple of days and see if we can finish up.

Installing the hinges, aluminum trim and filon skins.

Just slow tedious work.

Image


Image


Image

Image

Notes to remember

- Filon itches worse than any fiberglass I've ever worked with.
- Locktite PL premium holds better than any adhesive I've ever worked with, but is impossible to get off your hands.
- Garners contact cement stains thru Catalzed Laquer.


Image[IMG]


Sometimes no matter how much design and planning you put into it,
you're going to have to hack it up to make it work.

The "notches" in the cabinets were needed to make the gas springs work.

Image
With a little luck we should be able to roll it out by the weekend. There will still be alot of loose ends, but getting it out of teh shop will be a big boost.
Seems like as soon as we got done paying for the "Sins of Our Youth" , We needed to start saving for our retirement.

My Build at:http://www.tnttt.com/viewtopic.php?t=45264
User avatar
kentucky bryan
Teardrop Inspector
 
Posts: 24
Joined: Sun Jun 26, 2011 11:09 am
Location: Lexington, Kentucky
Top

Postby parnold » Tue Aug 16, 2011 9:18 pm

Wow!

I'm enjoying this. :applause: :applause:
User avatar
parnold
Donating Member
 
Posts: 2344
Images: 302
Joined: Mon Feb 08, 2010 4:49 pm
Location: Northwest New Jersey
Top

Postby Wolfgang92025 » Tue Aug 16, 2011 9:57 pm

Great work so far..... :applause: :applause:

That cut out for the gas shock looks real familiar....

Keep up the good work.
Wolfgang

Image
User avatar
Wolfgang92025
Lifetime member
 
Posts: 1064
Images: 651
Joined: Fri Apr 18, 2008 10:16 pm
Location: Salt Lake City area, Utah
Top

Postby mallymal » Wed Aug 17, 2011 3:50 pm

What can I say that others haven't except WOW

Some very clever ideas.... like doing a lot of the assembly with the body off the trailer.

The quality of your ply looks exceptional - and of course beautifully machined & finished.

Can I pick your brains on a coupkle of issues...
1) What thickness is your ply for the coookie cutter inner wall ... 1/2"?

2) Did you cover the top & sides in Filon - it really does look flawless.

Nice job! ;)

PS: Do you rent out that candy floss machine for kids parties?
User avatar
mallymal
The 300 Club
 
Posts: 308
Images: 18
Joined: Fri Sep 26, 2008 4:20 am
Location: manchester, UK
Top

Postby kentucky bryan » Thu Aug 18, 2011 7:17 pm

Parnold and Mallymal,
Thanks for the "WOWS" . They really help keep us going.

Wolfgang,
Yea, I've seen others use this mod to make things work, but you still feel like Homer when it happens, Doh.

Mallymal,

- The walls are 3/4" luan sandwiched between 1/8" Baltic Birch.
- The top and sides are covered in Filon. From my younger days of polishing the Aluminum cases of a Harley, I've used enough buffing compound to know that I didn't want to mess with it any more.
- As far as the "Candy Floss" rental, welllll I don't think so.

Mallymal, You thought the idea of build off the frame was a clever idea. So did we until it's time to get it back on wheels.

Image

This provided a bit of a pucker factor moment when you got 3 weeks of work setting on rusty paint cans.

Image


Our plan for the next one is to take the wheels off and set the frame on blocks. Don't know if this will give us access to the underside we need, but it's not going to done this way again.

Image


But with a lot of juggling of blocks and supports we got her back where she belongs.


Image

We also got the Galley Hatch in final trim and mounted for the last time, we think.

Image

And finally by the end of the day, I had had enough of the plastic protection on the Filon.

Image

Image

Image

Image

Image

Tomorrow is a lot of loose ends and also see if we can get some real work pushed thru the shop.

And it looks like we've got a name for this new venture,

Image

See ya tomorrow.
Last edited by kentucky bryan on Thu Aug 18, 2011 7:34 pm, edited 1 time in total.
Seems like as soon as we got done paying for the "Sins of Our Youth" , We needed to start saving for our retirement.

My Build at:http://www.tnttt.com/viewtopic.php?t=45264
User avatar
kentucky bryan
Teardrop Inspector
 
Posts: 24
Joined: Sun Jun 26, 2011 11:09 am
Location: Lexington, Kentucky
Top

Postby S. Heisley » Thu Aug 18, 2011 7:34 pm

WOW! :o You've just about completed an entire teardrop in less than a month and it looks good! I think you may have a viable, income producing product there. :thumbsup:

It will be fun to see the completed product, inside and out, via website advertising. 8)
User avatar
S. Heisley
Super Lifetime Member
 
Posts: 8774
Images: 495
Joined: Mon Sep 17, 2007 10:02 am
Location: No. California
Top

Postby jdarkoregon » Fri Aug 19, 2011 12:46 am

When are you going to sell a manual??? Good work there

John
Innovation is essential
The world can be better
ImageImage
User avatar
jdarkoregon
Donating Member
 
Posts: 1236
Images: 47
Joined: Mon Aug 22, 2005 7:07 pm
Location: Oregon, Sublimity
Top

Postby kentucky bryan » Fri Aug 19, 2011 7:28 pm

Sharon,
Thanks for the comments and encouragement. I know you watch alot of these builds and a thumbs up from you means alot. Website domain has been pulled from GoDaddy and I'll be working on that over the weekend.

Thanks again. :bowdown:

John,
Who needs a manual. Everything you need is right here.

Todays the Day


Installed the Porch Lights, Fenders, Running Lights, Windows and Fantastic Fan.

Time to hook it up and see how it pulls.

Image

Image

Image

Image

Image


:wine party: :cheerswine: :beer: :wine: :P

OK , I might be celebrating a little!!

Housekeeping has never been my strong suite.

Guess what we get to do first thing Monday !!

Image

Still loose ends to pull together,

Graphics, Clean-up, Final fit , Paint the fenders.
Seems like as soon as we got done paying for the "Sins of Our Youth" , We needed to start saving for our retirement.

My Build at:http://www.tnttt.com/viewtopic.php?t=45264
User avatar
kentucky bryan
Teardrop Inspector
 
Posts: 24
Joined: Sun Jun 26, 2011 11:09 am
Location: Lexington, Kentucky
Top

Postby Danny » Fri Aug 19, 2011 8:45 pm

:P :thumbsup: :applause: Super build and nice shop!!! Wish I had a little more room..
User avatar
Danny
The 300 Club
 
Posts: 333
Images: 108
Joined: Sat Oct 07, 2006 11:22 pm
Location: Nebraska
Top

PreviousNext

Return to Build Journals

Who is online

Users browsing this forum: No registered users and 6 guests