Lance and Becky's Sagwagon

...ask your questions in the appropriate forums BUT document your build here...preferably in a single thread...dates for updates, are appreciated....

Re: Lance and Becky's Sagwagon - Hatch Details

Postby Oldragbaggers » Tue Jul 30, 2013 5:52 pm

It is a great feeling, Alan. No regrets here. We are having a blast with the teardrop and are so happy that we have it!!
Life is sooooo good.........
Sail...camp....bike...repeat
Becky

Build Journal http://www.tnttt.com/viewtopic.php?f=50&t=45917
Visit our blog at http://www.oldragbaggers.com
Image Image
User avatar
Oldragbaggers
Gold Donating Member
 
Posts: 1842
Images: 331
Joined: Mon Aug 01, 2011 9:22 pm
Location: Essex, MD

Re: Lance and Becky's Sagwagon - Hatch Details

Postby sabrown82 » Sun Aug 11, 2013 9:16 pm

Hey Becky - You may have already said this somewhere in your journal, but I didn't see it. What did you use to hang your curtains and where did you get it? I found some sash rods at Walmart that might work, but I'm wondering what you have up there.

Also, I have some questions about finishing the hatch. Boy am I having a hard time with this.... What did you use on the edges of your outer walls? Is that just aluminum strapping? I'm trying to figure out how to finish my hatch and I'm so clueless. Maybe you could pop into my build journal and take a look? I'd love some advice. Maybe we could chat in private message?

:worship:
sabrown82
Teardrop Advisor
 
Posts: 53
Joined: Tue May 21, 2013 5:03 pm

Re: Lance and Becky's Sagwagon - Hatch Details

Postby harleykamper » Sun Aug 11, 2013 10:24 pm

Oldragbaggers wrote:It is a great feeling, Alan. No regrets here. We are having a blast with the teardrop and are so happy that we have it!!


You should be proud & happy! That's a great looking trailer!! Nice job.. :applause:
Paul & Marilyn Moon
2008 anniversary edition Harley Davidson ElectraGlide Ultra Classic
Kustom KlamShell tent Trailer. (In build now)
The ClamShell Tent Trailer Build Journal viewtopic.php?f=50&t=54531
User avatar
harleykamper
Teardrop Master
 
Posts: 102
Images: 206
Joined: Fri Feb 08, 2013 4:30 pm
Location: Reno Nv.
Top

Re: Lance and Becky's Sagwagon - Hatch Details

Postby redmech » Wed Oct 02, 2013 8:56 pm

Absolute great build thread. I will have to use this as a guide, when/if I get mine started. I am eye balling my Brother in Law's old popup camper as a frame donor. Hadn't thought of using his, until I saw this thread.

Nice work!!!
redmech
Teardrop Inspector
 
Posts: 17
Joined: Mon Sep 30, 2013 12:54 am
Top

Re: Lance and Becky's Sagwagon - Hatch Details

Postby drgrumpus » Sat Oct 05, 2013 9:31 am

Becky: I am a real newbie. However, I've started on a 5 x 10 modified Benroy. I'll start a build log when I make some progress.

Your build log is great. The end result is superb. I've read a lot of it, but i still have some questions.

1. I am also using 1/8 birch for the "roof". Like you, I think that is a little flimsy. I will either add a second layer of 1/8 or glass it. If you were doing it over, which would you chose?

2. Assuming it is 'glass, I would only do the roof since I will have solid 3/4 BB walls. I've never worked with glass. Your suggestions to a novice? I was thinking of coming down the sides about 1-1/2 inches, then covering the edge with one of the flexible aluminum trims.

3. Using staples to attach the inner 1/8 panels sounds good except I want use clear poly on the inside. How did you hide the staples?

I haven't thought about the hatch yet. Hope I get that right the first time. BTW, how has your little cutie worked?

Mike (Grumpus)
Five cords of wood in, snow tires on, 5 X 8 NT frame on order. Gonna build a TD this winter.
User avatar
drgrumpus
Teardrop Builder
 
Posts: 34
Joined: Wed Sep 18, 2013 5:45 pm
Location: SW New Hampshire
Top

Re: Lance and Becky's Sagwagon - Hatch Details

Postby Oldragbaggers » Mon Nov 11, 2013 9:50 pm

Hi Mike (Grumpus),

Sorry it took me so long to see this. Thank you for checking my build journal, and for your nice comments. I hope I can give you some good answers to your questions.

If I were doing it over I would still fiberglass the roof. Even with a second layer of birch you still have to waterproof it somehow. To me fiberglass was the best answer. But that is mostly because it was something I had a lot of experience working with. It's not hard to use but there is a bit of a learning curve, and it isn't cheap. If you did the second layer of birch how were you planning to waterproof the wood? Covering with aluminum would be another great option to consider.

I did overlap my edges. You can either overlap the roof fabric or you can use a strip of fiberglass tape over the edges. If you are going to glass over the edges you will need to round them over. The cloth will not lay down flat on a sharp corner, at least not in the weight that would give you some protection (6 oz. cloth).

If you decide to use something other than fiberglass, check out Woodbutcher's Slowmobile build journal. He did a very nice UV protected vinyl on his roof and then used window seal tape over the edges under his metal trim. I have seen this teardrop in person and it is GORGEOUS!! Check out his build journal here http://www.tnttt.com/viewtopic.php?f=50&t=48321&start=30.

And then there is also Filon. There are really so many ways to do it.
Life is sooooo good.........
Sail...camp....bike...repeat
Becky

Build Journal http://www.tnttt.com/viewtopic.php?f=50&t=45917
Visit our blog at http://www.oldragbaggers.com
Image Image
User avatar
Oldragbaggers
Gold Donating Member
 
Posts: 1842
Images: 331
Joined: Mon Aug 01, 2011 9:22 pm
Location: Essex, MD
Top

Re: Lance and Becky's Sagwagon - Hatch Details

Postby rick e » Tue Nov 19, 2013 10:09 pm

Hi Becky, just wanted to tell you your journal was what convinced me to fiberglass. Aluminum was not an option due to heat and a Woody wouldn't last long here.
Thanks for all the tips on applying it, I'm certain they will come in handy. The few times I have used it before were a struggle.
I also picked up some other tips from this thread such as the radius. As everyone says, your tear looks great.
Thanks again,
Rick
User avatar
rick e
Teardrop Advisor
 
Posts: 50
Images: 18
Joined: Mon Nov 11, 2013 6:44 pm
Location: Orange City, Florida
Top

Re: Lance and Becky's Sagwagon - Hatch Details

Postby Oldragbaggers » Tue Nov 19, 2013 10:41 pm

Thank you for the kind words Rick, and best of luck with your build. It makes me happy that the journal has been helpful. We have enjoyed our teardrop this summer and she stayed nice and dry in all weather. I certainly do not regret the extra time, effort and expense spent on the fiberglassing.
Life is sooooo good.........
Sail...camp....bike...repeat
Becky

Build Journal http://www.tnttt.com/viewtopic.php?f=50&t=45917
Visit our blog at http://www.oldragbaggers.com
Image Image
User avatar
Oldragbaggers
Gold Donating Member
 
Posts: 1842
Images: 331
Joined: Mon Aug 01, 2011 9:22 pm
Location: Essex, MD
Top

Re: Lance and Becky's Sagwagon - Hatch Details

Postby Esteban » Tue Jan 21, 2014 12:55 am

Becky, Your trailer turned out beautifully. Thanks for documenting it so well. I really like the clean lines of yours. You and your teardrop are an inspiration.

I was building a Grumman II inspired teardrop. Made some boo boos. Got delayed. Ideas changed. Am now ready to restart construction. Seeing how beautifully yours came out I'm changing my plans. A Benroy seems more space efficient, easier to build, the flat roof area looks good for solar, and the front begs for a tongue box. I will fiberglass and paint mine too. I tried making my own doors. They warped. So I (probably) will buy pre-made doors. It will be a 5 x 10.

Thanks again.
:applause: :thumbsup: :beer: :wine:
Steve - SLO, CA
Esteban
Donating Member
 
Posts: 1684
Images: 15
Joined: Fri Jul 28, 2006 4:39 pm
Location: California, San Luis Obispo
Top

Re: Lance and Becky's Sagwagon - Hatch Details

Postby Oldragbaggers » Wed Jan 22, 2014 8:08 pm

Hi Steve,

Thank you for the nice comments. I hope you find the journal useful as you build your next trailer.

I am sorry your Grumman did not turn out as you had hoped. I'm sure that must have been terribly disappointing. I'm glad you didn't give up and you're ready to give it another shot. No matter how simple the design I don't think building a teardrop from scratch (for most of use mere mortals) is an easy task. I had days when I didn't think I would be able to finish, and days when I didn't even want to. But the enjoyment we get from our trailer has made it all so worthwhile.

I agree with you about the doors. The hatch was my major challenge, and my biggest frustration. And if you want to talk boo boos, I made some major ones. I think everyone makes at least a few, some more than others. I am glad I didn't try to do my doors too. I'd probably still be building!!

Best of luck on your Benroy design. I will be looking forward to following it. Hopefully I'll run into you enjoying your trailer at a future gathering.
Life is sooooo good.........
Sail...camp....bike...repeat
Becky

Build Journal http://www.tnttt.com/viewtopic.php?f=50&t=45917
Visit our blog at http://www.oldragbaggers.com
Image Image
User avatar
Oldragbaggers
Gold Donating Member
 
Posts: 1842
Images: 331
Joined: Mon Aug 01, 2011 9:22 pm
Location: Essex, MD
Top

Re: Lance and Becky's Sagwagon

Postby Oldragbaggers » Sun Jun 15, 2014 6:08 pm

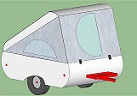
The Sagwagon is finally finished.

It now has everything that I envisioned when I first started planning it. And I honestly can't think of anything else that I could do to it that would make it suit our needs any better.

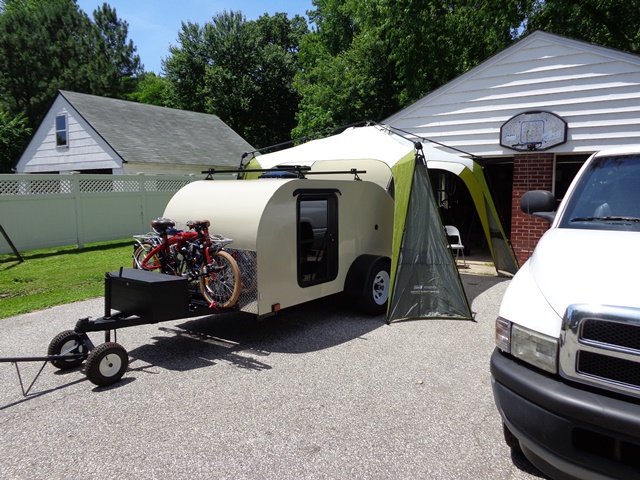
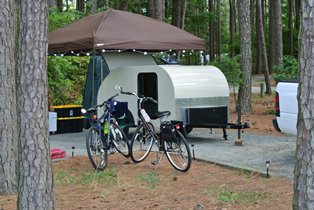
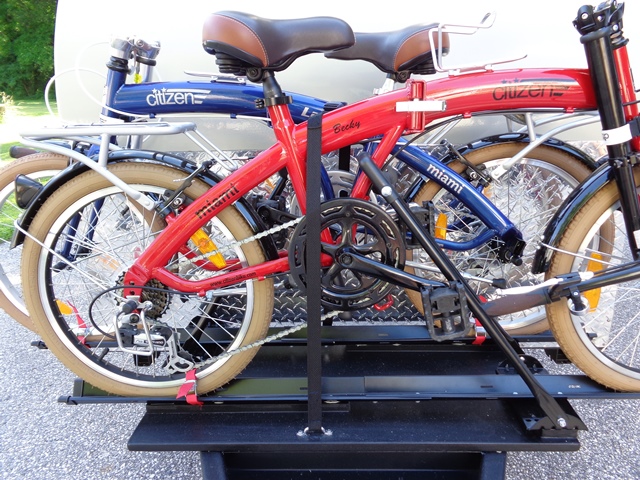
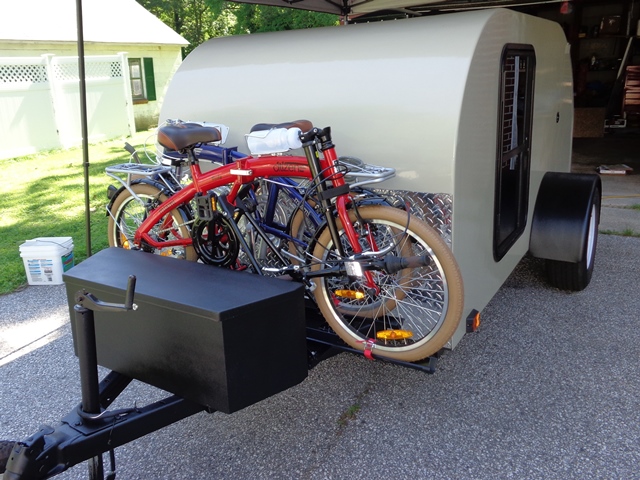
Over the course of the past two weeks I have added bicycle racks on the front to carry our Citizen Miami Folding bikes. I covered them in some detail in another thread. 
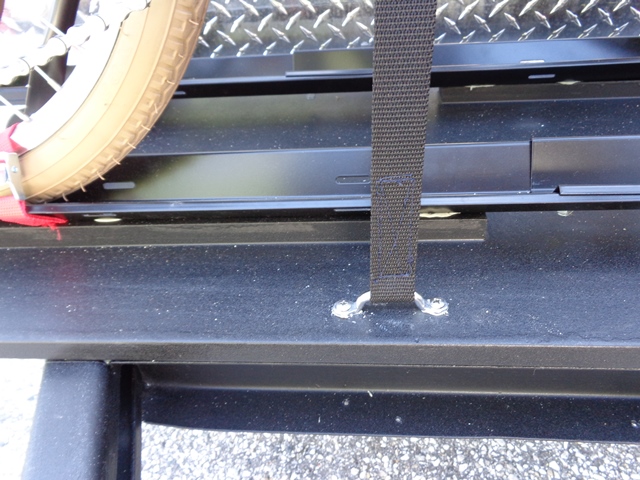
http://www.tnttt.com/viewtopic.php?f=46&t=60043&p=1082439&hilit=bike+rack#p1081870

This week I added a strap to secure them even better. They are rock solid, no movement whatsoever.

Image

Image

Image

Image

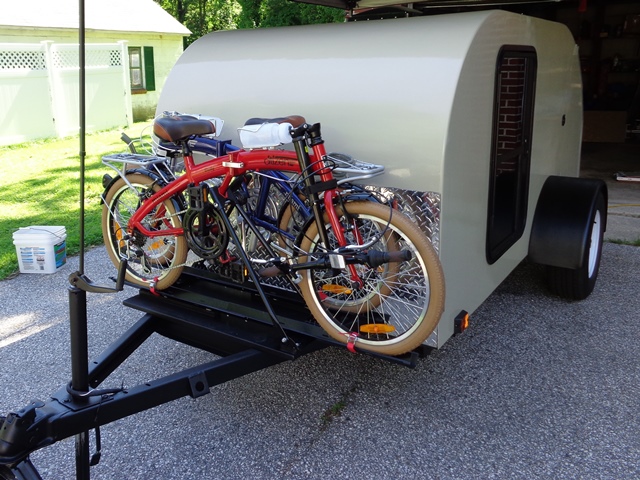
The tongue box has been moved forward of the bike racks. We were nervous that maybe we wouldn't have enough turning room for the truck but Lance did some pretty tight u-turns with it and we had at least 6-7 inches of clearance between the back of the truck and the box. All is well.

Image

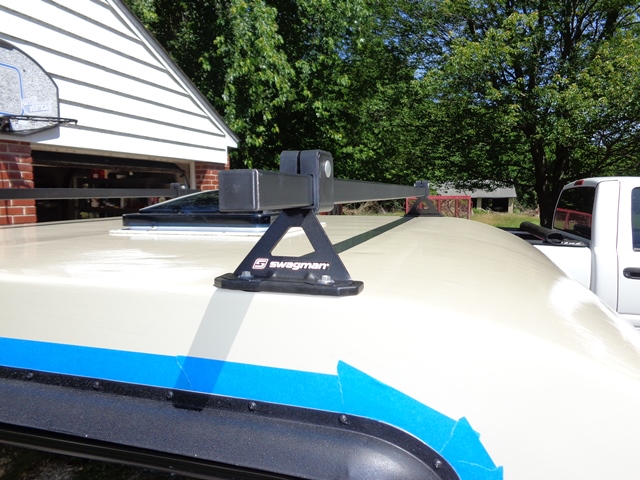
I also added a roof rack so that we can carry either a canoe or kayaks. This is a Swagman rack that is designed for use on top of a pop-up camper. I had looked into buying the roof racks from Little Guy, but they cost almost $400. I got this rack for $100 on Overstock.com. http://www.overstock.com/Sports-Toys/Pop-Up-Trailer-Rack/7307721/product.html?refccid=VXAA57QB5EEIMXCIGWM2EKDVQQ&searchidx=0 It is quite substantial, good quality, and has a 150# capacity.

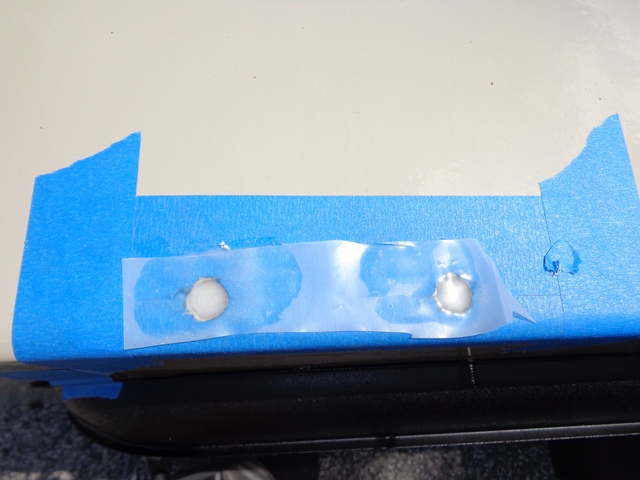
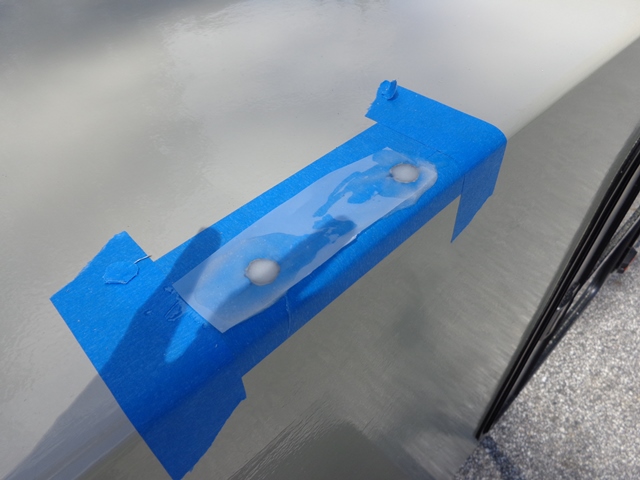
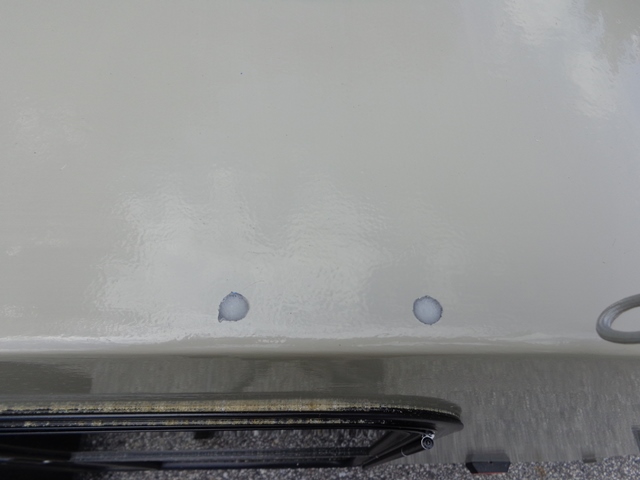
Rather than bolting into the walls from the side like the Little Guy rack, the risers for this rack sit flat on the top. I thought the best support was to be found right over the walls but I was concerned about screwing into the end grain of the plywood. I know endgrain isn't that strong to begin with and I was concerned that if the screw holes ever began to leak it would wick through the plywood walls and delaminate them. Being the anal retentive epoxy fiend that I am, I drilled out the screw holes oversized and filled them with thickened epoxy. I masked the holes off with blue tape, poured in the thickened epoxy and then smoothed over the tops with plastic. By doing this I was able to push the epoxy down into the holes well, get the top of the epoxy smooth and level and eliminate the need for any sanding after the epoxy had hardened. Then I redrilled the screw holes and set the screw in the center of the hardened epoxy. This gave the screws something much harder to bite into and completely protects the plywood from any water ingress. Of course I also used a lot of bedding compound.

Image

Image

Image

Image

Image

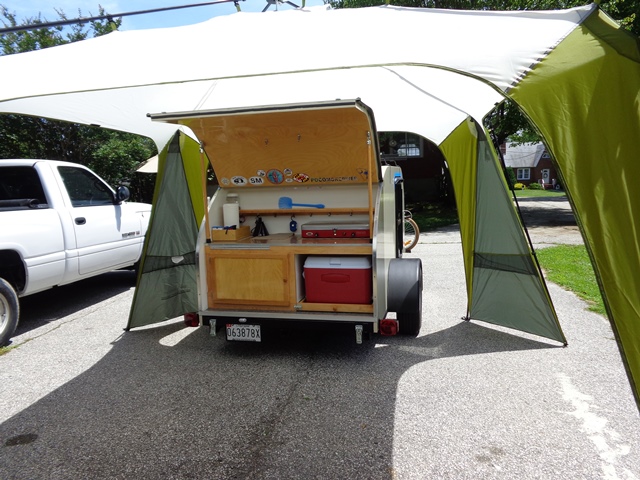
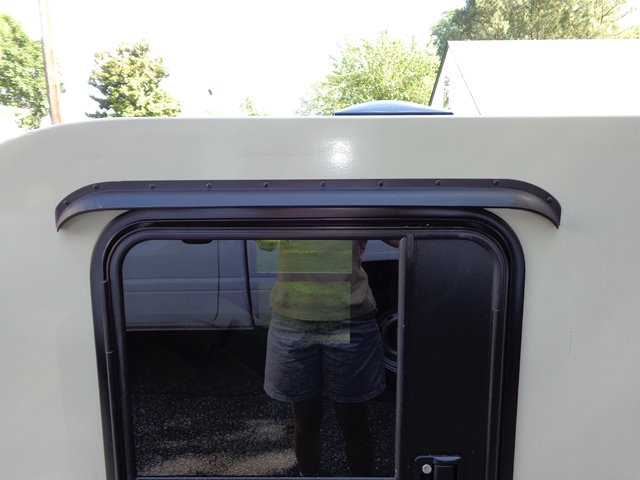
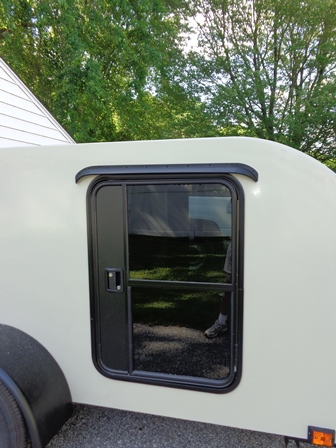
I also installed my rain caps. I have had these since the beginning and was back and forth about whether to install them, but I'm glad I finally did it.

Image

Image

The bike rack platform, rain caps, tongue box, and fenders have all been sprayed out with Rustoleum Truck Bed Liner. The enamel seemed to chip off of the fenders too easily from road debris. I have the word of Woodbutcher that the truck bed liner is a little more durable. We've already put at least 4000 miles on our tear, and we're just getting started, so we need stuff that can stand up to a lot of use. Since I was painting the fenders anyway (and I really like the look of it) I decided to do everything else to match.

The only thing I haven't got at this point is a decal. I had hoped to find something distinctive that fit with the personality of the teardrop and what it means to us, but I just haven't found quite the right thing yet. Rather than just stick something on there for the sake of having something, I would rather wait until I stumble on just the right thing.

Building this teardrop has been one of the most rewarding things I have ever done. And using it has added a whole new dimension to our lives. We have a whole new group of camping friends that are almost like family and we can travel more often and more cheaply than we ever have before. We may have a bigger camper someday but we will always have the teardrop. And for anyone who is wondering if they can, or if they should, build one (or buy one), I say go for it. You will never regret it.

Image

Image
Life is sooooo good.........
Sail...camp....bike...repeat
Becky

Build Journal http://www.tnttt.com/viewtopic.php?f=50&t=45917
Visit our blog at http://www.oldragbaggers.com
Image Image
User avatar
Oldragbaggers
Gold Donating Member
 
Posts: 1842
Images: 331
Joined: Mon Aug 01, 2011 9:22 pm
Location: Essex, MD
Top

Re: Lance and Becky's Sagwagon

Postby ParTaxer » Sun Jun 15, 2014 6:39 pm

Great work Becky! I don't know if I could have drilled those holes in the top but with your boat background I'm sure the confidence was there.

Mike W
I have wisdom beyond my years. In fact, I'm nearly senile.
User avatar
ParTaxer
The 300 Club
 
Posts: 391
Images: 32
Joined: Sat Mar 10, 2007 5:37 pm
Location: Louisville, KY
Top

Re: Lance and Becky's Sagwagon

Postby Oldragbaggers » Sun Jun 15, 2014 6:55 pm

Thanks, Mike. I'm not saying it didn't make me a little nervous!
Life is sooooo good.........
Sail...camp....bike...repeat
Becky

Build Journal http://www.tnttt.com/viewtopic.php?f=50&t=45917
Visit our blog at http://www.oldragbaggers.com
Image Image
User avatar
Oldragbaggers
Gold Donating Member
 
Posts: 1842
Images: 331
Joined: Mon Aug 01, 2011 9:22 pm
Location: Essex, MD
Top

Re: Lance and Becky's Sagwagon

Postby KCStudly » Sun Jun 15, 2014 7:25 pm

Nice updates! :thumbsup: :applause:
KC
My Build: The Poet Creek Express Hybrid Foamie

Poet Creek Or Bust
Engineering the TLAR way - "That Looks About Right"
TnTTT ORIGINAL 200A LANTERN CLUB = "The 200A Gang"
Green Lantern Corpsmen
User avatar
KCStudly
Donating Member
 
Posts: 9613
Images: 8169
Joined: Mon Feb 06, 2012 10:18 pm
Location: Southeastern CT, USA
Top

Re: Lance and Becky's Sagwagon

Postby S. Heisley » Sun Jun 15, 2014 9:22 pm

It looks good, Becky. The rain caps are a nice addition, too! :thumbsup:
User avatar
S. Heisley
Super Lifetime Member
 
Posts: 8774
Images: 495
Joined: Mon Sep 17, 2007 10:02 am
Location: No. California
Top

PreviousNext

Return to Build Journals

Who is online

Users browsing this forum: Bing [Bot], Google [Bot] and 58 guests