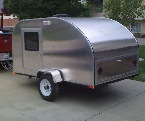
"The X-II" 5-Wide Convertible Teardrop

...ask your questions in the appropriate forums BUT document your build here...preferably in a single thread...dates for updates, are appreciated....

Postby jabrobbins » Sun Jan 01, 2012 10:07 pm

It's amazing that you were able to get so much cut out using your CAD work. I can't believe it all fit together like a puzzle. With my no-design wing-it style I had to work over each piece of wood. Your process is so much more efficient. You could probably sell your plans. Thanks for the inspiration!
jabrobbins
Eureka, CA
Image
User avatar
jabrobbins
Teardrop Builder
 
Posts: 41
Images: 35
Joined: Sun Mar 13, 2011 11:08 am
Location: Eureka, CA

Postby absolutsnwbrdr » Mon Jan 02, 2012 10:02 pm

jabrobbins wrote:It's amazing that you were able to get so much cut out using your CAD work. I can't believe it all fit together like a puzzle. With my no-design wing-it style I had to work over each piece of wood. Your process is so much more efficient. You could probably sell your plans. Thanks for the inspiration!


Its definitely a lot of planning up front, but it definitely speeds up assembly time. There are still some measurements that need adjusted along the way, but for the most part the build has been going great! I wouldn't be able to tackle a project like this without a serious game plan. I actually did write up a construction guide for my first convertible. Started selling it on my website a couple months ago.
Zach
Coming Soon...
Image Image
User avatar
absolutsnwbrdr
Donating Member
 
Posts: 2657
Images: 412
Joined: Mon Jan 25, 2010 6:10 pm
Location: Hanover, PA

Postby absolutsnwbrdr » Mon Jan 02, 2012 10:16 pm

More progress today, on this marathon weekend!

We started off by forming the front skin around the curve. Its been sitting clamped and strapped in place like this all day. I'll probably get around to permanently attaching it next weekend.

Image

Then my friend and I got to work permanently attaching the skin in front of the hatch. We had to add an extra spar to get the curve right, but that was easy enough.

Image

Image

Next we test fit the hatch after attaching the hurricane hinge. It was a little tight at the edges, so I took the belt sander and gave it some more wiggle room.

Image

Image

After I was content with the hatch fit, we brought the trailer back in and I got to work on the small roof sections on each side of the trolley top.

Image

Image

Image

It was a hell of a weekend! Can't wait to get back to work tomorrow so I can relax!! :lol:
Last edited by absolutsnwbrdr on Tue Nov 13, 2012 11:02 am, edited 1 time in total.
Zach
Coming Soon...
Image Image
User avatar
absolutsnwbrdr
Donating Member
 
Posts: 2657
Images: 412
Joined: Mon Jan 25, 2010 6:10 pm
Location: Hanover, PA
Top

Postby parnold » Mon Jan 02, 2012 11:08 pm

Great progress Zach!
User avatar
parnold
Donating Member
 
Posts: 2344
Images: 302
Joined: Mon Feb 08, 2010 4:49 pm
Location: Northwest New Jersey
Top

Postby absolutsnwbrdr » Wed Jan 04, 2012 7:50 pm

Someone messaged me asking how much distance there is above my tire to the sidewall, and the answer is 'not much'. The wheel arch was cut using a 45 degree bevel, so the clearance is slightly more than what you see looking directly at the side. The bevel actually matches the profile of the tire pretty well, so I'll venture to say I have right around 2" of clearance before the tire will rub. The outside face of the tire is even with the outside face of the trailer, which makes it appear tighter than it actually is.

Image

Even after the trailer is finished and loaded, I expect it to be around 1,000lbs, which is still well below the max capacity (1720lbs).

IF the tire ever rubs, I'm certain it will only be if I hit a pothole or something. Time will tell. Live and learn.

I think it looks great being absolutely in plane with the side. Never cared much for those pop-ups that hung over the wheels 6-12". Just didn't look right.


I also started playing around with how the wiring for the fan and lights will be hidden. The wires will run from the front of the trailer, through 1/4" holes in the short side spars, and into a 1/4" hole drilled vertically through the plywood, and then out the side of the plywood at the top, and across the very top spars (not there yet) to the fan/lights. Once the wiring is finished, the two visible holes at the bottom of the plywood trolley-top will be filled and painted over, so you won't even know they were there.

Image

Actually wasnt too hard to accomplish! Has anyone else had to do anything similar to this?
Last edited by absolutsnwbrdr on Tue Nov 13, 2012 11:03 am, edited 1 time in total.
Zach
Coming Soon...
Image Image
User avatar
absolutsnwbrdr
Donating Member
 
Posts: 2657
Images: 412
Joined: Mon Jan 25, 2010 6:10 pm
Location: Hanover, PA
Top

Postby Robbie » Thu Jan 05, 2012 8:54 am

I really like the flush look also! It looks clean! And I had to do something similar with the wiring on my trailer. It all worked out and is a much cleaner method of running and hiding your wiring. Looks great Zach!

Robbie
My aluminum benroy build:
viewtopic.php?t=45640
User avatar
Robbie
Teardrop Master
 
Posts: 250
Images: 86
Joined: Tue May 10, 2011 11:28 am
Location: West Jordan, UT
Top

Postby crumbruiser » Thu Jan 05, 2012 8:47 pm

Robbie wrote:I really like the flush look also! It looks clean! And I had to do something similar with the wiring on my trailer. It all worked out and is a much cleaner method of running and hiding your wiring. Looks great Zach!

Robbie

X2
Frank
I am not weird, I am a Limited Edition.
Facebook http://www.facebook.com/profile.php?id=100000303236631
User avatar
crumbruiser
Teardrop Master
 
Posts: 266
Images: 255
Joined: Sun Jul 10, 2011 6:11 pm
Location: Central Ohio
Top

Postby absolutsnwbrdr » Sat Jan 07, 2012 10:05 pm

It was a beautiful day today! 60 and sunny! We got the front skin done this morning, and moved on to finish the roof framing. 8)

Image

Image

Image

And also got the top edge of the MDO plywood sanded smooth to match the roof line.

Image

Then I spent about an hour cleaning up the mess of tools and vacuuming the trailer out. At this point it was dark.

Image

So I rolled the X-II back into my parents garage and started taking stock of some of my LED's and electrical components. I can't believe how big this galley is!!

Image

I think I'm going to start laying out some preliminary wiring tomorrow, and seal some of the plywood edges with more CPES now that everything is together. :D
Last edited by absolutsnwbrdr on Tue Nov 13, 2012 11:06 am, edited 2 times in total.
Zach
Coming Soon...
Image Image
User avatar
absolutsnwbrdr
Donating Member
 
Posts: 2657
Images: 412
Joined: Mon Jan 25, 2010 6:10 pm
Location: Hanover, PA
Top

Postby Oldragbaggers » Sat Jan 07, 2012 10:28 pm

Wow, Zach. I can't believe how fast you're knocking this thing out. It looks terrific.
Life is sooooo good.........
Sail...camp....bike...repeat
Becky

Build Journal http://www.tnttt.com/viewtopic.php?f=50&t=45917
Visit our blog at http://www.oldragbaggers.com
Image Image
User avatar
Oldragbaggers
Gold Donating Member
 
Posts: 1842
Images: 331
Joined: Mon Aug 01, 2011 9:22 pm
Location: Essex, MD
Top

Postby absolutsnwbrdr » Sat Jan 07, 2012 10:56 pm

Thanks Becky... Gotta try to get the exterior finished, or at least sealed and primed, while the weather is nice! First camping trip may be in March :snowstorm:
Zach
Coming Soon...
Image Image
User avatar
absolutsnwbrdr
Donating Member
 
Posts: 2657
Images: 412
Joined: Mon Jan 25, 2010 6:10 pm
Location: Hanover, PA
Top

Postby Deryk the Pirate » Sun Jan 08, 2012 1:53 am

Very impressive! Youve gotten quite a bit done very fast.

Im envious about you being able to work at your parents house. Me and my dad couldn't convince my mom... she was like, " Your not bringin all that sawdust in my house" lol.
Build Thread lil vardo 1: http://tinyurl.com/baqe6py
Build Thread lil vardo 2: http://tinyurl.com/b3rwffm
User avatar
Deryk the Pirate
500 Club
 
Posts: 809
Images: 158
Joined: Tue Aug 18, 2009 11:03 am
Location: Parlin NJ
Top

Postby rand_98201 » Sun Jan 08, 2012 4:41 am

nice work so far,its been great following along since im a newbie here and still in the planning stages of my first build.
rand_98201
Teardrop Advisor
 
Posts: 88
Joined: Sun Dec 18, 2011 3:04 am
Location: Western Washington
Top

Postby toypusher » Sun Jan 08, 2012 7:38 am

that's sure a nice looking battery in the last pic!! :D
User avatar
toypusher
Site Admin
 
Posts: 43040
Images: 324
Joined: Fri Jan 28, 2005 12:21 pm
Location: York, PA Area
Top

Postby absolutsnwbrdr » Sun Jan 08, 2012 10:23 am

Deryk the Pirate wrote:Very impressive! Youve gotten quite a bit done very fast.

Im envious about you being able to work at your parents house. Me and my dad couldn't convince my mom... she was like, " Your not bringin all that sawdust in my house" lol.


:lol:

It was kinda the opposite for me. My Mom told my Dad to move his car so I could have a decent place to work on it. The only stipulation is that my Dad wants the garage back before it snows on his car (Toyota Solara convertible). I told him to sell the car and get one that he doesnt have to baby. Thats kinda why I'm pushing to at least get the exterior sealed. Garage time may be running out :shock:

(if anyone wants to buy a 2009 Toyota Solara Convertible,red w/black top, low miles, contact me and I'll cut you a deal) :lol: :lol:

rand_98201 wrote:nice work so far,its been great following along since im a newbie here and still in the planning stages of my first build.


Thanks! Hope you're getting some great ideas from this site! I spent a couple months planning every detail of this build out, and that's why I could assemble it so fast. Plan, plan, plan!!

toypusher wrote:that's sure a nice looking battery in the last pic!! :D


It sure is! One of the threaded posts sheared off last night when I was trying to draw the nut down though. Couldn't freakin believe it! Oh well, as long as I can get 13.2V (or is it 12.8V?) from it, we're good! Thanks for the battery Kerry! :thumbsup:
Zach
Coming Soon...
Image Image
User avatar
absolutsnwbrdr
Donating Member
 
Posts: 2657
Images: 412
Joined: Mon Jan 25, 2010 6:10 pm
Location: Hanover, PA
Top

Postby NonProfit » Sun Jan 08, 2012 11:46 am

Nice build!
NonProfit
Teardrop Builder
 
Posts: 27
Joined: Wed Dec 07, 2011 10:35 pm
Location: Illinois
Top

PreviousNext

Return to Build Journals

Who is online

Users browsing this forum: Google [Bot] and 46 guests