"The X-II" 5-Wide Convertible Teardrop

...ask your questions in the appropriate forums BUT document your build here...preferably in a single thread...dates for updates, are appreciated....

Postby absolutsnwbrdr » Thu Dec 29, 2011 3:07 pm

parnold wrote:NOW you tell me.. lol.. I just reserved a site at the western PA one for the weekend before. I can do both, but probably wouldn't arrive at the DE one until late Fri nite or Sat morning.


You just had to go and jump the gun!! The DE one?! You mean MD!! Thurmont, MD. Cunningham Falls. Come on Paul, WAKE UP!! Its too early in the afternoon for you to be sleeping!! :lol: :lol:
Zach
Coming Soon...
Image Image
User avatar
absolutsnwbrdr
Donating Member
 
Posts: 2657
Images: 412
Joined: Mon Jan 25, 2010 6:10 pm
Location: Hanover, PA

Postby parnold » Thu Dec 29, 2011 3:34 pm

MD DE Same thing
8)
User avatar
parnold
Donating Member
 
Posts: 2344
Images: 302
Joined: Mon Feb 08, 2010 4:49 pm
Location: Northwest New Jersey

Postby absolutsnwbrdr » Thu Dec 29, 2011 3:55 pm

parnold wrote:MD DE Same thing
8)


:lol: :lol:
Just checking. Thought maybe there was ANOTHER Birthday Bash in our area that weekend that I didn't know about. :?
Zach
Coming Soon...
Image Image
User avatar
absolutsnwbrdr
Donating Member
 
Posts: 2657
Images: 412
Joined: Mon Jan 25, 2010 6:10 pm
Location: Hanover, PA
Top

Postby absolutsnwbrdr » Sat Dec 31, 2011 9:32 pm

Its been a busy couple of days! I took yesterday afternoon off work, and my dad and I got the sides attached to the trailer. Supported them with car jack stands while we used 12 3" lag screws to secure them to the wood framing.

Image

Image

Got a late start today since I was out with friends last night celebrating my birthday, but two friends came over around 1pm and we really got to work! Here my one friend is screwing the galley shelf in place while another makes sure he doesn't screw it up.

Image

Then we got the upper bulkhead wall installed, along with the interior shelf. Next was the oak sill at the front of the trailer.

Image

Image

Next came the trolley top sections. I stood on the trailer and made sure things were lining up, while my friend screwed the pieces in place.

Image

Image

One side done...

Image

Both trolley top sides done!!

Image

Image

Thats enough for one day! I'm exhausted. Probably won't even make it to midnight to ring in the new year. :lol:

See you in 2012 :beer:
Last edited by absolutsnwbrdr on Tue Nov 13, 2012 10:57 am, edited 1 time in total.
Zach
Coming Soon...
Image Image
User avatar
absolutsnwbrdr
Donating Member
 
Posts: 2657
Images: 412
Joined: Mon Jan 25, 2010 6:10 pm
Location: Hanover, PA
Top

Postby StPatron » Sat Dec 31, 2011 9:37 pm

Really nice work, Zach! :applause:

That's a lotta work for one day, the prefabrication of parts really paid off.

Happy Birthday to ya!
User avatar
StPatron
Donating Member
 
Posts: 748
Images: 297
Joined: Tue Dec 15, 2009 8:38 pm
Location: OK
Top

Postby S. Heisley » Sat Dec 31, 2011 9:51 pm

StPatrón wrote:Really nice work, Zach! :applause:

That's a lotta work for one day, the prefabrication of parts really paid off.

Happy Birthday to ya!


I agree! Good job, Zach. Happy Birthday, too! :P
User avatar
S. Heisley
Super Lifetime Member
 
Posts: 8773
Images: 495
Joined: Mon Sep 17, 2007 10:02 am
Location: No. California
Top

Postby toypusher » Sat Dec 31, 2011 10:05 pm

And here I thought you would have it done by midnight!!! :lol:
User avatar
toypusher
Site Admin
 
Posts: 43040
Images: 324
Joined: Fri Jan 28, 2005 12:21 pm
Location: York, PA Area
Top

Postby absolutsnwbrdr » Sat Dec 31, 2011 10:18 pm

Thanks Gary and Sharon!

Kerry I ran out of wood or it could have been finished :( :lol:
Zach
Coming Soon...
Image Image
User avatar
absolutsnwbrdr
Donating Member
 
Posts: 2657
Images: 412
Joined: Mon Jan 25, 2010 6:10 pm
Location: Hanover, PA
Top

Postby Robbie » Sat Dec 31, 2011 10:34 pm

Looking good zach! That's comin along nice! And happy birthday man!
My aluminum benroy build:
viewtopic.php?t=45640
User avatar
Robbie
Teardrop Master
 
Posts: 250
Images: 86
Joined: Tue May 10, 2011 11:28 am
Location: West Jordan, UT
Top

Postby DMcCam » Sun Jan 01, 2012 2:44 pm

She's really shaping up great Zach! Having extra hands can sure speed up the process. Very cool design Sir.

All the best,

Dave
User avatar
DMcCam
Gold Donating Member
 
Posts: 883
Joined: Wed Jan 06, 2010 8:30 pm
Location: Reno, Nevada
Top

Postby mikeschn » Sun Jan 01, 2012 3:10 pm

Looking good Zach!

Just wondered, are you planning on adding some wood strips to support the outside skin? See pic...

Image

A little like this...

Image

Mike...
The quality is remembered long after the price is forgotten, so build your teardrop with the best materials...
User avatar
mikeschn
Site Admin
 
Posts: 19202
Images: 479
Joined: Tue Apr 13, 2004 11:01 am
Location: MI
Top

Postby Deryk the Pirate » Sun Jan 01, 2012 6:47 pm

Looking Great!
Build Thread lil vardo 1: http://tinyurl.com/baqe6py
Build Thread lil vardo 2: http://tinyurl.com/b3rwffm
User avatar
Deryk the Pirate
500 Club
 
Posts: 809
Images: 158
Joined: Tue Aug 18, 2009 11:03 am
Location: Parlin NJ
Top

Postby absolutsnwbrdr » Sun Jan 01, 2012 9:02 pm

Thanks everyone! Definitely helps having a few extra hands!

Mike - I think the spars that are there will be enough to achieve a smooth curve. We got the pieces cut tonight for the outside skin and since they're only 6" wide, they curve really nicely.

Here's the progress from today...

Started with the hatch. Had to go to Lowe's to get the thin plywood. Found the stack of 5.2mm Oak Plywood and there were two really warped peices on top. Bargained with one of the lumber guys and got 2 for the price of one!! Just so happened that the way that they were warped was exactly the way I needed them to bend. Imagine that - preformed hatch skins :lol:

So we skinned the hatch...

Image

Image

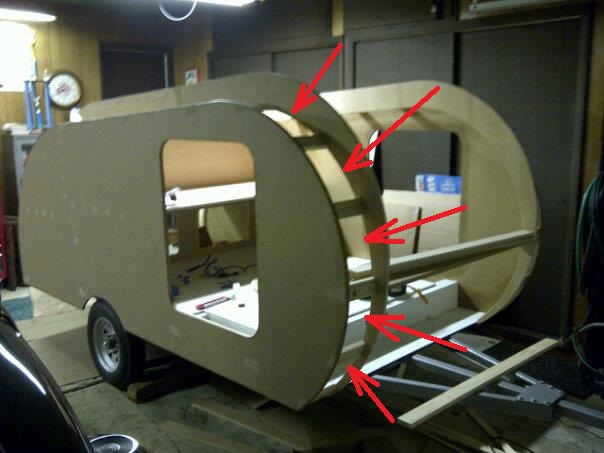
Then we got the hatch hinge spar in place, and the hurricane hinge temporarily installed on the hatch. It'll come off when its time to seal and paint.

Image

Then we cut the 6" wide exterior skin pieces and test fit them.

Image

Guess thats enough for today. :D
Last edited by absolutsnwbrdr on Tue Nov 13, 2012 10:59 am, edited 1 time in total.
Zach
Coming Soon...
Image Image
User avatar
absolutsnwbrdr
Donating Member
 
Posts: 2657
Images: 412
Joined: Mon Jan 25, 2010 6:10 pm
Location: Hanover, PA
Top

Postby parnold » Sun Jan 01, 2012 9:07 pm

Great progress Zach!

I'm surprised you quit so early tonight. :lol:
User avatar
parnold
Donating Member
 
Posts: 2344
Images: 302
Joined: Mon Feb 08, 2010 4:49 pm
Location: Northwest New Jersey
Top

Postby absolutsnwbrdr » Sun Jan 01, 2012 9:16 pm

parnold wrote:Great progress Zach!

I'm surprised you quit so early tonight. :lol:


I ran out of wood. Actually the pricks at Lowe's ran out of 1x3x8 oak boards, so I didnt get the trolley top done as I had hoped to. :cry:
Zach
Coming Soon...
Image Image
User avatar
absolutsnwbrdr
Donating Member
 
Posts: 2657
Images: 412
Joined: Mon Jan 25, 2010 6:10 pm
Location: Hanover, PA
Top

PreviousNext

Return to Build Journals

Who is online

Users browsing this forum: No registered users and 31 guests