Weekender status - 1st camping (update 10-21-12)

...ask your questions in the appropriate forums BUT document your build here...preferably in a single thread...dates for updates, are appreciated....

Re: Weekender status - hatch & tailgate (update 4-26-12)

Postby Alfred » Sat Apr 28, 2012 12:51 am

Awesome - Mine is on a Northern Tool trailer, too! Keep us posted!

AL :thumbsup:
4 minute video of our build - A 5x8 Camper for a family of 5 - http://youtu.be/CYGTlkfpIhY
How we built a 5x8 camper for a family of 5, using a utility trailer with an incorporated bunk bed for the kids.
From plain trailer to campground!

ImageImageImage
Also - More pictures here: http://flic.kr/ps/225piC
User avatar
Alfred
Silver Donating Member
 
Posts: 1633
Images: 368
Joined: Sun Jun 03, 2007 9:18 pm
Location: NC, Asheville

Re: The build begins (modified Weekender)!

Postby albion2 » Wed May 16, 2012 12:51 am

crumbruiser wrote:Image
I took 2 of the center cross braces, and clamped, drilled and bolted them to the sides.
Image
I had to cut off about 20 inches or so. I was wanting to save the weight, you can see what I cut off under the tongue jack.
Image
I am adding 2 2x4s length ways. Right now, there just laying in position. I'm thinking that a 5x10 might be too heavy for the PT Cruiser so I may build a 5x9 or 5x8 and give myself a back porch. I'm planning on a rear entry TTT.
Frank

Crumbruiser, I thinl your PT will pull the trailer fine,I had a Dodge Aries Wagon with a 2.2 in it and pulled a Starcraft popup all over the Eastern USA with it,after that I had a LeBaron coupe with a 2.5 and pulled that same pop up from Ohio to main and back through Canada to Ohio,also when my mom came over from UK we towed the pop up from Ohio to Colorado then up to Utah back through Wyoming , Nebraska and all the way home to Ohio.5500 miles.That PT you have has more HP than both of those cars I mentioned,My popup weighed about 15000 lbs loaded.I neverhad many people passing me on any trips.I ran at 65-75 mph most times.
albion2
Teardrop Builder
 
Posts: 36
Images: 0
Joined: Tue Dec 13, 2011 1:52 am

Re: Weekender status - body work and electrical (update 5-17

Postby les45 » Thu May 17, 2012 3:01 pm

It's been a while since I posted so I guess I need to catch up. Getting a lot done, but not a lot of picture changes to show for it. Rain and humidity for the past two weeks have really slowed down my body work and painting. I've gotten four coats of CPES on all the outside and the first round of Fill-it filler, but I'm waiting on the weather to clear before I sand everything and do the fiberglassing on all the edges. While I wait on the weather, I've started on my electrical. My original plan was to install the battery in the storage area under the galley counters, but I decided that I didn't want to deal with a vent system so I installed a battery box on the tongue (I needed the tongue weight up there anyway). I'm running the battery cables through the cabin with a combination of wiremold and clear plastic tubing for conduit. On the other side of the cabin I'm running the trailer lights with the same type of wiremold and plastic tubing. The nice thing about the tubing is that it slides down inside the ends of the wiremold and protects the wiring. I've been buying a lot of parts online including coolers, cabin lights, hurricane hinge, bussbars, and terminal strips. They are all starting to come in now. Hopefully the weather will clear up soon and I can finish the filler, apply the fiberglass tape, and paint with Valspar tractor paint. One thing I should point out is that I cut my holes for my Fantastic fan and tail lights after I applied the CPES. I had a little CPES left over so I plan to go back and seal all those raw edges with several coats.


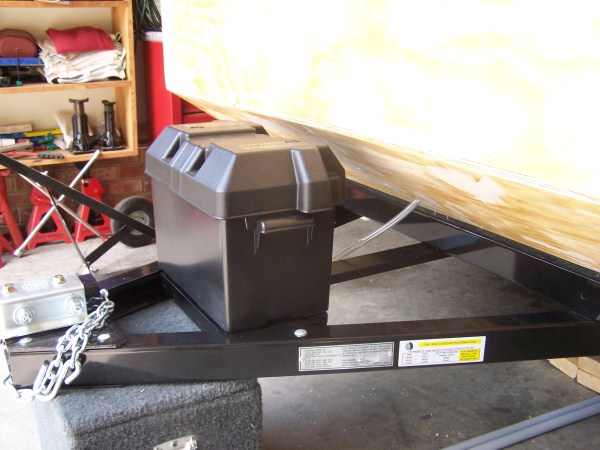
Battery box installed on tongue. I'll use clear plastic tubing as conduit to run the trailer light wiring and the battery wiring into the cabin. A slightly undersized hole through the plywood makes the soft plastic tubing seal really tight. I'm hoping it is waterproof without having to caulk. You can't tell by the pic, but the box is mounted really solid on a wood frame bolted to the spare tire rack with a full length metal strap washer inside. The size 24 battery is actually smaller than the size 27 box so there is plenty of room for the wiring and plastic tube conduit to run inside the box. I plan to fabricate a metal locking strap to hold down the lid and secure the entire box.
Image

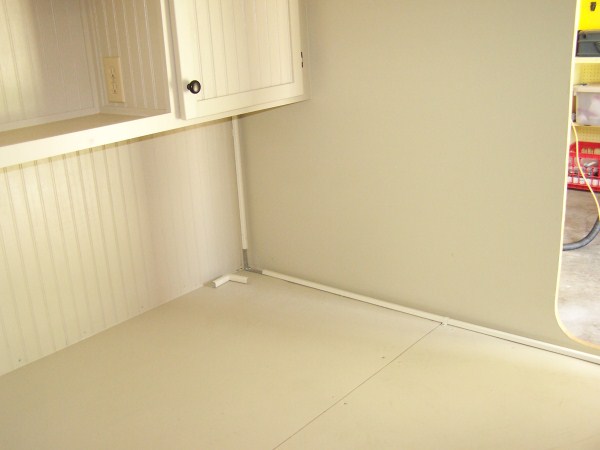
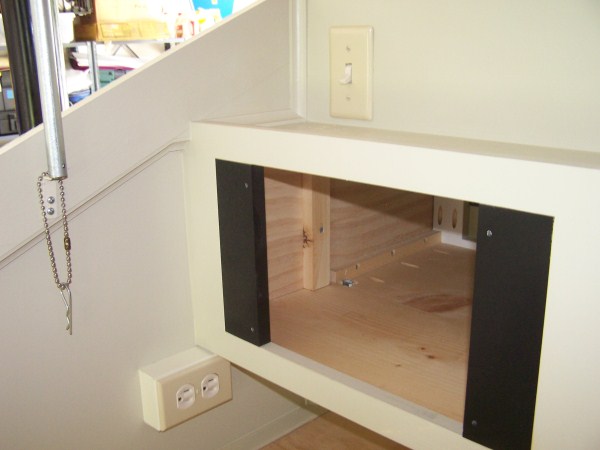
Wiremold on left side will carry battery cables to power cabinet. Similar wiremold on right side will carry trailer lights to galley storage area (rear side markers and tail lights). Haven't run wiring yet. Note receptacle installed in cabinet shelf for TV and heater.
Image

Switch at top is the master battery cutoff. Figured that would work better than a big old knife switch hidden down in a cabinet. The hot battery lead will run through the switch and will remain off when not in use. All of my cabin lights have built in on/off switches so this will prevent something from accidentally draining the battery. Receptacles under the galley cabinets are also in wiremold surface mount boxes.
Image

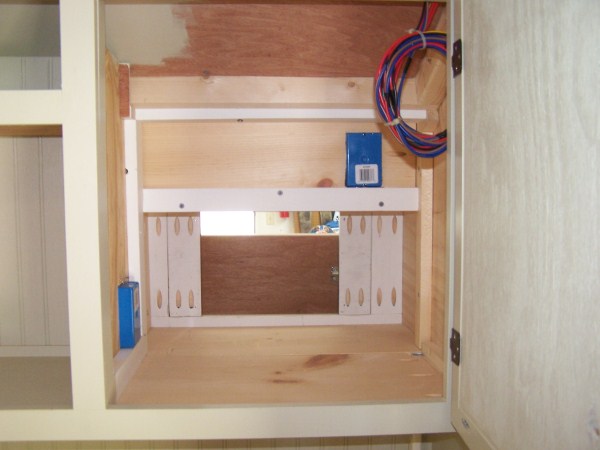
Backside of electrical cabinet. Progressive 4045 converter/charger will mount from the galley side and all AC/DC distribution will be inside this cabinet with access from the cabin. Note back side of cabin receptacle and battery cutoff switch installed.
Image

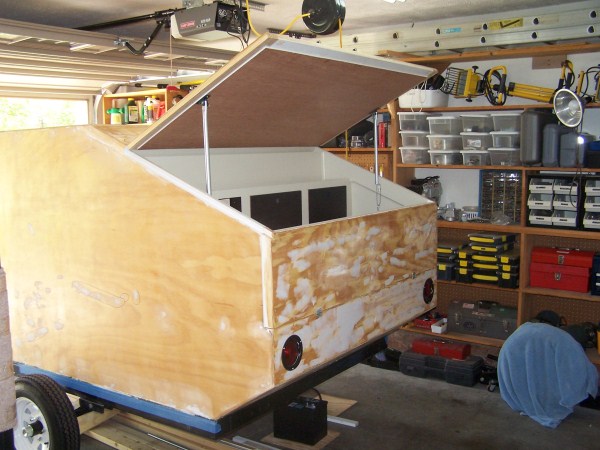
Tail lights dry fit under tailgate area. Wanted to use LED's, but the old style lights were the only ones that fit flush and allowed the tailgate to drop down flat. (obviously a lot of sanding yet to do).
Image

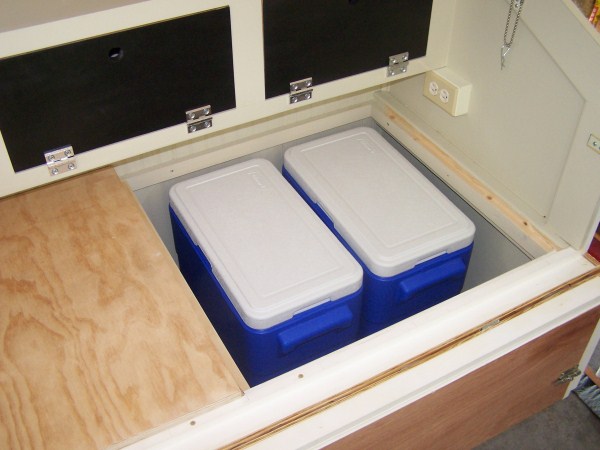
Found these Coleman coolers on sale at Sears online and they fit perfectly under the galley counter tops. I have two more coolers with handles and the camp stove to store in this area.
Image

Hurricane hinge came in the mail today and will be ready to install when I finally finish the paint. The folks at Vintek are really great to deal with. I've bought a lot of major parts from them and shipping is always fast.
Image

Hoping for good weather so I can get back on the body work. Stay tuned.
User avatar
les45
500 Club
 
Posts: 974
Images: 605
Joined: Sat Feb 25, 2012 8:57 am
Location: Aiken, South Carolina
Top

Re: Weekender status - elec complete (almost) (update 5-25-1

Postby les45 » Fri May 25, 2012 12:45 pm

During the past two weeks of rain that kept me from painting, I've nearly completed the electrical.

Painted wood bracket on spare tire carrier will hold battery box.
Image

Battery box bolted in place with aluminum plate washer.
Image

Battery box complete with 1/2" plastic tubing conduit from cabin. Battery leads in one tube and trailer harness in the other.
Image

Tubing conduits enter near center and run to each side. Right side is trailer wiring harness.
Image

Closeup of trailer wiring harness. Terminal block allows distribution of front clearance lights and allows removal of wiring harness with battery box without affecting
the rear half of the system. Wire nuts to clearance lights are temporary and will be replaced with permanent plug type fittings after final painting.
Image

Closeup of battery leads. Terminal block serves same purpose to allow removal of battery box by simply pulling the front tubing out without affecting the rest of the system.
Image

Progressive 4045 all wired up (except final AC inlet). This will control four DC circuits and three AC circuits.
Image

Back side of converter inside electrical cabinet. All power systems except trailer lights are distributed through this area. Hole is drilled for AC inlet (partly visible on right side). Inlet fitting and pigtail are complete but will not be installed until after painting.
Image

I've got running lights!
Image

Also (not shown) got the Fantastic Fan dry fitted.

After all this, I spent the morning removing all the exterior fittings so that I could resume sanding and painting. Weather is clearing so I hope to have the painting done soon. Stay tuned.
User avatar
les45
500 Club
 
Posts: 974
Images: 605
Joined: Sat Feb 25, 2012 8:57 am
Location: Aiken, South Carolina
Top

Re: Weekender status - glass tape wetted in (update 5-27-12)

Postby les45 » Sun May 27, 2012 1:07 pm

Weather finally cooperated so I got all my fiberglass tape wetted in today. Real pain in the butt working that stuff. Used Aeromarine 300/21 system (thanks to CliffinGA) with 4" tape. I wetted it in heavy with a 2" chip brush and then rolled it out with a 4" high density foam roller. I don't recall seeing this mentioned anywhere, but you have to use a tipping brush to get all the air bubbles out after you roll out the epoxy (very similar to an epoxy paint). Four and half ounces of mix and about 100" of tape is about all I could get done in each batch before it started setting up. Temp was about 80 degrees. Used a lot of disposable cups, sticks, chip brushes, and rubber gloves. Also used lots of drop cloths because it drips all over, especially working vertical joints and bottom bevels. Acetone cleans up pretty well as long as the stuff is still sticky.
I'll start smoothing it out tomorrow with more coats of epoxy to fill in the fiberglass weave and feather the edges.

Image
User avatar
les45
500 Club
 
Posts: 974
Images: 605
Joined: Sat Feb 25, 2012 8:57 am
Location: Aiken, South Carolina
Top

Re: Weekender status - fenders mounted (update 6-4-12)

Postby les45 » Mon Jun 04, 2012 3:27 pm

I was moving along pretty well with the fiberglass and epoxy until the rains came this weekend. Decided to go ahead and mount the fenders while I'm waiting on the weather to clear. I'm using the fenders off my old 4X8 HF trailer since they are angular and fit the shape of the weekender better (the NT fenders were big and round and they swapped right onto my old HF trailer with a little adaptation). I used a piece of 3/4" plywood as a spacer to set the fender out from the body and (mostly) cover the tire. There is about a 1/4" of sidewall sticking out, but it doesn't look bad. I may double the spacer to make it closer to center if I don't like the way it looks later. Simply bolted the fender to the spacer and then the spacer to the body with large strap washer and fender washers inside the cabin. The nuts and washers will be below the top of the mattress inside.

I figured the sturdiest mount would be bolting directly to the 3/4" sidewall.
Image

3/4" plywood spacer holds the fender and bolts directly to the sidewall.
Image

Used four 1/4" bolts to fasten fender to spacer and two 5/16" bolts to fasten spacer to sidewall.
Image

Everything dry fitted.
Image

Top view. Wood spacer gets sanded,sealed, and painted. Fender will stay black but I haven't decided whether to paint the spacer black or same color as body.
Holes in fender will get auto body filler.
Image

Aluminum strap and fender washers distribute load to sidewalls. Dry fit with plain nuts but will use nylon lock nuts for final installation.
Image
User avatar
les45
500 Club
 
Posts: 974
Images: 605
Joined: Sat Feb 25, 2012 8:57 am
Location: Aiken, South Carolina
Top

Re: Weekender status - fenders mounted (update 6-4-12)

Postby parnold » Mon Jun 04, 2012 6:04 pm

Looks good! Nice job on laying the glass tape. I hope I am as successful as you were at getting it smooth. Good idea with the fender spacers.. functional, and will be more than sufficient at keeping them on there. I would paint the spacers to match the fender, not the trailer, but that's just me.

Bravo, and keep up the good work! :applause:
User avatar
parnold
Donating Member
 
Posts: 2344
Images: 302
Joined: Mon Feb 08, 2010 4:49 pm
Location: Northwest New Jersey
Top

Re: Weekender status - fenders mounted (update 6-4-12)

Postby Oldragbaggers » Mon Jun 04, 2012 6:14 pm

+1 what Paul said. If you paint the spacer to match the fender, no one will even know it's there.

Nice job on everything. I love the paint on the interior. I wouldn't have thought I would like everthing all one color, but yours looks great.
Life is sooooo good.........
Sail...camp....bike...repeat
Becky

Build Journal http://www.tnttt.com/viewtopic.php?f=50&t=45917
Visit our blog at http://www.oldragbaggers.com
Image Image
User avatar
Oldragbaggers
Gold Donating Member
 
Posts: 1842
Images: 331
Joined: Mon Aug 01, 2011 9:22 pm
Location: Essex, MD
Top

Re: Weekender status - fenders mounted (update 6-4-12)

Postby RandyG » Wed Jun 13, 2012 9:20 am

Great job on the wiring!
Randy
Aircraft fabricator, novice carpenter, electrical apprentice, audio engineer dropout.
Build thread - http://www.tnttt.com/viewtopic.php?f=50&t=54126
User avatar
RandyG
500 Club
 
Posts: 695
Images: 115
Joined: Thu May 10, 2012 6:52 pm
Top

Re: Weekender status - ready to paint (update 6-13-12)

Postby les45 » Wed Jun 13, 2012 3:15 pm

No pics to show anything that hasn't already been seen, but I'm finally ready to paint. Sanded the last of my epoxy and filler today. Four coats of CPES, 12 oz of Smith's Fill-it filler, 25 yards of 4" fiberglass tape on all joints, three (in some places, four) layers of Aeromarine 300/21 layup epoxy, and several hundred pieces of 1/4 sheet sandpaper later. The bad thing is that I'm busy on other commitments for the next month so the painting won't start until mid-July. Oh well, that gives me time to keep thinking about what color to paint it.
User avatar
les45
500 Club
 
Posts: 974
Images: 605
Joined: Sat Feb 25, 2012 8:57 am
Location: Aiken, South Carolina
Top

Re: Weekender status - fenders mounted (update 6-4-12)

Postby les45 » Wed Jun 13, 2012 3:15 pm

RandyG wrote:Great job on the wiring!


Thanks, Randy
User avatar
les45
500 Club
 
Posts: 974
Images: 605
Joined: Sat Feb 25, 2012 8:57 am
Location: Aiken, South Carolina
Top

Re: Weekender status - devil in the details (update 7-24-12

Postby les45 » Tue Jul 24, 2012 12:44 pm

Well I just thought I was ready to paint in July. Lots of little details that I forgot about that had to be done before painting. After lots of delays, including the hot weather, I am finally back in the swing. Today, I completed all those little details so I really am ready to start slinging primer tomorrow.

Spent a lot of time worrying about offset hinges for the tailgate. Ended up simply shimming each side of a regular hinge and the offset is perfect to accommodate my edge trim.
Image

Also killed a lot of time trying to mount the license plate bracket on the lower bevel. Finally bolted it to the frame which made a perfect place for the light right below the trailer wiring inside the cabin.
Image

Decided to use three large pull latches to hold the hatch down. The hooks are about 5" long and custom made from 3/4" X 1/8" bar stock in order to get a good grip on the hatch. These can be locked, but I'll probably just stick a small carabiner in the hole to keep them from coming open. Like someone said in a previous post, I would rather they steal the small stuff from the galley than to have to rebuild the hatch.
Image

After finally figuring out which side is which, I got the hurricane hinge installed. That thing is a pain in the @$$ to thread back together after the pieces are installed on each side. A little lubricant might have helped.
Image

Of course now I have to remove all these things to start painting. First coat of Zinsser primer tomorrow. Still trying to decide on final color. The wife and I have been going back and forth between Rustoleum Safety Yellow and Rustoleum Sunburst Yellow, but we are going to do a sample of Rustoleum Safety Blue before we decide. TV is silver so any of the colors will be OK. Lots of black trim for contrast inluding doors, fenders, and trailer frame. This is turning out to be the hardest decision of the whole project. Anyone want a vote?
User avatar
les45
500 Club
 
Posts: 974
Images: 605
Joined: Sat Feb 25, 2012 8:57 am
Location: Aiken, South Carolina
Top

Re: Weekender status - devil in the details (update 7-24-12

Postby KCStudly » Tue Jul 24, 2012 2:38 pm

One of the yellows, bright and cheerful, see it coming.

Blue is everyone's fallback standard (other than white). Why be mundane?
KC
My Build: The Poet Creek Express Hybrid Foamie

Poet Creek Or Bust
Engineering the TLAR way - "That Looks About Right"
TnTTT ORIGINAL 200A LANTERN CLUB = "The 200A Gang"
Green Lantern Corpsmen
User avatar
KCStudly
Donating Member
 
Posts: 9611
Images: 8169
Joined: Mon Feb 06, 2012 10:18 pm
Location: Southeastern CT, USA
Top

Re: Weekender status - devil in the details (update 7-24-12

Postby RandyG » Tue Jul 24, 2012 5:42 pm

I like the safety yellow better. But if you decide to go with black trim it might look like "Bumble Bee".... Hmmmm.... A Transformer's theme on a trailer? We could be on to something!
Oh and about your PT Cruiser, the engine and drivetrain will handle alot of weight but you need to be careful with the uni-body. That's what limits the amount a car can handle, not the power it has.
Randy
Aircraft fabricator, novice carpenter, electrical apprentice, audio engineer dropout.
Build thread - http://www.tnttt.com/viewtopic.php?f=50&t=54126
User avatar
RandyG
500 Club
 
Posts: 695
Images: 115
Joined: Thu May 10, 2012 6:52 pm
Top

Re: Weekender status - devil in the details (update 7-24-12

Postby les45 » Sat Jul 28, 2012 12:33 pm

RandyG wrote:I like the safety yellow better. But if you decide to go with black trim it might look like "Bumble Bee".... Hmmmm.... A Transformer's theme on a trailer? We could be on to something!
Oh and about your PT Cruiser, the engine and drivetrain will handle alot of weight but you need to be careful with the uni-body. That's what limits the amount a car can handle, not the power it has.


You must have me confused with someone else. My TV is a big old Dodge Durango Hemi - no worries about weight.
User avatar
les45
500 Club
 
Posts: 974
Images: 605
Joined: Sat Feb 25, 2012 8:57 am
Location: Aiken, South Carolina
Top

PreviousNext

Return to Build Journals

Who is online

Users browsing this forum: No registered users and 18 guests