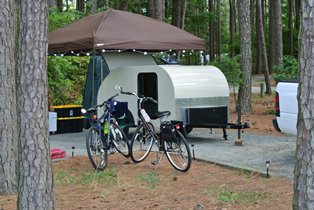
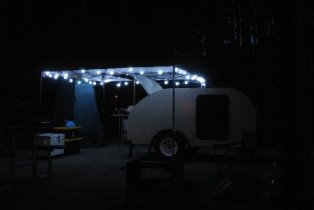
Weekender status - 1st camping (update 10-21-12)

...ask your questions in the appropriate forums BUT document your build here...preferably in a single thread...dates for updates, are appreciated....

Re: The build continues - the walls (update 3-24-12)

Postby Oldragbaggers » Sun Mar 25, 2012 8:49 am

You're really moving along with your build and doing a very nice job too. At this rate, you'll be camping by early summer!! :thumbsup:
Life is sooooo good.........
Sail...camp....bike...repeat
Becky

Build Journal http://www.tnttt.com/viewtopic.php?f=50&t=45917
Visit our blog at http://www.oldragbaggers.com
Image Image
User avatar
Oldragbaggers
Gold Donating Member
 
Posts: 1842
Images: 331
Joined: Mon Aug 01, 2011 9:22 pm
Location: Essex, MD

Re: The build continues - the walls (update 3-24-12)

Postby Martiangod » Sun Mar 25, 2012 12:37 pm

Another couple weeks of 36 hour days, not eating and not going to work, should be ready for Easter.

Lookin good
Build on...
If it ain't broke, fix it till it is

Chris

Deep in the Heart of Nowhere
The topper viewtopic.php?f=50&t=58140, gone to a new home to be converted
into an ice fishing shack...FREEBIE !!! for a nice young family
The trailer viewtopic.php?f=50&t=48156
User avatar
Martiangod
500 Club
 
Posts: 856
Images: 432
Joined: Mon Jan 09, 2012 10:39 pm
Location: Peace River, Alberta

Re: The build continues - slow (update 3-26-12)

Postby les45 » Mon Mar 26, 2012 2:38 pm

Got the spars completed back to the hatch area including the framing for the Fantastic Fan. Minor issue with the fan as the top screw holes don't hit my spars the way I have them turned on the 3/4" side. Had to add those short scabs on the front and back to give them something to screw to. Just pushed the two side pieces out a little, but I had to do that anyway on one side to have enough room for the wiring. Things are slowing down a little now as I have to give some thought to the cabinet layout and the framing for the rear hatch. Bought a small Kreg Jig set today so will start practicing with that.


Framing for Fantastic Fan. Wiring comes off the side and is really tight.
Image

Starting to plan for cabinets and hatch. That extra 12" I added to the rear makes it a long reach. Might have to re-think what I'm doing back there.
I'm looking at a hinged countertop with storage for ice chests, water, etc. beneath. Battery will be in the small bevel area at the very rear and to the left side.
Planning to put all my power system into one cabinet on the left side with a Progressive 4045 converter/charger system.
Image
User avatar
les45
500 Club
 
Posts: 974
Images: 605
Joined: Sat Feb 25, 2012 8:57 am
Location: Aiken, South Carolina
Top

Re: The build continues - slow (update 3-26-12)

Postby JSadler » Mon Mar 26, 2012 3:09 pm

Good job! It's really takin' shape!
JSadler
Teardrop Builder
 
Posts: 27
Joined: Fri Mar 23, 2012 5:27 pm
Top

Re: The build continues - slow (update 3-26-12)

Postby PcHistorian » Mon Mar 26, 2012 3:15 pm

You know, while you're thinking that out, someone here did it so the center of the counter top in the back would swing out from the center into two side counters. That arrangement could give you more counter space but let you go IN more at the center and reach those long corners. Make a "U" when folded out, but just a thicker counter when folded, swung in/shut.

oh yeah, p.s. I feel the need to grab some stain (stain the beams oak or maple) and poly (separate). that is some fine wood.
:-)
Elf Cottage
Image

Build Documentary
https://sites.google.com/site/pchistorian/home/hobby/camping/elf-build
Build Forum
http://www.tnttt.com/viewtopic.php?t=48462
Build Album
http://www.tnttt.com/gallery/album.php?album_id=42

progress is progress. (don't look a gift "progress" in the mouth.)
User avatar
PcHistorian
The 300 Club
 
Posts: 354
Images: 198
Joined: Fri Dec 09, 2011 1:06 pm
Location: S.E. Michigan
Top

Re: Weekender status - cabin framing complete (update 3-29-1

Postby les45 » Thu Mar 29, 2012 6:11 pm

Finally completed the cabin framing including the two piece hatch (I'm calling it a hatch and tailgate). After a lot of thought, I decided to go with the two pieces very similar to one of Mike's early versions on his weekender. Put the new Kreg Mini Jig to work in this area to do the hatch and tailgate and several blind stiffeners. Still have some slight squaring to do on the two hinged parts, but will wait until I skin them to let the plywood shell hold them in place. Only out of square about 1/8" on both pieces. Also still thinking about seals. The two pieces make sealing a little more complicated. The blank section on each side of the hatch will get some sort of filler with a gasket. Decided to use the 1X4 as a lip to channel any leakage down and to the rear. The hatch will overhang the tailgate about 1/2". Tomorrow I start the luan paneling on the interior and laying out the wiring before I install the foam board.

Rear framing complete and ready for hatch and tailgate
Image

Another view
Image

Hatch and tailgate partially open (no hinges yet)
Image

Hatch and tailgate in closed position (corner gussets are temporary to keep tailgate square)
Image

Another view of hatch and tailgate closed
Image
User avatar
les45
500 Club
 
Posts: 974
Images: 605
Joined: Sat Feb 25, 2012 8:57 am
Location: Aiken, South Carolina
Top

Re: Weekender status - cabin framing complete (update 3-29-1

Postby PcHistorian » Fri Mar 30, 2012 3:01 pm

looks great. you can always go with slide outs for the rear hatch and tailgate.
Elf Cottage
Image

Build Documentary
https://sites.google.com/site/pchistorian/home/hobby/camping/elf-build
Build Forum
http://www.tnttt.com/viewtopic.php?t=48462
Build Album
http://www.tnttt.com/gallery/album.php?album_id=42

progress is progress. (don't look a gift "progress" in the mouth.)
User avatar
PcHistorian
The 300 Club
 
Posts: 354
Images: 198
Joined: Fri Dec 09, 2011 1:06 pm
Location: S.E. Michigan
Top

Re: Weekender status - cabin framing complete (update 3-29-1

Postby Kharn » Fri Mar 30, 2012 6:17 pm

Looking good, but I would think about additional supports for the front vertical face in case you ever want to add a pop-out air conditioner, so you could cut the middle one without losing your frame strength.
User avatar
Kharn
500 Club
 
Posts: 655
Images: 1
Joined: Sun Jul 17, 2011 1:54 pm
Top

Re: Weekender status - cabin framing complete (update 3-29-1

Postby les45 » Fri Mar 30, 2012 7:47 pm

Kharn wrote:Looking good, but I would think about additional supports for the front vertical face in case you ever want to add a pop-out air conditioner, so you could cut the middle one without losing your frame strength.


Thanks for the recommendation, but I made a conscious decision early on that I don't want an AC. We are fair weather campers so we just don't do it much during the hot summers here in South Carolina. I am providing power for a small heater for the mild winters, but we just don't enjoy the whole camping experience when it is 95 degrees and 90 percent humidity. I'm keeping the rest of the camper fairly simple with just storage for ice chests and water jugs. The only amenities (other than the heater) will be a microwave, electric coffee pot, and propane camp stove.
Larry S.
User avatar
les45
500 Club
 
Posts: 974
Images: 605
Joined: Sat Feb 25, 2012 8:57 am
Location: Aiken, South Carolina
Top

Re: Weekender status - wiring/insulation (update 4-1-12)

Postby les45 » Sun Apr 01, 2012 4:15 pm

Good weekend for the weekender. Wife was out of town so I got a lot done. Installed interior paneling in ceiling and end walls. Wife got her touch with the bead board on the front end wall. I'll use bead board on the other end wall under the cabin cabinets and possibly use it as inserts in the cabinet doors. Ran all the wiring for the cabin lights and fan. Decided to insulate the floor. Basically ended up building my floor upside down from what most have done. Had a minor glitch with the insulation. I was trying to insulate 1.5" since my spars were 1X2 with the 1.5" side vertical. Couldn't find two layers of 3/4" foam board so I bought enough for three layers of 1/2". Turns out the 1/2" foam board is actually 9/16" so I went back and bought some foil lined foam that was only 7/16". I planned to use two layers of the 9/16" and one layer of the foil backed 7/16" board. That was still 1/16" too thick. I put that in the floor with luan paneling as a cover, but decided not to take the chance on the cabin insulation. I was afraid that the 1/16" extra thickness would bulge the outer skin so I ended up installing only two layers of the 1/2" stuff which is actually 1 1/8". That leaves a little air gap, but it also helped to work around the wiring in the ceiling. I may face that small air gap with Reynolds Wrap before I install the outer skin. Will start building cabinets this coming week.

Ceiling paneling (luan) screwed and glued.
Image

Wife got her bead board on front end wall.
Image

Wiring for cabin lights and fan. That big roll on the left goes to the converter/charger power source.
Image

Wiring running through roof area for cabin lighting and fan.
Image

Decided to add center nailer and insulate floor.
Image

Used two layers of the regular foam board and one layer of the foil faced board. This resulted in 1/16" too much thickness
but I wanted to see how it would look. Not critical under the mattress, but decided not to use all three layers in the rest of the cabin.
Image

All three layers in place.
Image

Finished floor. Can't really see a bulge around the edges, but I didn't want to take the chance on the rest of the cabin.
Image

Wall insulation complete with just two layers of the 9/16" foam board.
Image

Roof insulation complete. Used the air gap to work around the overhead wiring. Still had to notch a few places, but
will fill those with scrap pieces from some old fiberglass bats.
Image
User avatar
les45
500 Club
 
Posts: 974
Images: 605
Joined: Sat Feb 25, 2012 8:57 am
Location: Aiken, South Carolina
Top

Re: Weekender status - wiring/insulation (update 4-1-12)

Postby PcHistorian » Sun Apr 01, 2012 5:49 pm

bead board? that stuff might be nice to make cabinet doors out of... I have several sections I haven't figured out doors for yet. In some cases I'm just making doors out of the cut out paneling. usually these are for smaller sized doors, that a full cabinet door.

Looks fantastic.
what's your wiring plan look like? all 12v?
Elf Cottage
Image

Build Documentary
https://sites.google.com/site/pchistorian/home/hobby/camping/elf-build
Build Forum
http://www.tnttt.com/viewtopic.php?t=48462
Build Album
http://www.tnttt.com/gallery/album.php?album_id=42

progress is progress. (don't look a gift "progress" in the mouth.)
User avatar
PcHistorian
The 300 Club
 
Posts: 354
Images: 198
Joined: Fri Dec 09, 2011 1:06 pm
Location: S.E. Michigan
Top

Re: Weekender status - wiring/insulation (update 4-1-12)

Postby les45 » Sun Apr 01, 2012 6:33 pm

PcHistorian wrote:bead board? that stuff might be nice to make cabinet doors out of... I have several sections I haven't figured out doors for yet. In some cases I'm just making doors out of the cut out paneling. usually these are for smaller sized doors, that a full cabinet door.

Looks fantastic.
what's your wiring plan look like? all 12v?


My cabinet doors will be pretty simple with 1X2 frames and the bead board inletted as a center panel. I'll probably just use latex semi gloss paint for a final finish.

My power plan is to use a Progressive 4045 converter/charger with a battery. All the cabin lighting and fan will run off DC with a few AC receptacles front and back for things like ceramic heater, chargers, coffee pot, and small microwave.
User avatar
les45
500 Club
 
Posts: 974
Images: 605
Joined: Sat Feb 25, 2012 8:57 am
Location: Aiken, South Carolina
Top

Re: Weekender status - cleanup day (update 4-2-12)

Postby les45 » Mon Apr 02, 2012 3:20 pm

Time to clean up about two months worth of stuff so wife can get her car back in the garage. I told you that I was a little OCD.

Everything tucked under the trailer. Moving on to the cabinets.
Image
User avatar
les45
500 Club
 
Posts: 974
Images: 605
Joined: Sat Feb 25, 2012 8:57 am
Location: Aiken, South Carolina
Top

Re: Weekender status - cleanup day (update 4-2-12)

Postby WhitneyK » Thu Apr 05, 2012 10:51 am

les45 wrote:Time to clean up about two months worth of stuff so wife can get her car back in the garage.

Everything tucked under the trailer.


Must be a weekender builder thing :lol: I had to do the same thing for a long time.
Lookin' good Les, keep up the good work.
I may have missed it, but what are you planning to cover the outside with?
Whitney & Tracie
Crothersville, IN

We never really grow up, we only learn how to act in public.

Do not confuse what you hear with what I mean.

My build: http://www.tnttt.com/viewtopic.php?t=41955

160061-------------------------------101114
States we've drug our
li'l camper through. (44 States + Vancouver Island and over 45,000 miles so far)
User avatar
WhitneyK
Gold Donating Member
 
Posts: 559
Images: 412
Joined: Sun Dec 12, 2010 10:28 pm
Location: IN, Crothersville (36mi N or Louisville)
Top

Re: Weekender status - cleanup day (update 4-2-12)

Postby les45 » Thu Apr 05, 2012 3:26 pm

WhitneyK wrote:
les45 wrote:Time to clean up about two months worth of stuff so wife can get her car back in the garage.

Everything tucked under the trailer.


Must be a weekender builder thing :lol: I had to do the same thing for a long time.
Lookin' good Les, keep up the good work.
I may have missed it, but what are you planning to cover the outside with?


Trying to decide whether to use 1/4" ply or 3/8" ply. With the air gap in my insulation, it will not be giving me any support so I may go with the 3/8". It is the same price as 1/4" right now at Home Depot and it would only weigh 32 lbs more. I tend to overbuild and weight is not an issue with me since I'm using a 2,000 lb gvw trailer and my tow vehicle is a hemi Durango.
I plan to fiberglass all the joints, seal everything with CPES, and use a West system boat paint.
User avatar
les45
500 Club
 
Posts: 974
Images: 605
Joined: Sat Feb 25, 2012 8:57 am
Location: Aiken, South Carolina
Top

PreviousNext

Return to Build Journals

Who is online

Users browsing this forum: No registered users and 4 guests