Weekender status - 1st camping (update 10-21-12)

...ask your questions in the appropriate forums BUT document your build here...preferably in a single thread...dates for updates, are appreciated....

Re: Weekender status - cabinets roughed in (update 4-12-12)

Postby les45 » Thu Apr 12, 2012 3:37 pm

Really slowed down trying to design-build the cabinets. Killed one whole day trying to build a Barrister style hinge for my galley cabinet doors and finally gave up. The geometry was just too complicated. Ended up using a simple finger hole, magnetic closer, and flat hinge (hinges will be changed out later; can't stand that look but they were they only ones readily available). Also dry fit the Progressive 4045 converter/charger. The old Kreg jig and pocket screws really came in handy throughout the cabinet framing and door construction. After trying to decide how to hinge the galley counter, I finally gave up and made two pieces that simply slide over each other or come out completely for access to the storage area below. The tops will get formica and finger holes later. Used the same sliding sections and finger holes in the bottom shelf up front to access the small storage area in the front bevel area. Plan to detail the interior (caulk, spackle, trim, paint) before I start skinning the exterior next.

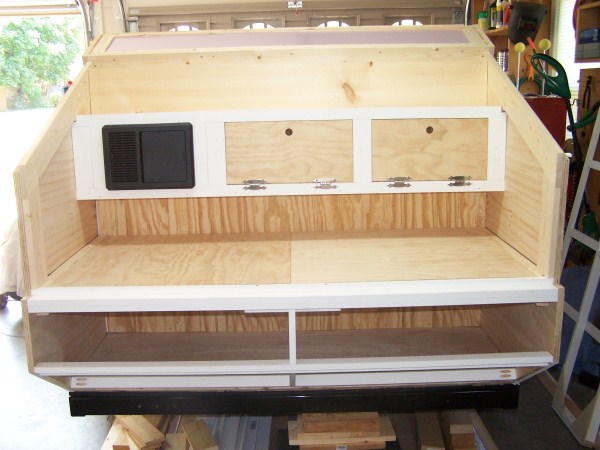
Galley framing is pretty simple with storage below the counter for ice chests, water, etc.
Image

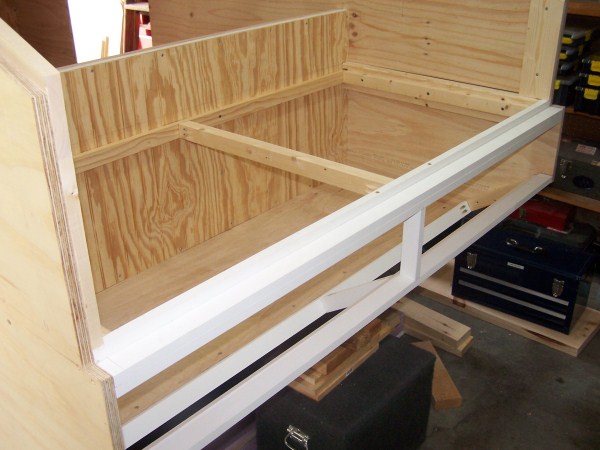
Used two pieces of 3/4" plywood for countertop sections.
Image

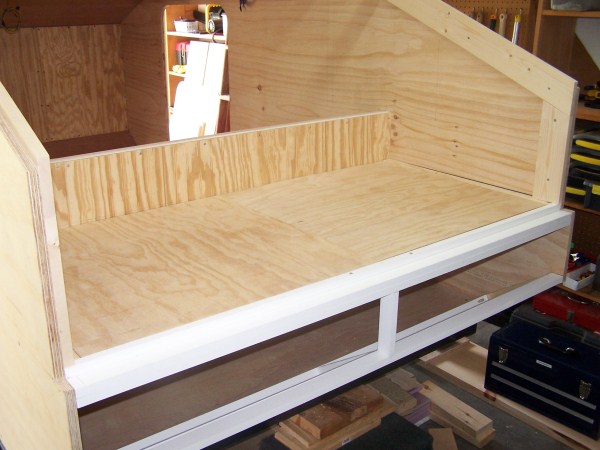
Countertop pieces will slide from side to side or can be removed completely
Image

Galley cabinets are pretty simple. Left side holds converter and right side goes through to corresponding cabin cabinet.
Image

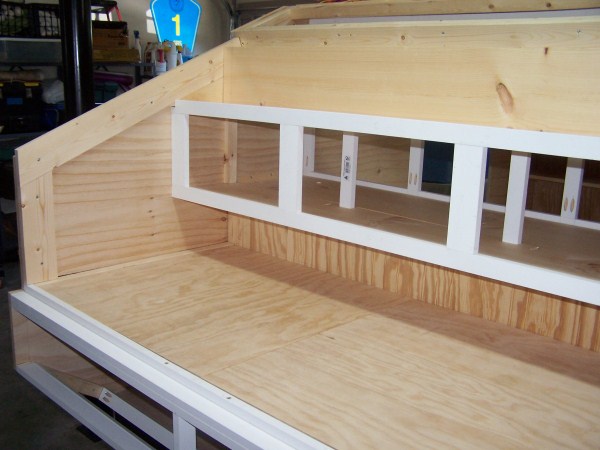
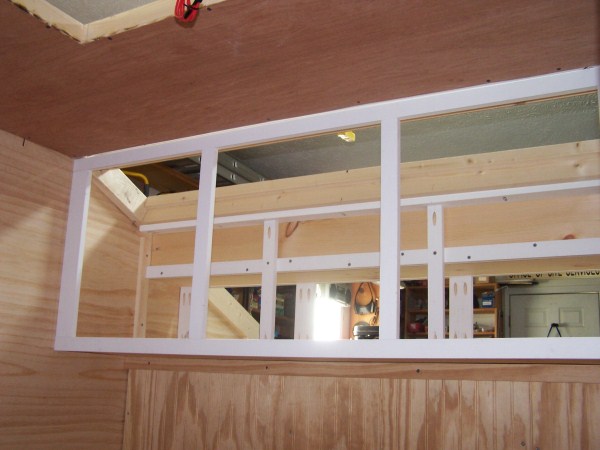
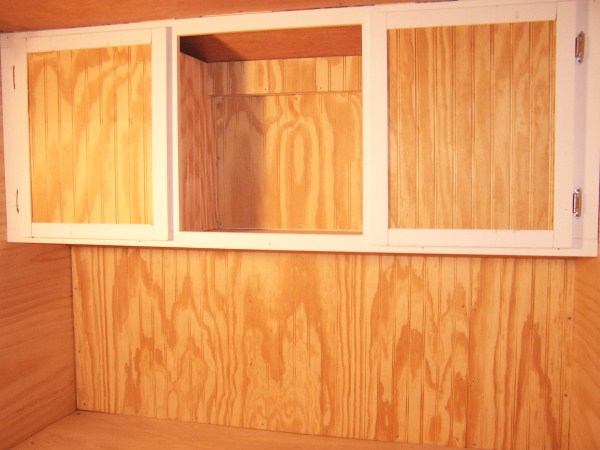
Cabin cabinets roughed in. Left cabinet gets shelf on top and bottom goes through to galley cabinet. Center section is a shelf for TV. Right section
goes through to converter and all electrical will be in this area.
Image

Converter dry fit and two doors with flat hinges (these old style hinges will be replaced with something more contemporary)
Image

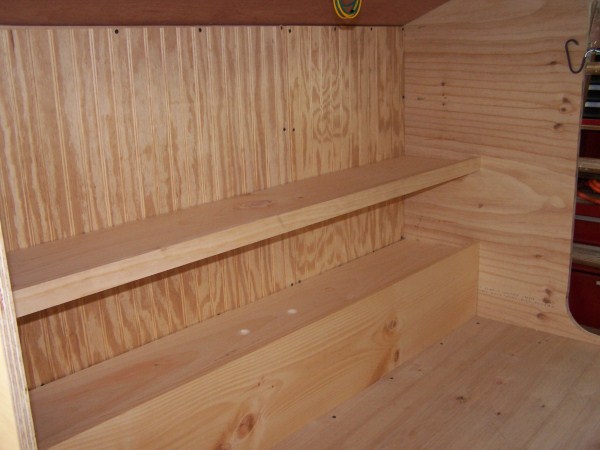
Cabin cabinet doors complete. The wife got her bead board trim pretty much throughout the cabin.
Image

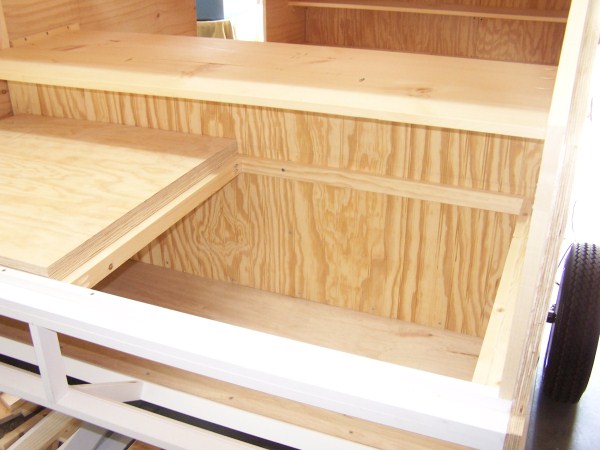
Front shelves will hold luggage, shoes, books, glasses, etc. Bottom shelf is two pieces that slide over each other with finger hole for
access to storage in front bevel area.
Image
User avatar
les45
500 Club
 
Posts: 974
Images: 605
Joined: Sat Feb 25, 2012 8:57 am
Location: Aiken, South Carolina

Re: Weekender status - cabinets roughed in (update 4-12-12)

Postby Kharn » Thu Apr 12, 2012 5:00 pm

Wow, you're really making progress :thumbsup:
I would be wary of putting anything heavy in the magnetic closer cabinets for the first few trips, a rough bump might pop them open. For appearance, you could attach a bar to the inside of the hatch that blocks the cabinets closed when the hatch is closed (also need to make sure it doesn't allow the door to flop open right as you open the hatch), it could double as a dish towel/paper towel rack when open if you plan it right. Or for the easy way, small decorative barrel latches.
User avatar
Kharn
500 Club
 
Posts: 655
Images: 1
Joined: Sun Jul 17, 2011 1:54 pm

Re: Weekender status - one month into build (update 4-15-12)

Postby les45 » Sun Apr 15, 2012 6:53 pm

Figured I would summarize my first month's effort. Finished detailing the galley and cabin and ready to start skinning with plywood.

Here is an overall view of current status. Cabin and galley complete except for electrical. Still have to cover the outside and paint.
Image

Galley finished except for laminate and thumbholes on two piece countertop. That's a Progressive 4045 converter for power center.
Cut the points off the old style hinges, but I'm still not happy with them. Still looking for a better looking flat hinge.
Image

Left the front shelves natural and painted everything else in the cabin. Color doesn't show too well with the flash, but it is the same light
green as the galley on the walls and floor and white on the ceiling. The bottom shelf is in two pieces with thumbholes that slide from side to side.
Image

Cabin cabinets are mostly bead board to match the front and rear walls.
Image

Gotta start researching sealers and paint. Looks like that will be the next major job after I get the skin on.
User avatar
les45
500 Club
 
Posts: 974
Images: 605
Joined: Sat Feb 25, 2012 8:57 am
Location: Aiken, South Carolina
Top

Re: Weekender status - skin complete (update 4-21-12)

Postby les45 » Sat Apr 21, 2012 3:45 pm

Skinned the weekender with 1/4" ply this weekend. Ended up buying an air stapler and that made the whole job so much easier.

All skinned with hatch and tailgate temporarily in place.
Image

Front view. Those bottom bevels on front and rear were the hardest.
Image

Temporary hinges and temporary hatch support show how galley will look when opened up. Still have to insulate and
install the interior trim on the hatch and tailgate. Permanent supports will be fixed rods on both sides.
Image

Ready to move on to trimming, sanding, filling, and sealing. Got my CPES and Fill-it on order.
User avatar
les45
500 Club
 
Posts: 974
Images: 605
Joined: Sat Feb 25, 2012 8:57 am
Location: Aiken, South Carolina
Top

Re: Weekender status - skin complete (update 4-21-12)

Postby Oldragbaggers » Sat Apr 21, 2012 4:45 pm

This is a very nice build. I love the look of the beadboard on the inside. it really gives it a warm, inviting look. And you are making great progress.
Life is sooooo good.........
Sail...camp....bike...repeat
Becky

Build Journal http://www.tnttt.com/viewtopic.php?f=50&t=45917
Visit our blog at http://www.oldragbaggers.com
Image Image
User avatar
Oldragbaggers
Gold Donating Member
 
Posts: 1842
Images: 331
Joined: Mon Aug 01, 2011 9:22 pm
Location: Essex, MD
Top

Re: Weekender status - skin complete (update 4-21-12)

Postby S. Heisley » Sat Apr 21, 2012 7:55 pm

The bead board, painted white, gives your build a nice, clean look. :thumbsup:
User avatar
S. Heisley
Super Lifetime Member
 
Posts: 8774
Images: 495
Joined: Mon Sep 17, 2007 10:02 am
Location: No. California
Top

Re: Weekender status - skin complete (update 4-21-12)

Postby les45 » Sun Apr 22, 2012 6:22 am

S. Heisley wrote:The bead board, painted white, gives your build a nice, clean look. :thumbsup:


Actually, all the bead board is the same light green as the galley area. It just didn't show up well in the flash pics of the interior. Only the ceiling is white. These were some paints that we had left over from doing our house, but they do make the interior of the cabin area much brighter.
User avatar
les45
500 Club
 
Posts: 974
Images: 605
Joined: Sat Feb 25, 2012 8:57 am
Location: Aiken, South Carolina
Top

Re: Weekender status - skin complete (update 4-21-12)

Postby WhitneyK » Sun Apr 22, 2012 8:55 am

:thumbsup: Lookin' good!!!

Your movin' along quite well, keep up the good work.:applause:
Whitney & Tracie
Crothersville, IN

We never really grow up, we only learn how to act in public.

Do not confuse what you hear with what I mean.

My build: http://www.tnttt.com/viewtopic.php?t=41955

160061-------------------------------101114
States we've drug our
li'l camper through. (44 States + Vancouver Island and over 45,000 miles so far)
User avatar
WhitneyK
Gold Donating Member
 
Posts: 559
Images: 412
Joined: Sun Dec 12, 2010 10:28 pm
Location: IN, Crothersville (36mi N or Louisville)
Top

Re: Weekender status - hatch & tailgate (update 4-25-12)

Postby les45 » Wed Apr 25, 2012 3:40 pm

Decided to go ahead and trim out the hatch and tailgate before I start sanding and prepping the exterior. Managed to go really cheap with my hatch supports by using spare parts that I had laying around the shop. I decided to go with a simple mechanical support since I had read that the hydraulic supports lose their gas if they sit for extended periods without use like mine will do during the offseasons. I literally found everything I needed in my spare parts bins and did not buy a single item. I'm not sure what the top support went to, but I had several of them and simply cut off the wings to make them fit flat. The rods are from a scrap piece of EMT and the lower brackets are a couple of old curtain rod brackets cut and bent. The clevis pins came with some old garage door openers. As you can see in the pics, the rod pivots on the top support and simply drops into the top leg of the bottom support and gravity does all the work from there. I cut one of the bottom supports a little longer than the other to make it easier to set them in place when reaching from one side to the other. When the hatch closes, the rod simply hangs down next to the lower bracket without any interference. The tailgate got a couple of barrel bolts to keep it in place. I'm still trying to decide how to lock the top hatch somehow with a latch type mechanism that will fit on the tailgate and hook into the hatch.

Hatch supports complete (both sides) except for painting.
Image

Top support is a plastic yoke with a clevis pin. Squeezed the end of the EMT in a vise and drilled a hole to make it fit.
Image

This is what the top support looked like before I trimmed it down. Still don't know what these things went to.
Image

Bottom support is an old curtain rod bracket bent and cut to shape. Bottom of EMT just fits down over the top leg.
Image

The top leg isn't very long so I don't have to reach far to make it fit. The hatch is heavy enough that it isn't going anywhere after it drops in place.
Image

A couple of barrel bolts hold the tailgate in place. Still designing the lock for the top hatch, but it will fit in the tailgate somehow and latch into the hatch.
Image

CPES arrived yesterday so my next effort will be sanding and sealing the exterior. Stay tuned.
User avatar
les45
500 Club
 
Posts: 974
Images: 605
Joined: Sat Feb 25, 2012 8:57 am
Location: Aiken, South Carolina
Top

Re: Weekender status - hatch & tailgate (update 4-25-12)

Postby KCStudly » Wed Apr 25, 2012 4:09 pm

Looks good, and thrifty, too. :thumbsup:

I have no experience (yet!), but have read many times where people had their hatch lift from the wind. Don't underestimate how much force can be applied to such a relatively large flat surface. It would be very easy for you to just drill thru the lower ends of your strut tubes thru the tab on your lower brackets and slip an inexpensive quick pin thru. I would surely hate to see all of your hard work get marred up by a hatch that got pushed over backwards.

I jumped over here Wind Pressure Calculator linky and had some fun playing with the numbers to figure out the force developed by the wind on a given surface, so many feet above the ground. If you select "Other" for the location it will use whatever wind speed you put in.
Last edited by KCStudly on Thu Apr 26, 2012 9:05 pm, edited 1 time in total.
KC
My Build: The Poet Creek Express Hybrid Foamie

Poet Creek Or Bust
Engineering the TLAR way - "That Looks About Right"
TnTTT ORIGINAL 200A LANTERN CLUB = "The 200A Gang"
Green Lantern Corpsmen
User avatar
KCStudly
Donating Member
 
Posts: 9613
Images: 8169
Joined: Mon Feb 06, 2012 10:18 pm
Location: Southeastern CT, USA
Top

Re: Weekender status - hatch & tailgate (update 4-25-12)

Postby les45 » Wed Apr 25, 2012 4:20 pm

KCStudly wrote:Looks good, and thrifty, too. :thumbsup:

I have no experience (yet!), but have read many times where people had their hatch lift from the wind. Don't underestimate how much force can be applied to such a relatively large flat surface. It would be very easy for you to just drill thru the lower ends of your strut tubes thru the tab on your lower brackets and slip an inexpensive quick pin thru. I would surely hate to see all of your hard work get marred up be a hatch that got pushed over backwards.

I jumped over here Wind Pressure Calculator linky and had some fun playing with the numbers to figure out the force developed by the wind on a given surface, so many feet above the ground. If you select "Other" for the location it will use whatever wind speed you put in.


You know I hadn't thought of that, but it is a possible problem with my arrangement. Looks like I'll be drilling a few more holes here pretty soon and hopefully I'll find some more cheap parts to use for a quick release type pin in that bottom bracket. Thanks a lot for that most helpful advice. That's what I like about this forum.
Larry S.
User avatar
les45
500 Club
 
Posts: 974
Images: 605
Joined: Sat Feb 25, 2012 8:57 am
Location: Aiken, South Carolina
Top

Re: Weekender status - hatch & tailgate (update 4-25-12)

Postby KCStudly » Wed Apr 25, 2012 4:24 pm

No problem. Glad to put some of my "research" time to good use.
KC
My Build: The Poet Creek Express Hybrid Foamie

Poet Creek Or Bust
Engineering the TLAR way - "That Looks About Right"
TnTTT ORIGINAL 200A LANTERN CLUB = "The 200A Gang"
Green Lantern Corpsmen
User avatar
KCStudly
Donating Member
 
Posts: 9613
Images: 8169
Joined: Mon Feb 06, 2012 10:18 pm
Location: Southeastern CT, USA
Top

Re: Weekender status - hatch & tailgate (update 4-26-12)

Postby les45 » Thu Apr 26, 2012 11:08 am

Voila! Let the winds blow. Found one of these safety pins in my junk drawer, but had to buy another one to match, so I now have 50 cents out of pocket invested in my hatch supports. Just to emphasize how much of a pack rat I am, the chains were left over from an aftermarket cruise control that I installed in an old car in 1978.

Image
User avatar
les45
500 Club
 
Posts: 974
Images: 605
Joined: Sat Feb 25, 2012 8:57 am
Location: Aiken, South Carolina
Top

Re: Weekender status - hatch & tailgate (update 4-26-12)

Postby parnold » Thu Apr 26, 2012 12:00 pm

les45 wrote: Just to emphasize how much of a pack rat I am, the chains were left over from an aftermarket cruise control that I installed in an old car in 1978.


I keep trying to convince my sons that the numerous junk drawers, boxes, and bins, all contain potentially valuable stuff!
User avatar
parnold
Donating Member
 
Posts: 2344
Images: 302
Joined: Mon Feb 08, 2010 4:49 pm
Location: Northwest New Jersey
Top

Re: Weekender status - hatch & tailgate (update 4-26-12)

Postby les45 » Thu Apr 26, 2012 2:41 pm

While I'm updating today, I figured I would show what (Twonight) Max looks like in the light of day. Took him outdoors today to start sanding and prepping for paint. Hadn't used a belt sander in years, but it sure came in handy for trimming all those edges. After a while it was just like sculpting the wood. My orbital sander crapped out just as I finished with it so I guess I'll be making another tool run tomorrow. I was amazed at how easy the trailer dollied, even on a slight slope in my driveway. I'm estimating he weighs about 800 pounds by now. Ready for the first coat of CPES.

Image

Image
User avatar
les45
500 Club
 
Posts: 974
Images: 605
Joined: Sat Feb 25, 2012 8:57 am
Location: Aiken, South Carolina
Top

PreviousNext

Return to Build Journals

Who is online

Users browsing this forum: No registered users and 48 guests