Kamp King last pics, journal is complete.

...ask your questions in the appropriate forums BUT document your build here...preferably in a single thread...dates for updates, are appreciated....

Re: Kamp King 10/20 interior done..pic heavy

Postby S. Heisley » Sun Oct 20, 2013 11:04 am

What a thrill it must be to see your newest trailer come into its full reality!

Having built so many camping trailers now, you add many thoughtful features that others would not think of, such as the backsplash and the pull outs and your placement of convenient storage spaces. The screen door is an awesome addition and the awning is the perfect match with the trailer's exterior. The placemats, dishes, etc are all well thought out. Like the expression or not, Doug, you will be "glamping" with good taste, in your Kamp King!

Well done, as it always is with you, Doug! :thumbsup: :applause:
Thanks, once again, for sharing your build with all of us.
User avatar
S. Heisley
Super Lifetime Member
 
Posts: 8774
Images: 495
Joined: Mon Sep 17, 2007 10:02 am
Location: No. California

Re: Kamp King 10/20 interior done..pic heavy

Postby bdosborn » Sun Oct 20, 2013 11:20 am

NIce job Doug, she's a real beauty!

Bruce

P.S. The yellow will probably keep the snow flies away....
2009 6.5'X11' TTT - Boxcar
All it takes is a speck of faith and a few kilowatts of sweat and grace.
Image
Boxcar Build
aVANger Build
User avatar
bdosborn
Donating Member
 
Posts: 5495
Images: 772
Joined: Wed May 05, 2004 11:10 pm
Location: CO, Littleton

Re: Kamp King 10/20 interior done..pic heavy

Postby nevadatear » Sun Oct 20, 2013 12:23 pm

Looking mighty fine, Doug, mighty fine.
Debbie (with Randy looking over my shoulder)
Our build thread: http://www.tnttt.com/viewtopic.php?t=41295&highlight=monstero
2009 Homebuilt woody, Kenskill inspired 5 wide
ImageImage
User avatar
nevadatear
Silver Donating Member
 
Posts: 2365
Images: 171
Joined: Mon Nov 10, 2008 2:37 pm
Location: No. Nevada
Top

Re: Kamp King 10/20 interior done..pic heavy

Postby halfdome, Danny » Sun Oct 20, 2013 12:36 pm

Hi Doug,
That is gorgeous! I usually don't get on the forum, but Danny said, "You've got to see this," and I'm so glad he showed me.
Great work! Trailer's like yours make trailering so much more fun and enjoyable for the rest of us.
Thanks for sharing, Jane.
ImageImage
"Conditions are never just right. People who delay action until all factors are favorable do nothing". William Feather
Don't accept "It's Good Enough" build to the best of your abilities.
Image
Teardroppers Of Oregon & WashingtonImage
User avatar
halfdome, Danny
*Happy Camper
 
Posts: 5883
Images: 252
Joined: Sun Aug 14, 2005 11:02 pm
Location: Washington , Pew-al-up
Top

Re: Kamp King 10/20 interior done..pic heavy

Postby wagondude » Sun Oct 20, 2013 4:49 pm

As usual, you work is stunning. :applause:
Bill

TnTTT ORIGIONAL 200A LANTERN CLUB
101137
User avatar
wagondude
1000 Club
1000 Club
 
Posts: 1535
Images: 35
Joined: Sun Jan 16, 2011 7:41 pm
Location: Land of the Jayhawks
Top

Re: Kamp King 10/20 interior done..pic heavy

Postby cherokeegeorge » Mon Oct 21, 2013 12:58 pm

:thumbsup: beautiful, nicely done, you da man. I really love that screen door :D
George

For info on hitch covers
Teardrophitchcovers.com
User avatar
cherokeegeorge
A Merkin Indian
 
Posts: 1116
Images: 37
Joined: Wed Aug 31, 2005 8:40 pm
Location: la crescenta calif
Top

Re: Kamp King 10/20 interior done..pic heavy

Postby campmaster-k » Tue Oct 22, 2013 5:53 pm

Look great Doug. Cool color combo. :thumbsup:
-Kirk

>TnTTT ORIGINAL 200A LANTERN CLUB

>CEO Coleman Recovery Inc.

>Nor Cal Camping Pinewood Racing Team


Build thread -

viewtopic.php?t=45307&postdays=0&postorder=asc&start=180

Check out my Pictures -

http://s1199.photobucket.com/albums/aa4 ... 0QQtppZZ24
User avatar
campmaster-k
Lifetime member
 
Posts: 3030
Images: 17
Joined: Fri Jun 17, 2011 5:02 pm
Location: Colusa, California
Top

Re: Kamp King 10/20 interior done..pic heavy

Postby TENNJIM » Wed Oct 23, 2013 1:16 pm

Looking Goood! It's a beauty, Doug.
:thumbsup: :beer: :wine: :applause:
Jim B / Utah
Most People Seem Normal Until You Really Get To Know Them!
Never mind what people say, I think those Saguaros are shooting us the finger!
72.68% Of All Statistics Are Made Up!
User avatar
TENNJIM
Palladium Donating Member
 
Posts: 597
Images: 35
Joined: Fri Aug 03, 2007 6:00 pm
Location: Ogden, UT
Top

Re: Kamp King 10/20 interior done..pic heavy

Postby doug hodder » Sun Nov 10, 2013 6:13 pm

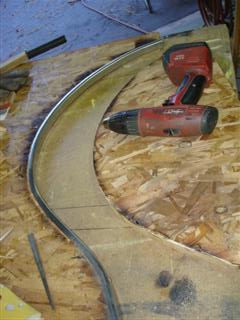
Here's how I did the wheel well trim pieces to form the S type curve needed. I'm sure there are all sorts of methods but this one seems to work well for my needs. I'm using the 1" by 1/2" L shaped trim that is pre-drilled.

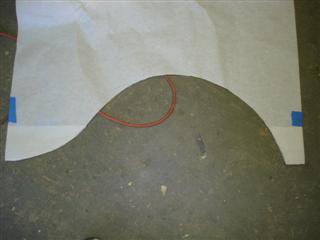
First, I took a large piece of paper and taped it to the side of the trailer with the bottom even with the edge of the side. Then I took a lumber crayon and did a rubbing of the wheel well profile. Cut it out.
Image

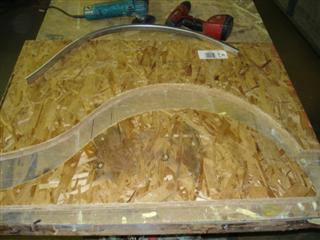
I transferred the template to 2 pieces of MDF that were stacked and screwed together so that they were taller than the 1" of the trim piece. Cut out the 2 pieces and screwed the female portion down to the table.
Image

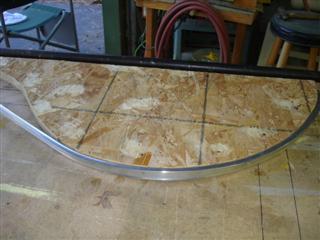
Attach the male portion so that you can swing the material around the curve and not have any interference. Clamp the end to the jig and then slowly bend the material around the curve. No heat is needed to do this as you are stretching the flange and it should bend/stretch easily. Shoot some screws into the jig edge to hold it in place and "massage" it with a rubber faced mallet and block of wood if needed.
Image

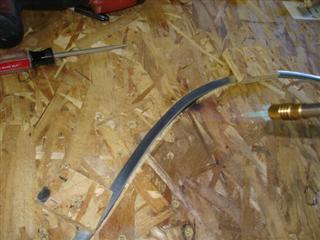
Once I got it this far along, I cut the inside end portion on the male side of the jig so that it would give me some room to work the tighter inside curve. I used some pipe clamps to suck the 2 pieces of the jig together with the newly bent material sandwiched between the 2. Then some sacrificial blocks screwed into the top of the female portion to hold the material down tight on the flange. Once it was all in place...then I shot some screws into the male portion into the table to hold it all tight. I gave it a quick shot with a propane torch so that it would relieve any of the stress on the curved piece.

For the tighter inside portion, I shot a screw in every pre-drilled hole, applied a bit of heat and whenever it tried to pucker on the flange, massaged it down and jammed a putty knife under the flange to act like an anvil and worked it with a small tack hammer to minimize puckering. A file, some sandpaper and steel wool should take care of your tooling marks.
Image

After the S curved piece was shaped I heat treated the whole thing with a blast from a propane torch by running it back and forth. You can hear it make some pops and noises as it eases the stress. Don't hit it with a real hot spot as aluminum this thin is unforgiving when applying heat and will suddenly collapse and puddle. Once heat treated it holds it's shape with no spring back.
Image

I installed it using a butyl tape as this really seals the seams. I, however have a real problem with that as the tape is a very light gray and the lower portion of this trailer is charcoal. It really shows! I used a credit card for a trim tool as it won't mark the paint and dragged it along the trim piece as a knife, then balled up the excess butyl tape. Use the excess tape as a ball and just mop the other tape and it will lift it and give you a clean edge. To hide the white...I took a tube of graphite lube and "dusted" the butyl...then wiped it down with a rag. It may not really show in the pic, but in real life, it hides a lot and makes the trim piece look nice and clean.

I still have a lot of excess butyl to remove on this trailer. It took 6 rolls of tape to do. You can see the difference on the far right side, just past the handle on the clamp. If your tape is nice and even and cleaned up well, I'd imagine that a felt pen would work as well to match your paint color. Over time...all the road grime will darken it up, I did this in the interim. I wonder if some yellow chalk for a string line would hide it up on the yellow portion?
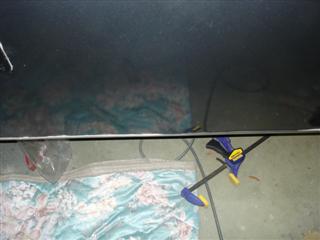
Image

Butyl tape will squish out over time and will want to "flow" in hot weather. I ran the shop up to about 85F with the wood stove today to maximize the squish out now. I'll go back on a early morning when it's really cool to cut out the excess and clean up the trim. It still needs a bit if TLC to be where I want it, but this technique has worked for a couple of trailers for me so far.

Things to remember: this is for 1 side of the trailer. When you do the opposite side, don't forget to flop your jigs over to get the opposing profile. Run the ends long and trim to fit prior to final install, don't bother asking me why...damn. Doug
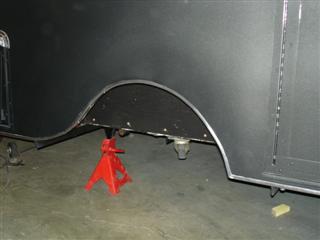
Image
doug hodder
*Snoop Dougie Doug
 
Posts: 12625
Images: 562
Joined: Tue Dec 14, 2004 11:20 pm
Top

Re: Kamp King wheel well trim techniques and ideas 11/11

Postby doug hodder » Sun Dec 22, 2013 4:50 pm

I recently took an old plastic topped folding Costco table, stripped the leg assembly from it and fabbed a new top using the leftover boomerang formica and galley trim. It's a great size for outdoor cooking. The formica top will work well for rolling dough etc, as I like cinnamon rolls and other baked stuff when camping. I also used some of the leftover skin drop to make some wind wings for the new stove. Attached the wings with piano hinge and some VHB tape, lays completely flat for storage, painted it up to match and applied some decorative decals.

These decals were all the rage right after the war. They are made by Meyercord and were available back in the 40's into the 50's. Back then, no one had the dough to do a kitchen remodel so at .15-.25 each, these were an inexpensive way to dress up a tired kitchen or bath. A buddy of mine found these at an estate sale, they didn't sell so were throwing them away. These were dated 1944 and laid down just like they were brand new. They are still available as originals on the web, considerably more expensive than the original price though.

I typically don't do a lot of cooking IN the trailer as it puts up too much crud in the air and will get on the fabrics and walls, so this is perfect for me to use outdoors under the awning. I still need to cook up an idea for the front of the stove, where the holes are. I don't know what was there, but will come up with something to "dress up" those legs. The vintage ice grinder from Mike P will attach to the table for those "cocktail" afternoons. Doug


Image

Image

Image
doug hodder
*Snoop Dougie Doug
 
Posts: 12625
Images: 562
Joined: Tue Dec 14, 2004 11:20 pm
Top

Re: Kamp King outdoor galley almost completed 12/22

Postby Phooey » Sun Dec 22, 2013 5:56 pm

Wow, that is perfect! Can't wait to see it all in person. :thumbsup:
User avatar
Phooey
Teardrop Master
 
Posts: 222
Images: 45
Joined: Mon Aug 21, 2006 9:47 am
Location: California, Woodland
Top

Re: Kamp King outdoor galley almost completed 12/22

Postby cherokeegeorge » Sun Dec 22, 2013 8:31 pm

:thumbsup: nicely done :thumbsup:
George

For info on hitch covers
Teardrophitchcovers.com
User avatar
cherokeegeorge
A Merkin Indian
 
Posts: 1116
Images: 37
Joined: Wed Aug 31, 2005 8:40 pm
Location: la crescenta calif
Top

Re: Kamp King outdoor galley almost completed 12/22

Postby S. Heisley » Sun Dec 22, 2013 8:31 pm

Nice job, Doug. ...Very pretty. :thumbsup:
User avatar
S. Heisley
Super Lifetime Member
 
Posts: 8774
Images: 495
Joined: Mon Sep 17, 2007 10:02 am
Location: No. California
Top

Re: Kamp King outdoor galley almost completed 12/22

Postby Martiangod » Sun Dec 22, 2013 11:44 pm

Outstanding.
Nice " Hide " on the bed front, it looks planned :)

What about a scaled down version of the planned bedfront for the front of the stove ?
Would tie in nicely

Bravo Doug
If it ain't broke, fix it till it is

Chris

Deep in the Heart of Nowhere
The topper viewtopic.php?f=50&t=58140, gone to a new home to be converted
into an ice fishing shack...FREEBIE !!! for a nice young family
The trailer viewtopic.php?f=50&t=48156
User avatar
Martiangod
500 Club
 
Posts: 856
Images: 432
Joined: Mon Jan 09, 2012 10:39 pm
Location: Peace River, Alberta
Top

Re: Kamp King outdoor galley almost completed 12/22

Postby PKCSPT » Mon Dec 23, 2013 2:08 am

That is really beautiful,,, yellow and white are my favorite color combinations and with the decal just enough added color.

Really nice
121172 116946 159644
PKCSPT
Silver Donating Member
 
Posts: 1515
Images: 61
Joined: Wed Mar 31, 2010 11:27 pm
Location: Minnesota
Top

PreviousNext

Return to Build Journals

Who is online

Users browsing this forum: No registered users and 47 guests