by doug hodder » Thu Oct 17, 2013 12:02 am
I've finished up the interior details. Last weekend, I decided that I wanted an extra wall cabinet over the drawers on the passenger side of the trailer, so got that taken care of. I also installed a slider under the sink with a drawer and sides on it for pots and pans. Got all the plumbing final connections completed, no leaks! whoopee!, trimmed out the windows and ceiling seams with painted strips, stainless screws and finishing washers, and got the curtains hung.
I am still waiting for the yellow caulk that I ordered to take care of the small joints along the ceiling. A lot of people use a product called "gimp" in this place, at least that's what I've heard it called. It's a vinyl tab with a bulb on it that allows the corner to be hidden with the bulb. I am not a fan of it, although it has been used for years, as the vinyl won't allow an adhesive to be used to attach the ceiling to the walls. I've torn apart enough older trailers to see just how floppy that joint can become over the years. Using the gimp, it's a staple situation and I prefer to have that joint glued, then hidden. I could be wrong on it all as it's not the typical vintage build technique, but somehow, I feel better about gluing that joint together. I'll lay in a tiny bead of caulk in a matching color, then wipe it down with a damp sponge. This isn't a restoration. It's just me, the vinyl material is fine, but that's just my building technique.
I also got the awning track attached. I had a major screw up on this! I didn't take pics of where the electrical for the porch light wiring went behind the track so had the possibility of shooting a screw into a "hot" wire. I attached the battery to the system, turned on the porch light, and then watched as I shot every screw into it. If it shorted out, at least I'd know what screw did it and could take care of it or at least knew where the issue was. I had no problems, fortunately.
I also had another screw up that I didn't discover till way late in the game. On the Nomad I had made the bed so that it sat right on top of the wheel wells. Well, that had a drop floor and this one doesn't. So the bed had a funny height to it and wasn't really comfortable for sitting on the edge, ahhh...the screw ups of not having any plans and just winging it! I built up the sub frame an extra 2.5" so it is a more comfortable sitting height. Now, I had a patch in front of the drawers that was visually dead, so I drilled a bunch of equally spaced 3" holes, backed it with some boomerang laminate and used some stainless screws and finishing washers on it. I think I covered my a$$ on it all, you all will probably be the judge on it. By the time I get the bed made and a quilt on it...no one will know, and a little splash of gray adds to the decor.
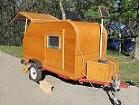
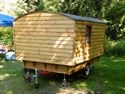
The exterior only needs to have the trim cap installed and 4 more clearance lights connected and it's all done!
I'll get some pics up this weekend, gotta make the bed etc... It's all really out of control out in the garage right now. I gotta get the garage cleaned out, put the Nomad in and get the beds made up in both of them. Sue and Shelly may be coming by in the next 10 days so I need to have my "spare" rooms ready. Thing is...I want to at least spend the night in the Kamp King before anyone else gets to! Just my thing...and if Shelly reads this...Bodie and Trance (dogs) can't sleep on the new quilt! Doug

 Danny
Danny