I've been a lurker only for nearly two years while planning and building my trailer, and will now try to repay the favor with some pictures and ideas. Also, a big thanks to Mike who troubleshot a peculiar picture uploading problem I had, and to Grant from Lil' Bear for answering some newbie questions early on.
I used a great number of construction screws and type 3 wood glue in building this thing. All but two exposed exterior screws are stainless steel. I've used polyurethane glue in the past and found it pretty messy and tough to deal with. In the woodworking community Type 3 wood glue is considered to be water proof as well as stronger than polyurethane, but if you prefer the latter there's no reason not to use it. I used several dabs of liquid nails between the outside 1/8" plywood skin and the poplar spars, but feel this was a mistake. It didn't hold for squat. The trailer is wired for 12 volts DC only, with all wire-to-wire connections soldered and crimp ends carefully attached. Wiring from the tow vehicle enters the trailer through a hole in the floor behind a rear wheel, and through a conduit up to the counter top level of the galley, so I don't expect any water to get inside due to wiring. I protected the wires underneath the trailer with either split or spiral wire wrap.
Caulk-wise, underneath all aluminum pieces and hinges is a bead of Lexel, which is amazing stuff. It isn't easy to use, but should last for a few thousand years. Any exposed area is clear DAP 230 siliconized acrylic caulk, which makes a very nice bead and can be easily repaired down the road. In all areas are these two barriers of caulk to keep things water tight. When I ran out of Lexel, I used urethane caulk around the bottom of the trailer and underneath the aluminum top skin.
The trailer underneath is a 5x8' Northern Tool bolt together, which I'm very pleased with. I have extensive woodworking and electrical/electronic experience, but I've never welded anything, thus the need for a kit. The exterior top is .040 aluminum, while the sides are something unusual. Keep reading, you'll find out soon enough. I used 1/2" plywood for the walls and floor, with 3/4" bead board insulation and 1/4" tongue and groove pine inside the walls, and 1" insulation and 1/16" polyethylene below the floor. The teardrop part I built is attached to the Northern trailer with 3/8" carriage bolts down through the floor at all frame cross members, and three 3/8" machine bolts up into the front wall that thread in to T-nuts.
The ceiling and exterior skin are 1/8" Baltic Birch plywood, with the roof spars being 1"x1.5" poplar, which as many of you have mentioned seems to be the ideal wood species for this purpose. I had never made anything with poplar, but found it to be strong enough, stable, hold a screw well, and reasonably light.
The vertical ribs are 1" thicknesses of plywood, and the hatch is quite heavy, but it sprung very slightly when I wrapped the outside with 1/4" plywood instead of two applications of 1/8". My error. I was able to carefully belt sand the plywood trailer sides to match the changed radius of the hatch, and then covered the sanded edge with 1/2" aluminum channel. The left and right edges which overlap the sides are 1/8" aluminum underneath the 1/4" plywood.
The interior wood of the side doors is shown here. Since it's soft pine and cedar, and due to the hinge and latch machine screws going through this soft wood, I beefed up the area just under the surface with nice firm plywood to keep the nut and washer from sinking in too far. Look closely, you'll see it. There's also 3/8" insulation underneath the center area.
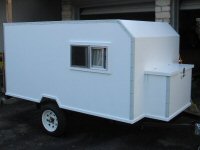
Here's a view of the side, which is a layer of Wilsonart sheet laminate attached with solvent based contact cement. Every edge is covered with aluminum angle or channel, and well caulked, so I figure it should last for awhile. I felt the laminate would be more forgiving of scratches and dents than aluminum, but only time will tell if it holds up in the great outdoors. The low mounted oval vents are air intakes into the cabin, while the higher round ones near the rear are exhausts. There is window screen behind all vents and fans for bugs, with furnace filter material in the air intakes to keep dust from being sucked in.
Below are some side door details. You can see the aluminum channel and angle which lines the door opening, EPDM weatherstripping, and the chrome plated cast hinges. I used three hinges for reliability, before finding a website selling stainless steel hinges the exact same size. Drat. I had to cut notches in the aluminum edges to use these hinges. The hinge edge weatherstripping isn't pulled off by closing the door due to the hinge pins being well forward of the door / frame gap.
The funny shaped aluminum piece shown below covers the end of the hurricane hinge. I figure it looks good, and will keep crud out of the hinge. It's held on with one #6 machine screw and Lexel caulk.
Concerned about my trailer possibly smelling like asphalt on a hot day, I covered the bottom with 1/16" HDPE from FarmTek. It was only 40-some bucks, but I made the mistake of attaching it with roofing nails around the perimeter and driving them in a bit too far. This very slightly squished the HDPE which created a few minor buckles in the surface. Luckily it's underneath so only roadkill will see it.
The interior is nearly entirely covered with knotty pine and cedar, finished with solvent based polyurethane, with a closet lined with unfinished aromatic cedar. There are three sliding closet doors of 1/4" cherry plywood, the center of which is held tight with a hasp, while the end doors use inside friction door catches inside. On the bottom is a clothes / towel rack made from oak dowels. In the center is an electrical control panel with a light switch for three LED fixtures, a dimmer for those lights, ventilation fans switch, digital voltmeter, and 12 vdc jack. There are 6 computer muffin fans to ventilate the interior, which are very quiet, use very little current, and hopefully move enough air to keep things cool. Keep in mind I live north of the Mason Dixon line and plan to use the trailer in Wisconsin and Minnesota. If you drill a 1/4" hole in the correct area of a standard door latch, and insert a brass pin for instance, the door can be locked from the inside as shown in the second photo below. Within each door frame is a reed switch, which uses a magnet in the door to turn on a foot well mounted LED assembly when a door is opened.
As with the aluminum on the walls near the hatch, and the top of the doors and frames, I annealed this drip edge over the doors with a propane torch. Water would sit on top of the door and gradually seep past the weatherstrip, and this cured that problem. Amazingly, I hand bent the first one just right, with leather work gloves of course, before making a wood template to bend the second one to match.
The galley is a basic one, since my food needs are simple and I don't anticipate any long stays. The pot rack is oak dowels, again. To its left is a plywood cover for all of the electrical connections and fuses, which is admittedly a bit messy, due to an alarm, high center mounted brake/turn lights, and trailer lights on both the steel trailer and the teardrop. The enclosures on the left and right serve as a fan housing to vent the interior through the round side vents.
The counter top is divided in half, left / right, and each side may be raised to allow access beneath. Under the left side will be an ordinary cooler, while under the right will be a Coleman white gas stove and the pots and pans while traveling. There's a drain hole / air intake on the floor. Air can exit through the fan enclosures mentioned above.
Below you can see the six fans, a center wiring mess only half done, two hatch uprights which pivot down to rest with the counter top, and a gizmo on each side wall which locks the walls and hatch lid rigidly when the hatch closes. I had visions of the trailer shaking itself silly on the road and wanted it to be as solid as possible. Oh well.
Being thus far inexperienced with backing a trailer, I wanted a rear bumper with some "give". This bumper is a cedar 2x4, covered with two lengths of garden hose, and mounted to the trailer frame through 5 valve springs from a ruined pair of 289 Ford cylinder heads I have sitting around. Cool huh?
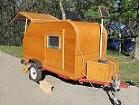
Here's the finished product. You can just barely see the third center brake/turn light assembly high on the galley hatch. It's actually meant for motorcycles. The tongue box is made by UWS and is very nice indeed. It holds a small garden tractor battery (which also fits my mower), a water jug, scissor jack, and a 20 watt solar panel for charging the battery. The battery will also be charged via a simple plug which taps into my car's electrical system through a large stud diode. A spare tire is mounted under the box and secured by two 7/16 bolts with wing nuts. Before long I'll replace the standard fenders with aluminum ones from Northern, and the the little 12" wheel / tire combinations with something slightly larger. Baby Moons would look nice eh?