Cross Bow / trolley / renamed little blue trolley

...ask your questions in the appropriate forums BUT document your build here...preferably in a single thread...dates for updates, are appreciated....

Re: Cross Bow

Postby 3nero » Wed Apr 23, 2014 6:35 pm

Looking Good so far. I was thinking of a similar design before i built mine. Maybe my next build... (nearly finished one and already thinking about my next one)

We do a lot of acrylic bending in work, it's not too hard to do but it does take practice to get it right. First off make sure you are using cast acrylic and not extruded. The cast is usually more expensive. The best way to tell the difference is to cut a scrap piece with some kind of power saw. The cast stuff will have a nice smooth cut, the extruded will be all fuzzy and may even re-weld itself back together before the cut is done.
You can use a blowtorch or a heat gun to heat the plastic , either way you must not spend too much time in one spot or the plastic will bubble and burn. we're talking seconds, 2 seconds with a torch will burn and about 4 with a gun. Just keep moving back and forth until the plastic starts to get shiny and warp, then lose the heat and push the bend by hand. Also make sure you have your hand wrapped in about 4 layers of towel or oven gloves ( but only if you are fond of having skin). hold the shape until the plastic has cooled back down.
You need to have some kind of former made to lay the plastic on so it takes the shape you want. Wood is best but it needs to be sanded smooth or the plastic will pick up any imperfections. also don't press to hard with the cloth or the plastic will pick up the thread pattern from it.
The thicker the sheet you are using the longer you need to heat it. but heat it to long and it will bubble up. Also it's better to use an oversized piece because the edges where it bends usually warp a bit so you cut them off afterwards. Just practice with some scraps first until you figure out how much time you can spend on it with the heat and you should be fine. But once the piece is bent its bent, re-heating a second time will cause bubbles and burning.
One last thing, Make sure the sheet is spotlessly clean before you heat it, any dirt or grease will burn into the plastic.

It's really not that hard to do but it does take a little bit of practice to get to know the how the plastic handles when heated.

Here's a pic of one of our models with lots of bent acrylic going on...

Image

22 years bending plastic and it still take me 2 or 3 tries to get it right :roll:
Measure once, cut twice....throw away and repeat.
Image Image

http://www.tnttt.com/viewtopic.php?t=55971
3nero
Teardrop Master
 
Posts: 129
Joined: Mon May 13, 2013 3:40 pm
Location: Co.Wicklow Ireland

Re: Cross Bow

Postby Ron Dickey » Thu Apr 24, 2014 1:10 am

3nero wrote:Looking Good so far. I was thinking of a similar design before i built mine. Maybe my next build... (nearly finished one and already thinking about my next one)

We do a lot of acrylic bending in work, it's not too hard to do but it does take practice to get it right. First off make sure you are using cast acrylic and not extruded. The cast is usually more expensive. The best way to tell the difference is to cut a scrap piece with some kind of power saw. The cast stuff will have a nice smooth cut, the extruded will be all fuzzy and may even re-weld itself back together before the cut is done.
You can use a blowtorch or a heat gun to heat the plastic , either way you must not spend too much time in one spot or the plastic will bubble and burn. we're talking seconds, 2 seconds with a torch will burn and about 4 with a gun. Just keep moving back and forth until the plastic starts to get shiny and warp, then lose the heat and push the bend by hand. Also make sure you have your hand wrapped in about 4 layers of towel or oven gloves ( but only if you are fond of having skin). hold the shape until the plastic has cooled back down.
You need to have some kind of former made to lay the plastic on so it takes the shape you want. Wood is best but it needs to be sanded smooth or the plastic will pick up any imperfections. also don't press to hard with the cloth or the plastic will pick up the thread pattern from it.
The thicker the sheet you are using the longer you need to heat it. but heat it to long and it will bubble up. Also it's better to use an oversized piece because the edges where it bends usually warp a bit so you cut them off afterwards. Just practice with some scraps first until you figure out how much time you can spend on it with the heat and you should be fine. But once the piece is bent its bent, re-heating a second time will cause bubbles and burning.
One last thing, Make sure the sheet is spotlessly clean before you heat it, any dirt or grease will burn into the plastic.

It's really not that hard to do but it does take a little bit of practice to get to know the how the plastic handles when heated.

Here's a pic of one of our models with lots of bent acrylic going on...

Image

22 years bending plastic and it still take me 2 or 3 tries to get it right :roll:


I may try that for the front of the trolley run the wood up 2/3 of the way and do the rest in plexi :thinking: :thinking: hhhmmm thoughts.
I also ran your statement over to my plexiglass for trolley top thread.
Thanks Ron
121377......134179
Inside almost done--Trolly top has opening windows & roof.doors need assembling--pictured above waley windows..galley 1/3 done
Cross Bow in Build Journals....http://www.tnttt.com/viewtopic.php?f=50&t=54108
User avatar
Ron Dickey
Silver Donating Member
 
Posts: 3075
Images: 711
Joined: Tue Apr 20, 2004 5:56 pm
Location: Central Coast, CA

Re: Cross Bow

Postby Ron Dickey » Thu Apr 24, 2014 1:43 am

119401 this shot shows several projects at once going on. cupboard above head with frame for it's door below, on right floor arch for hatch about to be cut, you can see where I will be cutting out the door, above the blue electrical boxes will go another cupboard, I am ether going to put a roll down screen above the door or make yet another small storage, above you can see me training the top for the trolley to bend, and you can see some of the parts for the vent laying below that roof.

119400 I am trying to train the wood to go down in front, but hat a message you will find above that may make it posable for me to put a plexiglass there that goes over that curve and give us a sky light.

119399 Aboard will go between the front arch board the the side board. either same thickness or deeper with slots to hold the wood sheets more in place as you can see on picture above too.

119398 When I cut out the roof to fit in the trolley I goofed and cut it to far out so I had to putt wood under to give silicone a place to rest. Then I put a pc of 1/8th ply over it to hide the cut and keep the water out in a rain.

I am missing my close up lens I saw a little sony camera at Target for $79 very tempting.

wiring for underside of trailer should be in soon, roof for cabin should be in soon too. Working to top for trolley roof, attached a pc of wood where the left and right skin on the front arch meet hiding that line (made of oak but there were several screw holds I had to fill and so I painted them instead of staining. Now that I have the wall kinda up I can seal the floor without worrying about dust. Door is designed wood for it needs to be bought and windows ordered. Vent being redesigned got some new ideas but it is very close to done. I keep hoping I will find some metal I like for the screen, looking at using wood now. Saddle bags are designed need to start making them so they can just slip into place. I need to take the hatch hinge off so I can paint the wood under it and then screw it into place. working on a rain catch between the hatch hinge and the roof thinking of a aluminum pipe cut length wise to catch water and send it off to the sides.

Ron
121377......134179
Inside almost done--Trolly top has opening windows & roof.doors need assembling--pictured above waley windows..galley 1/3 done
Cross Bow in Build Journals....http://www.tnttt.com/viewtopic.php?f=50&t=54108
User avatar
Ron Dickey
Silver Donating Member
 
Posts: 3075
Images: 711
Joined: Tue Apr 20, 2004 5:56 pm
Location: Central Coast, CA
Top

Re: Cross Bow

Postby Ron Dickey » Thu May 01, 2014 8:41 pm

ahhhh vacation 8) er ah :oops: well.... :o :roll: Damn I have a lot of work to do. ;)

first day off first coat sealed floor ran fans all day will be able to put second coat on in a couple of days .... Dry heat the last few days :thumbsup:
Painted the first coat of primer on the roof and painted the rear roof brake light holder too. Will need to drill them for the wires and glue ant nail them to the roof.
painted the bar the the top of the vent found at the rear of the trolley and while I had that paint out I painted the center of the front arch that color and set the other color paint samples next to it to see it did talk to each other. Look just fine. :beer:
When I put on the second coat on the floor I will drill out the corners of the wall where the doors will be. That way when I take the walls down I can saw out the door facings and start to build the doors.
Need to order windows and may have found a source for the handles.
Need to call those people who wanted to see the trailer so they can come and hopefully complement me on my great work :lol:
Tomorrow I will work on the wiring under the trailer and go to the beginnings of the Morro Bay car show.
http://www.morrobaycarshow.org/index.html?page_id=79 go to photo gallery for over 1000 shots of cars.
Usually there is one Teardrop or trailer there. We will see. :pictures: taking my camera.

Ron
121377......134179
Inside almost done--Trolly top has opening windows & roof.doors need assembling--pictured above waley windows..galley 1/3 done
Cross Bow in Build Journals....http://www.tnttt.com/viewtopic.php?f=50&t=54108
User avatar
Ron Dickey
Silver Donating Member
 
Posts: 3075
Images: 711
Joined: Tue Apr 20, 2004 5:56 pm
Location: Central Coast, CA
Top

Re: Cross Bow

Postby Ron Dickey » Sun May 04, 2014 11:57 pm

I have been very good up to now in putting my tools back, but today I failed. I had set the drill down on a bench just in back of the trailer. I crawled out and grazed the drill put my foot down and the drill seemed to think my little toe was a philips screw head. wham :hammer: :oops: :shocked: I reached down and felt it and it cracked when I bent it down and I bent it back up and it cracked again. :NC

Stopped work and went inside to find some ice and google what to do. then went to bed raised my leg and went to sleep :goodnight: woke up and realized I do not use my little toe for much and went back to work until it told me in no uncertain words to stop. :x I reacted with :shock: :? and I knew it was time to stop for the night! :baby:

Now I sit here with ice on my foot, but I did get some more stuff done.

You know when you are on vacation and you catch a cold it means you need to rest, What does a broken toe mean :thinking: Oh ya Put those tools back where they belong. ;)

Ron
121377......134179
Inside almost done--Trolly top has opening windows & roof.doors need assembling--pictured above waley windows..galley 1/3 done
Cross Bow in Build Journals....http://www.tnttt.com/viewtopic.php?f=50&t=54108
User avatar
Ron Dickey
Silver Donating Member
 
Posts: 3075
Images: 711
Joined: Tue Apr 20, 2004 5:56 pm
Location: Central Coast, CA
Top

Re: Cross Bow

Postby RandyG » Mon May 05, 2014 12:28 am

Ouch, I've slipped with all my weight on the drill just to have it slip off onto my hand a few times and that phillips tip hurts. :x
We've all had those building battle scars. Drilled into my hand many times, hammered a nail into my thumb and still kept hammering... Those scars make for good stories.
Hope it feels better soon.
Randy
Aircraft fabricator, novice carpenter, electrical apprentice, audio engineer dropout.
Build thread - http://www.tnttt.com/viewtopic.php?f=50&t=54126
User avatar
RandyG
500 Club
 
Posts: 695
Images: 115
Joined: Thu May 10, 2012 6:52 pm
Top

Re: Cross Bow

Postby Ron Dickey » Tue May 06, 2014 12:34 am

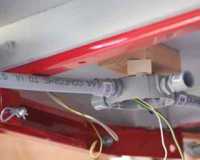
This may seem a little silly to you but I am containing my wires under the trailer. Not so much from road junk but more there are some animals in the sierras that like to eat into wires. Mostly car brake lines so my trailer will be protected but not my car :?
119899 
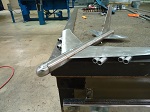
in this shot I did not want to buy bent pc's so I made mine.
It just makes sense to me but it does take longer to do.
119896

I drilled out where the doors should be cut while the sides were clamped on the sides of the trailer.
Things in the works
a. I have some things to do to the vent before I can get serious about the Trolley roof. Still working on that part. Need to experiment with some of those ideas you folks offered.
b. I found one set of wires I had not put in in the cabin and had to add a hole in the floor for them. I plan to have outside door lights blue or purple for when I am coming back to the trailer at night.
c. I need to drill out the over head brake light lights holder for the wires then I can attach them.
d. I can now take off the walls and cut out the doors and then attach the walls to the outside of the trailer.
c. Have the wood or the outside framing for the hatch. Need to cut them and find wood for the center ribs. The center ribs will be thicker and contain wires for plate and over head lights. and maybe small speakers.
e. the wires that connect to the car are there but I have many connections to make before they fully connected to the lights.
F. Wood will need to be bought for the insides of each door and it is about time to order the windows from Grant, also same windows are in the BoxKite.
G. starting to figure out the Saddle bags. they will be 7" deep and 55 " long. The doors on the Boxkite are 14" farther back from the front then the Cross Bow so we will have more room at the back of the trailer then before.
h. Starting to figure the dividing wall between cabin and Galley.
I. Time to see if the roof cut for the cabin will fit or it I have some cutting to do.
J. Wife wants a trash can by her so I am working on container for it and a tissue holder with a place for her glasses. I will need the same on my side of the trailer.
K. it may take a couple of years before I have worked out the batteries for the trailer but the wires will be ready.
K1. support for the batteries
K2. how to connect 2 batteries
k3. building or buying a switch for running total trailer on one or the other battery, switch to join batteries or if one goes down what I said at the beginning is true.
k4. in line charger and it's connection to the land line that will be used in the galley when available
k5 is there solar in my future???? :roll:
L. I plan to make the walls of the inside cabin into sections. So as I get around to those projects I need to finish I can pull down one section and install those things needed.
L1. Speaker wire will be put in and one day speakers will be installed into the walls of the cabin and the galley
L2. a cabinet is planned above the light switches, braces and supports will be pre-installed.
L3. above the doors I have a space for more storage or pull down shades or pull down screen. (I have a new plan for the screen door in the works)
M. The rear of the cabin will have drawers. a lite frame and cloth drawers held shut during travel with on large swing cabinet door. and the other side a place to hang clothing with cabinet door. in the center will be a shoot
to the galley and below that storage and a pull out drawer for a desktop to sit and maybe plugged into those future speakers.
N. The vent might one day have a heater too. maybe candle driven maybe dc who knows at this point.
O. LED light for the inside Trolley top
P. Reading lights are ready to be installed from the cabinet over head. each with it's own switch beside the bed.
Q the Cabinet above our heads is almost done. front cent is about to be attached and side panels, 2 cabinet doors are in the works.
R. two 8" wide Ceder fence pc's for the saddle Deck and to hold the rear lower brake lights.
S. LED side lights have holes drilled in the walls ready to be installed when the walls become attached.
T. Need to figure some type of inside light for the saddles probably battery driven.
U. The walls will be painted a little darker color of blue then the Trolley, the roofs and Galley will be painted white to keep us cool when we stay in the dessert.
V. the counter inside the galley is yet to be figure, cupboards above the counter are still unknown, but a plate and cup holder will be up there.
Plugs in the galley will be just above the counter but may move to the sides need to talk with others to see what worked or did not work for them.

There is much I have left out but it is time to go Ice me toe and think things through.
Ron
121377......134179
Inside almost done--Trolly top has opening windows & roof.doors need assembling--pictured above waley windows..galley 1/3 done
Cross Bow in Build Journals....http://www.tnttt.com/viewtopic.php?f=50&t=54108
User avatar
Ron Dickey
Silver Donating Member
 
Posts: 3075
Images: 711
Joined: Tue Apr 20, 2004 5:56 pm
Location: Central Coast, CA
Top

Re: Cross Bow

Postby Ron Dickey » Wed May 07, 2014 9:08 pm

upper brake lights are almost done just have to paint, mount, and connect wires.
119952 this is what it will look like.
119953 I used a drill press to route the lines holes and drilled a angular hole from back to bottom.

I keep getting frustrated by the vent parts but it is now 90% done not including the fan. I probably will not need the fan until we go to the desert.

working on a pc that will go our heads go then I can put down 2nd coat of sealant on floor.

wiring under trailer is coming closer, 50% done

by next week I can start cutting out doors, I am going to ask a neighbor with a better table saw to cut the boards for the galley hatch. that is the straight ones. have one pc of popular wood to be cut into 2 pc the left over for the doors.

I may need to replace the puller car with a old CRV, the springs seem shot and the replacement seems to be the same. I could put in an air system but that is a down payment on a better puller. It will need to be an automatic so she can drive too. CRV has good MPG and carry more and give better support balance for the trailer. The advantage of an older one is insurance is less. The 2001 carolla's insurance is down to about $190 a yr.

Any way the puzzle is coming together.
Ron :beer:
121377......134179
Inside almost done--Trolly top has opening windows & roof.doors need assembling--pictured above waley windows..galley 1/3 done
Cross Bow in Build Journals....http://www.tnttt.com/viewtopic.php?f=50&t=54108
User avatar
Ron Dickey
Silver Donating Member
 
Posts: 3075
Images: 711
Joined: Tue Apr 20, 2004 5:56 pm
Location: Central Coast, CA
Top

Re: Cross Bow

Postby Ron Dickey » Wed May 07, 2014 9:23 pm

119953 Oh ya I added a ground wire put in a round connecter so when the screw goes in it will ground to the wire
I am buying a lantern battery to check the lights as I put them in before doing the over all check with the car attached.
Nothing worse then putting them in and having to go back and rip each out until it works. :x
Ron :beer:[/quote]
121377......134179
Inside almost done--Trolly top has opening windows & roof.doors need assembling--pictured above waley windows..galley 1/3 done
Cross Bow in Build Journals....http://www.tnttt.com/viewtopic.php?f=50&t=54108
User avatar
Ron Dickey
Silver Donating Member
 
Posts: 3075
Images: 711
Joined: Tue Apr 20, 2004 5:56 pm
Location: Central Coast, CA
Top

Re: Cross Bow

Postby Ron Dickey » Mon May 12, 2014 2:49 pm

Vent done all but roof for the trolley needs to be done and it is a project in it's self. :applause:
120129 the screen was the hard part finding the right one. used for the outside vent of a house cut down. cost $3ish
120130 The plexi was cut a long time ago and the holes drilled. it is crucked at the top and straight at the bottom :? oh well I take it time to move on.

120127 cabin floor before. needed some cleaning up before I put send seal down.

120128 this improvement to the cabin floor and the cabinet above is nearing completion!!

will put the second coat of sealant on the floor tomorrow :thumbsup:

will work on wiring some more under trailer had to get some parts but getting closer there too.
after it dries
1. I need to put the galley hinge the wood where it is mounted has been covered with two coats of prime.
2. will attach the upper cross pc to the galley hatch and mark where all the holes need to be drilled.
3. will notch out the galley hinge so it will not slide left or right. Per Grants direstions
4. will pull back down the galley cross pc drill out the holes and put prim paint on the side where the top of the galley hatch is and apply white glossy paint over the primer.
5. Once completed the roof top of the trolley and the roof top of the trailer will be painted glossy white paint. The galley is painted with a light blue color and
the outr sides of the trailer will be painted in a darker blue that will mach my blue house.
6. I will start cutting out the ribs for the galley hatch
7. cut out the cross wood parts as I need them.
8. the lower cross bar for the galley has been cut and the bottom of that will be painted when the top is.
9. when the floor is dry the walls will be removed and the side doors cut out.
10. the inside walls will be put into the cabin so I can properly mark where the doors will be cut, and where I need to cut out plugs and make sure it still fits.
I am thinking of cutting it into sections so it I need to work behind that wall I do not have to remove the in tire unit.
11. Wiring under trailer should be ready for lights.
12. saddle should be started. but may only be a frame when it is time to go to the IRG.
:sweaty: (closest I can come to a little guy with a sweat band on and sweat coming down.) :FNP
Ron
121377......134179
Inside almost done--Trolly top has opening windows & roof.doors need assembling--pictured above waley windows..galley 1/3 done
Cross Bow in Build Journals....http://www.tnttt.com/viewtopic.php?f=50&t=54108
User avatar
Ron Dickey
Silver Donating Member
 
Posts: 3075
Images: 711
Joined: Tue Apr 20, 2004 5:56 pm
Location: Central Coast, CA
Top

Re: Cross Bow w/ trolley top

Postby Ron Dickey » Wed May 14, 2014 11:11 am

floor is now sealed, tomorrow or the next day depending on dryness of floor I will pull down the walls and cut out the doors.

Tomorrow I will start work on the galley hatch. Upper and lower studs done, will cut out left and right arched studs and start that process. I will also be starting on the passenger doors too. Because I an designing as I go I often will go back and forth between project so I can step back and think about my next move. Having the old door with the window cut out in it will help me get ready for the windows. And once the galley arches seem to fit I can use them as the profile for the center arches. which will be a little deeper in depth to hold lights and plate wiring.

:thumbsup: :NC gosh I did all that he say's :roll: Not bad Ron :worship: I Just need to have it on the road for IRG :pictures: more photo's to come. :wine:
121377......134179
Inside almost done--Trolly top has opening windows & roof.doors need assembling--pictured above waley windows..galley 1/3 done
Cross Bow in Build Journals....http://www.tnttt.com/viewtopic.php?f=50&t=54108
User avatar
Ron Dickey
Silver Donating Member
 
Posts: 3075
Images: 711
Joined: Tue Apr 20, 2004 5:56 pm
Location: Central Coast, CA
Top

Re: Cross Bow

Postby Ron Dickey » Fri May 23, 2014 1:35 am

This is a great time for building, I leave this site for a day or two and it is almost pushed to the next page Every one is building something wonderful for their camping world. I applaud you :applause: :applause:

Things are coming together here.
I have been doing a lot of cutting. Door ways, parts for the galley hatch with figuring out where it will make contact when it close.

Had a friend Steve B. come by and see the trailer, he brought is pin gun and we tried it out on my cabin cabinet doors that go above our head when we sleep. Got some in site as to his direction and some ideas for mine. good talk long and fun.

here are some pictures of my work.
120492 cut notch for make sure my galley hinge does not slide. and starting to figure out where the hatch will attach 120491

I will be doing something both experimental and different with my doors. The Wiley windows have interested me for a long time. I have my old first door from the boxkite (oh the doors on the Cross Bow are the same size as those on the Box Kite) that being said I will make the window size the same as on the boxkite. That way if the Wiley window 120488 do not work I can put in Grants windows, I will even drill the holes for the bolts and simply place flat pc's over the holes for the Wiley windows. Which are less expensive and I already have most of the wood.

120494120493 as you can see my first door was very very basic but know one saw it as a door that could be broken into from the outside.

Ron :goodnight: long day time for bed.
121377......134179
Inside almost done--Trolly top has opening windows & roof.doors need assembling--pictured above waley windows..galley 1/3 done
Cross Bow in Build Journals....http://www.tnttt.com/viewtopic.php?f=50&t=54108
User avatar
Ron Dickey
Silver Donating Member
 
Posts: 3075
Images: 711
Joined: Tue Apr 20, 2004 5:56 pm
Location: Central Coast, CA
Top

Re: Cross Bow

Postby Ron Dickey » Fri May 23, 2014 1:44 am

I did not take a close shot of the cabinet but here it is mounted with the lock

120495

I have found I do not fully under stand hinges. Had to leave some screws out so it would close right not up :NC :oops: :x H**ll but it works ok and we will not be in it that much. the one on the other side should work better.

Ron
121377......134179
Inside almost done--Trolly top has opening windows & roof.doors need assembling--pictured above waley windows..galley 1/3 done
Cross Bow in Build Journals....http://www.tnttt.com/viewtopic.php?f=50&t=54108
User avatar
Ron Dickey
Silver Donating Member
 
Posts: 3075
Images: 711
Joined: Tue Apr 20, 2004 5:56 pm
Location: Central Coast, CA
Top

Re: Cross Bow

Postby Ron Dickey » Tue May 27, 2014 12:58 am

Have started the arches for the galley hatch once I have the left and right one I will use those to trace out the center ones.

My plan for Wiley Windows is still a go. have to look at the doors on the Box Kite ( my first trailer) and see several measures for grants windows so if they fail I can still put in grants windows.

The door pc's are cut from the outside and inside walls, now I have to buy the wood for them.

The galley hatch is an experience but as long as I follow the lines of the side of the trailers where the outside pc's were cut for the side arches I should be ok.
I keep looking at other builds.

I have the top stop lights ready to be wired to the rest of the trailer road light system.

One cut is still needed on the outside of the riders side or right side looking from the back of the trailer, it is for the shore poser until I put in the saddle bags.

Saddle bags might be delayed a little longer. If I have to move the axel back I would need to make a new saddle bag for each side. I think it will be ok but will not know until I have pulled it.

I will cut the cabin walls into 3's on each side so later if I need to get behind the walls I do not have to pull the entire thing out. Back of the door front of the door and over the door.That way I can work on electrical as improvements happen, and behind the front wall where I plan to make a cabinet on each side, and above the door where I plan to have a roll down screen and a small cabinet.

Pictures are coming. But you might look at my album as downloads come in.

My job works me different shift each day so some times I can work on in mornings some times afternoon and sometimes I get up at 6am & construct for 4 hrs then go to work then after work work on it some more. Some times I have 2 days off together some times not. Keeps things interesting. I usually sit in the car drawing my next step before work or walking the isles looking for needed things and things that might work.

Every time I put in some wires I check them with the Volt meter to see if it is connected, tonight I connected a DC cigaret type plug and found it was connected to it's self had to take it all apart and fixed it.
Electric connections and other stuff
1. I am ready to put in switches for inside reading and cabin lights, have to do some painting before installing reading lights, will have a DC plug for the vent fan by tomorrow, need to buy lights for the cabin lights but the plug is ready, need to cut out from the cabin walls where the DC plug and reading light switch and overhead or outside under body light switches are on each side of the front of the cabin.
2. Wiring is waiting for galley hatch is to be built so license plate lights can be connected and galley roof lights can get power. under body doorway and cabin to be purchased, need two more clearance lights needed, need to buy the outside wood deck that the rear lower stop lights are to be connected.
3. future electrical AC power plug and wiring, saddle bag battery cargo storage built, galley be built so plugs and switches can be installed, speaker wire installed near the back of the cabin so if we want add a radio or computer we can get better sound :M . Finding a better puller unit :cry: for the trailer that is larger so we do not have to store everything in the trailer and when we stop we have to unload it and put it in the car so we can enjoy all the wonders this trailer will have to offer, rather then just go to bed because we are so tired from driving, unloading and loading and just crashing. :goodnight:

I can see the end just can not get a grip on it just yet. Each day I am another step closer. :thumbsup:

Ron
121377......134179
Inside almost done--Trolly top has opening windows & roof.doors need assembling--pictured above waley windows..galley 1/3 done
Cross Bow in Build Journals....http://www.tnttt.com/viewtopic.php?f=50&t=54108
User avatar
Ron Dickey
Silver Donating Member
 
Posts: 3075
Images: 711
Joined: Tue Apr 20, 2004 5:56 pm
Location: Central Coast, CA
Top

Re: Cross Bow

Postby Ron Dickey » Sat May 31, 2014 12:05 pm

The other day I put in the drivers side ceiling to the cabin, earlier I put in the roof brake lights and screwed them in just incase one day I needed to remove it.

Well now I need to remove it because it is to close to galley hinge and it hits when I open it.
I thought I had only once choice to add a pc of wood and bring the hinge away that means I have to change the length of my arches (Rib's) cut a pc of wood to bring it out 7/16th
OR drill a hole in the roof so I can get an extended pit in and unscrew the unit and move it back. I thought of that when I was writing this, I hate holes but I did screw it in and now I need to unscrew it and move it back.

Picked up Paint for the roof but ran out of primer which I will need for trolley roof and other small jobs.
Got strips of wood for hiding cut lines on my inside cabin walls and use to hold insolation strips for the doors.
What do I mean cut lines on my cabin walls. Well I am running out of time so I cut the walls into sections so I can unscrew strips and remove the walls to get to the wires and other future projects. I will not have power in my trailer for some time like my old trailer. I will have a DC plug that I can plug in a portable battery to turn on lights and such and as I get the saddle made I can finish that job. I also have a cupboard I want to add on the front sides of the cabin. I made the basic frame inside the wall including the back wall for it then I will cover it with the wall and put in it later down the line.

The side ribs for the galley are pine but I will get some plywood and cut out 2 more ribs and double the thickness to give it more strength. I may even run the second layer in a different direction to give it more strength, I have the frame for the galley done but not connected, I was starting that process when I found the above problem. There is a hole in the bucket! I think I can the fix it other wise I will have to make a new trailer. :lol:
http://www.youtube.com/watch?v=MAfCQ-t7xY0
121377......134179
Inside almost done--Trolly top has opening windows & roof.doors need assembling--pictured above waley windows..galley 1/3 done
Cross Bow in Build Journals....http://www.tnttt.com/viewtopic.php?f=50&t=54108
User avatar
Ron Dickey
Silver Donating Member
 
Posts: 3075
Images: 711
Joined: Tue Apr 20, 2004 5:56 pm
Location: Central Coast, CA
Top

PreviousNext

Return to Build Journals

Who is online

Users browsing this forum: No registered users and 40 guests