Building the "Heart of Gold" - Done 3/9/2014

...ask your questions in the appropriate forums BUT document your build here...preferably in a single thread...dates for updates, are appreciated....

Re: Building the "Heart of Gold" - started!

Postby drewh1 » Wed Oct 30, 2013 11:19 pm

The front cabinets look great, I can't wait to put the doors on with the hinges and latches.
IMG_2499.JPG
IMG_2499.JPG (83.04 KiB) Viewed 2657 times


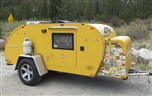
The front curve looks sweet!
IMG_2494.JPG
IMG_2494.JPG (98.52 KiB) Viewed 2657 times


IMG_2503.JPG
IMG_2503.JPG (73.55 KiB) Viewed 2657 times


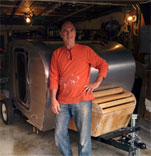
There are a ton of little things that have to be adjusted so it all fits right. It is really good I did a trial run otherwise, it would have been a mess!

Then I'll take it apart, polyurethane it, glue it and screw it, and start wiring. I have already put together my shopping list and picked out most of my lights. One sort of major screw up is I didn't leave enough space on the roof for a high wattage solar panel, so I might have to settle for something smaller.
"If only I knew what I know now when I started . . ."

My Build Journal http://www.tnttt.com/viewtopic.php?f=50&t=56916
User avatar
drewh1
Donating Member
 
Posts: 245
Images: 7
Joined: Sat Aug 03, 2013 3:01 pm
Location: El Cerrito, CA

Re: Building the "Heart of Gold" - started!

Postby KCStudly » Mon Nov 04, 2013 4:27 pm

Your progress and craftsmanship are impressive!

The method of building the roof and skinning the ceiling as a separate unit (like you, Aggie79/Tom and others have done) seems to be the way to do a "traditional".

For the solar panel, consider a portable folding unit; that way you can locate it in the sun, and, if the campsite provides for it, locate the TD in the shade. You can also chase the sun with the moveable panel much more easily than with a fixed panel on the roof. To me, having a panel on the roof would take away from the graceful appearance of a shapely TD.

I just ordered a portable panel here, and from what I am hearing it is a good performing unit at a decent price; controller and wire leads included. I suspect that the controller and leads are "entry level", but it seems like a good way to get started to me and if desired can be upgraded to more efficient hardware later. (I'll share my impressions on TPCE thread once I receive mine.)

Keep up the great work. :thumbsup:
KC
My Build: The Poet Creek Express Hybrid Foamie

Poet Creek Or Bust
Engineering the TLAR way - "That Looks About Right"
TnTTT ORIGINAL 200A LANTERN CLUB = "The 200A Gang"
Green Lantern Corpsmen
User avatar
KCStudly
Donating Member
 
Posts: 9613
Images: 8169
Joined: Mon Feb 06, 2012 10:18 pm
Location: Southeastern CT, USA

Re: Building the "Heart of Gold" - started!

Postby drewh1 » Tue Nov 05, 2013 1:45 am

Hey, thanks KC. I do think forming the ceiling separately was the way to go. Tomorrow I am putting on the polyurethane and I am sure that will be so much easier with it laying on the floor (rather than painting upside down).

and about the solar panel, I agree about the panel messing up the lines. But don't you worry about a portable unit getting stolen if it is just dangling off the wires in your campsite?

drew.
"If only I knew what I know now when I started . . ."

My Build Journal http://www.tnttt.com/viewtopic.php?f=50&t=56916
User avatar
drewh1
Donating Member
 
Posts: 245
Images: 7
Joined: Sat Aug 03, 2013 3:01 pm
Location: El Cerrito, CA
Top

Re: Building the "Heart of Gold" - started!

Postby KCStudly » Tue Nov 05, 2013 9:26 am

Well, I do plan on being "out there"... way out there, and I don't expect to be running in to too many other people.

If we leave camp for any length of time I have the option of locking it up.

Others have made racks that they can attach their portable panels to the TD, if desired, and I suppose those could be made more secure, but I feel that having the portability, as an option at least, is preferred. We'll see. UMMV.
KC
My Build: The Poet Creek Express Hybrid Foamie

Poet Creek Or Bust
Engineering the TLAR way - "That Looks About Right"
TnTTT ORIGINAL 200A LANTERN CLUB = "The 200A Gang"
Green Lantern Corpsmen
User avatar
KCStudly
Donating Member
 
Posts: 9613
Images: 8169
Joined: Mon Feb 06, 2012 10:18 pm
Location: Southeastern CT, USA
Top

Re: Building the "Heart of Gold" - started!

Postby drewh1 » Wed Nov 06, 2013 7:31 pm

super happy with the way the front cabinet turned out - I think the Galley cabinets will look nice too when done. Gonna install it all this weekend!

IMG_2517.JPG
IMG_2517.JPG (102.99 KiB) Viewed 2526 times
"If only I knew what I know now when I started . . ."

My Build Journal http://www.tnttt.com/viewtopic.php?f=50&t=56916
User avatar
drewh1
Donating Member
 
Posts: 245
Images: 7
Joined: Sat Aug 03, 2013 3:01 pm
Location: El Cerrito, CA
Top

Re: Building the "Heart of Gold" - started!

Postby KCStudly » Wed Nov 06, 2013 8:47 pm

Ooh, that's tasty good! :thumbsup: :applause:
KC
My Build: The Poet Creek Express Hybrid Foamie

Poet Creek Or Bust
Engineering the TLAR way - "That Looks About Right"
TnTTT ORIGINAL 200A LANTERN CLUB = "The 200A Gang"
Green Lantern Corpsmen
User avatar
KCStudly
Donating Member
 
Posts: 9613
Images: 8169
Joined: Mon Feb 06, 2012 10:18 pm
Location: Southeastern CT, USA
Top

Re: Building the "Heart of Gold" - started!

Postby drewh1 » Wed Nov 06, 2013 9:46 pm

Thanks! checked out that crazy pumpin launcher on your build journal, Now that is quite a project. Glad to hear your back to work on your foamie.
"If only I knew what I know now when I started . . ."

My Build Journal http://www.tnttt.com/viewtopic.php?f=50&t=56916
User avatar
drewh1
Donating Member
 
Posts: 245
Images: 7
Joined: Sat Aug 03, 2013 3:01 pm
Location: El Cerrito, CA
Top

Re: Building the "Heart of Gold" - started!

Postby Ron Dickey » Thu Nov 07, 2013 12:40 am

You make it all look simple. Nice job so far.

Ron
Los Osos, CA
121377......134179
Inside almost done--Trolly top has opening windows & roof.doors need assembling--pictured above waley windows..galley 1/3 done
Cross Bow in Build Journals....http://www.tnttt.com/viewtopic.php?f=50&t=54108
User avatar
Ron Dickey
Silver Donating Member
 
Posts: 3075
Images: 711
Joined: Tue Apr 20, 2004 5:56 pm
Location: Central Coast, CA
Top

Re: Building the "Heart of Gold" - started!

Postby drewh1 » Thu Nov 07, 2013 3:36 pm

Thanks Ron - I can assure that nothing has seemed simple. I just don't post all the cursing and photos of my dumb ass mistakes. :x

I have developed a great deal more patience doing this project though. Whenever I go to fast and don't think about what I am doing, kapow!

Someday when we meet up on the road in California, I'll show you all the blunders.

drew.
"If only I knew what I know now when I started . . ."

My Build Journal http://www.tnttt.com/viewtopic.php?f=50&t=56916
User avatar
drewh1
Donating Member
 
Posts: 245
Images: 7
Joined: Sat Aug 03, 2013 3:01 pm
Location: El Cerrito, CA
Top

Re: Building the "Heart of Gold" - started!

Postby jeporter25 » Fri Nov 08, 2013 10:04 am

Looking great Drew!
jeporter25
Teardrop Master
 
Posts: 102
Joined: Sun May 20, 2012 6:41 pm
Top

Re: Building the "Heart of Gold" - started!

Postby drewh1 » Thu Nov 14, 2013 3:02 pm

I have been down with a flu all week. I couldn't work so I did some planning. How is this for "old school"! I am planning out the hatch support (Camp-inn style)
I am going to frame this drawing when it is all done. 8)

IMG_2521.JPG
IMG_2521.JPG (91.96 KiB) Viewed 2394 times


I did assemble my project last week. It all went together after a few adjustments. So now I am working on wiring and will build the hatch soon.
"If only I knew what I know now when I started . . ."

My Build Journal http://www.tnttt.com/viewtopic.php?f=50&t=56916
User avatar
drewh1
Donating Member
 
Posts: 245
Images: 7
Joined: Sat Aug 03, 2013 3:01 pm
Location: El Cerrito, CA
Top

Re: Building the "Heart of Gold" - started!

Postby drewh1 » Wed Nov 20, 2013 6:53 pm

Progress! The inside is complete, cabinets are done and installed. I used a piece of Purple heartwood to trim out the shelf and cabinet in the back. Wish I had done some trim on the front cabinet too. I will probably integrate some into the galley. Fortunately, I also remember to drill holes for wiring BEFORE I installed the cabinets, made it a lot easier. There are lots of small mistakes :x , mostly not visible but a few will probably need some corrective work

I still need to finish the counter portion of the galley and may do that next, or may work on wiring. :twisted:

IMG_2529.JPG
IMG_2529.JPG (97.54 KiB) Viewed 2269 times

IMG_2527.JPG
IMG_2527.JPG (82.31 KiB) Viewed 2269 times

IMG_2523.JPG
IMG_2523.JPG (85.46 KiB) Viewed 2269 times
"If only I knew what I know now when I started . . ."

My Build Journal http://www.tnttt.com/viewtopic.php?f=50&t=56916
User avatar
drewh1
Donating Member
 
Posts: 245
Images: 7
Joined: Sat Aug 03, 2013 3:01 pm
Location: El Cerrito, CA
Top

Re: Building the "Heart of Gold" - started!

Postby kayakdlk » Wed Nov 20, 2013 9:13 pm

Looking great. Only you will notice those "lots of small mistakes "

My experience on anything I have built is if you do no point them out to anyone they will never know.
User avatar
kayakdlk
Platinum Donating Member
 
Posts: 310
Images: 392
Joined: Wed Jun 27, 2012 9:02 pm
Location: Foothills of Colorado
Top

Re: Building the "Heart of Gold" - started!

Postby PKCSPT » Thu Nov 21, 2013 1:38 am

I'd never know the mistakes, that is looking really nice.
121172 116946 159644
PKCSPT
Silver Donating Member
 
Posts: 1515
Images: 61
Joined: Wed Mar 31, 2010 11:27 pm
Location: Minnesota
Top

Re: Building the "Heart of Gold" - started!

Postby drewh1 » Thu Nov 28, 2013 10:12 pm

Happy Thanksgiving - a couple of days to work on the project.

Got the hatch framed over the last two days! this feels like a big step forward. For the hatch, I laminated two 3/4" pieces with some 1/8" birch to make the side pieces. Everything is 2" X 1 1/2 and dado'ed. I assembled, glued and screwed in place. Feels solid as a rock :) .

IMG_2533.JPG
IMG_2533.JPG (98.2 KiB) Viewed 2120 times


IMG_2535.JPG
IMG_2535.JPG (71.48 KiB) Viewed 2120 times


Now I am working on this hatch latch - I am using the 3 way and think it is going to work great once everything is lined up.

IMG_2538.JPG
IMG_2538.JPG (93.44 KiB) Viewed 2120 times
"If only I knew what I know now when I started . . ."

My Build Journal http://www.tnttt.com/viewtopic.php?f=50&t=56916
User avatar
drewh1
Donating Member
 
Posts: 245
Images: 7
Joined: Sat Aug 03, 2013 3:01 pm
Location: El Cerrito, CA
Top

PreviousNext

Return to Build Journals

Who is online

Users browsing this forum: No registered users and 39 guests