Building the "Heart of Gold" - Done 3/9/2014

...ask your questions in the appropriate forums BUT document your build here...preferably in a single thread...dates for updates, are appreciated....

Re: Building the "Heart of Gold" - started!

Postby drewh1 » Wed Sep 11, 2013 6:24 pm

Last work before I leave - Routing the sides was a bit nerve wracking. I also cut out the doors based on the measurements provided by Grant. Oh, AND i decided to go with the 36" Milled Aluminum doors that Grant is now offering. I want to be able to sit in the doorway without banging my head!

There were a few minor mistakes with the routing. I did most of it right though and took great care to make sure the bulkhead was perfectly aligned where the hatch joins the roof, so everything will be square (theoretically) I keep learning more and more about using a router.

IMG_2420.JPG
IMG_2420.JPG (91.51 KiB) Viewed 2879 times


IMG_2423.JPG
IMG_2423.JPG (92.83 KiB) Viewed 2879 times
"If only I knew what I know now when I started . . ."

My Build Journal http://www.tnttt.com/viewtopic.php?f=50&t=56916
User avatar
drewh1
Donating Member
 
Posts: 245
Images: 7
Joined: Sat Aug 03, 2013 3:01 pm
Location: El Cerrito, CA

Re: Building the "Heart of Gold" - started!

Postby drewh1 » Thu Sep 12, 2013 3:20 pm

I couldn't resist setting it up to see what it looks like - I am pretty happy with the layout of everything so far.

Thanks goodness for half empty paint cans.

IMG_2426.JPG
My garage is looking small!
IMG_2426.JPG (109.54 KiB) Viewed 2863 times


IMG_2429.JPG
Cooler fits just right!
IMG_2429.JPG (93.65 KiB) Viewed 2863 times


IMG_2428.JPG
I am sure glad I went 5' x 9. and the layout of cabinets feels right.
IMG_2428.JPG (103.94 KiB) Viewed 2863 times
"If only I knew what I know now when I started . . ."

My Build Journal http://www.tnttt.com/viewtopic.php?f=50&t=56916
User avatar
drewh1
Donating Member
 
Posts: 245
Images: 7
Joined: Sat Aug 03, 2013 3:01 pm
Location: El Cerrito, CA

Re: Building the "Heart of Gold" - started!

Postby iregan » Fri Sep 13, 2013 8:13 pm

Looks awesome! :)
Have a great trip
Regan
iregan
Teardrop Builder
 
Posts: 36
Joined: Thu May 02, 2013 3:08 am
Top

Re: Building the "Heart of Gold" - started!

Postby RandyG » Fri Sep 13, 2013 8:42 pm

:thumbsup: Looking good! Did those paint cans hold your weight? I know you tried to lay inside, another thing most of us can't resist. :lol:
Randy
Aircraft fabricator, novice carpenter, electrical apprentice, audio engineer dropout.
Build thread - http://www.tnttt.com/viewtopic.php?f=50&t=54126
User avatar
RandyG
500 Club
 
Posts: 695
Images: 115
Joined: Thu May 10, 2012 6:52 pm
Top

Re: Building the "Heart of Gold" - started!

Postby drewh1 » Fri Sep 13, 2013 9:55 pm

RandyG wrote::thumbsup: Looking good! Did those paint cans hold your weight? I know you tried to lay inside, another thing most of us can't resist. :lol:


I am laughing so hard - of course, i tried it out! almost brought a couple of pillows and a pad down. I even put a board up where the shelves in the front sit, just so I could see how that felt. Now I am going to forget about it for a week or so. Hilarious, what a great group!

OH, the big news is, the trailer is on its way! That means I can really make progress when I get back.
"If only I knew what I know now when I started . . ."

My Build Journal http://www.tnttt.com/viewtopic.php?f=50&t=56916
User avatar
drewh1
Donating Member
 
Posts: 245
Images: 7
Joined: Sat Aug 03, 2013 3:01 pm
Location: El Cerrito, CA
Top

Re: Building the "Heart of Gold" - started!

Postby drewh1 » Thu Sep 26, 2013 2:00 pm

Had an awesome trip - here is a picture of a friend that I met diving.
Shark.jpg
Shark.jpg (23.43 KiB) Viewed 2749 times

Me at 85'
Drew.jpg
Drew.jpg (44.63 KiB) Viewed 2749 times

Look what came right after I got back! Guess you know what i'll be doing this weekend.
IMG_2430.JPG
IMG_2430.JPG (123.51 KiB) Viewed 2749 times
"If only I knew what I know now when I started . . ."

My Build Journal http://www.tnttt.com/viewtopic.php?f=50&t=56916
User avatar
drewh1
Donating Member
 
Posts: 245
Images: 7
Joined: Sat Aug 03, 2013 3:01 pm
Location: El Cerrito, CA
Top

Re: Building the "Heart of Gold" - started!

Postby KCStudly » Thu Sep 26, 2013 7:18 pm

Mako or Black Tip?
KC
My Build: The Poet Creek Express Hybrid Foamie

Poet Creek Or Bust
Engineering the TLAR way - "That Looks About Right"
TnTTT ORIGINAL 200A LANTERN CLUB = "The 200A Gang"
Green Lantern Corpsmen
User avatar
KCStudly
Donating Member
 
Posts: 9611
Images: 8169
Joined: Mon Feb 06, 2012 10:18 pm
Location: Southeastern CT, USA
Top

Re: Building the "Heart of Gold" - started!

Postby drewh1 » Thu Sep 26, 2013 11:31 pm

He's a blacktip although it looks like the tip of his Dorsal fin might have been lost. Usually there is a black tip on the dorsal fin.

We were spearing lionfish and carrying large bags of them around, so the sharks were quite interested. We had a few nurse sharks that came right up to us and had to be encouraged to move on.
"If only I knew what I know now when I started . . ."

My Build Journal http://www.tnttt.com/viewtopic.php?f=50&t=56916
User avatar
drewh1
Donating Member
 
Posts: 245
Images: 7
Joined: Sat Aug 03, 2013 3:01 pm
Location: El Cerrito, CA
Top

Re: Building the "Heart of Gold" - started!

Postby drewh1 » Sat Sep 28, 2013 7:44 pm

Well I made some progress and a few mistakes. Nothing disastrous. I planned everything around the trailer being 2 x 2's. Well the NT trailer is 2 x 3's! so I had to route another inch out of my sides. that throws off the counter top placement so I have to move that up 1/2" otherwise my cooler no longer fits. Also, Router went astray on one of the sides but most of it will be under the cabinets :x Guess there is no other way to learn than through mistakes huh?

Now that the trailer is built and the floor is almost done, most of the heavy lifting is done and I can get on to more detailed and interesting things.

IMG_2432.JPG
IMG_2432.JPG (133.59 KiB) Viewed 2679 times


IMG_2434.JPG
IMG_2434.JPG (118.63 KiB) Viewed 2679 times


IMG_2435.JPG
IMG_2435.JPG (163.03 KiB) Viewed 2679 times
"If only I knew what I know now when I started . . ."

My Build Journal http://www.tnttt.com/viewtopic.php?f=50&t=56916
User avatar
drewh1
Donating Member
 
Posts: 245
Images: 7
Joined: Sat Aug 03, 2013 3:01 pm
Location: El Cerrito, CA
Top

Need a little help Please!

Postby drewh1 » Wed Oct 02, 2013 11:07 pm

So I spent the better part of the fabricating a nice piece to fill in between the frame and the hatch closure. then I looked as some photos of hatches and decided I did this completely wrong. the way that I have set it up, I will need to cover a small 3 1/2 inch piece of wood with aluminum and trim when the area should probably be covered by the hatch. I planned on having the hatch seal on the bottom to the floor and but not go all the way to the bottom of the frame. It seems it would be much simpler to just have the hatch continue all the way down to the bottom of the frame and cut off the filler piece so the hatch can seal against it.

I'd love to get some experienced guidance on how best to do this. Hope the explanation is clear.

here are some photos of how it is now.

IMG_2440.JPG
IMG_2440.JPG (66.53 KiB) Viewed 2611 times

IMG_2438.JPG
IMG_2438.JPG (60.89 KiB) Viewed 2611 times
"If only I knew what I know now when I started . . ."

My Build Journal http://www.tnttt.com/viewtopic.php?f=50&t=56916
User avatar
drewh1
Donating Member
 
Posts: 245
Images: 7
Joined: Sat Aug 03, 2013 3:01 pm
Location: El Cerrito, CA
Top

Re: Building the "Heart of Gold" - started!

Postby RandyG » Thu Oct 03, 2013 11:04 am

I think it would work the way you have it now and stop the hatch at the floor. If you ran it all the way down, your latch will be almost under the trailer. And where that bottom piece is would be a good place to mount tail lights or one of those tail light strips and licence plate. But it all depends on what other plans you have. Are you putting your lights into the hatch? What type of latch are you planning? Your hatch area is alot like mine, though I'm not even trying to finish it now, I'm curios to see what others have to say and how you go about it.
Randy
Aircraft fabricator, novice carpenter, electrical apprentice, audio engineer dropout.
Build thread - http://www.tnttt.com/viewtopic.php?f=50&t=54126
User avatar
RandyG
500 Club
 
Posts: 695
Images: 115
Joined: Thu May 10, 2012 6:52 pm
Top

Re: Building the "Heart of Gold" - started!

Postby drewh1 » Thu Oct 03, 2013 12:03 pm

hey Randy -

Having never done this before, I keep running into important details that I just couldn't plan for. So I have to keep modifying my plan. I really appreciate your feedback on this because it made me revisit the problem and see that there are advantages to doing it the way that I have. I had planned on putting the tail lights on the hatch but see a possibility for putting them on this lower section. I also have considered some type of bumper and that would work well this way. I think the latch and the seal will be much more solid ending it at the floor. The negative is the extra detail work in covering such a small section with aluminum. If I had a metal shop, I would fabricate a piece that fit in to the floor joint and became a part of the seal!

I'll sit tight for a few days and look at other plans before deciding but I am leaning towards leaving it the way it is.
"If only I knew what I know now when I started . . ."

My Build Journal http://www.tnttt.com/viewtopic.php?f=50&t=56916
User avatar
drewh1
Donating Member
 
Posts: 245
Images: 7
Joined: Sat Aug 03, 2013 3:01 pm
Location: El Cerrito, CA
Top

Re: Need a little help Please!

Postby aggie79 » Thu Oct 03, 2013 2:13 pm

drewh1 wrote:So I spent the better part of the fabricating a nice piece to fill in between the frame and the hatch closure. then I looked as some photos of hatches and decided I did this completely wrong. the way that I have set it up, I will need to cover a small 3 1/2 inch piece of wood with aluminum and trim when the area should probably be covered by the hatch. I planned on having the hatch seal on the bottom to the floor and but not go all the way to the bottom of the frame. It seems it would be much simpler to just have the hatch continue all the way down to the bottom of the frame and cut off the filler piece so the hatch can seal against it.

I'd love to get some experienced guidance on how best to do this. Hope the explanation is clear.

here are some photos of how it is now.

IMG_2440.JPG

IMG_2438.JPG


drewh1,

I used a similar detail to build my hatch and it has worked well. The only difference is that I left the leading edge vertical rather than following the profile. Here you can see a picture of the vertical edge.

Image

Part of the reason for leaving it vertical is that was the only way at the time I could figure out how to seal the gap between the hatch edge and the teardrop. I used a P-shaped seal and capped the flat part with trim.

Image

Image

On the hatch, I also used a P-shaped seal that seats against the flat part of the trim.

In hindsight, I ended up placing a piece of flat aluminum on the hatch to cover the gap. The aluminum projects beyond the edge of the hatch. I probably would have been okay just placing a seal on it rather than using the double P-seals. I don't have a good picture of the flat other than this one that shows the hatch closed and the rubber latches that I use to keep it closed while in transit.

Image

Take care,
Tom
Tom (& Linda)
For build info on our former Silver Beatle teardrop:
Build Thread

93503
User avatar
aggie79
Super Duper Lifetime Member
 
Posts: 5405
Images: 686
Joined: Tue Aug 07, 2007 5:42 pm
Location: Watauga, Texas
Top

Re: Building the "Heart of Gold" - started!

Postby drewh1 » Thu Oct 03, 2013 3:35 pm

Tom,

Your photos are super helpful. I am going to go with it the way it is. I do think I need to revisit the seal and probably route it to a vertical shape but now feel much better about the way I did it. Thanks so much for posting them. where did you get the rubber retainers?

I probably already told you this, but I love your build and used it for inspiration for my original design. AND, I need to go through your build thread again . . .

Drew
"If only I knew what I know now when I started . . ."

My Build Journal http://www.tnttt.com/viewtopic.php?f=50&t=56916
User avatar
drewh1
Donating Member
 
Posts: 245
Images: 7
Joined: Sat Aug 03, 2013 3:01 pm
Location: El Cerrito, CA
Top

Re: Building the "Heart of Gold" - started!

Postby drewh1 » Wed Oct 09, 2013 9:47 pm

More progress but not much to show. I applied the Henry's to my floor. It wasn't messy at all. The weather was about 95 degrees and 0 humidity so it dried almost as quickly as I put it on. I ended up using almost an entire gallon. I feel pretty confident my under floor is water resistant!

IMG_2443.JPG
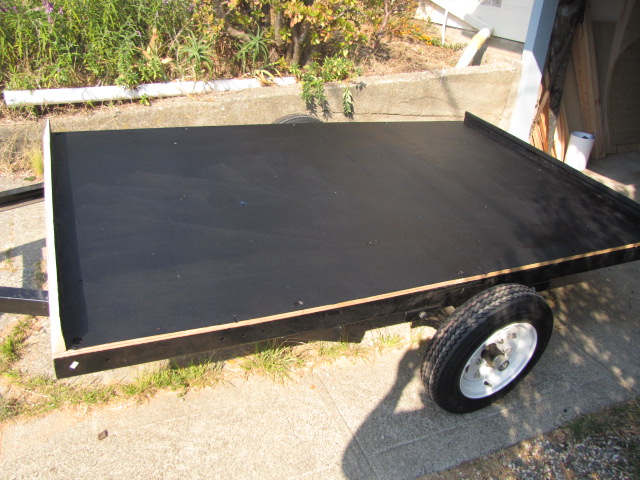
IMG_2443.JPG (136.93 KiB) Viewed 2492 times


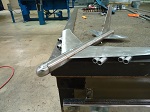
At some point, I realized i needed a trailer hitch on my car. So that was another project, bolting and wiring the hitch on my Lexus. I plan on taking the trailer down and registering before I put the teardrop on it. In California, you can register a utility trailer and they don't count the camper as a permanent part of the trailer! I spent an hour or so towing the trailer around the neighborhood and practicing backing as it has been a while since I parked a trailer.

IMG_2447.JPG
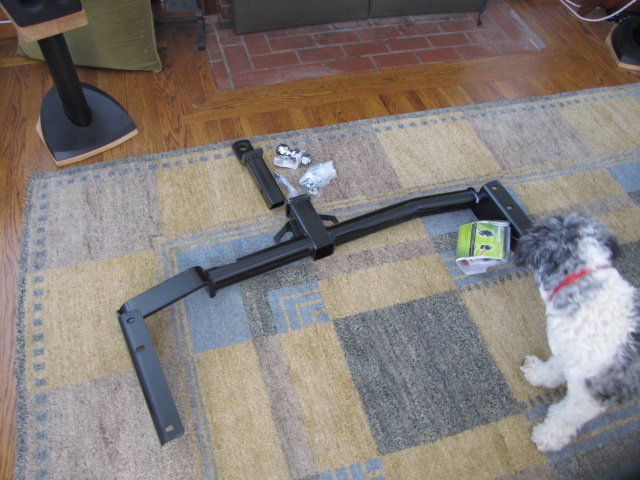
IMG_2447.JPG (128.72 KiB) Viewed 2492 times


So then I bolted the bottom down. NOW, I can get on to more interesting fun and detailed things. The roof is next and I ordered my stargazer window, fan and hatch hinge. I can't wait to start really putting this together.

Wish me luck with the DMV.


IMG_2449.JPG
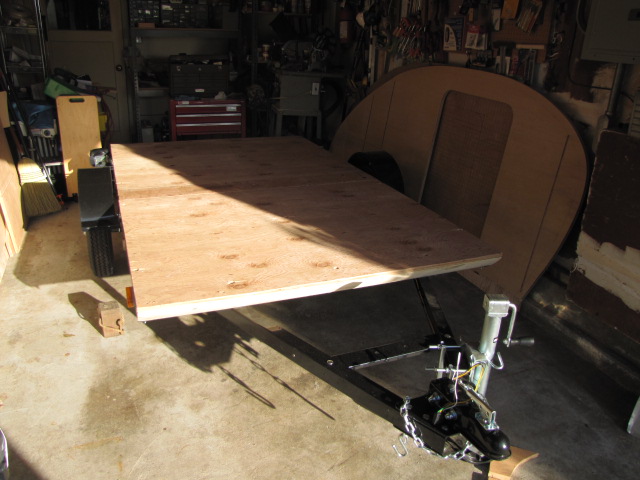
IMG_2449.JPG (100.31 KiB) Viewed 2492 times
"If only I knew what I know now when I started . . ."

My Build Journal http://www.tnttt.com/viewtopic.php?f=50&t=56916
User avatar
drewh1
Donating Member
 
Posts: 245
Images: 7
Joined: Sat Aug 03, 2013 3:01 pm
Location: El Cerrito, CA
Top

PreviousNext

Return to Build Journals

Who is online

Users browsing this forum: No registered users and 4 guests