4-Day Weekender - Toddler bed!

...ask your questions in the appropriate forums BUT document your build here...preferably in a single thread...dates for updates, are appreciated....

Re: 4-Day Weekender - Redesign required?

Postby Kharn » Tue Mar 11, 2014 5:00 am

I'm still working out my plywood count for the MDO sheets. The lumber yard with the stuff in stock has a $250 minimum order for non-tradesmen so I need to make sure I get it 100% right. I'm currently looking at 2 4x10x3/4" sheets (walls), 8 4x8x1/2" (floor, roof, etc) and 1 4x8x3/4" (galley/cabin bulkhead), its not very sheet efficient due to being 62" wide. I decided not to go 60" wide and use 5x8 plywood because I didn't want to get a batch of 59.5" wood and end up with a bunch of design headaches; 62" wide gives a 60.5" interior so there's a little extra space for changing sheets on the mattress on a standard queen mattress.

I'm going to go with drilling my own tongue extension, my brother has a large enough drill press and I have a source for the steel, but the steel store is only open Mon-Fri so when I decided to do it last Friday afternoon it was too late to get over there and get a custom cut piece.

So much for "campable by St Paddy's" :oops:
User avatar
Kharn
500 Club
 
Posts: 655
Images: 1
Joined: Sun Jul 17, 2011 1:54 pm

Re: 4-Day Weekender - Slowly getting closer

Postby absolutsnwbrdr » Tue Mar 11, 2014 9:27 am

Did you get your tractor out of the way yet? You're gonna need the room after you pick up all that wood!
Zach
Coming Soon...
Image Image
User avatar
absolutsnwbrdr
Donating Member
 
Posts: 2657
Images: 412
Joined: Mon Jan 25, 2010 6:10 pm
Location: Hanover, PA

Re: 4-Day Weekender - Slowly getting closer

Postby Kharn » Tue Mar 11, 2014 8:18 pm

Tractor's off, it was a little adventurous driving it across the snow while praying it didn't get stuck because my second course of action would have required snow-blowing a path to the shed.

I hit Tractor Supply today for bolts, nuts and washers to connect the tongue extension together.
User avatar
Kharn
500 Club
 
Posts: 655
Images: 1
Joined: Sun Jul 17, 2011 1:54 pm
Top

Re: 4-Day Weekender - Slowly getting closer

Postby Kharn » Fri Mar 14, 2014 7:35 pm

I decided to drill the metal myself, so I picked it up and drilled 5 of the 8 required holes (4 for the new coupler, 1 for the second cross member) on my brother's drill press. I have a 3/8" press, so I can at least start the remaining 3 holes (1 for the first cross member, 2 for the original coupler) before having to move up to a 1/2" hand drill. One of the vertical holes on the coupler (the manufacturer says two 1/2" through-bolts horizontally are sufficient, but I need a place to attach the chains and figured a 4th bolt can't hurt) is slightly out of position and will require a 7/16" bolt, but the other three are correctly aligned with each other so I can use 1/2" bolts.

Tomorrow is disassembling the stock hitch and drilling the remaining holes. I expect the first cross member hole to be the biggest problem, since that will be centered on the weld (and its rough bead on the inside of the tube), the two horizontal ones for the original coupler should go much easier. If I was doing it over again, I would have bought the metal and taken it along with the trailer to my dad's when I picked up the tractor, so I could use the mill in his shop and do it right rather than now having to use a handheld drill. Sunday, I'll cut off the original safety chain hooks & replace them with quick links, plus hopefully paint the extension and original tongue.

One thing I realized today is the extra hitch length means I'll have to store the trailer in my garage nose-in, so it can go past the table saw. I bought a HF trailer dolly to make it easier to move the trailer around.
User avatar
Kharn
500 Club
 
Posts: 655
Images: 1
Joined: Sun Jul 17, 2011 1:54 pm
Top

Re: 4-Day Weekender - Tongue extension

Postby Kharn » Sat Mar 15, 2014 1:27 pm

So here's what I had to work with for drilling the remaining 3 holes. :lol:
Drill.jpg
Drill.jpg (207.55 KiB) Viewed 2687 times

And here's the test fit.
Tongue test fit.jpg
Tongue test fit.jpg (151.24 KiB) Viewed 2687 times

I've disassembled it so I can paint the extension and the factory tongue.

Going slow, and using a ton of 5W30 as cutting fluid made it super easy. But now I have a big 5W30/steel shavings stain on my driveway. :thumbdown:
User avatar
Kharn
500 Club
 
Posts: 655
Images: 1
Joined: Sun Jul 17, 2011 1:54 pm
Top

Re: 4-Day Weekender - Tongue extension

Postby Kharn » Sun Mar 16, 2014 3:03 pm

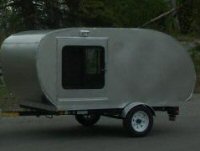
We met up with the Chesapeake Tearjerkers last night for the first camp-out of the season. I got a bunch of good ideas, I really liked the Magnadyne dual 12v/dual USB unit, it has a flat bottom, screw holes and instructions for permanent wiring so it is a nicer solution than several other options I was looking at.

I put two coats of paint on the tongue parts and visible parts of the frame today (I've heard the HF paint fades to pink in time, so that had to be corrected). I'm really glad I had a good respirator from some previous work, the fumes from Rustoleum's hammered finish paint are incredibly nasty. :? I also opted to buy several cheap brushes instead of investing in a gallon of xylene to use as a thinner/cleaner since I doubt I'll ever use this stuff again.

I've been researching fiberglass/epoxy while waiting for the paint to dry, I had a bunch of questions so I posted them in the teardrop construction forum.

Next up is electrical planning.
Rough design:
-120v duplex plus one of the Magnadyne units on each side of the bed
-Two 120v duplex outlets and another Magnadyne in the galley.
-Duplex 120v outlet and two 12v outlets on exterior of tongue box, so we can power our 12v drop lights while making camp or playing cards out of range of the porch lights even if the galley and cabin doors are closed.

I have to call the plywood vendor tomorrow to find out what their stock levels are and if out of stock, the lead time for delivery. I can't make much progress on the floor without the plywood to build the under floor storage or wheel wells. I also have to figure out what I'm doing with the extra two stabilizer jacks I ended up with, I might be able to run them from the stock tongue to the extension, but then I'd have to make sure the tongue box covers their jack screws or else someone might get an uncomfortable surprise while walking around the camper in the dark. :shock:

I plan to make saw dust next weekend with the under-bed framing. Finally. :oops:
User avatar
Kharn
500 Club
 
Posts: 655
Images: 1
Joined: Sun Jul 17, 2011 1:54 pm
Top

Re: 4-Day Weekender - Tongue extension

Postby absolutsnwbrdr » Mon Mar 17, 2014 1:00 pm

Nice seeing you and Tiff this weekend. Better hurry up and cut some wood before she gets her way. :lol:
Zach
Coming Soon...
Image Image
User avatar
absolutsnwbrdr
Donating Member
 
Posts: 2657
Images: 412
Joined: Mon Jan 25, 2010 6:10 pm
Location: Hanover, PA
Top

Re: 4-Day Weekender - Tongue extension

Postby jbyrd » Mon Mar 17, 2014 1:14 pm

I have looked through your whole build so far and liking what i'm seeing so far! I have to ask what size metal did you use for your tongue extension and did you attach the whole thing with bolts?
Til later, See ya
Jeremy

My build journal #1 "SOLD" : viewtopic.php?t=45945
my build journal #2 "SOLD": viewtopic.php?f=50&t=59216
User avatar
jbyrd
Teardrop Master
 
Posts: 146
Images: 172
Joined: Sun Aug 28, 2011 8:24 pm
Location: marianna, Florida
Top

Re: 4-Day Weekender - Tongue extension

Postby Kharn » Mon Mar 17, 2014 2:03 pm

It is 2" square tube, 84" long, 3/16" wall thickness, which cost about $58 at Metals Supermarket.
It has a 1/2" bolt at each of the first two crossmembers, two horizontal 12mm (I'm reusing the HF bolts but had to add some washers for spacing) bolts at the inverted original coupler, 3 1/2" and one 3/8" bolt at the new coupler. All of the inch bolts are Grade 8, they were only $1.50/lb more expensive than Grade 5 at Tractor Supply.
User avatar
Kharn
500 Club
 
Posts: 655
Images: 1
Joined: Sun Jul 17, 2011 1:54 pm
Top

Re: 4-Day Weekender - Tongue extension

Postby Kharn » Mon Mar 17, 2014 4:01 pm

Zach,
You'd better hurry up with those Lowes runs, my MDO is being delivered on Friday. :FNP
User avatar
Kharn
500 Club
 
Posts: 655
Images: 1
Joined: Sun Jul 17, 2011 1:54 pm
Top

Re: 4-Day Weekender - Tongue extension

Postby absolutsnwbrdr » Tue Mar 18, 2014 9:00 am

Kharn wrote:Zach,
You'd better hurry up with those Lowes runs, my MDO is being delivered on Friday. :FNP


This sounds like a challenge to me.... :twisted:
Zach
Coming Soon...
Image Image
User avatar
absolutsnwbrdr
Donating Member
 
Posts: 2657
Images: 412
Joined: Mon Jan 25, 2010 6:10 pm
Location: Hanover, PA
Top

Re: 4-Day Weekender - Tongue extension

Postby Kharn » Thu Mar 20, 2014 4:26 pm

I put a third coat of paint on the tongue parts last night, mainly touching up the areas that had been supporting the parts while I did the first two coats. Now I need to reassemble the tongue tonight so I can get the trailer out of the garage for when the MDO shows up. After that, its time to pick up a load of 2x4s and start ripping them down for the floor.
User avatar
Kharn
500 Club
 
Posts: 655
Images: 1
Joined: Sun Jul 17, 2011 1:54 pm
Top

Re: 4-Day Weekender - Tongue extension

Postby Kharn » Fri Mar 21, 2014 11:01 am

I had just finished cleaning up the garage from painting the tongue extension and moving stuff to make room for the MDO when the truck showed up. 14 sheets in the garage, a tip in the driver's hand and now I'm, well, ready to play with CAD some more. :oops:

My side panel design originally had two notched sections, at the front and back of the trailer, so that those side-to-side panels wouldn't have an exposed bottom edge, but a notch is not easy to cut with a circular saw so I'm going to redesign those two spots and fix some other small issues.

I did find out my 3" tongue/coupler bolts aren't long enough, I never thought about how thick washers for 1/2" bolts are so I need to get two 3.5" bolts sometime this week as the 3" ones don't touch the nylon part of the lock nuts. I must not have mixed the paint up very well for the third coat, it has more of a flat appearance than the intended hammered finish, but those spots are mainly in non-visible areas.

I also tested out my tongue lock, it works with the new coupler.
Painted frame 20140321.jpg
Painted frame 20140321.jpg (192.46 KiB) Viewed 2499 times


I'm debating moving my battery from the tongue box to the first bay and adding provisions for a second battery, I'd never realized there were 12v heated blankets available so I might want some extra amp-hours in the future. :snowstorm: One problem would be sealing the access panel in the floor, I guess I could put weather stripping around it and screw it down since I'd only ever need access to change a battery every few years. I'd also prefer some impact protection for the batteries, maybe I'd put a scrap of plywood on the forward, bottom and outside faces to protect them from rocks, etc.

ETA:
And the mailman brought my PD4045 and the Magnadyne's. :twisted:
User avatar
Kharn
500 Club
 
Posts: 655
Images: 1
Joined: Sun Jul 17, 2011 1:54 pm
Top

Re: 4-Day Weekender - Plywood's here

Postby Kharn » Sat Mar 22, 2014 2:01 pm

I decided to jump into the double-battery-under-the-bed design with both feet.
Zach might brag about using a jigsaw to cut his, but that didn't work for me as it broke one blade and just made a mess of things (it seemed like half the stuff on my workbench ended up on the floor :x ). So I switched to the angle grinder and woke up the neighborhood around 8:30 this morning.

The angle grinder worked awesome. I also found another key to using angle iron is to always cut through the middle of a hole or slot, to keep the spacing correct and make squaring everything easier.

I included an extra 1/2" of space on each side of the battery so that each front and bottom face, plus the outer face (since they'll be just 4" apart across the tongue bar, I didn't think they warranted protection between them), can have a piece of plywood to keep a stone or whatever from wrecking a battery. I'll probably just use one battery for the time being and add the second one if we are going to do any cold-weather camping, but I wanted to have both cages installed during the build vs trying to copy the first cage afterwards.

20140322 battery cages small.jpg
20140322 battery cages small.jpg (84.11 KiB) Viewed 2455 times

You can see one of the scraps of OSB I was using to test the sizing.

The battery protrudes above the cage about an inch, since it will be lag-bolted to the 2" joists that will support the bed, and accessed from above, so it didn't have to be the full depth of the battery.
User avatar
Kharn
500 Club
 
Posts: 655
Images: 1
Joined: Sun Jul 17, 2011 1:54 pm
Top

Re: 4-Day Weekender - Plywood's here

Postby jbyrd » Sat Mar 22, 2014 3:35 pm

pretty good idea for the batteries :thumbsup:
Til later, See ya
Jeremy

My build journal #1 "SOLD" : viewtopic.php?t=45945
my build journal #2 "SOLD": viewtopic.php?f=50&t=59216
User avatar
jbyrd
Teardrop Master
 
Posts: 146
Images: 172
Joined: Sun Aug 28, 2011 8:24 pm
Location: marianna, Florida
Top

PreviousNext

Return to Build Journals

Who is online

Users browsing this forum: No registered users and 35 guests