Father-Daughter Build 2013-14

...ask your questions in the appropriate forums BUT document your build here...preferably in a single thread...dates for updates, are appreciated....

Re: Father-Daughter Build 2013-14

Postby KCStudly » Sat Dec 07, 2013 10:29 am

I took the approach of designing from the ground up as if everything depended on each other. In some small way I feel that this approach should save weight at the end. Where the seams in my floor land on the trailer xmbrs; where the blocks in the floor for the bolts to the trailer also receive the screws from the galley counter face frame legs where they met the floor; where I needed to attach anything to the wall there is suitable blocking placed before skinning (that meant deciding on everything up front: dome lights, coat hooks, light switch locations, pillow light location, wiring paths, etc.), and so on. The more things that can tie together and do double duty, the stronger and lighter the build should be.

For some things it is not such a big deal to go back and redesign or make additions as you go, but for other things it can create very difficult situations to do rework once things have already started to come together. I'm a detail guy and "that's how I roll" and I guess it can be different depending on the style of construction (I am using very thin ply for my inner skin and minimal wall framing, mostly just dedicated blocks glued in wherever anything needs to be attached).

All that being said, it seems that there is no wrong way to build a TD, so long as it does not leak. The most important thing to do is to have fun... and post pics as you go! :thumbsup:
KC
My Build: The Poet Creek Express Hybrid Foamie

Poet Creek Or Bust
Engineering the TLAR way - "That Looks About Right"
TnTTT ORIGINAL 200A LANTERN CLUB = "The 200A Gang"
Green Lantern Corpsmen
User avatar
KCStudly
Donating Member
 
Posts: 9613
Images: 8169
Joined: Mon Feb 06, 2012 10:18 pm
Location: Southeastern CT, USA

Re: Father-Daughter Build 2013-14

Postby lfrazer98 » Sat Dec 07, 2013 1:10 pm

KCStudly wrote:I took the approach of designing from the ground up as if everything depended on each other. In some small way I feel that this approach should save weight at the end. Where the seams in my floor land on the trailer xmbrs; where the blocks in the floor for the bolts to the trailer also receive the screws from the galley counter face frame legs where they met the floor; where I needed to attach anything to the wall there is suitable blocking placed before skinning (that meant deciding on everything up front: dome lights, coat hooks, light switch locations, pillow light location, wiring paths, etc.), and so on. The more things that can tie together and do double duty, the stronger and lighter the build should be.

For some things it is not such a big deal to go back and redesign or make additions as you go, but for other things it can create very difficult situations to do rework once things have already started to come together. I'm a detail guy and "that's how I roll" and I guess it can be different depending on the style of construction (I am using very thin ply for my inner skin and minimal wall framing, mostly just dedicated blocks glued in wherever anything needs to be attached).

I completely agree with you. I am trying to see how every detail will fit together so that I am not adding pieces as I go. I know many people say they want to make it perfect, as I do, but I know it won't be. I just want to put as much planning into it as possible. The more I think about it, the more it all comes together. :)

You can just glue your blocks between the skins and that is enough to attach to? I am picturing framing blocks between the skins of the walls. Is that what you are talking about? Just curious. We are cutting the metal off of the frame today and then going to design our floor and walls. Got lots of reading to do in the next week.
Going to go out and take a picture of the man doing all the hard work at the moment! :applause:

Will be back later with an update!
User avatar
lfrazer98
Teardrop Master
 
Posts: 204
Images: 217
Joined: Tue Sep 17, 2013 6:25 pm
Location: New York

Re: Father-Daughter Build 2013-14

Postby lfrazer98 » Sat Dec 07, 2013 4:42 pm

Jim removed the side rails after we both took a step back and tried to figure out the best approach. It only took about 3 hours total, including a trip to the store to buy more cutting blades (T 27, 4 1/2", 1/16" thick). We still have some weld remnants along the frame to clean up, but all in all, we (he) made a lot of progress today. :thumbsup:
115011
115012
Next steps are to get all the rust off the trailer, primed and painted, get the wheels sand blasted, primed and painted, check the wheel bearings, and finalize our floor plan. I will probably work on the interior cabinets in the mean time. More to come next week!
User avatar
lfrazer98
Teardrop Master
 
Posts: 204
Images: 217
Joined: Tue Sep 17, 2013 6:25 pm
Location: New York
Top

Re: Father-Daughter Build 2013-14

Postby jdarkoregon » Sat Dec 07, 2013 6:03 pm

lfrazer98 wrote:Image
Revised profile sketch. Don't mind the question marks and scribbles :D Still deciding


You are going to love that shelf in the front.

John
Innovation is essential
The world can be better
ImageImage
User avatar
jdarkoregon
Donating Member
 
Posts: 1236
Images: 47
Joined: Mon Aug 22, 2005 7:07 pm
Location: Oregon, Sublimity
Top

Re: Father-Daughter Build 2013-14

Postby KCStudly » Sat Dec 07, 2013 9:31 pm

lfrazer98 wrote:You can just glue your blocks between the skins and that is enough to attach to? I am picturing framing blocks between the skins of the walls. Is that what you are talking about?

Sorry to confuse, my build is a hybrid foamie, so rather than having a bunch of wood framing, I routed pockets in the 1-1/2 inch thk foam, 3/4 deep on either side for blocks at all of my attachment points. By unitizing my cabinet frames, modifying the traditional Benroy profile to have a continuously arched roof, and using stressed panel (torsion box) construction techniques I hope to combine the light weight properties of the foamie style of construction (and its thrifty elimination of aluminum skin and trim) with the warm wooden interior appearance of a traditional tear.

As to weight savings, time will tell if it has been worth the effort. As to Mike's quote about the cost of the best materials, I have no regrets.

It is difficult to figure the benefit of the mental, physical and psychological rewards that come with such a commitment. In my case I feel that the journey is equal to the destination.
KC
My Build: The Poet Creek Express Hybrid Foamie

Poet Creek Or Bust
Engineering the TLAR way - "That Looks About Right"
TnTTT ORIGINAL 200A LANTERN CLUB = "The 200A Gang"
Green Lantern Corpsmen
User avatar
KCStudly
Donating Member
 
Posts: 9613
Images: 8169
Joined: Mon Feb 06, 2012 10:18 pm
Location: Southeastern CT, USA
Top

Re: Father-Daughter Build 2013-14

Postby lfrazer98 » Sat Dec 07, 2013 10:23 pm

When I first got on here and I was reading about how to build a tear, I tried to look up information on foamies, but I don't think I was looking in the right place. I get what you are saying though, KC. I figured it was foam interior and no skeleton. I bet they must be super light!
User avatar
lfrazer98
Teardrop Master
 
Posts: 204
Images: 217
Joined: Tue Sep 17, 2013 6:25 pm
Location: New York
Top

Re: Father-Daughter Build 2013-14

Postby lfrazer98 » Sat Dec 07, 2013 10:27 pm

jdarkoregon wrote:You are going to love that shelf in the front.

John


I figured it would come in handy for blanket storage and such, but also for all the last minute things you put down before sleep: book, glasses, phone, etc. Does it seem about the right height? I think I measured it to be about 15-18 inches above the mattress, but I would have to double check.
Thanks, John!
User avatar
lfrazer98
Teardrop Master
 
Posts: 204
Images: 217
Joined: Tue Sep 17, 2013 6:25 pm
Location: New York
Top

Re: Father-Daughter Build 2013-14

Postby Esteban » Sun Dec 08, 2013 1:36 pm

Lauren, your design is evolving nicely.

If you use (part of) a 4' x 8' sheet of plywood for your galley counter top you could cut its 8' length down to fit your galleys width and leave the plywood the full 48" width so that part of it extends into the cabin area about 18" (minus the thickness of the upper bulkhead). That would create a shelf and or the bottom part of some cabin cabinets. 1/2" plywood should work.

You could build/install the lower part of the bulkhead first. Then install the counter top/shelf above it. Then build/install the upper part of the bulkhead. The upper bulkhead could line up with the lower bulkhead or be off set from it...whichever best meets your needs/design.

You might use the nominally 3' x 4' left over part of the plywood for (parts of) the dividers beneath the counter top in the galley or for dividers in cabinets in the cabin. I imagine the dividers below the galley counter top would each be a bit less than 19" tall by about 30" long per you sketch. Easily cut out of the roughly 36" by 48" part left over from the counter top.

Just an idea.

BTW, do you or your Dad have a pocket hole tool? Kreg is the well known brand. Harbor Freight sells one harborfreight.com/portable-pocket-hole-jig-kit-96264 for less that is well reviewed at lumberjocks.com a very useful web site I learned about here at tnttt. http://lumberjocks.com review of Harbor Freight Drill Master Pocket Hole Jig Pocket hole jigs are wonderful tools for building a teardrop trailer. They save time and help you to build stronger joints for cabinetry and much much more.

I apologize in advance for directing your attention to LumberJocks, another great web site, that may burn up more of your free time. Its filled with good/wonderful information and people. Its complimentary to tnttt because we teardrop builders often need to learn about cabinet making. LumberJocks is a go to place for that kind of knowledge. Several people there have built teardrop campers. Juneaudave@LumberJocks
:D
Last edited by Esteban on Sun Dec 08, 2013 3:09 pm, edited 1 time in total.
Steve - SLO, CA
Esteban
Donating Member
 
Posts: 1684
Images: 15
Joined: Fri Jul 28, 2006 4:39 pm
Location: California, San Luis Obispo
Top

Re: Father-Daughter Build 2013-14

Postby lfrazer98 » Sun Dec 08, 2013 3:08 pm

Esteban wrote:Lauren, your design is evolving nicely.

If you use (part of) a 4' x 8' sheet of plywood for your galley counter top you could cut its 8' length down to fit your galleys width and leave the plywood the full 48" width so that part of it extends into the cabin area about 18" (minus the thickness of the upper bulkhead). That would create a shelf and or the bottom part of some cabin cabinets. 1/2" plywood should work.

You could build/install the lower part of the bulkhead first. Then install the counter top/shelf above it. Then build/install the upper part of the bulkhead. The upper bulkhead could line up with the lower bulkhead or be off set from it...whichever best meets your needs/design.

You might use the nominally 3' x 4' left over part of the plywood for (parts of) the dividers beneath the counter top in the galley or for dividers in cabinets in the cabin. I imagine the dividers below the galley counter top would each be a bit less than 19" tall by about 30" long per you sketch. Easily cut out of the roughly 36" by 48" part left over from the counter top.


Steve,
That sounds like a good idea. I did mention to my father about extending the ply for the counter top into the interior for cabinets, but I wanted to check out the foot clearance. I toss and turn so I didn't want anything too low that I might kick. :lol: I don't want to go any deeper into the interior with the upper galley cabinets because I am not sure I could reach! I actually may still have room behind the lower cabinets in the center to have interior storage at the foot of my bed, Only 2 feet wide, but storage none the less. I have a feeling that my interior cabinets won't extend far enough into the interior, if that makes sense. I am sure that I am just over thinking it, but I figure that I don't need interior cabinets over 15-18 inches deep. What do you think? I was thinking a "cubby" on the left and right with an open compartment in the middle for a portable DVD player or my computer. I think extending the counter top ply would be too low for this. Maybe just a shelf then and cabinets above...
User avatar
lfrazer98
Teardrop Master
 
Posts: 204
Images: 217
Joined: Tue Sep 17, 2013 6:25 pm
Location: New York
Top

Re: Father-Daughter Build 2013-14

Postby Esteban » Sun Dec 08, 2013 3:35 pm

Lauren,

Only you know how much "stuff" you will want to carry in the cabin. An upper cabinet or shelves are very handy and its a good place for them over your feet. For one reason it keeps storage weight near the axle. You plan a counter height of 19". Less your 6" mattress that leaves almost 13" for your feet. Enough? A 6" mattress is pretty generous.

If 17" is too deep for an upper cabinet for your use/taste you can cut it down. Me, I'd keep it at 17" and enjoy it. More room for clothes and bulky things like a jacket, blankets, pillows, etc.

That lower middle space of yours might be nice for shoes, etc. Or the battery.

BTW, where do you plan to store your battery? Two choices are typical. In the galley or on the tongue. 3rd option...Halfdomedanny puts two batteries below the floor with hatches thru the floor for service access. Personal choice again rules.

Have you seen this video?

Your trailer will be bigger (2 ft. longer) than hers so you can have more generous storage space if you want/need it.

I have gone back and forth about my ideal inside cabinets. Sometimes I favor all (above your feet) upper cabinets. Other times I favor a lower open shelf like in the above video. I lean a little bit more toward all upper cabinets with doors to contain/hide any clutter. It's really a personal choice to work with the space you have available and your needs/wants/ability/budget/aesthetic sense. :) :thinking:

An Ipad or similar tablet would take up very little room for a video device. Technology changes so fast I'd be hesitant to custom make a space to fit an entertainment device.
Last edited by Esteban on Sun Dec 08, 2013 5:08 pm, edited 1 time in total.
Steve - SLO, CA
Esteban
Donating Member
 
Posts: 1684
Images: 15
Joined: Fri Jul 28, 2006 4:39 pm
Location: California, San Luis Obispo
Top

Re: Father-Daughter Build 2013-14

Postby Esteban » Sun Dec 08, 2013 4:58 pm

Lauren,

In your sketch I see an easy opportunity to add more storage. How: extend the curvature of the galley hatch rearward at the height of you counter top. It could extend rearward a few more inches at the counter top level than it would at the floor level. I think that's how the Grumman II hatch looks. Easy peasy.

You then could move the counter top and under counter cabinets/drawers closer to the back. There would be less bending over and reaching. It should be easier on your back The inches gained could be used where ever you want. I see an easy opportunity to make your front shelf/cabinet deeper by the inches gained. Or it may create more room for the battery and battery box in the galley.
:thinking: :thinking: :thinking:

Or (maybe in addition) you could gain room by using a fridge/freezer like a TruckFridge which is only 23" long (28" including detachable handles), instead of a longer cooler chilled by ice. truckfridge.com Your roof has room for solar power too. Together they would make longer trips easier to do.
:thinking:
Steve - SLO, CA
Esteban
Donating Member
 
Posts: 1684
Images: 15
Joined: Fri Jul 28, 2006 4:39 pm
Location: California, San Luis Obispo
Top

Re: Father-Daughter Build 2013-14

Postby KCStudly » Sun Dec 08, 2013 6:32 pm

This ^ was exactly the approach that I took.
Image

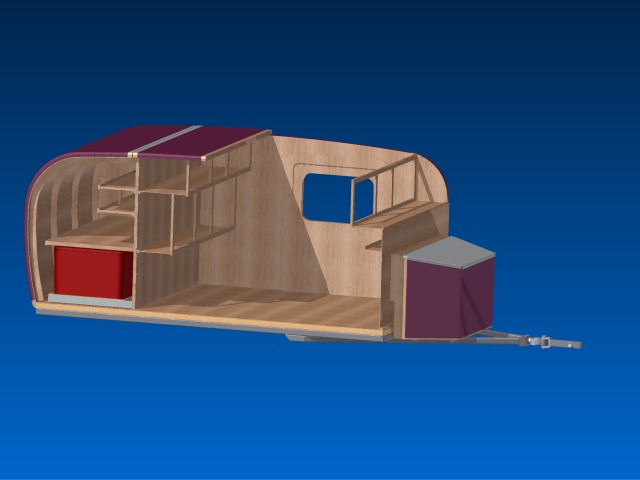
By using a modified Benroy profile with the rear curve pushed out into a "bustle", I was able to have the cooler extend lengthwise from under the galley counter, preserving lots of storage space next to it under the counter, yet keep the counter and upper galley shelves relatively close to the rear; the bustle effect, rather than a long sloping tear. I purposely kept the rear cabinets high and relatively close to the bulkhead to preserve interior space, so as not to feel claustrophobic. By having the front wall straight vertical with a smaller radius at the top, making the key catcher shelf just a shelf, and putting the front cabinet over the pillows I am gaining quite a bit of storage space at the front. Doing this I have been able to keep my overall floor length down to about 9ft-8in. Not as curvy as a traditional tear, but if you are going to put a tongue box on it, the front curved wall is less important to the profile and the shape of the tongue box can help blend.

I haven't mocked-up all of the cabinets at the same time, but all of my tests (sitting down in the doorway and doing the spin and lay test, as well as sitting in the cabin akimbo) suggests that my planning has paid off; it is very roomy inside and no danger of hitting my head on the cabinet edges. I was a little worried about the height of the lower rear cabinet above the mattress (I left 18 inches up from the floor and plan on a 4 to 6 inch mattress... will probably start with 4 inch thk and add 1 inch thk dense interlocking exercise tiles if we bottom out), but since it is stepped back under the upper cabinet, it doesn't stick out very far so should not be a shin knocker.

Shape is such a personal choice, but if you are going with a Benroy, maybe these ideas can help you have more confidence in your plan.

One thing I will add is that someone (I think it was Sharon) found she did not like having the catcher shelf behind her. She found it was not as practical as she would have liked, so she added corner shelves that come forward a bit more on the sides. I went ahead with mine the way I had planned, but it is another data point to consider.
KC
My Build: The Poet Creek Express Hybrid Foamie

Poet Creek Or Bust
Engineering the TLAR way - "That Looks About Right"
TnTTT ORIGINAL 200A LANTERN CLUB = "The 200A Gang"
Green Lantern Corpsmen
User avatar
KCStudly
Donating Member
 
Posts: 9613
Images: 8169
Joined: Mon Feb 06, 2012 10:18 pm
Location: Southeastern CT, USA
Top

Re: Father-Daughter Build 2013-14

Postby oakinteriors1 » Sun Dec 08, 2013 6:44 pm

lfrazer98 wrote:
I am sure that I am just over thinking it, but I figure that I don't need interior cabinets over 15-18 inches deep. What do you think? I was thinking a "cubby" on the left and right with an open compartment in the middle for a portable DVD player or my computer. I think extending the counter top ply would be too low for this. Maybe just a shelf then and cabinets above...


My cabinets at the foot of the bed are 18'' deep and 20'' off the floor...So with a 5'' mattress you still have plenty of room...And we like storage that is why I ran the head board cabinets up so tall to be able to hang clothes in the center cabinet...
User avatar
oakinteriors1
Silver Donating Member
 
Posts: 297
Images: 1
Joined: Tue Sep 03, 2013 4:47 pm
Location: Bates City Mo.
Top

Re: Father-Daughter Build 2013-14

Postby KennethW » Sun Dec 08, 2013 6:52 pm

If you move the hinge back a little you will get more shade-rain cover when cooking.
110010113386
I like the under curve in that I have never bump my knees.
Just my thoughts
KennethW
1000 Club
1000 Club
 
Posts: 1188
Images: 82
Joined: Wed Feb 20, 2013 8:01 pm
Top

Re: Father-Daughter Build 2013-14

Postby KCStudly » Sun Dec 08, 2013 7:04 pm

My modeling showed that if I put the hinge further back the hatch would have to rotate further up for adequate headroom and that the overall overhang in that position would be about the same. The way I have it more of the hatch is higher (so I should be able to walk right in under it), and the back of the hatch is flatter at the top when it is open so it will look better to my eye.

Each situation could be different, so it pays to check it out beforehand. You don't need fancy computer software. Graph paper and scissors can get the job done.

I don't mean to high jack your thread, Lauren, but since you are deep into your planning stage, this all seems to be germane.
KC
My Build: The Poet Creek Express Hybrid Foamie

Poet Creek Or Bust
Engineering the TLAR way - "That Looks About Right"
TnTTT ORIGINAL 200A LANTERN CLUB = "The 200A Gang"
Green Lantern Corpsmen
User avatar
KCStudly
Donating Member
 
Posts: 9613
Images: 8169
Joined: Mon Feb 06, 2012 10:18 pm
Location: Southeastern CT, USA
Top

PreviousNext

Return to Build Journals

Who is online

Users browsing this forum: No registered users and 57 guests