Lil' Nugget build

...ask your questions in the appropriate forums BUT document your build here...preferably in a single thread...dates for updates, are appreciated....

Re: Lil' Nugget build

Postby kenafp » Wed Dec 24, 2014 11:40 pm

Thanks, Brian and Sandi!

I realized after I posted that , I need 12v for my Fantastik Fan.
Oh, well.

Anyway, I've been agonizing over the electrical system for weeks. I am like a deer in headlights every time I look at it. :? I have looked at drawings and diagrams. I have put a list of what I want in the TD, and still, my mind has a tough time wrapping around it.
I posted elsewhere that I wish there was an electrical system kit I could use that had the basics, from start to finish, with options being available to add on to it.

It looks like I'll have to have a 12v system and a shore power system.
I'd also like to be able to use a battery system to power a TV, DVD, juicer and blender. I guess that means I need an inverter?
Also, it would be nice to be able to charge the battery (ies) while plugged into shore line power and/or running from my car battery and/or a solar backup trickle charger (which I already have).

I get confuse over whether I need a fuse box and where to put it, and for how many amps.
I still have time to decide, but I am getting close.

In the meantime, while I haven't taken pictures of it yet, my galley is shaping up. I found that my cabinets on the inside of the TD are about 18 inches deep, and I could shorten them to 12", giving me 6 more inches for cabinets in the galley. I'll have to make that adjustment in the next couple of days.

I also have some adjustments to consider in building my hatch since the darned thing isn't square.
It's a good life!
Ken

Build Journal: viewtopic.php?f=50&t=60665
User avatar
kenafp
Teardrop Advisor
 
Posts: 87
Joined: Sat Nov 02, 2013 6:14 am
Location: Timonium, Md

Re: Lil' Nugget build

Postby kenafp » Fri Dec 26, 2014 9:50 pm

After trying to figure out why so many measurements are out of whack with my TD, I think I should rename her The Cattywampus.
It's a good life!
Ken

Build Journal: viewtopic.php?f=50&t=60665
User avatar
kenafp
Teardrop Advisor
 
Posts: 87
Joined: Sat Nov 02, 2013 6:14 am
Location: Timonium, Md

Re: Lil' Nugget build

Postby rebapuck » Sat Dec 27, 2014 1:08 am

Just keep plugging away. It will come together.
Judy
1966 VW camper
1967 VW singlecab
Image
User avatar
rebapuck
.
 
Posts: 2243
Images: 1
Joined: Thu May 14, 2009 1:55 pm
Location: Chapel Hill NC
Top

Re: Lil' Nugget build

Postby kenafp » Fri Jan 09, 2015 12:13 pm

Update
I was able to pull Lil Nugget out of the storage unit where I am assembling her.
It was great to finally get a good look from the sides and get some good pictures. You don't always get to appreciate how things are when you work in such close quarters like my storage unit.

Eventually, I will be storing her in another unit that I use for my business. But for now, I will be continuing to rent this for a few more months. It only drives the cost up that much more, unfortunately. But in my own home renovation, I got rid of my garage and turned it into more of a living space, so I am forced to look for space off site of my home.

I haven't seen other pictures of how you fit doors. I was told I needed 1/4 inch on 3 sides and 3/8th inch on the hinge side. So I lined up the doors, noted where I needed to shave it down and took them home to do it in the warmth of my lower level. It's also the place where I will staining and polyurethaning . Feel sorry for my wife since she has to put up with the stink until it dissipates.

20150105_150021.jpg
20150105_150021.jpg (155.91 KiB) Viewed 1437 times

20150105_151627.jpg
20150105_151627.jpg (141.64 KiB) Viewed 1437 times

20150105_151027.jpg
20150105_151027.jpg (58.44 KiB) Viewed 1437 times
It's a good life!
Ken

Build Journal: viewtopic.php?f=50&t=60665
User avatar
kenafp
Teardrop Advisor
 
Posts: 87
Joined: Sat Nov 02, 2013 6:14 am
Location: Timonium, Md
Top

Re: Lil' Nugget build

Postby kenafp » Fri Jan 09, 2015 12:24 pm

Working on building and staining the cabinet fronts...sans doors...
Attachments
20150107_175311.jpg
My note book has come in handy and has become invaluable in figuring out my options
20150107_175311.jpg (68.13 KiB) Viewed 1436 times
20150107_173444.jpg
The headboard. 8.5 inches as a base to account for the mattress
20150107_173444.jpg (75.84 KiB) Viewed 1436 times
20150105_231229.jpg
The foot cabinets facade
20150105_231229.jpg (87.22 KiB) Viewed 1436 times
It's a good life!
Ken

Build Journal: viewtopic.php?f=50&t=60665
User avatar
kenafp
Teardrop Advisor
 
Posts: 87
Joined: Sat Nov 02, 2013 6:14 am
Location: Timonium, Md
Top

Re: Lil' Nugget build

Postby kenafp » Fri Jan 09, 2015 12:34 pm

Will be fitting the foot cabinets here.
20150105_150201.jpg
20150105_150201.jpg (52.03 KiB) Viewed 1440 times


20150105_150057.jpg
20150105_150057.jpg (70.54 KiB) Viewed 1440 times


With the galley, I'm not to sure how I want to configure it. I had an original idea. But decided against that as my plans change.
I figured I still had time to customize it as we get experience out in the field.
20150105_150240.jpg
20150105_150240.jpg (108.03 KiB) Viewed 1440 times
It's a good life!
Ken

Build Journal: viewtopic.php?f=50&t=60665
User avatar
kenafp
Teardrop Advisor
 
Posts: 87
Joined: Sat Nov 02, 2013 6:14 am
Location: Timonium, Md
Top

Re: Lil' Nugget build

Postby kenafp » Fri Jan 09, 2015 1:44 pm

I was able to score a deal on 15" tires. I was about to go to Tractor Supply Store to get them, when it dawned on me to check Craigslist. That day,a guy had posted 4 tires for the same price I was going to buy 1 for! YES!!!

These tires came off of another trailer. The guy hauls high priced cars and wanted to upgrade his rims and tires for his upscale customers. There's a bit of wear on 2 of the tires on the outside edge, but the other two are like new. I wish this kind of luck was constant, and transferable to all my other fellow TD builders!

10897814_10152980040584134_590418975672739971_n.jpg
10897814_10152980040584134_590418975672739971_n.jpg (92.42 KiB) Viewed 1432 times


Now, as I tried to fit them, they weren't a good fit and rubbed up against the spring brackets. On another post, it was suggested to use wheel spacers.
viewtopic.php?f=21&t=60948

After this discussion, I will stick with the spacers for now and make sure they are properly installed and will use red locktite to secure the nuts.
It's a good life!
Ken

Build Journal: viewtopic.php?f=50&t=60665
User avatar
kenafp
Teardrop Advisor
 
Posts: 87
Joined: Sat Nov 02, 2013 6:14 am
Location: Timonium, Md
Top

Re: Lil' Nugget build

Postby kenafp » Wed Jan 14, 2015 1:43 am

Been working on staining and finish coating the doors and cabinet frames. 2 coats of stain and 3 coats of varnish on each side takes a number of days. But I am really pleased with the results.

I was wondering what to do with the over head cabinet and the headboard cabinet openings. I decided on sliding doors. I was able to pick up some cabinet sliding door tracks on ebay at a good price, cheaper than buying router bits. They came today. I'll install them once I put up the frames.
It's a good life!
Ken

Build Journal: viewtopic.php?f=50&t=60665
User avatar
kenafp
Teardrop Advisor
 
Posts: 87
Joined: Sat Nov 02, 2013 6:14 am
Location: Timonium, Md
Top

Re: Lil' Nugget build

Postby kenafp » Wed Jan 14, 2015 9:04 pm

Two problems solved with this insert:
1. I cut the opening for the windows too large in doors
2. The windows are a little too thick for the 1 inch thickness of the wood. This spacer should help it get tighter when screwed down.

A 3rd benefit is that it provides a nice contrast to the darker stain.

20150109_182547 (1).jpg
20150109_182547 (1).jpg (94.91 KiB) Viewed 1325 times


This is just my template. Adjustments will have to be made once I see how this fits.


20150110_134424.jpg
20150110_134424.jpg (10.78 KiB) Viewed 1325 times

20150110_145344 (1).jpg
20150110_145344 (1).jpg (69.93 KiB) Viewed 1325 times


These are the finished cutouts. They fit the windows!
Last edited by kenafp on Wed Jan 14, 2015 9:14 pm, edited 1 time in total.
It's a good life!
Ken

Build Journal: viewtopic.php?f=50&t=60665
User avatar
kenafp
Teardrop Advisor
 
Posts: 87
Joined: Sat Nov 02, 2013 6:14 am
Location: Timonium, Md
Top

Re: Lil' Nugget build

Postby kenafp » Wed Jan 14, 2015 9:09 pm

The staining and finishing process was agonizingly slow.
I didn't have much space to work with and each coat took 6-8 hours to dry before the next one.
The inside is a satin finish, while the exterior is a gloss. Both have two coats of stain and 3 coats of poly/spar varnish.
Once complete, the exterior will get at least another coat of spar varnish.

20150112_123207.jpg
20150112_123207.jpg (18.94 KiB) Viewed 1324 times


20150112_123229.jpg
20150112_123229.jpg (20.93 KiB) Viewed 1324 times


20150114_202324.jpg
20150114_202324.jpg (87.98 KiB) Viewed 1324 times


Now, I'm just waiting on my order for the edge molding to arrive so I can get that done. In the meantime, this will sit and cure.
It's a good life!
Ken

Build Journal: viewtopic.php?f=50&t=60665
User avatar
kenafp
Teardrop Advisor
 
Posts: 87
Joined: Sat Nov 02, 2013 6:14 am
Location: Timonium, Md
Top

Re: Lil' Nugget build

Postby kenafp » Sun Jan 25, 2015 2:48 am

I was a bit anxious to get back to working on the TD. So, hastily, I unwrapped the long tube of parts I got from Grant, and started to cut away. First challenge was that I used a left handed cutting tool that bent the aluminum up one way and down the other. I had to try to straighten out the metal, and this started off looking pretty bad.
As I cut, I installed the pieces of edge molding, and T-molding, as well as the offset door hinge.
BIG MISTAKE!
I should have looked over my supplies, and decided on the best piece to use, instead of just grabbing the first one I could.
I should have cut the pieces, then dry fit them. But I secured the pieces to the door as I cut them. It cause a bit of anxiety.
The topped curved piece was the last piece I cut , shaped and fitted. All the other pieces I cut, applied clear sealant and adhesive and tacked each side with just three short twist nails. I did, at least, make sure that the overlaps at each end allowed for any possibly water to go over the joint, rather than allow it to accept and hold any potential water.
But the top bent piece was a bear. I'm not really sure how to do this right.
I tacked two short twist nails at the end to hold it in place, then as I bent it, I tried to tack additional nails closer together. The only problem was when I mis-hit the nail, I would ding the aluminum t-molding and nick it. I also decided to try using a few pan head screws to see if that might hold better than the nails, which I didn't trust on holding as I feared that the force of the bend might pop out the nails. Worst case scenario is that if the screws are too big for the closing of the door, I'll take them out, and fill with caulk to keep the water from penetrating.
I found that when bending the t-molding that it tended to twist as well, and it was tough keeping the face of the molding on the flat part of the door. I had to take out the nails a few times and re-position it, using clamps to secure the t-molding so it was flush with the front of the door.
I'm a little concerned that the combination of this twisting and the nicking of the t-molding may compromise the integrity of the watertight seal when the door is closed. But I attribute my fear to inexperience, and hope that it will prove to be ok.
The top of the door looks really rough and not well done at all. The second door should be much better.

One note here, is that when I was tacking the nails into the t-molding, I was smart in that I pre-drilled holes for the nails to go into. The one nail I did not do that for caused my set up to almost explode. All the tools and nails I had sitting on top went everywhere.
I'm a little upset that these dings look bad.
I was able to apply some 50 year clear caulk to the edges to seal these. We'll see how this holds up.

QMKbWqWe9YxkpPwnnfk0a5dNw7Q1D1nava3xQJJgs0U=w821-h809-no.jpg
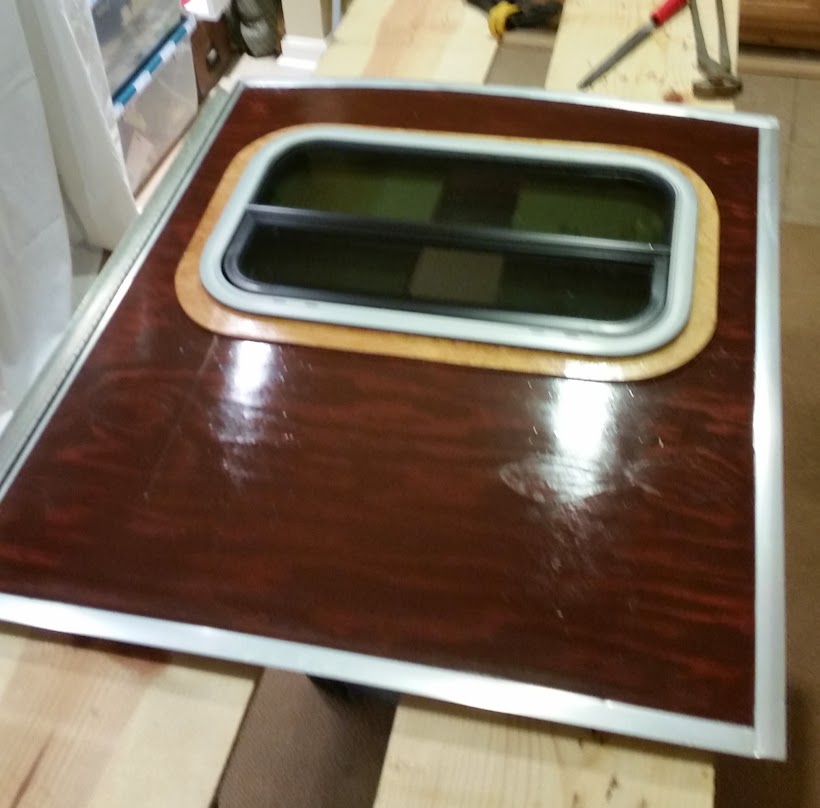
QMKbWqWe9YxkpPwnnfk0a5dNw7Q1D1nava3xQJJgs0U=w821-h809-no.jpg (71.62 KiB) Viewed 1249 times


Here is the diagram from Grant that I used in fitting the t-molding. Grant, I hope you don't mind me sharing these.

door molding.jpg
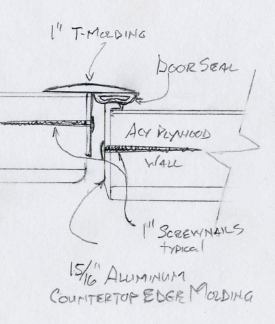
door molding.jpg (12.63 KiB) Viewed 1249 times


offset door hinge.jpg
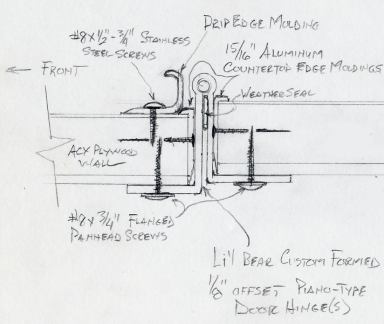
offset door hinge.jpg (17.91 KiB) Viewed 1249 times
It's a good life!
Ken

Build Journal: viewtopic.php?f=50&t=60665
User avatar
kenafp
Teardrop Advisor
 
Posts: 87
Joined: Sat Nov 02, 2013 6:14 am
Location: Timonium, Md
Top

Re: Lil' Nugget build

Postby Johnysteam » Sun Feb 01, 2015 2:45 pm

Looks great. Looking forwards to seeing the assembled unit
User avatar
Johnysteam
Silver Donating Member
 
Posts: 80
Images: 40
Joined: Mon Sep 16, 2013 6:28 pm
Top

Re: Lil' Nugget build

Postby kenafp » Sun Feb 01, 2015 3:22 pm

Thanks Johnny. Me too!
It's a good life!
Ken

Build Journal: viewtopic.php?f=50&t=60665
User avatar
kenafp
Teardrop Advisor
 
Posts: 87
Joined: Sat Nov 02, 2013 6:14 am
Location: Timonium, Md
Top

Re: Lil' Nugget build

Postby Kaman » Sun Sep 06, 2015 11:23 am

Hi Ken
I've read most of your thread and feel like I'm in the same spot you where in a few months back. I need to wire my Td in the next day or two and am unsure how to proceed. I've searched online quite a bit and am pretty confused. I wonder if I can prewire my walls and figure out the charging system and hookups later or if it's critical to understand it before hand.
Did you ever find any particular link that helped you understand it?
Kevin
Kaman
Teardrop Inspector
 
Posts: 5
Joined: Thu Sep 03, 2015 1:08 pm
Top

Re: Lil' Nugget build

Postby kenafp » Sun Sep 06, 2015 1:13 pm

I spoke with an electrician who came over and visually walked me through the wiring. His suggestion was to list where I wanted electricity, outlets, etc.
He told me to get the white cord and go ahead and install my wiring without hooking it up. And to go ahead and install the boxes where the outlets will go. Once I get that done, he'll help get things hooked up.
That conversation was just last week. And I am running my wire this weekend.
Funny you should ask.
It's a good life!
Ken

Build Journal: viewtopic.php?f=50&t=60665
User avatar
kenafp
Teardrop Advisor
 
Posts: 87
Joined: Sat Nov 02, 2013 6:14 am
Location: Timonium, Md
Top

PreviousNext

Return to Build Journals

Who is online

Users browsing this forum: No registered users and 56 guests