'Adventure Time' Benroy 4'6"x8'x5'H

...ask your questions in the appropriate forums BUT document your build here...preferably in a single thread...dates for updates, are appreciated....

Making a sink out of a $15 serving pan

Postby Adventure Time » Thu Sep 18, 2014 3:35 am

photo (7).JPG
photo (7).JPG (99.85 KiB) Viewed 1585 times
There was a sink in my shop that my partner made out of a big salad bow. It looked legit except water would sit around the drain because the drain was higher than the bottom of the bowl. A store bought sink has a depression to let the drain sit lower than bottom. Also I wanted to crease the sink to make it more prominent. That's a piece of plywood in the press I set the sink on the plywood and used a big socket to press a depression into the pan. The crease in the corner was an accident but I am going to leave it because it helps the water drain if the trailer is tipped forward any.
photo.JPG
photo.JPG (71.62 KiB) Viewed 1585 times
The two problems I had with sinks at HD was they were too big or too small. And the drain is always in the middle. I put the hole all the way to the back so I can have as much storage space as possible. I actually had to cut the wood out and let the sink extend into the cabin an inch or so. I could have covered it with wood, but i like the look. I'll put a strip of neoprene under it to seal the cabin from the storage under the sink.
photo (8).JPG
photo (8).JPG (93.24 KiB) Viewed 1585 times
Last edited by Adventure Time on Wed Jun 03, 2015 1:25 am, edited 1 time in total.
User avatar
Adventure Time
Teardrop Advisor
 
Posts: 58
Images: 6
Joined: Mon Aug 18, 2014 5:03 pm

Re: 'Adventure Time' Benroy 4'6"x8'x5'H

Postby Adventure Time » Sun Sep 21, 2014 2:37 am

Johnysteam wrote:Your build looks great. I love your sink , and you have given me the idea to do a similar thing, because a proper sink costs soo much

I like your trailer.4' tall TDs look so sleek but I needed just a little more headroom. What is the headroom in yours at the tallest point? I was going to call mine a crouchie. I want to see California, Grand canyon, yellowstone. But I don't want to always have to be in a camping situation. Like if I stop in a parking lot to spend the night, I want to be able to access everything important from inside. It just wouldn't be cool to pull up to walmart, pop the hatch and start cooking up a hamburger.
I really want a shower/toilet combo that is only accessible from the outside so we won't have to smell it. I have a Mac mini computer. I am going to build the exact same shape as the mac mini and mount it to the front on the tongue. 4'6"x 4'6"x30" or so. I wish I would have thought it out before hand so I could have made my plywood box big enough to accommodate the bathroom but I am here now and gotta deal with it. This probably sounds a little sketchy but I will make it look right.
User avatar
Adventure Time
Teardrop Advisor
 
Posts: 58
Images: 6
Joined: Mon Aug 18, 2014 5:03 pm

Re: 'Adventure Time' Benroy 4'6"x8'x5'H

Postby Adventure Time » Fri Sep 26, 2014 7:12 pm

photo (9).JPG
photo (9).JPG (97.11 KiB) Viewed 1505 times

photo (10).JPG
photo (10).JPG (94.17 KiB) Viewed 1505 times

The cabinet frames are installed. I built the galley frame and then used it for a router template on the inside. The doors will all be flush. With flush hardware. The door on the inside is just sitting in the frame. I haven't recessed the sealing area yet.
User avatar
Adventure Time
Teardrop Advisor
 
Posts: 58
Images: 6
Joined: Mon Aug 18, 2014 5:03 pm
Top

Attaching skinning aluminum .050

Postby Adventure Time » Mon May 18, 2015 12:26 pm

hatchcorner1.JPG
hatchcorner1.JPG (20.81 KiB) Viewed 1383 times
I took the winter off from building but I am back at it. I did finish my doors and door frames.
In the past few weeks I got all the aluminum on! Contact cement work was easier than I thought it was going to be. Part of the reason it went well was I used .050 aluminum. That stuff is thick. I read about the trouble some had using router bits and how the aluminum clogged up on them. I used 1/2" flush trim bit and I just took it apart every 8 or 10 linear feet of cutting and used a small chisel to clean all the caked up aluminum. Then I went back with a 45 degree bearing bit and angled every edge back. Then I used a hand metal file on any edges that look like they might interfere with the trim. I used the gel formula Weldwood contact cement from Lowes. Three coats on both surfaces and I let it dry the last time until it felt just a little tacky but not not completely bone dry. When I say barely tacky I mean your hand doesn't stick to it and it will be completely dry very soon, about 15 minutes in 80 degree texas weather. The gel was very thick and really helped give a thicker glue area, I think. I built a bender out of some pipe, hinges and wood(I'll find the picture of that soon) because there was no way that aluminum was going over those tight radii I have on my benroy.
The pic here show something I have tried to deal with water sitting on top. I left a tab of aluminum hanging over 3/4" wide and 3" long when I trimmed the top. I put butyl tape under it and used a rubber hammer to lay it down. Then put a clamp across the whole trailer to press it flat into place. This will make it the lowest point and should drain all water. When I installed my cross beams in the frame, I looked for the natural bend in the board and put the arch up so I wouldn't have any low spots in the roof. My hatch hinge has an ever so slight arch to it. I will probably put two rivets in this little tab as soon as I do some research and find waterproof rivets. The trim will stop at and possibly overlap this tab and inch or so. I'll see when I get the trim.
User avatar
Adventure Time
Teardrop Advisor
 
Posts: 58
Images: 6
Joined: Mon Aug 18, 2014 5:03 pm
Top

Re: 'Adventure Time' Benroy 4'6"x8'x5'H

Postby Adventure Time » Wed May 20, 2015 1:19 pm

hinge.JPG
hinge.JPG (102.05 KiB) Viewed 1343 times
The hinge is now butyl taped sealed and mounted.
User avatar
Adventure Time
Teardrop Advisor
 
Posts: 58
Images: 6
Joined: Mon Aug 18, 2014 5:03 pm
Top

Re: 'Adventure Time' Benroy 4'6"x8'x5'H

Postby Adventure Time » Wed May 20, 2015 2:52 pm

herosmallfile.JPG
herosmallfile.JPG (40.58 KiB) Viewed 1350 times

FRACKIN' TOASTER
Last edited by Adventure Time on Thu May 21, 2015 7:40 pm, edited 1 time in total.
User avatar
Adventure Time
Teardrop Advisor
 
Posts: 58
Images: 6
Joined: Mon Aug 18, 2014 5:03 pm
Top

Flush Doors Flush Windows

Postby Adventure Time » Thu May 21, 2015 7:29 pm

flushdoor.JPG
flushdoor.JPG (105.72 KiB) Viewed 1320 times

The doors are flush to the trailer. The windows are flush to the doors. When assembling I didn't want to put the hinges on the outside because I had to cut the top one because the window takes up so much of the door. Those are just $2.17 hinges from home depot. I bought a lot of stuff I never used. The door frame gets trim and the outside of the door gets trim but I won't trim around the window.
Last edited by Adventure Time on Wed Jun 03, 2015 1:37 am, edited 1 time in total.
User avatar
Adventure Time
Teardrop Advisor
 
Posts: 58
Images: 6
Joined: Mon Aug 18, 2014 5:03 pm
Top

Re: 'Adventure Time' Benroy 4'6"x8'x5'H

Postby Adventure Time » Thu May 21, 2015 7:35 pm

insidedoor.JPG
insidedoor.JPG (97.61 KiB) Viewed 1320 times
Inside view. If you look along the sides of the door. I routed out two channels and put in 1"x1/4" aluminum bars to add rigidity to the door frame. The doors just would not stay flat because the sides next to the windows were just too thin. I still have to route out below those interior door handle down about 1/4". They fit fine until I added the aluminum and the gasket!
You can see the door needs to be shifted left about 1/8" or 3/16". I have 1/4" spacers behind the hinges now. I just need to put in thinner ones. Also I got these windows on ebay for cheap because they didn't come with the "interior clamping ring". I don't even know how one works. But these will be held in place pretty much by the butyl tape. I need to buy or make something to pull the windows into the frame.
User avatar
Adventure Time
Teardrop Advisor
 
Posts: 58
Images: 6
Joined: Mon Aug 18, 2014 5:03 pm
Top

Re: 'Adventure Time' Benroy 4'6"x8'x5'H

Postby Adventure Time » Sun May 24, 2015 2:06 am

taillight.JPG
taillight.JPG (93.55 KiB) Viewed 1271 times
I routed out some taillight holes and put these in. I am looking for some cool billet aluminum rings to seal them in with and make them look cool. I will eventually make them on the lathe but would much rather buy them if any one knows a source.
User avatar
Adventure Time
Teardrop Advisor
 
Posts: 58
Images: 6
Joined: Mon Aug 18, 2014 5:03 pm
Top

Door Strike

Postby Adventure Time » Sun May 24, 2015 2:09 am

door strike.JPG
door strike.JPG (139.74 KiB) Viewed 1271 times
This door strike probably took me 30 minutes to make. It's crap like this that really adds up the time.
Last edited by Adventure Time on Wed Jun 03, 2015 1:38 am, edited 1 time in total.
User avatar
Adventure Time
Teardrop Advisor
 
Posts: 58
Images: 6
Joined: Mon Aug 18, 2014 5:03 pm
Top

Re: 'Adventure Time' Benroy 4'6"x8'x5'H

Postby Adventure Time » Sun May 24, 2015 5:19 pm

door handleinside.JPG
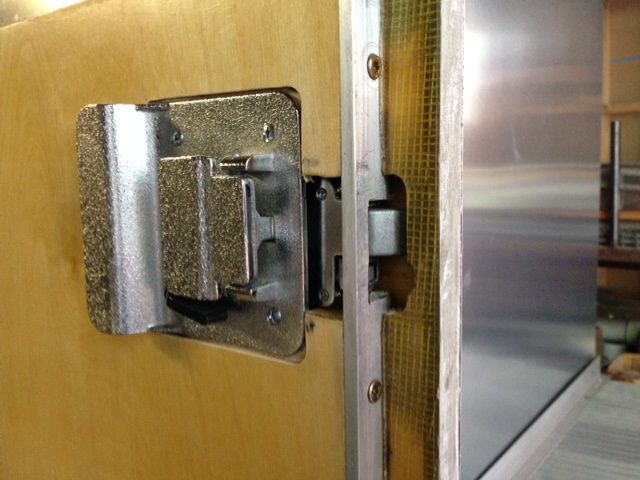
door handleinside.JPG (108.19 KiB) Viewed 1233 times
I just read back through this thread and realized I didn't say anything about my doors. IT feels like the doors and door jams took as much time as the rest of the trailer, not even joking around.
I talk about how the door jams are built and I have pictures earlier in this thread.
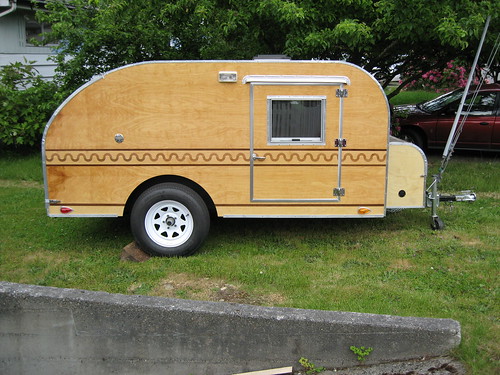
This is how I built the doors. I ended up using the blanks that I carefully cut out with a template out of the sides of the trailer (see the beginning of this blog). I used one blank to make a table to work on. I cut out another blank and then screwed it to the table and used a router bit to make the door 1/8" smaller. Then I put wax paper under it and used short hair resin to rebuild the 1/8" outside. Then used a 1/2" flush trim bit to cut the door back to the original size. The first blank that I used as a table is the template for the outside of the doors. So the outside edge is now waterproof and can be left exposed or covered with aluminum with no fear it will ever rot(provided you seal your screws properly).
Then I used resin to glue another 1/2" birch that will be the inside finished surface. I used a router to inset the sealing surface that the flush windows will sit into. Then painted 4 or 5 coats of resin on the outside. I gave it a hand sanding with 80 grit to roughen it up to accept the gel formula Weldwood contact cement. Sam procedure in attaching the aluminum; scuff up both surfaces with 80 grit. contact cement rolled on the door front and the aluminum. wait 15 to 20 minutes between each coat. On the first two coats I waited until it was completely dry. The last coat that will be the contacting surface, I waited until just before it was completely dry. Then used 3/16" wood dowel rods spaced 6" apart and starting at one end removed them and used a J roller with all my 135 body weight pushing down onto it. The aluminum I used is .050" mill finish. Mill finish was all I could find in 5' by 12' sheets. For the record I would have used anodized if I could find it in that size. I will keep my trailer waxed with some good pure carnuba wax to try to preserve the finish. And of course store it indoors when I am not using it.
Last edited by Adventure Time on Sun May 24, 2015 5:31 pm, edited 1 time in total.
User avatar
Adventure Time
Teardrop Advisor
 
Posts: 58
Images: 6
Joined: Mon Aug 18, 2014 5:03 pm
Top

Re: 'Adventure Time' Benroy 4'6"x8'x5'H

Postby Adventure Time » Sun May 24, 2015 5:29 pm

doorhandleoutside.JPG
doorhandleoutside.JPG (108.56 KiB) Viewed 1232 times
Here is a view with the window removed. The windows will be sealed with butyl tape. Everything that is two surfaces mating together with bolts to compress them will be sealed with butyl tape. I owned a sailboat before I built this. I know of a guy that had 30 year old butyl tape sealing his chain plates and they never leaked. Silicone just can't do that. I don't use silicone anywhere ever. Once silicone cures nothing wants to stick to those surfaces anymore, not even more silicone! Also I powder coat things and if silicone touches any metal then the powder coat will have fish eyes in the finish. In my opinion the only place I want silicone is in my wife's chest :D
I also try to make everything where it can be taken apart and serviced. Butyl tape allows this easily because it never cures. Anyway how many car windshields have you HEARD of leaking, and how many silicone sealed things have you SEEN leaking?
Frank Bear sells butyl tape very reasonable. I am going to buy all my trim from him also because he has great prices. I bought my hurricane hinge from him last year.
User avatar
Adventure Time
Teardrop Advisor
 
Posts: 58
Images: 6
Joined: Mon Aug 18, 2014 5:03 pm
Top

Re: 'Adventure Time' Benroy 4'6"x8'x5'H

Postby Adventure Time » Sat May 30, 2015 3:09 am

cabinet progress.JPG
cabinet progress.JPG (95.04 KiB) Viewed 1160 times
Made some progress on the cabinet doors.
User avatar
Adventure Time
Teardrop Advisor
 
Posts: 58
Images: 6
Joined: Mon Aug 18, 2014 5:03 pm
Top

Re: 'Adventure Time' Benroy 4'6"x8'x5'H

Postby Adventure Time » Sat May 30, 2015 3:10 am

shelf.JPG
shelf.JPG (87.07 KiB) Viewed 1160 times
That last pic was a little dark. I bought an aluminum trailer ramp at harbor freight for the floor of my shower/toilet box and I had some extra pieces so they became shelves.
User avatar
Adventure Time
Teardrop Advisor
 
Posts: 58
Images: 6
Joined: Mon Aug 18, 2014 5:03 pm
Top

Re: 'Adventure Time' Benroy 4'6"x8'x5'H

Postby Adventure Time » Sat May 30, 2015 3:23 am

inside cabinet.JPG
inside cabinet.JPG (101.73 KiB) Viewed 1159 times
I finally got the big cabinet door finished. I can open this door and access the sink. There is a lot of work to be done to the counter top to make it ready for water being all over it.
User avatar
Adventure Time
Teardrop Advisor
 
Posts: 58
Images: 6
Joined: Mon Aug 18, 2014 5:03 pm
Top

PreviousNext

Return to Build Journals

Who is online

Users browsing this forum: Bing [Bot] and 7 guests

cron