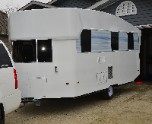
Lifting roof XPStream - Almost Finished!

...ask your questions in the appropriate forums BUT document your build here...preferably in a single thread...dates for updates, are appreciated....

Re: Lifting roof XPStream - Almost Finished!

Postby OP827 » Sat Feb 06, 2021 2:22 pm

Yes, the door parts come together same way as walls. I do not think I have detailed pictures of that, so I went to the trailer and took the picture, see below. My design might not be the best out there, but it works, was tested in heavy rains last summer. Hope it helps.Image
User avatar
OP827
Donating Member
 
Posts: 1553
Images: 405
Joined: Fri Apr 25, 2014 7:27 pm
Location: Bruce County Ontario

Re: Lifting roof XPStream - Almost Finished!

Postby OP827 » Sat Feb 06, 2021 2:34 pm

And another picture of the door opening weatherstripping placement on the door lock side.Image
User avatar
OP827
Donating Member
 
Posts: 1553
Images: 405
Joined: Fri Apr 25, 2014 7:27 pm
Location: Bruce County Ontario

Re: Lifting roof XPStream - Almost Finished!

Postby iconicflux » Sun Feb 07, 2021 12:42 am

The doors look fantastic to me!

What kind of hinges did you use on the folding walls and how do they lock in place? My wife thought those folding walls absolutely kick ass.

Thanks!
iconicflux
Teardrop Advisor
 
Posts: 83
Joined: Sat Jun 02, 2018 5:02 am
Top

Re: Lifting roof XPStream - Almost Finished!

Postby OP827 » Sun Feb 07, 2021 9:43 am

Folding walls are fixed with piano hinges and fixed in its up position with homemade quarter turn screw latches. Look up esterel, gobur, A-frame folding walls trailers to get ideas.
User avatar
OP827
Donating Member
 
Posts: 1553
Images: 405
Joined: Fri Apr 25, 2014 7:27 pm
Location: Bruce County Ontario
Top

Re: Lifting roof XPStream - Almost Finished!

Postby iconicflux » Mon Feb 15, 2021 9:11 pm

Thats probably the whiffletree. They're neat but a little prone to failure from what i was reading. Enough so that you can buy aftermarket ones that are better than the originals. Probably not worth messing with unless it breaks.

Ill probably be using the same thing on mine. Id switch to a boat crank but i want to convert the tongue to a folding tongue.

So why did you use the pulley lifts like you did instead of the coleman lifts?

Any chance you can make a drawing of how you did it so I can include it on the thread i started to collect info on lifts and slideouts? I think i saw one that didnt include the whiffletree maybe?

Thanks

OP827 wrote:I have a centrally located ball screw that directly pulls all four cables in each corner.
Initially I had central actuator which then was changed to a ball screw. Some trailers have actuators in each corner, but that introduces more components that may fail in a most inappropriate time.
iconicflux
Teardrop Advisor
 
Posts: 83
Joined: Sat Jun 02, 2018 5:02 am
Top

Re: Lifting roof XPStream - Almost Finished!

Postby OP827 » Tue Feb 16, 2021 7:45 pm

iconicflux wrote:Thats probably the whiffletree. They're neat but a little prone to failure from what i was reading. Enough so that you can buy aftermarket ones that are better than the originals. Probably not worth messing with unless it breaks.

Ill probably be using the same thing on mine. Id switch to a boat crank but i want to convert the tongue to a folding tongue.

So why did you use the pulley lifts like you did instead of the coleman lifts?

Any chance you can make a drawing of how you did it so I can include it on the thread i started to collect info on lifts and slideouts? I think i saw one that didnt include the whiffletree maybe?

Thanks

OP827 wrote:I have a centrally located ball screw that directly pulls all four cables in each corner.
Initially I had central actuator which then was changed to a ball screw. Some trailers have actuators in each corner, but that introduces more components that may fail in a most inappropriate time.


I understand that by whiffletree you mean various lifters for tent trailers, correct? I looked at my donor tent trailer lifters and I decided not to use them. I do not believe that the design was reliable and durable enough due to excessive stress on parts and cables and all parts being exposed to elements. In fact, I got this donor trailer relatively cheap with the lifting system already failed and I now know why these lifters fail, but that is a separate discussion.
Most of my lifting components are inside or protected from rain and weather. Lead ball screw, cables and pulleys are located inside the trailer. Idea is the same as described by Andrew Gibbens here, except lead screw located and cables routed differently i.e. inside as internal furniture allows, not outside as Andrew's drawing shows. Since original tent trailer lead screw could handle much higher load and did not have long enough travel distance, I have added a 2:1 cable and pulley for the lead screw as mentioned in lifting roof video comments (link is in signature). I might do the drawing later, but let me know if you understand the idea or have further questions.
User avatar
OP827
Donating Member
 
Posts: 1553
Images: 405
Joined: Fri Apr 25, 2014 7:27 pm
Location: Bruce County Ontario
Top

Re: Lifting roof XPStream - Almost Finished!

Postby iconicflux » Tue Feb 16, 2021 8:31 pm

Have a look at this image:
Image

The "whiffletree" includes the large pipe that goes down the center of the chassis and connects to a large screw that when turned pulls 4 cables on pulleys.

I'll have a look at the rest of what you said and let you know if I have questions.

Thanks,

OP827 wrote:
iconicflux wrote:Thats probably the whiffletree. They're neat but a little prone to failure from what i was reading. Enough so that you can buy aftermarket ones that are better than the originals. Probably not worth messing with unless it breaks.

Ill probably be using the same thing on mine. Id switch to a boat crank but i want to convert the tongue to a folding tongue.

So why did you use the pulley lifts like you did instead of the coleman lifts?

Any chance you can make a drawing of how you did it so I can include it on the thread i started to collect info on lifts and slideouts? I think i saw one that didnt include the whiffletree maybe?

Thanks

OP827 wrote:I have a centrally located ball screw that directly pulls all four cables in each corner.
Initially I had central actuator which then was changed to a ball screw. Some trailers have actuators in each corner, but that introduces more components that may fail in a most inappropriate time.


I understand that by whiffletree you mean various lifters for tent trailers, correct? I looked at my donor tent trailer lifters and I decided not to use them. I do not believe that the design was reliable and durable enough due to excessive stress on parts and cables and all parts being exposed to elements. In fact, I got this donor trailer relatively cheap with the lifting system already failed and I now know why these lifters fail, but that is a separate discussion.
Most of my lifting components are inside or protected from rain and weather. Lead ball screw, cables and pulleys are located inside the trailer. Idea is the same as described by Andrew Gibbens here, except lead screw located and cables routed differently i.e. inside as internal furniture allows, not outside as Andrew's drawing shows. Since original tent trailer lead screw could handle much higher load and did not have long enough travel distance, I have added a 2:1 cable and pulley for the lead screw as mentioned in lifting roof video comments (link is in signature). I might do the drawing later, but let me know if you understand the idea or have further questions.
iconicflux
Teardrop Advisor
 
Posts: 83
Joined: Sat Jun 02, 2018 5:02 am
Top

Re: Lifting roof XPStream - Almost Finished!

Postby iconicflux » Wed Feb 17, 2021 10:36 am

I've been reading more of your thread and saw where you mentioned the pulleys being sourced from lowes but the mounts being sourced from hd or something like that.

Are those the floor/wall mountable pulleys like these:
https://www.lowes.com/pd/Covert-2-in-Do ... y/50426998

I've seen you mention moving the ball screw a few times now. When you moved the ball screw you stopped using the coleman style "whiffletree", right? What'd you end up using as a ball screw? how long is it now?

I'm asking because I have some extra parts here from a 3d printer that I don't plan on running any longer and one of them is a 2' lead screw along with all the associated parts. (It's nowhere near as high quality as my other printers and not worth the effort to try to get functional again. Let me know if you ever need something printed.)

Thanks,
iconicflux
Teardrop Advisor
 
Posts: 83
Joined: Sat Jun 02, 2018 5:02 am
Top

Re: Lifting roof XPStream - Almost Finished!

Postby OP827 » Wed Feb 17, 2021 3:05 pm

I got pulleys from HD and fabricated brackets myself out of rectangular steel tubing that I purchased in length to match the pulleys diameter and height. I will find and send some pictures of installed pulleys later. I have reused and modified the donor tent trailer lead screw, just built some enclosure to affix it on the plywood floor inside the trailer under one of the dinette seats. You cannot just copy my design as your loads could be different which will require sizing of cables, which in turn will determine acceptable pulleys diameter and lead screw capacity. I could help you estimate that if needed, once we know what loads are expected on cables.
User avatar
OP827
Donating Member
 
Posts: 1553
Images: 405
Joined: Fri Apr 25, 2014 7:27 pm
Location: Bruce County Ontario
Top

Re: Lifting roof XPStream - Almost Finished!

Postby OP827 » Wed Feb 17, 2021 10:54 pm

These are the rollers I used. As mentioned above, I made various design holding brackets out of steel tubing to suit needed routing. They are 1-1/4" external diameter and I would not go less than that diameter to reduce aircraft cable wear and I used 1/16" diameter (with 480lbs breaking strength) galvanized aircraft cable. There are four lifting points and roof structure is roughly 120lbs including front and back upper part walls, back window and partial loads from lifting side walls.
Below is a typical cable pulleys install inside the trailer. Each cable length has a turn buckle to do fine adjustment.
164394
User avatar
OP827
Donating Member
 
Posts: 1553
Images: 405
Joined: Fri Apr 25, 2014 7:27 pm
Location: Bruce County Ontario
Top

Re: Lifting roof XPStream - Almost Finished!

Postby iconicflux » Thu Feb 18, 2021 8:48 am

Thanks! I totally agree with not using your specific design. I'm more just wanting to understand the mechanics of it so I can evaluate what works for mine.

For example, I'm certain that I'll have far more roof weight than you both because I'll be suspending a heavy object from the ceiling and because my ceiling design goes over the bottom walls to significantly lower the overall height. I'd like to do the folding walls like you but when I began looking at how to construct them given my desire to have slideouts I'm not not sure it'd work well with folding walls and I'd kind of like the top to cover the windows when we're traveling. If it were up to me, I'd make the slide-outs into fold outs instead but my wife seems to be interested in using what has worked for other people and she doesn't want to have to move the bunkbeds around.


This is kind of what I'm thinking of:
Screen Shot 2021-02-18 at 7.59.59 AM copy 2.png
Screen Shot 2021-02-18 at 7.59.59 AM copy 2.png (215.4 KiB) Viewed 1634 times


I'll probably redo the pulley system that's in place on mine and add some kind of hand crank like Andrew showed in his picture. I'd make it electric but the only safe way I can figure that might work is if I used stepper motors for driving the lead screw since they can sense when there's a problem and be programmed to stop. If you used an electric winch it would be far too easy to accidentally damage the lift system via someone not stopping it when they should and thus tear out pulleys, cables, or termination points for the cables. Barring a way to do that safely, I'll probably make it manual via lead/ball screw or cable winch.

On a different note, are the stringers between your foam pieces plywood or are they dimensional lumber? I seem to recall you saying in the threads they're plywood?

Thanks,


iconicflux wrote:I've been reading more of your thread and saw where you mentioned the pulleys being sourced from lowes but the mounts being sourced from hd or something like that.

Are those the floor/wall mountable pulleys like these:
https://www.lowes.com/pd/Covert-2-in-Do ... y/50426998

I've seen you mention moving the ball screw a few times now. When you moved the ball screw you stopped using the coleman style "whiffletree", right? What'd you end up using as a ball screw? how long is it now?

I'm asking because I have some extra parts here from a 3d printer that I don't plan on running any longer and one of them is a 2' lead screw along with all the associated parts. (It's nowhere near as high quality as my other printers and not worth the effort to try to get functional again. Let me know if you ever need something printed.)

Thanks,
OP827 wrote:These are the rollers I used. As mentioned above, I made various design holding brackets out of steel tubing to suit needed routing. They are 1-1/4" external diameter and I would not go less than that diameter to reduce aircraft cable wear and I used 1/16" diameter (with 480lbs breaking strength) galvanized aircraft cable. There are four lifting points and roof structure is roughly 120lbs including front and back upper part walls, back window and partial loads from lifting side walls.
Below is a typical cable pulleys install inside the trailer. Each cable length has a turn buckle to do fine adjustment.
164394
iconicflux
Teardrop Advisor
 
Posts: 83
Joined: Sat Jun 02, 2018 5:02 am
Top

Re: Lifting roof XPStream - Almost Finished!

Postby OP827 » Thu Feb 18, 2021 6:54 pm

iconicflux wrote:On a different note, are the stringers between your foam pieces plywood or are they dimensional lumber? I seem to recall you saying in the threads they're plywood?
- They are Baltic birch 6mm plywood strips.
User avatar
OP827
Donating Member
 
Posts: 1553
Images: 405
Joined: Fri Apr 25, 2014 7:27 pm
Location: Bruce County Ontario
Top

Re: Lifting roof XPStream - Almost Finished!

Postby iconicflux » Fri Feb 19, 2021 2:43 pm

I thought that's what I remembered. By my weight calculations, this saved you about 1/2 the weight of the strings/studs vs using 1x3s. Haven't seen anything lighter weight than that yet other than all foam no stringers but I think the stringers are ideal.

OP827 wrote:
iconicflux wrote:On a different note, are the stringers between your foam pieces plywood or are they dimensional lumber? I seem to recall you saying in the threads they're plywood?
- They are Baltic birch 6mm plywood strips.
iconicflux
Teardrop Advisor
 
Posts: 83
Joined: Sat Jun 02, 2018 5:02 am
Top

Re: Lifting roof XPStream - Almost Finished!

Postby OP827 » Mon Mar 22, 2021 5:17 pm

Hi,

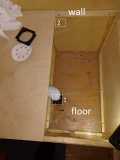
Looking for advice from all knowledgeable people here as to where to locate my (not so much composting) bucket toilet vent fan: on the floor or on the side wall.

I have "tested" my homemade bucket toilet and so far it seems to work great with no (for my nose) detectable smell. I tested with peat moss as a covering media.
I still want to add a vent with a computer fan similar to commercial composting units to keep any potential smell away and that is why this question is here.

I do not see huge difference between placing the vent on the floor or on the side due to only ~10 inch difference in elevation. I do not know if from thermal air stratification perspective both options will make a big difference for the exhaust computer fan efficiency. I do not have a good option to exhaust through the roof with this design, which is a standard in RV industry that is why I am only showing two options on the picture below for locating the exhaust fan: 1. on the floor and 2. on the trailer side wall.

On the floor is easier to make and further from the bed to hear the fan noise, if any. On the wall is what van conversion people do, but I do not like making holes on the side as I am concerned about road spray will be getting inside the vent more readily, but I have no experience with that, so looking for people who might have such vents on their trailer side. I am thinking of using the standard house soffit vent for this purpose, but open for advice here. The side wall vent location would be about 14" from the floor or 22" from the road level. Cannot place it higher than that.

What do you think the fan location should be between these two options shown below, on the wall or on the floor? And if on the wall is the soffit vent ok to use?

Thanks!
164602 164601
User avatar
OP827
Donating Member
 
Posts: 1553
Images: 405
Joined: Fri Apr 25, 2014 7:27 pm
Location: Bruce County Ontario
Top

Re: Lifting roof XPStream - Almost Finished!

Postby iconicflux » Tue Mar 23, 2021 6:00 pm

I'd probably put it in the floor and I read about others that did that themselves just this past week. I think you'd have an easier time going through the floor. I can't help but wonder if you sealed it through the side whether you might end up with wind some night pushing the smell into your camper instead of out of it.

Be aware that you might have to cut the fantastic fan (if you have one) when taking a dump or it's liable to pull air through the toilet and into the living space. There's a review on the natures head composting toilet on youtube where they were talking about that. Apparently it was quite pungent.


OP827 wrote:Hi,

Looking for advice from all knowledgeable people here as to where to locate my (not so much composting) bucket toilet vent fan: on the floor or on the side wall.

I have "tested" my homemade bucket toilet and so far it seems to work great with no (for my nose) detectable smell. I tested with peat moss as a covering media.
I still want to add a vent with a computer fan similar to commercial composting units to keep any potential smell away and that is why this question is here.

I do not see huge difference between placing the vent on the floor or on the side due to only ~10 inch difference in elevation. I do not know if from thermal air stratification perspective both options will make a big difference for the exhaust computer fan efficiency. I do not have a good option to exhaust through the roof with this design, which is a standard in RV industry that is why I am only showing two options on the picture below for locating the exhaust fan: 1. on the floor and 2. on the trailer side wall.

On the floor is easier to make and further from the bed to hear the fan noise, if any. On the wall is what van conversion people do, but I do not like making holes on the side as I am concerned about road spray will be getting inside the vent more readily, but I have no experience with that, so looking for people who might have such vents on their trailer side. I am thinking of using the standard house soffit vent for this purpose, but open for advice here. The side wall vent location would be about 14" from the floor or 22" from the road level. Cannot place it higher than that.

What do you think the fan location should be between these two options shown below, on the wall or on the floor? And if on the wall is the soffit vent ok to use?

Thanks!

164602 164601
iconicflux
Teardrop Advisor
 
Posts: 83
Joined: Sat Jun 02, 2018 5:02 am
Top

PreviousNext

Return to Build Journals

Who is online

Users browsing this forum: No registered users and 23 guests