Ok here we go...PMF!

...ask your questions in the appropriate forums BUT document your build here...preferably in a single thread...dates for updates, are appreciated....

Re: Ok here we go...

Postby dales133 » Tue Oct 21, 2014 6:01 am

Image hitch fitted a treat, never done anything like this and the other handbrake leaver was ugly and too wide.
this drawbar styles how its all done here now.

put the springs and axle back on in the next day or two but this is a fairly close chasis hight on 275/75/16's
Image
Image
User avatar
dales133
4000 Club
4000 Club
 
Posts: 4605
Images: 1
Joined: Mon Oct 13, 2014 5:26 pm

Re: Ok here we go...

Postby KCStudly » Tue Oct 21, 2014 6:57 am

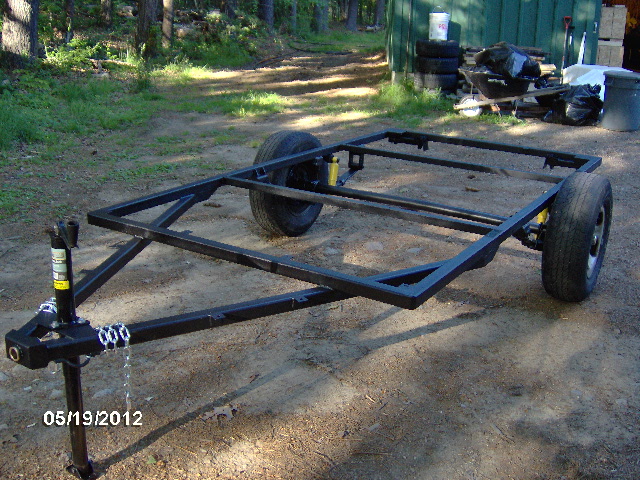
What are the wheels off of? They look nice. :thumbsup:

You are doing a great job there; it all looks very nice.

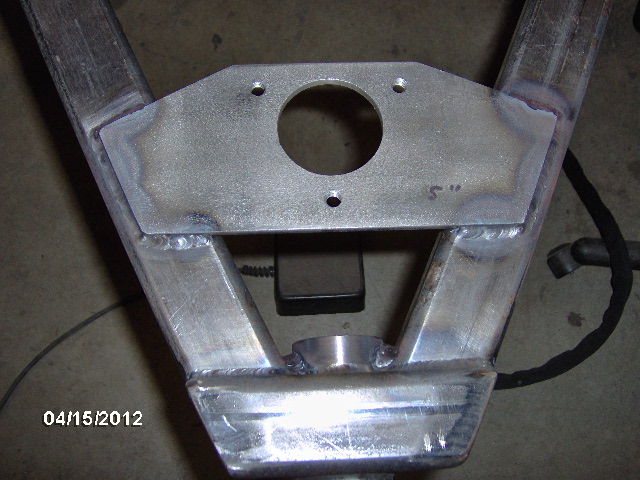
One thing I was wondering about is just having a single plane of flat bar at the front tying the tongue members together. My habit would be to try and tie both the top and bottom of the tubes together; less chance of flex trying to crack a weld. If you are planning to have a tongue jack, maybe you could mount another plate across the top of the tubes just behind the coupler; perhaps similar to the way I did mine.
Image
Image
Image

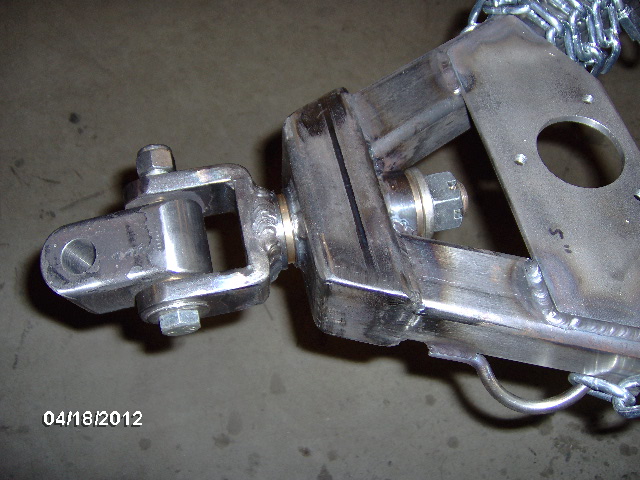
The fixed jack (as apposed to a swivel style) is a compromise: it was easier to mount in a central location (so no frame twist when in use), but to remove and stow for travel I will have to pull the foot off and unbolt it at the mounting flange (the mounting plate is tapped to make this easier using a single wrench).
Last edited by KCStudly on Wed Oct 22, 2014 9:14 pm, edited 1 time in total.
KC
My Build: The Poet Creek Express Hybrid Foamie

Poet Creek Or Bust
Engineering the TLAR way - "That Looks About Right"
TnTTT ORIGINAL 200A LANTERN CLUB = "The 200A Gang"
Green Lantern Corpsmen
User avatar
KCStudly
Donating Member
 
Posts: 9613
Images: 8169
Joined: Mon Feb 06, 2012 10:18 pm
Location: Southeastern CT, USA

Re: Ok here we go...

Postby dales133 » Tue Oct 21, 2014 7:34 am

The wheels are the stock wheels of my 80 series.
The bloody things weigh a ton but tough as nails.
They are worth 1000 bucks in average condition here ... I spent about an hour a wheel with a wire brush on my drill and removed all the paint and cap back to metal and painted them with rustinhibiting paint similar to factory.
User avatar
dales133
4000 Club
4000 Club
 
Posts: 4605
Images: 1
Joined: Mon Oct 13, 2014 5:26 pm
Top

Re: Ok here we go...

Postby dales133 » Tue Oct 21, 2014 7:41 am

I'll show you some pics from the caravan rv show 2 weeks ago and thier all going 8m plate underneath.
And most welded in a jig without the central member like I have.
I'm planning on an also 8 or 10 inch flip up jockey wheel that clamps to one side of the draw bar with u bolts.
Please don't at all think I'm discrediting your thoughts or advice I have gained a lot from your posts here and elsewhere .
I'll show you some draw bar profiles I saw recently and value your thoughts .
Cheers Dale
I'm not sure if you noticed but just shy of that last photos extremities is a 70x50x3 cross member and just behind that it's attached to the frame 3 times a side at 600 or less intervals.
But I only want to make this once and won't be offended buy constructive criticism offered by anyone, it's what I admire about this place.
User avatar
dales133
4000 Club
4000 Club
 
Posts: 4605
Images: 1
Joined: Mon Oct 13, 2014 5:26 pm
Top

Re: Ok here we go...

Postby dales133 » Tue Oct 21, 2014 8:10 am

Image
Image
Image
just a few drawbar/hitches i took pics of the weekend before last.
i looked more carefully at the new kimberly campers that go for about 80 grand but they are a beautiful well made looking bit of gear.
User avatar
dales133
4000 Club
4000 Club
 
Posts: 4605
Images: 1
Joined: Mon Oct 13, 2014 5:26 pm
Top

Re: Ok here we go...

Postby KCStudly » Tue Oct 21, 2014 11:13 am

Well, we know they build 'em stout down under, so I am sure you will do fine emulating the commercial builders. :thumbsup:

Cheers :beer: , and good-ay to you, mate! :D
KC
My Build: The Poet Creek Express Hybrid Foamie

Poet Creek Or Bust
Engineering the TLAR way - "That Looks About Right"
TnTTT ORIGINAL 200A LANTERN CLUB = "The 200A Gang"
Green Lantern Corpsmen
User avatar
KCStudly
Donating Member
 
Posts: 9613
Images: 8169
Joined: Mon Feb 06, 2012 10:18 pm
Location: Southeastern CT, USA
Top

Re: Ok here we go...

Postby tony.latham » Tue Oct 21, 2014 12:27 pm

That's quite the articulating hitch.

I use a similar tongue jack and have the issue of 4" or so of hang-down. On my old tear I had to replace the jack once after finding a rock.

I use 4" of steel pipe and 5" bolts to lift the bottom of the jack. Works well –I still have plenty of lift– and it doesn't look (too) odd.

Tony
User avatar
tony.latham
Gold Donating Member
 
Posts: 6900
Images: 17
Joined: Mon Jul 08, 2013 4:03 pm
Location: Middle of Idaho on the edge of nowhere
Top

Re: Ok here we go...

Postby Captain Monkeyshines » Wed Oct 22, 2014 7:59 pm

This is going to be a fun build to watch! The drawbar is cool, similarish to the Max Coupler.
“When You're Alone”
When you're in the kitchen, you've got to behave
You don't put metal in the microwave
The knobs on the stove are “hands off” no doubt
And when you make toast, don't use a knife to fish it out!
When you're alone, when you're alone
You got to stay safe when you're home all alone.
When you're alone, when you're home all alone
You got to make sure not to die, or choke or burn the house down.
User avatar
Captain Monkeyshines
Teardrop Advisor
 
Posts: 84
Images: 1
Joined: Wed Jan 25, 2012 9:23 pm
Location: A galaxy not too far away
Top

Re: Ok here we go...

Postby teddy » Sat Oct 25, 2014 12:26 pm

Good start :thumbsup: i'm, looking forward to your build!
Image
User avatar
teddy
Donating Member
 
Posts: 93
Images: 187
Joined: Tue Jul 08, 2014 4:37 pm
Location: Holland
Top

Re: Ok here we go...

Postby dales133 » Sun Oct 26, 2014 7:30 am

I'll post some pics later but I managed to finish the topside to where it needed to be then flip it back over again and apply 2 coats of rust kill black gloss to the underside so that should be the final flip (it's a pain in the arse. I had to brush paint it as the only compressor I had acsess to gave up the ghost.
I'll look at spraying the sides even though it came up pretty good due to heating the paint and it's self leveling qualities.
I made up the upper and lower subfloor frames as well.
User avatar
dales133
4000 Club
4000 Club
 
Posts: 4605
Images: 1
Joined: Mon Oct 13, 2014 5:26 pm
Top

Re: Ok here we go...

Postby dales133 » Fri Oct 31, 2014 4:13 am

didn't get much done this week except for grab some more steel for my sub floor and weld up the perimeter sections top and bottom.
gave the underside 2 coats of self leveling gloss black rust kill paint and etch primer.
welded on he bolts for the water tank brackets and got ready to cut the trailer frame back to the sub floor.
tank positioning, immediately behind the axle.

Image

Image

Image

Image

Image

hope to get a bit done tomorrow as im working sunday at this stage.
User avatar
dales133
4000 Club
4000 Club
 
Posts: 4605
Images: 1
Joined: Mon Oct 13, 2014 5:26 pm
Top

Re: Ok here we go...

Postby KCStudly » Fri Oct 31, 2014 7:13 am

Looking good. :thumbsup:

I'm sure you have something planned, but I am wondering if you will shorten your tank straps or add some blocking for the tank to cinch up against. The way it is now looks like the tank is just dangling in the straps and could potentially move around. Do you need the empty space above it for the vent and/or fill line, or can the tank be shifted up into the space provided by the frame?
Last edited by KCStudly on Sun Mar 29, 2015 9:47 pm, edited 1 time in total.
KC
My Build: The Poet Creek Express Hybrid Foamie

Poet Creek Or Bust
Engineering the TLAR way - "That Looks About Right"
TnTTT ORIGINAL 200A LANTERN CLUB = "The 200A Gang"
Green Lantern Corpsmen
User avatar
KCStudly
Donating Member
 
Posts: 9613
Images: 8169
Joined: Mon Feb 06, 2012 10:18 pm
Location: Southeastern CT, USA
Top

Re: Ok here we go...

Postby dales133 » Fri Oct 31, 2014 4:43 pm

Yea it's just hanging there.
It won't come up alot because the filler and feed hoses will interfere with the suspension so i had to mount it a bit lower than i first intended
I will however do something on top so it actually clamps in
User avatar
dales133
4000 Club
4000 Club
 
Posts: 4605
Images: 1
Joined: Mon Oct 13, 2014 5:26 pm
Top

Re: Ok here we go...

Postby GPW » Sat Nov 01, 2014 7:46 am

Dale , found ya’ .... Quite Nice eh !!!! :thumbsup: 8) :applause:
There’s no place like Foam !
User avatar
GPW
Gold Donating Member
 
Posts: 14912
Images: 546
Joined: Thu Feb 09, 2006 7:58 pm
Location: New Orleans
Top

Re: Ok here we go...

Postby dales133 » Sat Nov 01, 2014 11:12 am

Thank you kind sir
User avatar
dales133
4000 Club
4000 Club
 
Posts: 4605
Images: 1
Joined: Mon Oct 13, 2014 5:26 pm
Top

PreviousNext

Return to Build Journals

Who is online

Users browsing this forum: No registered users and 30 guests