The No Tears Teardrop Build

...ask your questions in the appropriate forums BUT document your build here...preferably in a single thread...dates for updates, are appreciated....

The No Tears Teardrop Ceiling Install

Postby Diemjoe » Mon May 11, 2015 10:25 am

It has been a while but that's because I am trying to make some progress and camping season looms. It was blue skies and almost 80 degrees here on Saturday which is unheard of in Seattle in May. I think this is going to be a warm one.

I got all of the spars in with openings for the Skylight and Fan. I remembered to drill wiring holes through the spars before I got the bendy board installed. I have run the wiring for the brakes and trailer lights and there isn't much room for the cabin and galley electrical wiring so I'll probably have to make more holes. Hopefully, I' bee able to get the drill in between the spacers.
w-TD-Cabin-Spars-IMG001.jpg
The spars fitted for skylight and fan
w-TD-Cabin-Spars-IMG001.jpg (78.19 KiB) Viewed 1792 times


I was expecting the bendy board to be difficult to work with and it has. In my little space and my small table saw, I was challenged to get a straight rip to get the boards down from 60 inches to 58 1/4. Especially with the sheets not quite the same length.
w-TD-Cabin-Ceiling-IMG001.jpg
Getting ready to glue up the ceiling panels
w-TD-Cabin-Ceiling-IMG001.jpg (78.82 KiB) Viewed 1792 times


I tried edge glueing the sheets together after they were cut to size in the hopes that there wouldn't be a seam. But it boards are just to thin to get a good seam. it worked here and there but I'll have to try something else.
w-TD-Cabin-Ceiling-IMG002.jpg
Weighing down the seam
w-TD-Cabin-Ceiling-IMG002.jpg (84.23 KiB) Viewed 1792 times
Don Miller
Seattle
Trippinwithdon.com
Diemjoe
Teardrop Master
 
Posts: 191
Images: 2
Joined: Tue Jun 10, 2014 3:42 pm
Location: Seattle

Fresh Air for the No Tears Teardrop

Postby Diemjoe » Mon May 11, 2015 10:35 am

After a bit of a struggle, I finally got the ceiling in. It didn't cut exactly straight so I had to try to install it, mark where it was too wide, pull it out, trim it and repeat until I got the whole ceiling in. All while trying to keep the seam from separating. Plus avoiding scratching the already skinned inside walls. I finally got it in but noticed that some of the bottom coating as smeared on it somewhere during the process. I was worried that I wouldn't be able to clear varnish it. But some light sanding took it off.
w-TD-Cabin-Ceiling-IMG003.jpg
supporting the glue up. Used construction adhesive.
w-TD-Cabin-Ceiling-IMG003.jpg (105.96 KiB) Viewed 1790 times


The next problem is corner bead to cover the gaps where I had to trim the ceiling width to get it installed. I bought a few pieces of 1/2 x 1/4 hemlock trim. Hopefully, I can get it to bend the curve with out cutting.


w-TD-Cabin-Ceiling-IMG004.jpg
view showing the gaps that need to be covered
w-TD-Cabin-Ceiling-IMG004.jpg (79.94 KiB) Viewed 1790 times
Don Miller
Seattle
Trippinwithdon.com
Diemjoe
Teardrop Master
 
Posts: 191
Images: 2
Joined: Tue Jun 10, 2014 3:42 pm
Location: Seattle

Re: The No Tears Teardrop Build

Postby KCStudly » Mon May 11, 2015 12:13 pm

I have a little "matchbox" sized plane like this one that I used to true up the edges on my 5mm panel butt joints, then I used a narrow strip of the same material as a backer for the splice. Got pretty good results.

The troubles you describe getting the ceiling in are a perfect argument for the Steve Fredricks method of roof construction. I know it is a little late for this advice, but something for others to consider and maybe for "next time".

BTW, it all looks very good from here. :thumbsup:
KC
My Build: The Poet Creek Express Hybrid Foamie

Poet Creek Or Bust
Engineering the TLAR way - "That Looks About Right"
TnTTT ORIGINAL 200A LANTERN CLUB = "The 200A Gang"
Green Lantern Corpsmen
User avatar
KCStudly
Donating Member
 
Posts: 9616
Images: 8169
Joined: Mon Feb 06, 2012 10:18 pm
Location: Southeastern CT, USA
Top

Re: The No Tears Galley Hatch

Postby Diemjoe » Tue Jun 09, 2015 2:20 pm

It has been a while but not do to lack of trying. I have been busy building but not fast enough for my tastes. The weather here in Seattle has been Unseasonably warm and sunny the past couple of weeks so that at least has helped me to move the trailer into the drive to have more elbow room to work.
I got the Hatch build last weekend. Still not attached though. I need to get through the electrical work before I can finish the insulation and put the top on. I also need to work on the galley build so that I know where to pull the electrical into the trailer.

But the hatch is built out now so I am happy about that.

td-cabin-hatch-img001.jpg
The spars getting fitted
td-cabin-hatch-img001.jpg (111.29 KiB) Viewed 1713 times
td-cabin-hatch-img002.jpg
The glue up
td-cabin-hatch-img002.jpg (99.01 KiB) Viewed 1713 times
td-cabin-hatch-img003.jpg
A quick fitting to the galley opening
td-cabin-hatch-img003.jpg (96.56 KiB) Viewed 1713 times
Don Miller
Seattle
Trippinwithdon.com
Diemjoe
Teardrop Master
 
Posts: 191
Images: 2
Joined: Tue Jun 10, 2014 3:42 pm
Location: Seattle
Top

Re: The No Tears Teardrop Build

Postby Diemjoe » Sun Jul 05, 2015 9:36 pm

Just a quick check in. I have a more detailed write up on my hard drive some where but just wanted to let folks know I am still full speed ahead. Today was a big day with my finally getting a door mounted. It sticks a little bit and I still need to put in the weather stripping and door handle but so far I am happy with how it came out.

teardrop-cabin---door-img005.jpg
teardrop-cabin---door-img005.jpg (29.16 KiB) Viewed 1612 times
Don Miller
Seattle
Trippinwithdon.com
Diemjoe
Teardrop Master
 
Posts: 191
Images: 2
Joined: Tue Jun 10, 2014 3:42 pm
Location: Seattle
Top

Re: The No Tears Teardrop Build

Postby KCStudly » Sun Jul 05, 2015 9:45 pm

Looks like you have got the roof on it, too.

Looking good. :thumbsup:
KC
My Build: The Poet Creek Express Hybrid Foamie

Poet Creek Or Bust
Engineering the TLAR way - "That Looks About Right"
TnTTT ORIGINAL 200A LANTERN CLUB = "The 200A Gang"
Green Lantern Corpsmen
User avatar
KCStudly
Donating Member
 
Posts: 9616
Images: 8169
Joined: Mon Feb 06, 2012 10:18 pm
Location: Southeastern CT, USA
Top

Re: The No Tears Teardrop Build

Postby S. Heisley » Mon Jul 06, 2015 6:01 pm

It's looking like a teardrop ought to! You're three quarters or more done now. Keep going! We're watching! :SG
User avatar
S. Heisley
Super Lifetime Member
 
Posts: 8774
Images: 495
Joined: Mon Sep 17, 2007 10:02 am
Location: No. California
Top

Re: The No Tears Teardrop Build

Postby Diemjoe » Mon Jul 13, 2015 9:43 am

I ran into an electrical issue yesterday that has stopped forward progress. I have each awning light controlled by two switches, one on each side of the cabin. I put the roof skin on and it seems they have stopped working. I should have tested it one last time before I did that. I think it is at the switch so I am not too worried.

I have having a surprisingly difficult time finding 2 gang SPDT switches. I found a couple of cheap sets at the autoparts store but I had to Permabond them to my homemade switch console. On a good permanent solution. Anybody know of a supplier of 2 rocker switches in a single faceplate? Boat suppliers come close but they are expensively and unnecessarily waterproof for my needs. I also don't see any just have simple on-off capabilities that I have found so far.

Tonight, it will be me and the voltmeter to see where I have gone wrong.

Still waiting on my aluminum supplier to get back to me. No hurry until I can get the wiring figured out, though.
Don
Don Miller
Seattle
Trippinwithdon.com
Diemjoe
Teardrop Master
 
Posts: 191
Images: 2
Joined: Tue Jun 10, 2014 3:42 pm
Location: Seattle
Top

Re: The No Tears Teardrop Build

Postby Wobbly Wheels » Mon Jul 13, 2015 9:38 pm

Boat suppliers come close but they are expensively and unnecessarily waterproof for my needs.


Then you're talking to the wrong boat suppliers ! :lol: :lol:
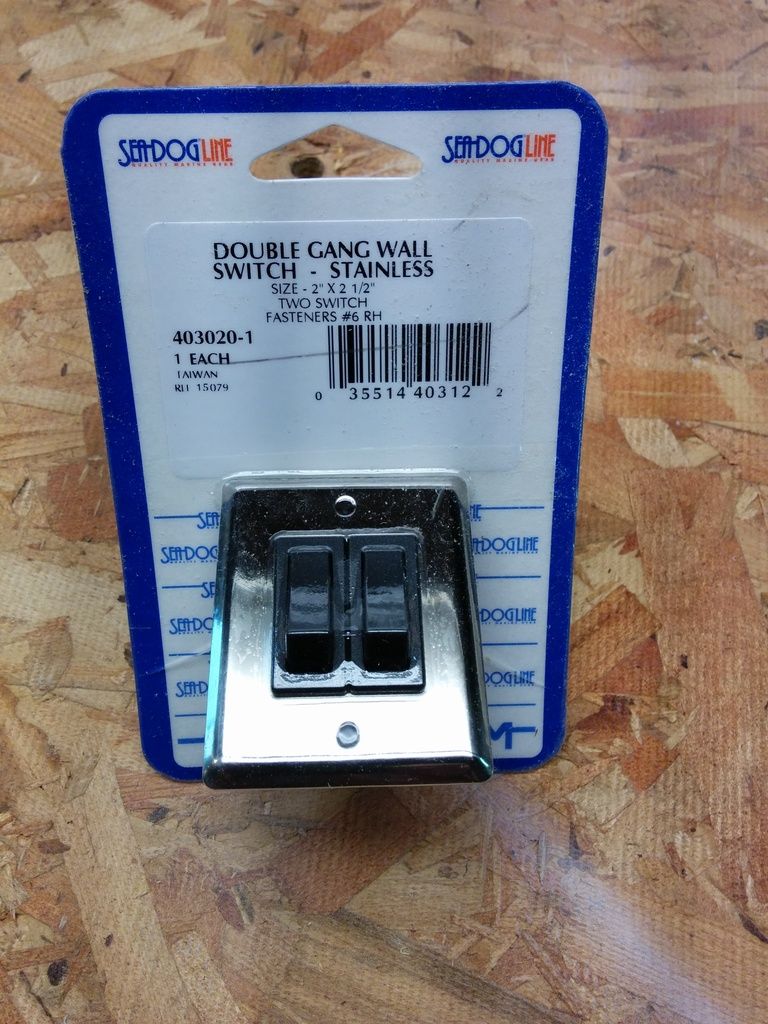
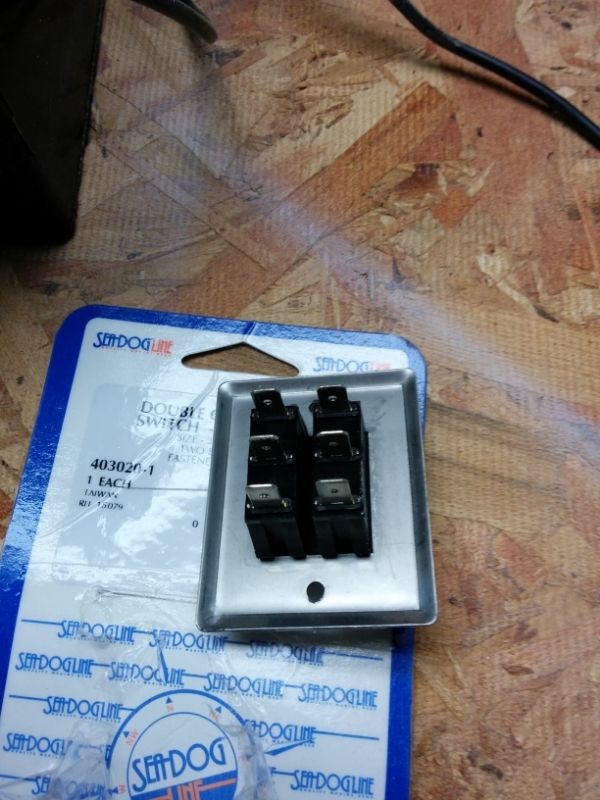
I'm using Seadog p/n 403020
Image
Image

The switches are a standard automotive switch - nothing fancy and certainly not waterproof....but cheap. I think I paid about $10 each (retail is around 15).
Singles are available too.
User avatar
Wobbly Wheels
Donating Member
 
Posts: 1080
Joined: Tue Mar 15, 2011 9:51 am
Top

Re: The No Tears Teardrop Build

Postby Diemjoe » Tue Jul 14, 2015 9:11 am

Thanks for posting that info. With that part number, I did find them on the web. Now I just need to figure out why the 2 switch, one light set up is not working.

Don
Don Miller
Seattle
Trippinwithdon.com
Diemjoe
Teardrop Master
 
Posts: 191
Images: 2
Joined: Tue Jun 10, 2014 3:42 pm
Location: Seattle
Top

Re: The No Tears Teardrop Build

Postby Wobbly Wheels » Tue Jul 14, 2015 11:33 pm

It sounds like you're looking to wire a three-way DC switch. It's been a while, so I'll dig through my work notes for a wiring diagram that will be clearer than words. If I find it I'll scan it and post it.

How have you got it wired now ?
User avatar
Wobbly Wheels
Donating Member
 
Posts: 1080
Joined: Tue Mar 15, 2011 9:51 am
Top

Re: The No Tears Teardrop Build

Postby ukewarrior » Wed Jul 15, 2015 7:48 am

Do you have a location where you have uploaded your pictures in full size?
The small versions loaded here are sometimes hard to see.
ukewarrior
Donating Member
 
Posts: 107
Joined: Tue Apr 21, 2015 3:19 pm
Top

Re: The No Tears Teardrop Build

Postby KCStudly » Wed Jul 15, 2015 8:18 am

FYI, if you click the "quote" button and pretend like you are going to make a reply, you can see the links imbedded. :D
KC
My Build: The Poet Creek Express Hybrid Foamie

Poet Creek Or Bust
Engineering the TLAR way - "That Looks About Right"
TnTTT ORIGINAL 200A LANTERN CLUB = "The 200A Gang"
Green Lantern Corpsmen
User avatar
KCStudly
Donating Member
 
Posts: 9616
Images: 8169
Joined: Mon Feb 06, 2012 10:18 pm
Location: Southeastern CT, USA
Top

Re: The No Tears Teardrop Build

Postby Diemjoe » Mon Aug 03, 2015 10:57 am

I finally got the cabin lighting worked out and am now able to attach the aluminum skin to the roof. In my effort to trouble shoot the lighting issues, I had to cut through the roof plywood wood to find the connections and make sure nothing came loose. In the end it was a loose common wire that got lost in the jumble of cables I have. I am kind of disappointed that I had to cut up the roof but I bade sure that I cut it on the spars so there was a secure place to re-attach the patches. I wood puttied the new seams and sanded them down.

I got the Aluminum from a South Seattle metal shop. They were only able to go as wide as 60" and my trailer has ended up at 60.25 inches. I am hoping it is ok with the width of the trim to cover the gap.
Don Miller
Seattle
Trippinwithdon.com
Diemjoe
Teardrop Master
 
Posts: 191
Images: 2
Joined: Tue Jun 10, 2014 3:42 pm
Location: Seattle
Top

Re: The No Tears Teardrop Build

Postby noseoil » Mon Aug 03, 2015 11:31 am

Mine is actually 60 9/16" due to the frame size being over 5' from the factory. Not too worried about it as I will be using some 1" trim on the top edge, which will still give about a 3/4" overlap once the trim is installed. I'm using the butyl rubber tape as a sealant, so it should hold pretty well once all the screws are in place.

About the wiring, I use a small 12 volt alarm panel battery for testing circuits as I go. If there's a problem, I can fix it as soon as I make the mistake, then move on. Much easier to fix it before everything is closed in. I'm soldering all of the connections as I go, which won't have an easy access later on in the build. Check a local electronics supply store & look at a 1.5 amp hour battery ($10 - $12). Mine is an AGM type, so it's nice & small for testing switches & LED wiring. A couple of small alligator clips & you're ready to test a circuit. I re-charge with a cigarette lighter plug in the truck while running errands when it drops a bit in voltage. It's a crude test setup, but if it saves having to cut into the build, I figure it's worth it in the long run. It already "paid for itself" on one switch I had wired wrong.
Build log: viewtopic.php?f=50&t=60248
The time you spend planning is more important than the time you spend building.........

137905
User avatar
noseoil
1000 Club
1000 Club
 
Posts: 1820
Images: 669
Joined: Sun Apr 27, 2014 8:46 am
Location: Raton, New Mexico, living the good life!
Top

PreviousNext

Return to Build Journals

Who is online

Users browsing this forum: No registered users and 9 guests