M116A3 Build

...ask your questions in the appropriate forums BUT document your build here...preferably in a single thread...dates for updates, are appreciated....

Re: M116A3 Build

Postby bdosborn » Mon Jul 31, 2023 7:18 pm

Tom&Shelly wrote: Or did I misunderstand this thread? :thinking:


From what I've read on the internet ( so I know it's true) you have to change your oil every 3,000 miles or you risk the ten Plagues of Egypt raining down upon you. Oil running down your arm will be the least of your worries. ;) :lol:
Bruce
2009 6.5'X11' TTT - Boxcar
All it takes is a speck of faith and a few kilowatts of sweat and grace.
Image
Boxcar Build
aVANger Build
User avatar
bdosborn
Donating Member
 
Posts: 5498
Images: 776
Joined: Wed May 05, 2004 11:10 pm
Location: CO, Littleton

Re: M116A3 Build

Postby Tom&Shelly » Tue Aug 01, 2023 7:22 am

bdosborn wrote:
Tom&Shelly wrote: Or did I misunderstand this thread? :thinking:


From what I've read on the internet ( so I know it's true) you have to change your oil every 3,000 miles or you risk the ten Plagues of Egypt raining down upon you. Oil running down your arm will be the least of your worries. ;) :lol:
Bruce


My mechanic suggests we change our oil every 3000 miles because we live in such a dusty place, and he's building a deck and lumber prices have soared... :thinking:

But sorry to hijack the thread. I'll keep quiet now!

Tom
172912 170466 173366
Tom&Shelly
Palladium Donating Member
 
Posts: 2216
Images: 2021
Joined: Tue Sep 05, 2017 3:27 pm
Location: Upstate New York/New Mexico

Re: M116A3 Build

Postby lfhoward » Wed Aug 02, 2023 6:47 pm

Ha! I literally have to change the oil in my Jeep, so this is ironic. LOL. I just towed the trailer to Michigan and back (to eastern PA), then to West Virginia and back. The Jeep towed the trailer up the Allegheny Front! It is definitely time to give the 6 squirrels under the hood a little TLC. The price of acorns these days is out of control. Probably related to the price of lumber.
My off-road camper build on an M116A3 military chassis:
http://www.tnttt.com/viewtopic.php?f=50&t=62581
Tow vehicle: 2008 Jeep Liberty with a 4 inch lift.
User avatar
lfhoward
1000 Club
1000 Club
 
Posts: 1370
Joined: Wed Jan 22, 2014 6:10 pm
Location: Philadelphia, PA
Top

Re: M116A3 Build

Postby lfhoward » Sun Aug 13, 2023 7:09 pm

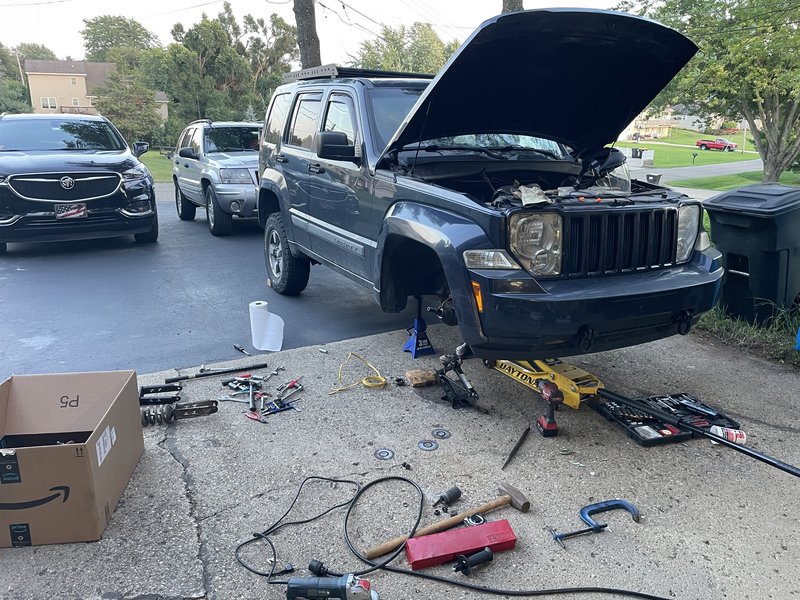
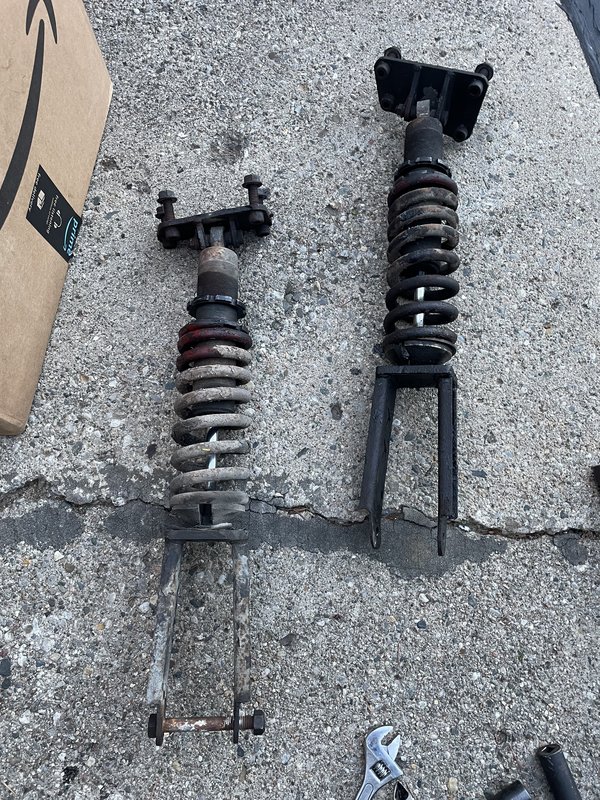
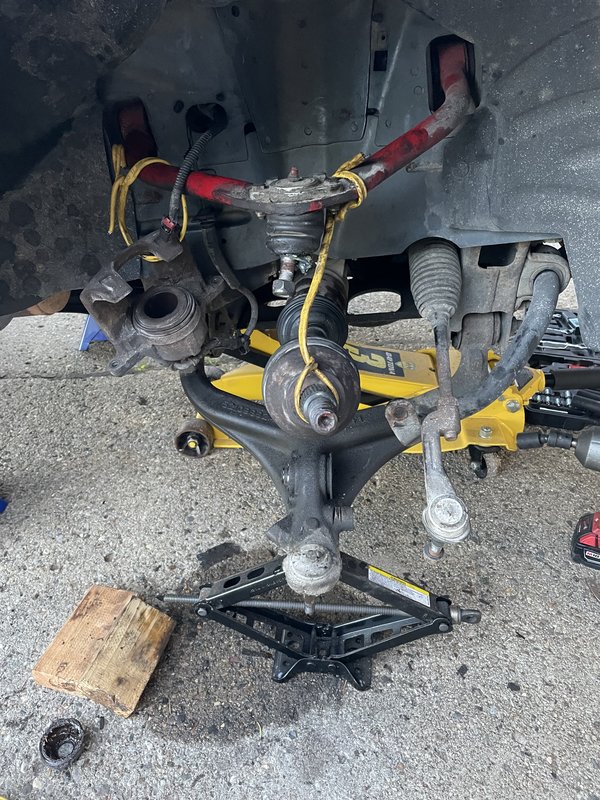
The Jeep must have damaged a shock in WV and it completely leaked out on our trip to Michigan. Time for some major surgery since our Jeep has special coilover shocks as part of its 4 inch lift kit. They will need to be rebuilt rather than simply replaced.

Image

Image

Image
My off-road camper build on an M116A3 military chassis:
http://www.tnttt.com/viewtopic.php?f=50&t=62581
Tow vehicle: 2008 Jeep Liberty with a 4 inch lift.
User avatar
lfhoward
1000 Club
1000 Club
 
Posts: 1370
Joined: Wed Jan 22, 2014 6:10 pm
Location: Philadelphia, PA
Top

Re: M116A3 Build

Postby featherliteCT1 » Sun Aug 13, 2023 8:27 pm

Milwaukee impact driver and Victron electronics … first class in my world. :thumbsup:
featherliteCT1
1000 Club
1000 Club
 
Posts: 1127
Joined: Wed Dec 28, 2016 6:54 am
Location: Southern Indiana
Top

Re: M116A3 Build

Postby bdosborn » Mon Aug 14, 2023 9:31 am

Time for the big boy tools! :thumbsup:
Bruce
2009 6.5'X11' TTT - Boxcar
All it takes is a speck of faith and a few kilowatts of sweat and grace.
Image
Boxcar Build
aVANger Build
User avatar
bdosborn
Donating Member
 
Posts: 5498
Images: 776
Joined: Wed May 05, 2004 11:10 pm
Location: CO, Littleton
Top

Re: M116A3 Build

Postby lfhoward » Mon Aug 14, 2023 5:55 pm

Ha! The Milwaukee impact and the big sockets and the giant floor jack belong to the neighbors. :lol:

Someday I’ll be that cool!
My off-road camper build on an M116A3 military chassis:
http://www.tnttt.com/viewtopic.php?f=50&t=62581
Tow vehicle: 2008 Jeep Liberty with a 4 inch lift.
User avatar
lfhoward
1000 Club
1000 Club
 
Posts: 1370
Joined: Wed Jan 22, 2014 6:10 pm
Location: Philadelphia, PA
Top

Re: M116A3 Build

Postby lfhoward » Sun Aug 20, 2023 10:55 am

Been thinking about the challenge of increasing the solar panels on the trailer roof by adding a parallel set of two 100 watt Renogy units, as mentioned on the previous page. My math gives me 398 watts for the array when accounting for the inefficiency of combining these new panels in series with my 210 watt panel.

I went back and checked the PV input from my previous camping trip. The 210 watt roof panel pretty much maxed out at 120 watts given that it was flat and not angled, and that 120 was at noon. Given 120/210 is 57% of the max, that means I could probably expect 114 watts out of a pair of new 100 watt panels also laid flat on the roof. So the practical wattage the roof would generate at noon in July on a clear day would be something like 227 watts given 57% of 398 watts, but usually less.

This brings up whether the current charge controller would be up to the task, and if not, which one I should get to replace it. From a space standpoint, I could go up to the Victron 100/20 without an electrical & logistical redesign. The 100/30 has a much larger footprint.

Wired the way I want to do it, the roof array would have the following stats:
Voc (open circuit voltage) = 50.2 volts
Isc (short circuit amps) = 9.85 amps
Vmp = 42.8 volts
Imp = 9.3 amps
Max power = 398 watts

These numbers are comfortably below the 75/15 charge controller’s limits of 75 volts and 15 amps. So my current charge controller won’t blow up, even on a super cold day. However, the max output of this controller, regardless of how much it is overpaneled, is capped at 220 watts (15 amps x 14.5 volts). If the roof would typically max out at 227 watts of real production with the panels flat on the roof, then all I am missing out on is 7 watts. Not bad. However, there are times when the existing 210 watt panel can be angled up and pointed south. In that case, efficiency goes up, adding maybe another 40-60 watts of real power. If I stuck with the 75/15 charge controller, I would not be able to access that additional power from lifting the panel at midday because the controller would already be working at its max. (I am sure it would help on the shoulders of the day though to angle the panel when production is not at max.)

Alternatively, I could replace the 75/15 with the Victron 100/20 MPPT charge controller, which has a max power output of 290 watts at 12 volts. With that I would be able to capture and use 73% of the roof array’s 398 watts to charge the battery, which is probably as good efficiency as I would ever see from the roof array where the 210 panel is angled towards the sun and the 2, 100 watt panels are mounted flat. Thus, I don’t think I would need the even larger 100/30 charge controller to run my roof array without a loss of efficiency, and I can avoid the rewiring I would have to do to make the larger 100/30 fit. Although the max output of the 100/30 is 440 watts at 12 volts and could theoretically use 100% of the roof array’s output, I would never see anything that good from the roof array even under ideal conditions.

So I think I am going to look for a good deal on 2 Renogy panels.

Would you keep the 75/15 charge controller or upgrade it to 100/20, or would you go crazy and get a 100/30? After adding the 2 Renogy panels there would be no more space for additional solar on the roof, so having extra future capacity is not a factor.
Last edited by lfhoward on Sun Aug 20, 2023 11:51 am, edited 1 time in total.
User avatar
lfhoward
1000 Club
1000 Club
 
Posts: 1370
Joined: Wed Jan 22, 2014 6:10 pm
Location: Philadelphia, PA
Top

Re: M116A3 Build

Postby lfhoward » Sun Aug 20, 2023 11:45 am

New question:

Would you trust adhesive mounts for a small solar panel like a 100 watt, especially mounted longitudinally with the small side facing the wind?

https://www.renogy.com/corner-bracket-mount/

Or would you go with Z-mounts? I only have a few 2x2 crossmembers that I can tie them into with Z-mounts.

https://www.renogy.com/solar-panel-moun ... -set-of-4/
My off-road camper build on an M116A3 military chassis:
http://www.tnttt.com/viewtopic.php?f=50&t=62581
Tow vehicle: 2008 Jeep Liberty with a 4 inch lift.
User avatar
lfhoward
1000 Club
1000 Club
 
Posts: 1370
Joined: Wed Jan 22, 2014 6:10 pm
Location: Philadelphia, PA
Top

Re: M116A3 Build

Postby bdosborn » Mon Aug 21, 2023 8:07 am

lfhoward wrote:Wired the way I want to do it, the roof array would have the following stats:
Voc (open circuit voltage) = 50.2 volts
Isc (short circuit amps) = 9.85 amps
Vmp = 42.8 volts
Imp = 9.3 amps
Max power = 398 watts

These numbers are comfortably below the 75/15 charge controller’s limits of 75 volts and 15 amps.


True, but your controller max output to the battery is around 15a*13.5v~202.5w. I routinely see 75% of my panel output in mid-summer, even laying flat. It seems like you're islanding a fair amount of PV capacity. I'd upgrade to the 30A controller, add 200w of panels and use your 15a controller for a portable panel. It's only money, you'll make more... :lol: $>
Bruce
2009 6.5'X11' TTT - Boxcar
All it takes is a speck of faith and a few kilowatts of sweat and grace.
Image
Boxcar Build
aVANger Build
User avatar
bdosborn
Donating Member
 
Posts: 5498
Images: 776
Joined: Wed May 05, 2004 11:10 pm
Location: CO, Littleton
Top

Re: M116A3 Build

Postby featherliteCT1 » Mon Aug 21, 2023 5:55 pm

lfhoward wrote: Would you trust adhesive mounts for a small solar panel like a 100 watt


What is the material of your roof to which the adhesive would need to adhere?
featherliteCT1
1000 Club
1000 Club
 
Posts: 1127
Joined: Wed Dec 28, 2016 6:54 am
Location: Southern Indiana
Top

Re: M116A3 Build

Postby lfhoward » Mon Aug 21, 2023 6:40 pm

featherliteCT1 wrote:
lfhoward wrote: Would you trust adhesive mounts for a small solar panel like a 100 watt


What is the material of your roof to which the adhesive would need to adhere?


The roof is aluminum sheet over 1/4 inch plywood over 2x2 crossbeams (that are actually 1.5x1.5). The aluminum is screwed into place along the edges with the molding. It should be nice and stable.

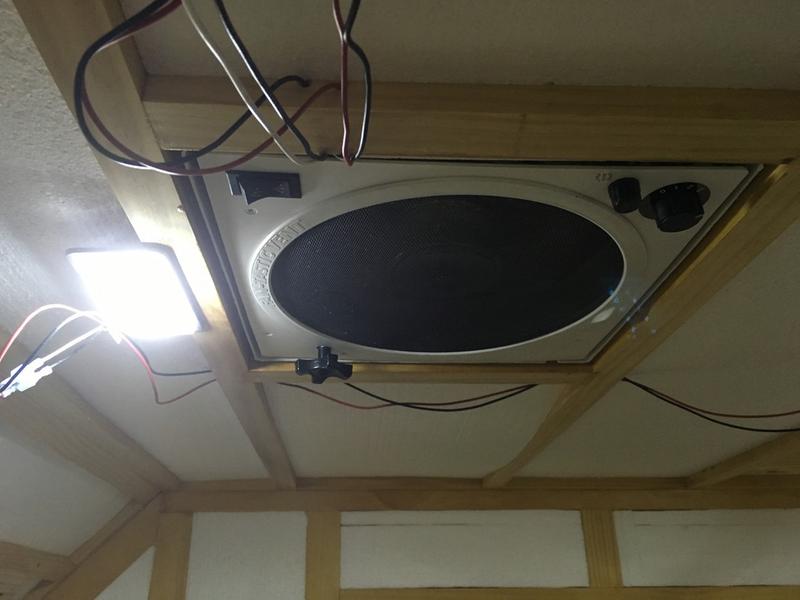
I think if screwing brackets down, screws would have to go into the crossbeams. I found some old pics to illustrate. The solar panels would go on either side of the fantastic fan. The first four crossbeams are potentially available, although the very front would not look good with a solar panel right up to the front of the roof. The 4th one may or may not get too close to the rear 200 watt panel to work.

Image

Image
My off-road camper build on an M116A3 military chassis:
http://www.tnttt.com/viewtopic.php?f=50&t=62581
Tow vehicle: 2008 Jeep Liberty with a 4 inch lift.
User avatar
lfhoward
1000 Club
1000 Club
 
Posts: 1370
Joined: Wed Jan 22, 2014 6:10 pm
Location: Philadelphia, PA
Top

Re: M116A3 Build

Postby featherliteCT1 » Mon Aug 21, 2023 6:48 pm

I used 3M 4950 VHB tape to adhere my 100W Renogy panels onto the aluminum roof of my trailer. In so doing, I achieved 96 sq. inches of contact area on the surface. My three original panels are mounted using that VHB tape and after about 10k miles, no sign of failure or any give whatsoever. I fabbed my own 2x2 aluminum angle brackets, each 8" long, six per panel for 96 sq inches of adhesion on the roof.
featherliteCT1
1000 Club
1000 Club
 
Posts: 1127
Joined: Wed Dec 28, 2016 6:54 am
Location: Southern Indiana
Top

Re: M116A3 Build

Postby lfhoward » Mon Aug 21, 2023 7:18 pm

featherliteCT1 wrote:I used 3M 4950 VHB tape to adhere my 100W Renogy panels onto the aluminum roof of my trailer. In so doing, I achieved 96 sq. inches of contact area on the surface. My three original panels are mounted using that VHB tape and after about 10k miles, no sign of failure or any give whatsoever. I fabbed my own 2x2 aluminum angle brackets, each 8" long, six per panel for 96 sq inches of adhesion on the roof.

That is a really good idea! Long brackets and lots of VHB. Those are never coming off.
My off-road camper build on an M116A3 military chassis:
http://www.tnttt.com/viewtopic.php?f=50&t=62581
Tow vehicle: 2008 Jeep Liberty with a 4 inch lift.
User avatar
lfhoward
1000 Club
1000 Club
 
Posts: 1370
Joined: Wed Jan 22, 2014 6:10 pm
Location: Philadelphia, PA
Top

Re: M116A3 Build

Postby featherliteCT1 » Mon Aug 21, 2023 8:12 pm

Another plus for me is that the tape can be removed with isopropyl alcohol and a piano wire to saw through the tape.
featherliteCT1
1000 Club
1000 Club
 
Posts: 1127
Joined: Wed Dec 28, 2016 6:54 am
Location: Southern Indiana
Top

PreviousNext

Return to Build Journals

Who is online

Users browsing this forum: No registered users and 29 guests