M116A3 Build

...ask your questions in the appropriate forums BUT document your build here...preferably in a single thread...dates for updates, are appreciated....

Re: M116A3 Build

Postby lfhoward » Thu Aug 24, 2023 1:39 pm

bdosborn wrote:True, but your controller max output to the battery is around 15a*13.5v~202.5w. I routinely see 75% of my panel output in mid-summer, even laying flat. It seems like you're islanding a fair amount of PV capacity. I'd upgrade to the 30A controller, add 200w of panels and use your 15a controller for a portable panel. It's only money, you'll make more... :lol: $>
Bruce


Hi Bruce and Featherlite, I am still mulling the best way to deal with adding more solar capacity. Money seems to be the common denominator!

Currently, the roof is 210 watts, potentially expandable to 410. The aux panels are 200 watts, potentially expandable to 400.
Two 100 watt panels for the roof are $175, plus $150 for mounting (aluminum angle, stainless hardware, 3M VHB tape, and cables). = $325
Two more matching 100 watt suitcase panels for the outdoor auxiliary system are $280 (eBay, as they are out of production) = $280

Perhaps the more challenging aspect of the project is getting the electrical system to absorb double the watts of solar.

Option 1: Buy bigger solar charge controllers.
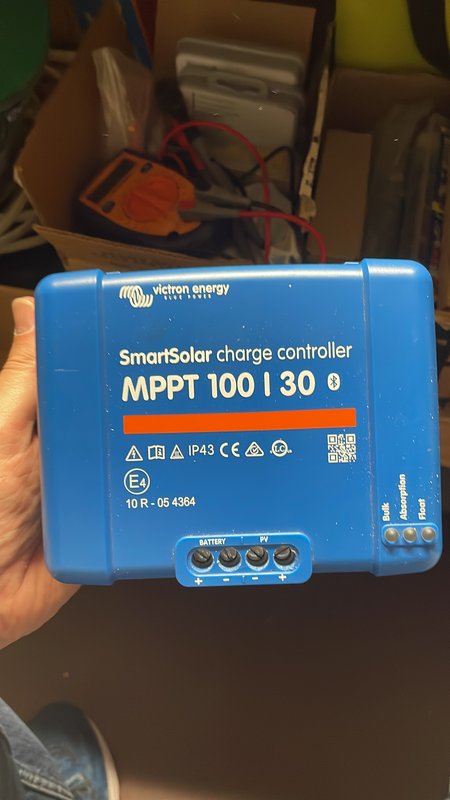
The Victron 100/30 can convert 440 watts of solar on a 12 volt system. The more I think about it, the more I think I would want this controller and not the smaller 100/20 which has a 290 watt max. The 75/15's in there now have a 220 watt max. The 100/30 controller costs $214 and potentially I should get two. Another problem is the space constraints I have in the electrical cabinet. The 100/30 is a big unit.

Image

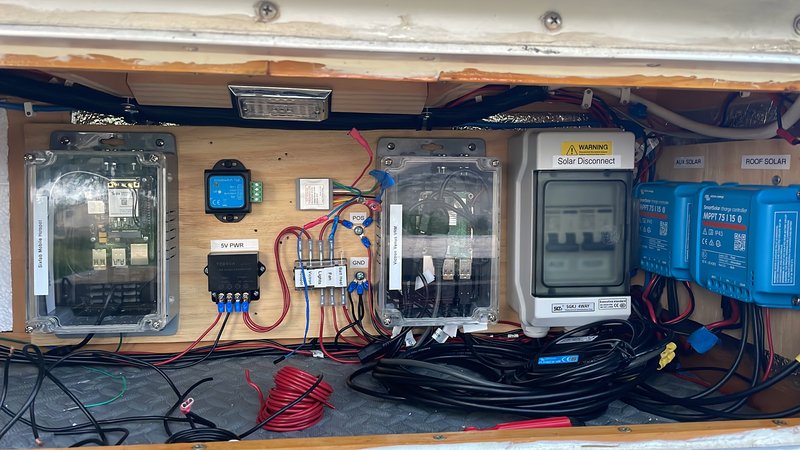
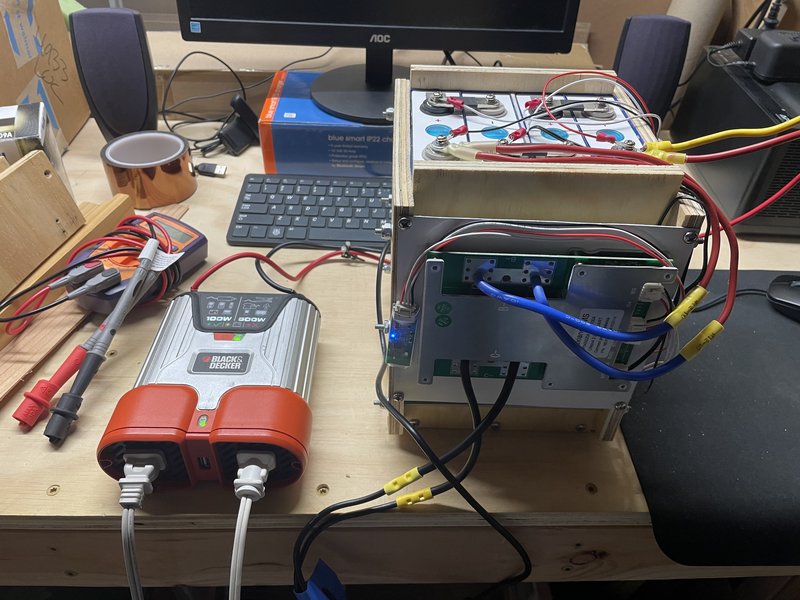
One 100/30 will take as much space as both 75/15's at the right side of this picture. That would cause another redesign/reorganization of all the components you see here, and even then I am not sure there would be enough room.

Option 2: Convert to 24 volt and continue to use the same charge controllers I have now.
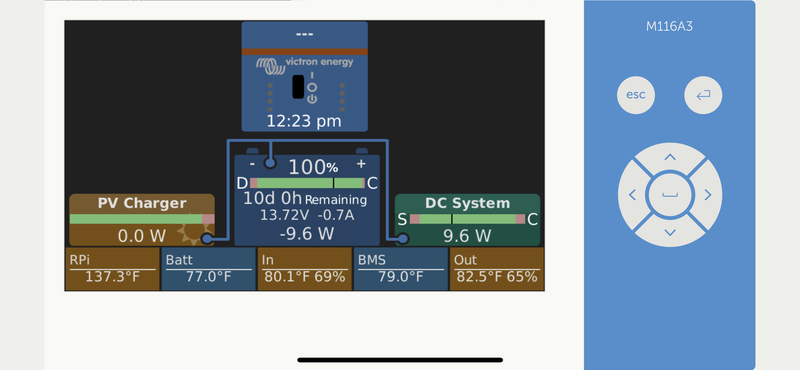
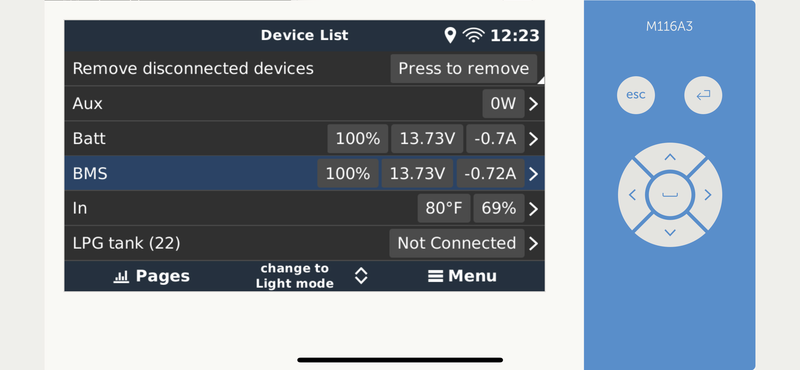
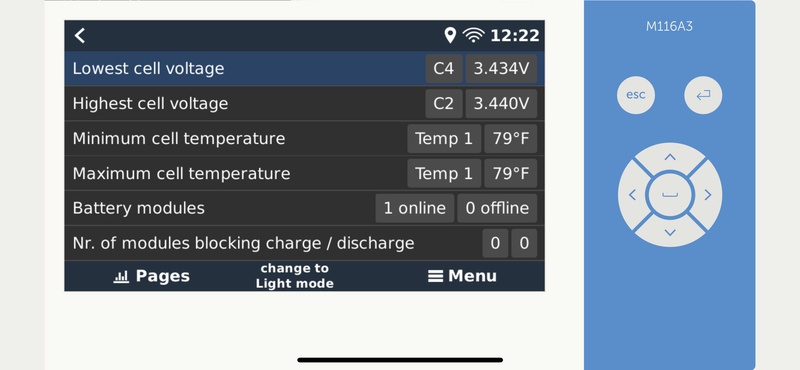
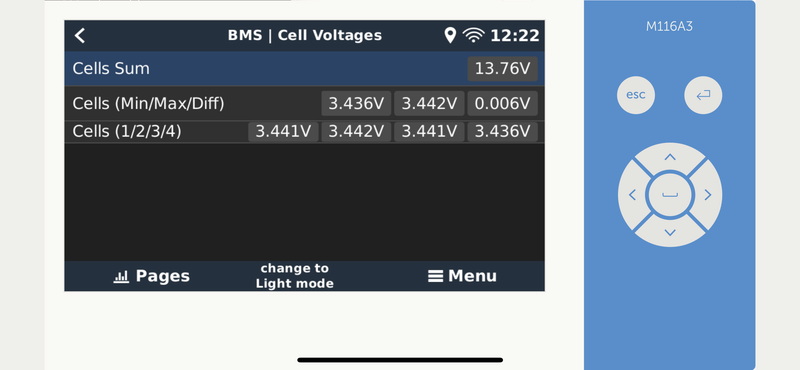
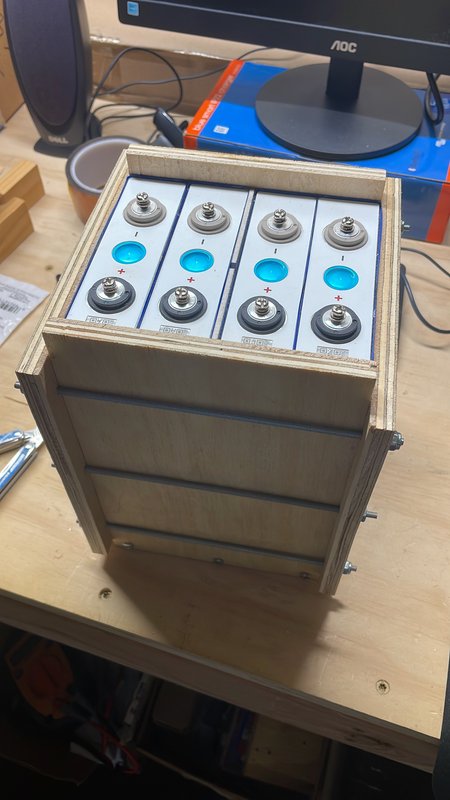
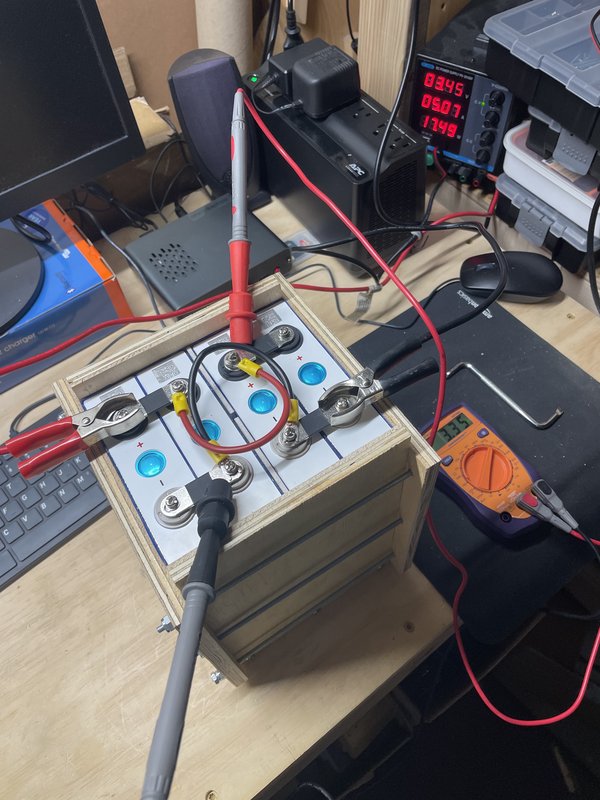
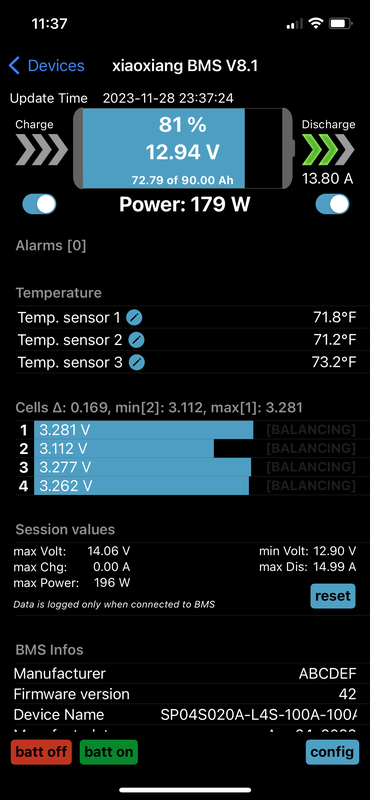
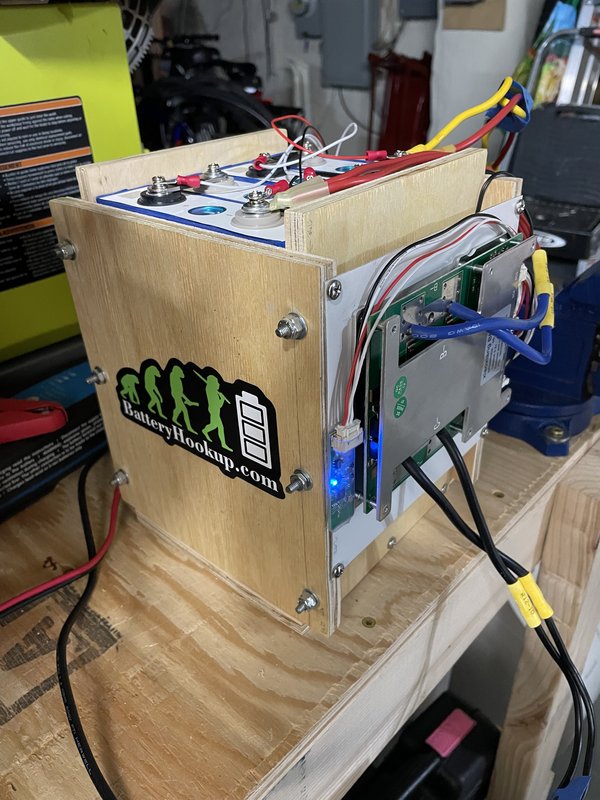
On a 24 volt system, the 75/15 controllers can convert 440 watts of solar. Normally 24 volt would not be a real option, except that in my case, I built my LiFePO4 battery from 8 cells:

Image

The bus bars could easily be reorganized for free into a 24 volt battery, and a 100 amp 24 volt BMS from Overkill Solar goes for $139. If I go with an 80 amp 24 volt BMS instead, I could get it for $97.

So far this sounds great! Except...
I would now need a 24 to 12 volt converter. Victron sells those, but we'd be looking at about $103 for a 40 amp version or $72 for the 25 amp version. I would need the converter to run the 12 volt equipment, like lights, fan, Propex heater, and the USB chargers. Victron's units are 95-97% efficient.

So far, this still sounds good. Except...
I would need a 24 volt version of my 800 watt inverter and 30 amp battery charger.

Image

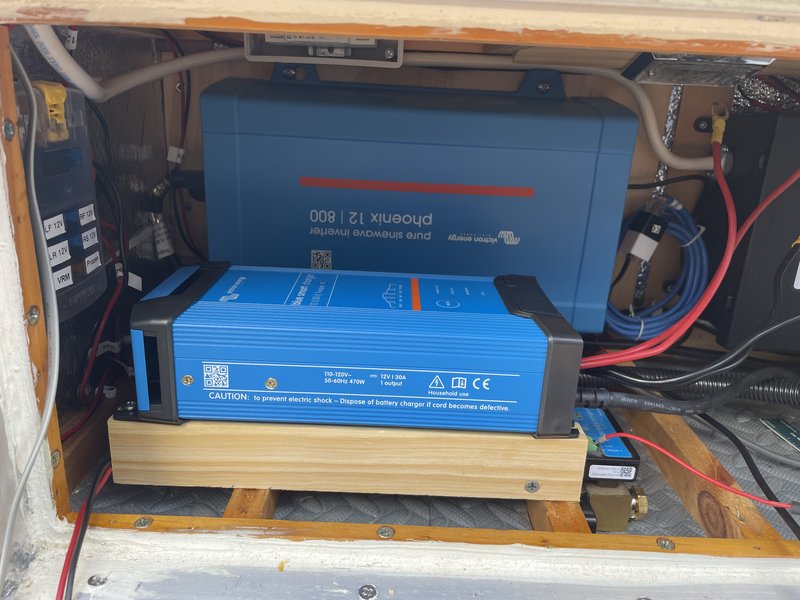
At this point, things are getting much more expensive. The 24 volt inverter is $271 and the 24 volt 16 amp charger is $207. I could potentially step down to the 500 watt inverter which is only $151.

So the damage (not including new solar panels & mounting options) would be:
Option 1, 100/30 charge controllers: $214-428 depending on if I get 1 or 2 of them. (And lots of work reorganizing the electrical system to fit the available space.)
Option 2, 24 volt conversion: $527-720 depending on if I get the lower vs higher wattage components listed above. (But no real change in layout of the electrical system.) The cost of the 24 volt setup could be lowered a bit by purchasing used/open box Victron equipment on eBay, or by selling the existing 12 volt equipment to recoup some cost.
Option 3, stay at my current 12 volt (non-expandable) 210 watt roof + 200 watt aux solar setup: Free.

Option 3 is looking pretty good!
My off-road camper build on an M116A3 military chassis:
http://www.tnttt.com/viewtopic.php?f=50&t=62581
Tow vehicle: 2008 Jeep Liberty with a 4 inch lift.
User avatar
lfhoward
1000 Club
1000 Club
 
Posts: 1370
Joined: Wed Jan 22, 2014 6:10 pm
Location: Philadelphia, PA

Re: M116A3 Build

Postby featherliteCT1 » Thu Aug 24, 2023 2:07 pm

I am wondering if you have enough room in your electrical cabinet to install a wood partition wall, vertically in your electrical cabinet, and then mount a third Victron MPPT on the partition wall.

I am visualizing a partition wall installed perpendicular to one of the walls, attached to that wall and to the ceiling and/or the floor (or some variation thereof or somewhere else in the electrical cabinet).

My thinking is that you could keep your existing system and use the extra MPPT to run the extra panel(s) you are thinking about. For example, maybe use the new MPPT to run your ground deploy panel(s) wired in series to accommodate a long wire run.

Just thinking out loud.
featherliteCT1
1000 Club
1000 Club
 
Posts: 1127
Joined: Wed Dec 28, 2016 6:54 am
Location: Southern Indiana

Re: M116A3 Build

Postby KCStudly » Sat Aug 26, 2023 11:43 am

Would it be more cost effective, and easier, to devise a way to tip your existing panels toward the sun. Seems like some sort of tilting frame would result in much better output of your current setup. (Keep in mind that I am so far down in the weeds in my solar energy tech knowledge, compared to y'use guys.)
KC
My Build: The Poet Creek Express Hybrid Foamie

Poet Creek Or Bust
Engineering the TLAR way - "That Looks About Right"
TnTTT ORIGINAL 200A LANTERN CLUB = "The 200A Gang"
Green Lantern Corpsmen
User avatar
KCStudly
Donating Member
 
Posts: 9615
Images: 8169
Joined: Mon Feb 06, 2012 10:18 pm
Location: Southeastern CT, USA
Top

Re: M116A3 Build

Postby lfhoward » Sat Aug 26, 2023 6:21 pm

Hi KC and Featherlite,

Thanks for your suggestions. I will definitely think about adding partitions in that electrical cubby to create more surface area for larger charge controllers to be mounted. I have my eye on some used 100/30’s on ebay, which are going for almost half the cost of new. I have no idea how much life is left in them, but that is a seriously good price for Victron stuff. Unfortunately I find myself in the midst of expensive Jeep repairs and don’t think I can carve this out of the budget just yet.

Angling the panels gets up to 30% more power compared to flat panels, so it is definitely a good idea. My roof panel can be angled up, but the trailer has to be parked facing south for that to be worth it. I often do this when storing my trailer in the winter, as the short cold days in December make it hard to recoup the power used to warm the batteries and run the VRM. It does work. I usually look at the aerial photos on Google Maps when making campground reservations, not just to see if there are too many trees shading the campsite, but that the driveway faces a southerly direction. The mobile auxiliary panels I have are great for catching sun at an optimal angle all day long, as long as I am there at the campsite to periodically reposition them. They can easily out-produce the roof panel with some attention from me.

Here is a photo that shows the camper in the shade but the auxiliary panels making nearly maximum watts.
Image

The wiring and input connector on the side of the trailer will allow me to double the aux panels if I can afford to buy them. These particular panels are no longer being made unfortunately, so the only option if I want them to be the same is to find them used.
My off-road camper build on an M116A3 military chassis:
http://www.tnttt.com/viewtopic.php?f=50&t=62581
Tow vehicle: 2008 Jeep Liberty with a 4 inch lift.
User avatar
lfhoward
1000 Club
1000 Club
 
Posts: 1370
Joined: Wed Jan 22, 2014 6:10 pm
Location: Philadelphia, PA
Top

Re: M116A3 Build

Postby bdosborn » Mon Aug 28, 2023 9:33 am

lfhoward wrote:I will definitely think about adding partitions in that electrical cubby to create more surface area for larger charge controllers to be mounted.

That's what I was going to suggest as well. I ran into this same problem with my trailer; the electrical system evolved overtime and took up more room than I planned for during the build.

Bruce
2009 6.5'X11' TTT - Boxcar
All it takes is a speck of faith and a few kilowatts of sweat and grace.
Image
Boxcar Build
aVANger Build
User avatar
bdosborn
Donating Member
 
Posts: 5498
Images: 776
Joined: Wed May 05, 2004 11:10 pm
Location: CO, Littleton
Top

Re: M116A3 Build

Postby lfhoward » Wed Aug 30, 2023 11:42 am

bdosborn wrote:
lfhoward wrote:I will definitely think about adding partitions in that electrical cubby to create more surface area for larger charge controllers to be mounted.

That's what I was going to suggest as well. I ran into this same problem with my trailer; the electrical system evolved overtime and took up more room than I planned for during the build.

Bruce

Yes! My electrical system started out with 3 marine deep cycle batteries, used a 140 watt solar panel, and a cheap Tracer charge controller. It has been through 3 major redesigns and a lot of small changes.
Last edited by lfhoward on Wed Aug 30, 2023 12:06 pm, edited 1 time in total.
My off-road camper build on an M116A3 military chassis:
http://www.tnttt.com/viewtopic.php?f=50&t=62581
Tow vehicle: 2008 Jeep Liberty with a 4 inch lift.
User avatar
lfhoward
1000 Club
1000 Club
 
Posts: 1370
Joined: Wed Jan 22, 2014 6:10 pm
Location: Philadelphia, PA
Top

Re: M116A3 Build

Postby lfhoward » Wed Aug 30, 2023 11:58 am

Today I got Louisvdw’s Dbus-serialbattery mod up and running on my Venus Raspberry Pi. Detailed instructions are here:

https://github.com/Louisvdw/dbus-serialbattery

On the VRM console it adds another battery temperature sensor. My Victron BMV is called "Batt" and I named the Dbus-serialbattery "BMS". The 2 degree difference is because the BMV's temperature sensor is mounted on the terminals, and the BMS's is buried in between the cells.
Image

The best part is that the data unique to the BMS is now viewable on the remote console from anywhere.
Image

I can see the lowest and highest cell voltages.
Image

Or I can view all the cells at once. This would be more impressive with a 24 volt battery with 8 cells.
Image

But before, I needed to be standing within Bluetooth range to be able to see the cell delta. Now it is in the VRM!

I still have the solar charge controllers using their own coordinated bluetooth networking, and they are not controlled by the BMS. The data they get about voltage and current and battery temperature come from the BMV, not the BMS.
My off-road camper build on an M116A3 military chassis:
http://www.tnttt.com/viewtopic.php?f=50&t=62581
Tow vehicle: 2008 Jeep Liberty with a 4 inch lift.
User avatar
lfhoward
1000 Club
1000 Club
 
Posts: 1370
Joined: Wed Jan 22, 2014 6:10 pm
Location: Philadelphia, PA
Top

Re: M116A3 Build

Postby bdosborn » Thu Aug 31, 2023 3:00 pm

Nifty!
Bruce
2009 6.5'X11' TTT - Boxcar
All it takes is a speck of faith and a few kilowatts of sweat and grace.
Image
Boxcar Build
aVANger Build
User avatar
bdosborn
Donating Member
 
Posts: 5498
Images: 776
Joined: Wed May 05, 2004 11:10 pm
Location: CO, Littleton
Top

Re: M116A3 Build

Postby lfhoward » Mon Nov 27, 2023 10:23 pm

Over the weekend I picked up four EVE 90 ah LiFePO4 cells from a person on Craigslist. He bought them for a project that he never followed through on, so they are basically new. There is no bulging/deformation and they look great.

Today I built a battery box for them that will keep them compressed. The wooden sides are under a bit of tension from threaded rods and nylon lock nuts.

Image

I am currently top balancing the 4 cells in parallel. They started out at 3.34 volts and tonight I’m going to see if I can charge them to 3.45 volts. If they reach 3.45, I’ll carefully take them to 3.65 tomorrow and see if they remain above 3.5 volts after disconnecting the power supply and waiting 30-60 minutes. If they pass the test, they are top balanced and I can then rearrange the cells in series to make a 12 volt (13.2 volt nominal) battery.

Image

Tomorrow I am picking up a JBD BMS from BatteryHookup in Bensalem PA which is basically similar to the Overkill Solar BMS on my other battery. I’ll hook it up to my 12 volt battery and do a capacity test to see how many amp hours are actually in the cells. Supposedly they are 90 amp hour units. I’ll let you know how it goes.

The LiFePO4 battery tutorial I wrote up a couple of years ago is here:
https://www.tnttt.com/viewtopic.php?f=30&t=74022#p1281267

It’s what I’m using now. My original 156 amp hour battery is still going strong and remains extremely well balanced to this day. I figure I’ll follow the same procedure here.

This battery will eventually end up in parallel with my other battery in the trailer for a total of 246 amp hours. This will be an increase in energy storage of about 60%. Andy on the Off Grid Garage YouTube channel recently showed what happens when you charge LiFePO4 batteries of different capacities together in parallel, which is nothing bad. The 156 and the 90 should play nice together. Here is that link:

https://youtu.be/bhCSccNsQOw?si=rPkk4lK27Ynzr2VK

Before the battery goes into service I plan on replacing the terminal screws with studs and lock nuts, as well as add an MRBF terminal fuse. The two batteries should probably tie into a common bus bar, which would then go to the Victron shunt on the negative side. I should probably also install a means of shutting off the current from each battery independently of the other, so I can perform battery maintenance without the trailer and the Victron Venus Rasberry Pi losing power. The level of complexity will increase a bit, but it won’t be a difficult install. The new smaller battery will live inside the rear drivers side cubby and the cables will go over the wheel well and under the side bench, to where the larger battery lives in the front drivers side cubby.

Image

I haven’t given up on adding more solar to my camper, but increasing battery capacity is easier when a good deal on cells shows up on Craigslist!

In addition to the 90 ah cells, the seller also had a Victron 100/30 SmartSolar charge controller and a 7 amp smart battery charger. I am happy to have these! The 100/30 is part of what I will need to be able to add more panels.

Image

Image
My off-road camper build on an M116A3 military chassis:
http://www.tnttt.com/viewtopic.php?f=50&t=62581
Tow vehicle: 2008 Jeep Liberty with a 4 inch lift.
User avatar
lfhoward
1000 Club
1000 Club
 
Posts: 1370
Joined: Wed Jan 22, 2014 6:10 pm
Location: Philadelphia, PA
Top

Re: M116A3 Build

Postby bdosborn » Tue Nov 28, 2023 1:13 pm

Score! :thumbsup:
I'm rethinking compression, I only use enough compression to keep the batteries together in a pack. Andy says it only helps on the initial charge.
Bruce
2009 6.5'X11' TTT - Boxcar
All it takes is a speck of faith and a few kilowatts of sweat and grace.
Image
Boxcar Build
aVANger Build
User avatar
bdosborn
Donating Member
 
Posts: 5498
Images: 776
Joined: Wed May 05, 2004 11:10 pm
Location: CO, Littleton
Top

Re: M116A3 Build

Postby featherliteCT1 » Tue Nov 28, 2023 7:03 pm

bdosborn wrote: I only use enough compression to keep the batteries together in a pack.
Bruce


Me too. I compressed mine just tight enough so that I can grip the sides of my fixture by hand and lift the battery up without the cells falling out of the bottom of the fixture.

FYI, these solar systems have become a disease for me. Soon, I may need a 12 step program like "SA" i.e., Solar Anonymous or "VA" i.e., Victron Anonymous.
featherliteCT1
1000 Club
1000 Club
 
Posts: 1127
Joined: Wed Dec 28, 2016 6:54 am
Location: Southern Indiana
Top

Re: M116A3 Build

Postby lfhoward » Wed Nov 29, 2023 12:25 am

Feeling Blue? Try Victron. :lol:

I top balanced my cells for the new 90 amp hour battery this evening and then rearranged them into series and hooked up the BMS!

Image

I started a capacity test and it ran for an hour or two, but I discovered a serious issue!

Image

Did I get ripped off? Is there a bad cell?!?! Nope. It was a loose bus bar connection. D’oh!!

I am charging the pack back up so I can rebalance it and restart the capacity test. The current delta as I write this is 0.015 now at 13.45 volts. Not terrible, but I probably got them out of balance by that much by attaching a load to the pack while one cell had a loose connection. That cell now has the highest voltage.

In terms of cell compression, my pack sounds like it is about the same as yours. I can’t lift the cells out of the wooden battery box without loosening the rods, but I wouldn’t say they were being squeezed crazy hard.
My off-road camper build on an M116A3 military chassis:
http://www.tnttt.com/viewtopic.php?f=50&t=62581
Tow vehicle: 2008 Jeep Liberty with a 4 inch lift.
User avatar
lfhoward
1000 Club
1000 Club
 
Posts: 1370
Joined: Wed Jan 22, 2014 6:10 pm
Location: Philadelphia, PA
Top

Re: M116A3 Build

Postby featherliteCT1 » Wed Nov 29, 2023 5:38 pm

It was a loose bus bar connection


Glad you found the problem!
featherliteCT1
1000 Club
1000 Club
 
Posts: 1127
Joined: Wed Dec 28, 2016 6:54 am
Location: Southern Indiana
Top

Re: M116A3 Build

Postby lfhoward » Wed Nov 29, 2023 7:05 pm

The capacity test is finished. I ran a HEPA filter and a mini fridge from the battery via an inverter (about 180 watts load) for most of the day.

Image

The battery put out 88 amp hours of the advertised 90 ah, so not bad at all for used cells! I didn’t do another top balance before running this test, so the delta hung out around 30 millivolts during most of the test. If I had redone the top balance, it might have given me another amp hour or two, probably getting me closer to 89 or 90 ah capacity. I consider this result a success! The cells were only $100 on Craigslist and the BMS was $78 at BatteryHookup.com, so I feel like I stole it. All the other parts (wood, screws, wiring, etc.) was stuff I already had.
My off-road camper build on an M116A3 military chassis:
http://www.tnttt.com/viewtopic.php?f=50&t=62581
Tow vehicle: 2008 Jeep Liberty with a 4 inch lift.
User avatar
lfhoward
1000 Club
1000 Club
 
Posts: 1370
Joined: Wed Jan 22, 2014 6:10 pm
Location: Philadelphia, PA
Top

Re: M116A3 Build

Postby lfhoward » Tue Dec 12, 2023 8:41 pm

Same 210 watt panel, same location, clear day, middle of December -- December 8 & 9, and Dec 12.

Image

The difference is, on December 8 & 9, the panel was tilted towards the south at a 30 degree angle. For Dec 12, I changed it to a 50 degree angle (the max my tilting system can reasonably do). According to my Sun Tracker AR app, the sun only gets to be 28 degrees over the horizon at this time of year in my location (approximately 40 degrees N latitude). Thus, a tilt angle of 62 degrees would be ideal. I think 50 degrees tilt angle isn't too bad! The difference is going from about 100 watts max to about 127 watts max, which is a 27% improvement. If the panel was flat on the roof at this time of year, the output would be way lower.
My off-road camper build on an M116A3 military chassis:
http://www.tnttt.com/viewtopic.php?f=50&t=62581
Tow vehicle: 2008 Jeep Liberty with a 4 inch lift.
User avatar
lfhoward
1000 Club
1000 Club
 
Posts: 1370
Joined: Wed Jan 22, 2014 6:10 pm
Location: Philadelphia, PA
Top

PreviousNext

Return to Build Journals

Who is online

Users browsing this forum: No registered users and 20 guests